Custom Fit Balcony Railing Desk
Stop trying to fit a square peg in a round balcony. Big box stores design for the average balcony, which usually means it fits no one perfectly. By becoming the producer, you can reclaim every square inch. This custom railing bar turns a ‘useless’ ledge into a high-productivity workspace or a sunset dinner spot.
Most urban dwellers treat their balconies like a storage unit for dead plants or a lonely chair. They settle for flimsy, plastic tables that wobble at the slightest breeze. You deserve better than a generic solution that eats up valuable floor space. Designing a custom railing desk allows you to leverage the strongest part of your outdoor architecture: the railing itself.
Every inch counts when you are working with limited square footage. Traditional furniture forces you to choose between a walkway and a workspace. A custom railing bar eliminates that compromise entirely. It creates a floating surface that hovers over the edge, leaving your floor open for movement, rugs, or larger plants.
This project is more than just a weekend DIY task. It is an exercise in intentional living. You are choosing to optimize your environment for your specific needs, whether that is a 9-to-5 remote job or a 6-to-9 cocktail hour. Let’s dive into how you can transform your railing from a safety barrier into a functional masterpiece.
Custom Fit Balcony Railing Desk
A custom fit balcony railing desk is a specialized piece of outdoor furniture designed to mount directly onto a deck or balcony railing. Unlike standard tables, it lacks traditional legs. Instead, it uses a system of hooks, brackets, or clamps to secure itself to the top cap or the vertical balusters of your railing. This design serves a primary purpose: maximizing usable surface area without sacrificing floor space.
In the real world, these desks are the ultimate life hack for apartment dwellers. Imagine a tiny 4×8 balcony in a dense city. Adding a standard four-legged table makes the space feel cramped and difficult to navigate. A railing desk, however, utilizes the “dead space” above the railing.  . It effectively extends your living area outward. It creates a seamless transition between your indoor office and the great outdoors.
Think of it as a bar-height extension of your home. These setups are used for everything from professional workstations to casual dining ledges. Because they sit at the perimeter of your space, they offer the best views available. You aren’t just working; you are working with a skyline as your backdrop. This setup is particularly popular in high-density urban areas like Vancouver, New York, or London, where every square foot of outdoor access is a premium luxury.
Construction varies based on the railing type. If you have a classic wooden deck with a flat top cap, your desk might simply “hook” over the top. If you have a modern metal railing with thin vertical spindles, you might use adjustable clamps or U-bolts. The beauty of the custom build is that you tailor the mounting mechanism to your specific infrastructure, ensuring a rock-solid fit that no mass-produced product can match.
How to Build Your Custom Railing Bar
Building a custom railing desk requires a blend of precise measurement and sturdy material choice. You don’t need a master’s degree in carpentry, but you do need to follow a logical progression to ensure safety and stability. The process starts with the most critical step: the site survey.
Step 1: Measuring Your Railing
Precision is the difference between a desk that sits level and one that dumps your coffee. Measure the width of your railing’s top cap. This is the horizontal board or metal bar that sits at the very top. Next, measure the “drop” or the distance from the top cap to the first horizontal support or the floor. If you are building a hook-style desk, you need to know the exact thickness of the railing so the “hook” can fit snugly without wobbling.
Step 2: Selecting the Tabletop
Choose a material that can handle the sun, rain, and wind. Hardwoods like Teak or Ipe are the gold standard because of their high oil content and natural resistance to rot. Cedar is a fantastic mid-range option; it is lightweight, smells great, and contains natural preservatives. Avoid untreated pine or indoor-grade plywood, as these will warp and delaminate within a single season of exposure.
Step 3: Constructing the Support System
Create a “U-shaped” hook assembly if you have a flat-topped railing. This consists of three pieces of wood: a back plate, a top spacer (equal to your railing width), and a front support. Screw these together with exterior-grade wood glue and stainless steel screws. For metal railings, consider purchasing a hardware kit that includes powder-coated aluminum brackets. These kits often feature thumb screws that allow for a tool-free, non-permanent installation that is perfect for renters.
Step 4: Assembling the Surface
Attach your tabletop to the support system. . If you want a deeper workspace, you may need to add angled support arms (braces) that rest against the vertical balusters. This forms a triangle, which is the strongest shape in engineering. It prevents the desk from tipping forward when you lean on it or place a heavy laptop on the edge. Using a pocket-hole jig can help hide your screws and give the desk a professional, clean finish.
Step 5: Weatherproofing and Finishing
Sanding is mandatory. Smooth out every edge and corner to prevent splinters. Apply an exterior-grade sealant or oil. Teak oil is excellent for preserving the natural wood grain, while a water-based polyurethane provides a hard, protective shell. Apply at least two coats, allowing for a light sand between each to ensure maximum adhesion and a smooth touch.
Benefits of the Custom Approach
Opting for a custom-built railing desk over a store-bought version offers measurable advantages in both performance and aesthetics. You are not just buying a product; you are engineering a solution. The primary benefit is the absolute optimization of space. You can build the desk to the exact length of your railing, turning a 6-foot ledge into a 6-foot workstation, rather than settling for a generic 24-inch fold-down tray.
Material quality is another major factor. Big box stores often use low-grade plastic or thin, painted metal that rusts. When you build it yourself, you choose the wood. You can select sustainably sourced Cedar or high-end Mahogany that will last for decades. This longevity translates to better value over time. You won’t be replacing a cracked plastic table every two years; you’ll be enjoying a seasoned wood bar that patinas beautifully with age.
Ergonomics play a massive role in why custom wins. Standard tables are usually 29 to 30 inches high. Railing heights vary wildly. By building your own, you can set the height of the desk relative to your specific bar stools or your own standing height. This prevents neck strain and makes the space genuinely comfortable for long-term use. You are creating a workspace that fits your body, not forcing your body to fit a cheap piece of furniture.
Customization allows for integrated features that you simply won’t find on a shelf. You can add a 1-inch “lip” or rim around the edge to prevent your phone or pens from sliding off the side—a common tragedy on high-floor balconies. You can also integrate drainage gaps between boards to prevent standing water, which is the number one killer of outdoor wood furniture. These small design choices make a massive difference in daily usability.
Challenges and Common Mistakes
Mistakes during the planning phase can lead to safety hazards or a desk that falls apart. One of the most common errors is failing to account for weight distribution. A railing desk is a cantilevered structure. If the surface is too deep and the supports aren’t reinforced against the vertical balusters, the leverage will put immense strain on your railing. Always ensure your supports create a stable “V” or “L” shape against the railing structure.
Ignoring the “Wind Uplift” factor is a recipe for disaster. High-floor balconies experience significant wind gusts. A large, flat tabletop can act like a wing. If it isn’t securely fastened to the railing, a strong storm can literally lift the desk and throw it off the balcony. Never rely on gravity alone. Use clamps, bolts, or heavy-duty straps to lock the desk onto the railing so it cannot move vertically or horizontally.
Using the wrong hardware is another frequent pitfall. Interior screws will rust within weeks when exposed to humidity. Rust doesn’t just look bad; it weakens the joints and can eventually cause the desk to collapse. . Always use 304 or 316 stainless steel hardware, or at the very least, high-quality galvanized screws. These materials are designed to resist the corrosive effects of rain and salt air.
Failing to pre-drill pilot holes is a mistake that ruins expensive wood. Hardwoods like Ipe or even softwoods like Cedar are prone to splitting when a screw is driven in near the edge. Splitting destroys the structural integrity of your “hook” or support arms. Taking the extra thirty seconds to drill a pilot hole ensures a clean, strong connection that won’t crack under the weight of your gear.
Limitations and Constraints
While a railing desk is a fantastic solution, it isn’t universal. Some balconies have glass railings or “top-less” designs that lack a sturdy cap. In these cases, a traditional hook-style desk won’t work. You would need to look into specialized fascia-mounted systems that attach to the floor joists or the side of the building, which often requires professional installation and may violate rental agreements.
Structural integrity of the existing railing is a non-negotiable constraint. Most residential balcony railings are designed to withstand a linear load of 50 pounds per foot. If your railing is old, wobbly, or shows signs of rot, adding a heavy wood desk and the weight of a person leaning on it could exceed the safety limits. Always inspect the railing’s mounting points to the building before adding any furniture.
HOA and rental rules are the most common “soft” limitation. Many condo associations have strict rules against anything hanging over the railing or attached permanently to the exterior of the building. Even if your desk is perfectly safe, a “nosy neighbor” or a strict property manager could force you to remove it. Always check your bylaws. If rules are tight, focus on a “removable” or “fold-down” design that can be taken inside when not in use.
Environmental exposure is a constant trade-off. Even the best wood will eventually grey or weather if left in direct sun and rain. If you aren’t prepared for annual maintenance—cleaning and reapplying oil—your custom desk will lose its luster. If you live in a climate with heavy snowfall, you must have a plan for winter storage. Leaving a wood desk under a foot of snow for months will lead to warping and moisture damage regardless of the wood species.
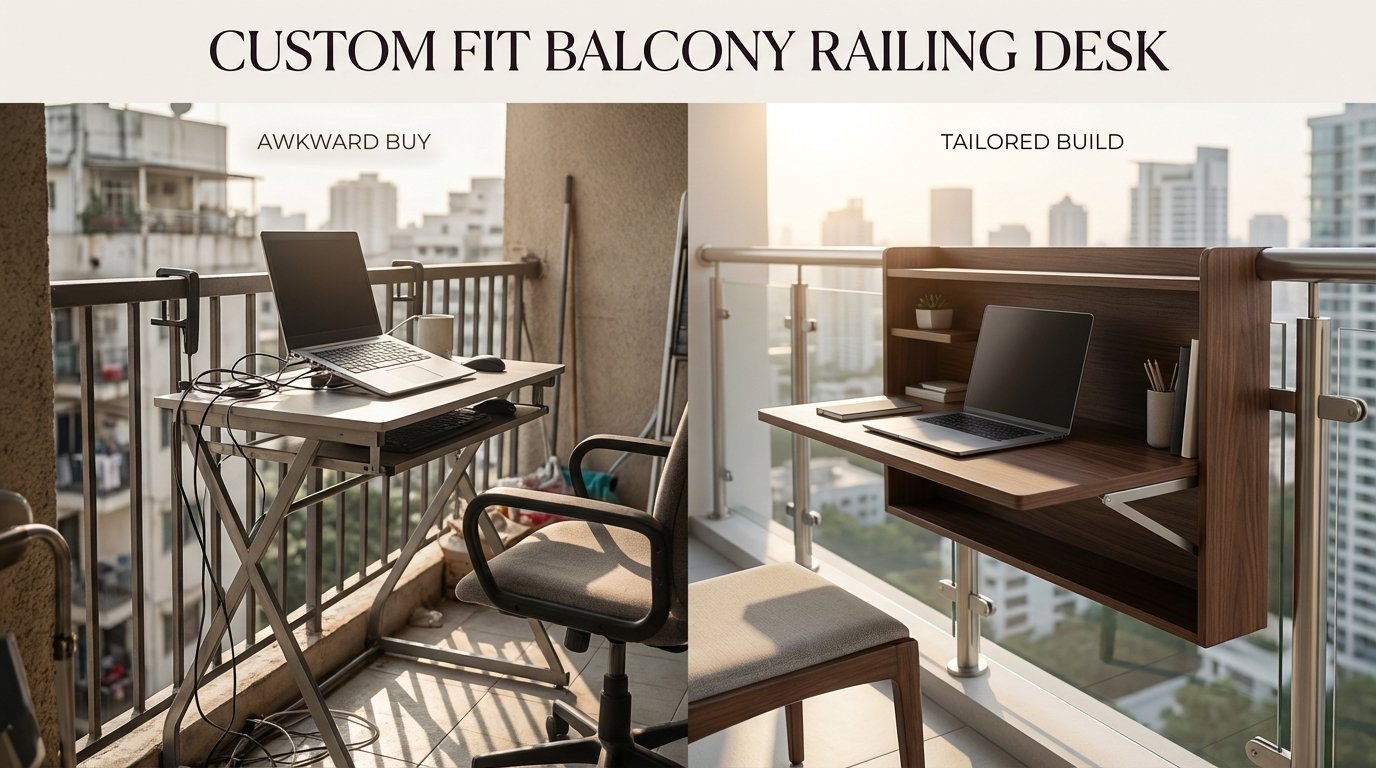
Comparison: AWKWARD BUY vs TAILORED BUILD
Choosing between a store-bought “Universal” balcony table and a custom build depends on your priorities for durability and fit. Below is a breakdown of how they compare across key metrics.
| Feature | AWKWARD BUY (Store-Bought) | TAILORED BUILD (Custom DIY) |
|---|---|---|
| Fit & Stability | Generic clamps; often wobbles or sits unevenly. | Engineered to your railing’s exact dimensions. |
| Material Quality | Thin metal or plastic; prone to rust/cracking. | Premium hardwoods or weather-treated softwoods. |
| Surface Area | Fixed sizes; usually small and restrictive. | Unlimited length; tailored to your workspace needs. |
| Maintenance | Low, but has a shorter total lifespan. | Annual oiling required; can last 15+ years. |
| Cost | $50 – $150 (initial purchase). | $80 – $300 (depends on wood choice). |
Practical Tips and Best Practices
Implementing a few expert techniques can elevate your desk from a “DIY project” to a professional-grade fixture. One of the best practices is to use a slatted design for the tabletop. Instead of one solid piece of wood, use three or four narrow boards with small 1/8-inch gaps between them. This allows rainwater to pass through easily. It also gives the wood room to expand and contract with temperature changes without warping the entire surface.
Focus on the “No-Fall” rule. If you are on a high floor, anything that falls off your desk is a potential hazard to people below. Adding a 1×2-inch trim board around the back and sides of the desk creates a safety barrier. This prevents your laptop, pens, or drinks from being knocked over the edge by a sudden gust of wind or an accidental elbow bump.
Counter-sinking your screws is a mandatory aesthetic and safety step. Use a counter-sink drill bit so the heads of your screws sit slightly below the surface of the wood. You can then fill these holes with wood plugs or specialized wood filler. This creates a snag-free surface where your clothes or laptop bag won’t get caught, and it prevents water from pooling around the screw heads.
Think about cable management if you plan to use this as a laptop workstation. Drilling a 2-inch hole (grommet) near the back corner allows you to run power cables cleanly to an outdoor outlet. You can also mount a weather-resistant power strip to the underside of the desk. This keeps your cables organized and prevents them from dangling over the railing where they could be caught by wind or pets.
Advanced Considerations
Serious practitioners often want more than just a static ledge. Adding a folding mechanism is the most popular advanced upgrade. Using heavy-duty “drop-leaf” brackets allows the tabletop to fold flat against the railing when not in use. This is a game-changer for very small balconies, as it completely clears the floor space for other activities. Ensure your brackets are rated for at least 100 pounds to handle the weight of your arms leaning on the desk.
Integrated lighting is another way to scale your design. You can router a groove into the underside of the tabletop and install a waterproof LED strip. This provides “task lighting” for late-night work or “mood lighting” for dinner dates. Solar-powered options are particularly effective because they don’t require any wiring. Simply mount the solar collector to the top of the railing and enjoy an illuminated workspace every evening.
Consider the “Modular Add-on” system. You can build small, removable accessories that slide onto the edge of your desk. A dedicated cup holder, a small planter box for herbs, or even a tablet stand can be custom-made to match your desk. This modularity allows you to switch the desk’s function from a high-productivity office to a social bar in seconds.
Advanced woodworkers might experiment with live-edge slabs. Using a single piece of kiln-dried Walnut or Cedar with the bark-edge intact creates a stunning, organic look. This requires more maintenance—typically a thick epoxy pour or multiple coats of high-grade marine spar varnish—but the result is a piece of “functional art” that significantly increases the visual appeal and value of your outdoor space.
Realistic Scenarios
Let’s look at how this works in practice. Meet “The WFH Warrior.” This person has a 5×10 balcony and needs to escape their indoor office. They build a 48-inch-long railing desk using Western Red Cedar. They mount it at a height of 42 inches to use with their existing bar stools. By adding a simple grommet for their laptop charger and a small rim to prevent their mouse from falling, they turn a cramped outdoor space into a 4-hour-a-day office. They gain fresh air, Vitamin D, and a clear mental break from the “inside” house.
Consider “The Sunset Socialite.” They don’t care about laptops; they want a place for wine and cheese. They build a deeper, 20-inch bar using Teak. They choose a slatted design with 1/4-inch gaps to handle spills and rain. They add integrated LED lighting underneath. On Friday nights, their tiny balcony becomes the premier “rooftop bar” in the neighborhood. They didn’t have to buy a $400 bistro set that blocks the door; they spent $150 on materials and kept their floor space entirely open.
Finally, there is “The Renter’s Solution.” Using a hardware kit with adjustable aluminum clamps, a renter attaches a simple butcher-block top to their balcony railing. They don’t drill a single hole into the building. When their lease is up, they loosen four thumb screws, pack the desk into their car, and take their custom workspace to their next home. This demonstrates the portability and flexibility of a well-engineered railing desk.
Final Thoughts
Reclaiming your balcony is about moving from a passive consumer to an active producer of your environment. You don’t have to accept the limitations of mass-produced furniture that doesn’t fit your life or your space. Building a custom railing bar is a tangible way to manifest better utility from the square footage you already pay for. It is an investment in your productivity and your peace of mind.
The journey from a “useless ledge” to a “high-productivity workspace” is surprisingly short. With a few pieces of quality wood, the right stainless hardware, and a Saturday afternoon, you can fundamentally change how you interact with the outdoors. Start by measuring your railing today. Once you feel the stability of a desk designed specifically for your home, you will never go back to the square pegs of the big box stores.
Experiment with different woods, play with heights, and don’t be afraid to add features that matter to you. Whether it is a place for your morning espresso or a dedicated zone for your deepest work, the custom railing desk is the ultimate urban upgrade. Take control of your space, reclaim your view, and start building.
Sources
1 youtube.com (https://www.youtube.com/watch?v=yoWjbHyZ4eM) | 2 youtube.com (https://www.youtube.com/watch?v=Lm3hfrdrKEU) | 3 loveyourdeck.com (https://loveyourdeck.com/products/diy-deck-railing-table-hardware-kit) | 4 aosom.ca (https://www.aosom.ca/blog-how-to-make-a-hanging-balcony-table.html) | 5 holmesmurphy.com (https://www.holmesmurphy.com/wp-content/uploads/2024/07/Balcony-Safety-Checklist-2024.pdf)