Diy Privacy Screen Balcony Bench
Your balcony is a stage until you build a shield. Most balcony furniture is designed for ‘open spaces,’ but urban living requires a different strategy. This DIY ‘Sentry Bench’ uses height and structure to turn a windy, exposed slab of concrete into a private sanctuary where the neighbors can’t see what you’re reading.
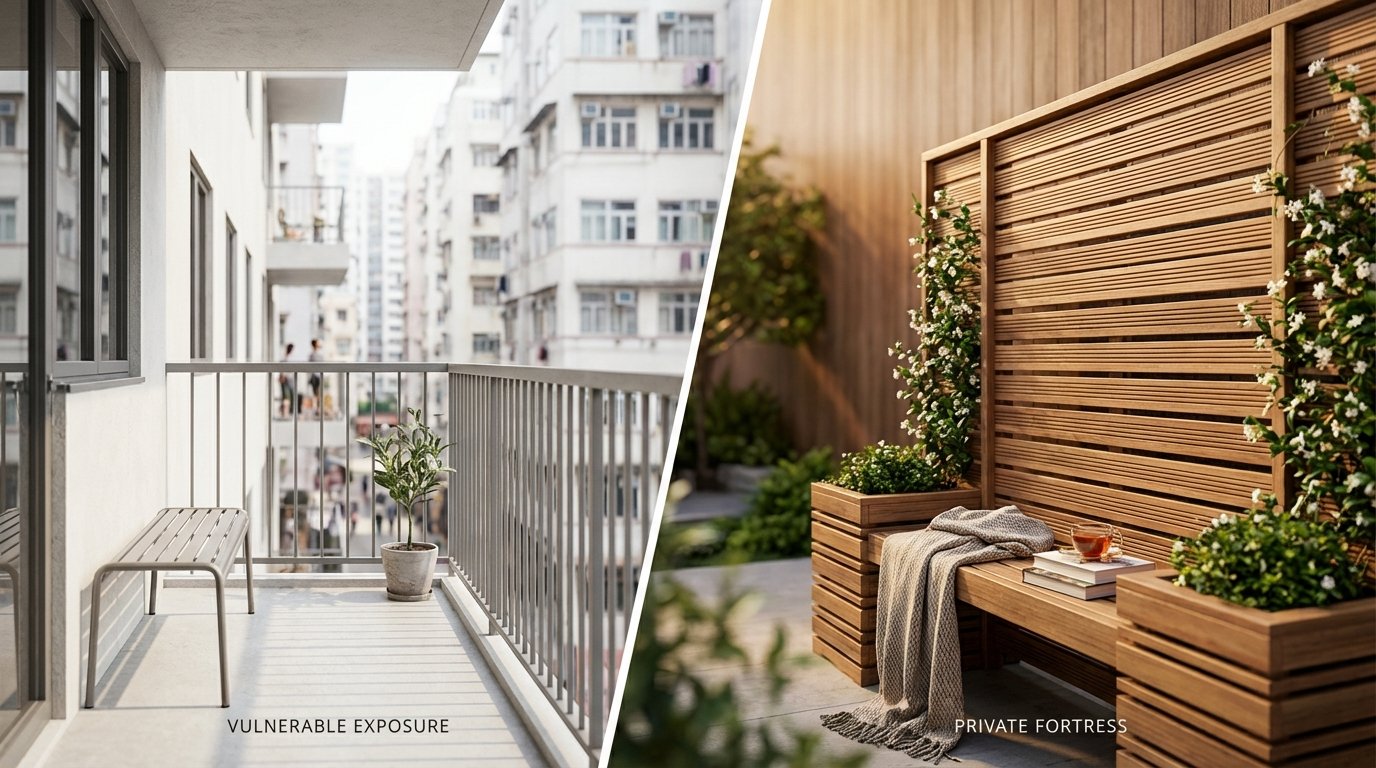
Urban life often feels like living in a glass bowl. You have a beautiful view, but everyone else has a view of you. Standard patio chairs offer no protection from prying eyes or the biting wind that whips between high-rise buildings. Building a “Sentry Bench” changes the dynamic of your outdoor space entirely.
This project is more than just a place to sit. It is a structural intervention for small spaces. It combines the weight of a solid seating base with the airy height of a privacy louver system.  . You gain a comfortable reading nook and a visual barrier that makes your balcony feel like a true extension of your living room.
Modern apartment living demands that every square inch performs a dual purpose. A simple bench is a waste of space. A bench that acts as a fortress, a storage unit, and a windbreak is an essential tool for the city dweller. This guide walks you through every cut, screw, and finish required to claim your domain.
Diy Privacy Screen Balcony Bench
The “Sentry Bench” is a hybrid furniture piece designed specifically for the unique constraints of an apartment balcony. It features a heavy, stable base for seating and a tall, integrated backrest that functions as a privacy screen. . Unlike standalone folding screens, this unit is anchored by the weight of the person sitting on it and the materials themselves.
This design solves the “Vulnerable Exposure” problem. Most balconies are overlooked by taller buildings or adjacent units. A traditional railing only provides security, not seclusion. The Sentry Bench extends that protection vertically. It uses horizontal or vertical slats to block lines of sight while still allowing light and air to pass through.
Think of it as a piece of architectural furniture. In a real-world setting, it acts as a focal point. You can use it to frame a view or hide an unsightly air conditioning unit. Because it is a single cohesive unit, it avoids the cluttered look of multiple mismatched pots and flimsy store-bought dividers.
The bench provides a sense of enclosure that is psychologically grounding. Humans naturally feel more relaxed when their back is protected.  . This “nesting” effect is why high-back chairs have been a staple of luxury furniture for centuries. The Sentry Bench brings that same level of intentionality to your five-by-ten-foot slab of concrete.
How to Build Your Sentry Bench
Construction begins with a solid plan and the right materials. You need to balance the need for a “Private Fortress” with the weight limits of your balcony. Most modern balconies are engineered for a live load of 40 to 60 pounds per square foot. Choosing a lightweight but durable wood like Western Red Cedar is the smartest move for this build.
Step 1: Frame the Base
Create a rectangular frame using 2×4 lumber. For a standard balcony, a 48-inch width is usually the sweet spot. Use pocket hole screws or 3-inch exterior-grade deck screws to join the corners. Add two internal supports to prevent the seat from sagging over time. This frame will be the foundation for the entire structure.
Step 2: Construct the Vertical “Sentry” Supports
This is where the privacy screen comes to life. Instead of short legs, you will use two tall 2×4 posts for the back corners. These should extend 5 to 6 feet above the floor. Secure these posts to the inside of the base frame with at least three heavy-duty bolts or multiple structural screws. Stability here is non-negotiable.
Step 3: Build the Bench Seat
Install 2×4 legs for the front corners. Once the legs are level, attach a 3/4-inch exterior-grade plywood top or individual 1×6 slats across the base frame. Slats are better for drainage, ensuring water doesn’t pool and rot the wood. Leave a 1/8-inch gap between each slat to allow for natural wood expansion and contraction.
Step 4: Install the Privacy Slats
Attach 1×4 or 1×2 slats horizontally across the tall back posts. This creates the “screen” effect. Start from the top and work your way down. Use a 1-inch spacer block between each slat to ensure perfectly even gaps. These gaps are critical. They break up the wind and prevent the screen from acting like a sail during a storm.
Step 5: Sanding and Sealing
Outdoor furniture must endure UV rays and moisture. Sand every surface with 80-grit and then 120-grit sandpaper to prevent splinters. Apply a high-quality oil-based stain or a clear UV-protective sealant. Never skip the end grain of the wood, as this is where moisture most easily penetrates and causes rot.
Benefits of the Sentry Bench Design
The primary advantage of this DIY project is total control over your environment. Store-bought screens are often too short or too flimsy. By building it yourself, you can match the screen height exactly to the floor height of the neighbor’s balcony across the street. You create a custom blind spot that offers total peace of mind.
Seating capacity is another major win. Traditional balcony sets often feel “squished.” A built-in bench maximizes the perimeter of the space, leaving the center open for movement or a small coffee table. You can even design the bench with a hinged seat to provide hidden storage for cushions and gardening tools.
Wind mitigation is an overlooked benefit of the Sentry Bench. Tall buildings create “wind tunnels.” A solid wall would be dangerous, but the slatted design of the Sentry Bench diffuses the wind. It transforms a gale into a gentle breeze, making the balcony usable on days when it would otherwise be too cold or turbulent.
Vertical gardening opportunities abound with this design. You can mount planter boxes directly to the screen slats. Herbs like mint, rosemary, and thyme thrive in these elevated positions. You aren’t just building a wall; you are building a living, breathing ecosystem that smells as good as it looks.
Challenges and Common Mistakes
Ignoring the “Sail Effect” is the most dangerous mistake a builder can make. A solid 6-foot-high wall on a high-rise balcony can catch enough wind to tip over or even damage the building railing. Always ensure there is sufficient gap between slats for air to pass through. Safety must always come before total opacity.
Using the wrong fasteners will lead to unsightly rust streaks within months. Standard interior screws will corrode the moment they touch moisture. Always use stainless steel or ceramic-coated exterior deck screws. The extra cost is a small price to pay for a project that looks professional for a decade.
Neglecting drainage is a silent killer of DIY furniture. If the bench legs sit directly in a puddle of water after it rains, the wood will eventually wick up that moisture and rot from the inside out. Install small plastic furniture feet or “glides” to keep the wood a fraction of an inch off the concrete floor.
Failure to measure the doorway is a classic “rookie” error. Many people build a massive, beautiful bench in their living room only to realize it won’t fit through the sliding glass door to the balcony. Build the bench in sections or ensure your dimensions allow for easy transport through the narrowest point of your home.
Limitations of the DIY Approach
Weight is a realistic constraint that cannot be ignored. While wood is sturdy, it is also heavy. If you plan to add large planters or concrete elements to your bench, you must calculate the total load. Concrete-topped benches are stylish but can easily exceed the safe weight limit of an older wood-frame balcony.
HOA and Strata regulations often have strict rules about “permanent” modifications. In some buildings, anything that exceeds the height of the railing is technically prohibited. The Sentry Bench is usually viewed as furniture rather than a structure, but it is wise to check your lease agreement before you start cutting lumber.
Maintenance is an ongoing requirement. Unlike plastic or metal furniture, wood needs to be re-sealed every one to two years. If you live in a particularly harsh climate with high humidity or intense sun, the color will fade. You must be willing to put in the work to maintain the “Private Fortress” aesthetic.
Comparison: DIY Sentry Bench vs. Commercial Dividers
Choosing between a custom build and a store-bought solution often comes down to the “Private Fortress” vs. “Temporary Patch” mindset. Commercial dividers are usually lightweight and easy to move, but they lack the structural integrity to withstand high-altitude winds.
| Factor | DIY Sentry Bench | Commercial Screen |
|---|---|---|
| Durability | High (Solid wood construction) | Low to Medium (Often plastic/fabric) |
| Wind Resistance | Excellent (Integrated weight) | Poor (Likely to topple) |
| Customization | Infinite (Height/Width/Finish) | Limited to available sizes |
| Assembly Time | 4–8 Hours | 15–30 Minutes |
| Functionality | Seating + Storage + Privacy | Privacy Only |
The Sentry Bench wins on value over time. While the initial investment in tools and lumber is higher, the multi-functional nature of the piece replaces the need for chairs, storage boxes, and separate privacy panels. It is a consolidated solution for a complex environment.
Practical Tips and Best Practices
Apply “Ballast Thinking” to your bench. If you live in an area prone to high winds, use the storage area under the seat to hold heavy items. Sandbags or gallon jugs of water tucked inside the base can add 50 pounds of stability without putting any visible clutter on the balcony floor.
Use a “Mockup” before you buy wood. Grab some blue painter’s tape and mark the dimensions of the bench on your balcony floor and wall. Sit on a crate or bucket in the “bench position” to see if the proposed height of the screen actually blocks the line of sight from the neighbor’s window. Adjust your plans before the first cut.
- Pre-drill every hole: Wood like cedar is prone to splitting near the ends. Always use a drill bit slightly smaller than your screw to create a pilot hole.
- Use wood glue: An exterior-grade wood glue like Titebond III adds immense structural strength to every joint. It works in conjunction with your screws to prevent the bench from becoming “wobbly” over time.
- Check for level: Balcony floors are designed with a slight pitch to allow water to run off. You may need to trim the front legs of your bench slightly shorter than the back legs to ensure the seat is perfectly level.
Advanced Considerations for Serious Builders
Integrated lighting can turn your Sentry Bench into a nighttime oasis. You can router a groove into the underside of the top privacy slat to hide a strip of LED lights. This provides a soft, downward glow that illuminates the bench without creating glare that would annoy your neighbors.
Acoustic dampening is another advanced move. If your balcony faces a busy street, you can back the privacy slats with specialized outdoor acoustic foam or dense climbing plants. While it won’t block all the noise, the extra mass and surface area will noticeably soften the “harshness” of city sounds.
Material science matters. If your budget allows, consider “Shou Sugi Ban”—a traditional Japanese method of charring wood to make it rot and fire-resistant. It creates a stunning, deep black finish that highlights the wood grain and lasts far longer than any chemical stain.
Smart storage hinges can elevate the build. Instead of a simple lift-off lid, use gas struts (the kind used on car trunks). This allows the seat to stay open on its own, making it much easier to organize your outdoor gear. It adds a level of “built-in” luxury that sets your project apart from standard DIY fare.
Project Scenarios and Examples
Imagine a typical 4×10-foot urban balcony. The “Vulnerable Exposure” comes from a taller building 50 feet away. By placing a 4-foot wide Sentry Bench against the far railing, the resident creates a “dead zone” for the neighbor’s cameras. They can now sit, drink coffee, and exist without feeling watched.
Consider the “Corner Shield” scenario. If you have a corner balcony, you are exposed on two sides. Building an L-shaped Sentry Bench provides 270 degrees of privacy. One side can be the tall privacy screen, while the other side features a lower backrest to preserve a specific view of the park or skyline.
In a small 3-foot deep “Juliet” style balcony, a full bench might be too large. In this case, builders can adapt the Sentry Bench into a “Sentry Perch.” This is a narrower, bar-height seat with a high screen that takes up only 18 inches of depth but provides the same psychological and visual benefits of the full-sized version.
Final Thoughts
Creating a DIY Privacy Screen Balcony Bench is the most effective way to reclaim your outdoor space from the chaos of the city. It moves your balcony from being a neglected concrete slab to becoming a “Private Fortress” where you can truly relax. By combining sturdy seating with a high-back louvered screen, you address privacy, wind, and storage in one elegant build.
The Sentry Bench is an investment in your mental well-being. Having a place to retreat to—one where you are not on display—is a rare luxury in modern urban environments. The process of building it yourself also builds a deeper connection to your home, giving you a sense of mastery over your surroundings.
Do not be intimidated by the scale of the project. Woodworking is a skill that rewards patience and planning. Start with the frame, trust your measurements, and remember that every screw you drive is a step toward your own private sanctuary. Once you sit down in your completed Sentry Bench, the city noise will feel a little further away, and the view will finally be yours alone.
Sources
1 makingitwithabby.com (https://makingitwithabby.com/871/how-to-build-a-built-in-storage-bench-step-by-step-tutorial/) | 2 shelterstore.co.uk (https://www.shelterstore.co.uk/pages/the-significance-of-benches-in-the-urban-environments/) | 3 builders-surplus.com (https://builders-surplus.com/diy-outdoor-privacy-screen/) | 4 masterstrokebyresene.com (https://www.masterstrokebyresene.com/diy-projects/build-your-own-outdoor-privacy-screen/) | 5 woodgraingirls.com (https://www.woodgraingirls.com/avoid-these-common-mistakes-when-building-diy-outdoor-furniture) | 6 urbanmicrotips.com (https://urbanmicrotips.com/balcony-weight-limits-renters/) | 7 farrellslandscaping.com (https://farrellslandscaping.com/best-wood-for-outdoor-furniture-a-simple-guide/)