Product Description
What Will Driftwood Weathering Wood Finish Do For You?
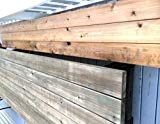
Love that restoration look? Achieve that high end weathered look without the messy, time-consuming and costly faux paint techniques. Driftwood Weathering Wood Finish creates a beautiful driftwood weathered finish on most bare unfinished wood that contains a lot of tannins. Use on fencing, decks, siding, ceilings, banisters, moulding, frames, window boxes, beams, posts and feature walls plus more.
What’s In The Box?
1 Box containing 10 packets
Instructions
Instructions
Mix 1 packet with 1 Cup of water and apply to bare wood. For application on woods high in tannins such as oak, mahogany or walnut, dilute the solution for a lighter color. Suggested dilution for woods high in tannins is up to 1 gallon of water per 2 packets.
Apply with a brush, sponge, or sprayer and see results usually within 10-15 minutes.
Product will cover approx. 275-350 sq. ft and up to 2,200-2800 sq. ft. if diluted. That’s 10 cups up to 5 full gallons of solution.
What to Expect: Most woods will take on a bluish gray color – some darker than others. Try the product on an inconspicuous area first. Darken the color with a 2nd coat or lighten it by diluting the solution. Pine, birch and poplar will be lighter while oak, walnut and mahogany will be darker.
Will NOT work on woods with very low tannins such as particle board, balsa, parawood, bamboo, rubberwood or Malaysian oak or wood that has been pre-treated.
Clean up: Clean up with soap and water. Unused solution can be stored up to 3 mths in an airtight non-metal container. Dry product can be stored indefinitely.
CAUTION: Product stains skin and clothing. Avoid inhalation of powder.
RECOMMENDED TOP COAT: To protect your Driftwood Weathering Wood Finish, we recommend our Driftwood Final Finish Liquid Wax.
Price: $52.99
- Creates a Beautiful Aged Driftwood Finish, Quickly and Easily on bare, unfinish wood – just watch our video on the left
- Simple to Use – Mix with water, apply – see your results in minutes
- Indoor or Outdoor Use – Finish Lasts a Lifetime
- Non-toxic and free of VOCs — cleans up with soap and water – environmentally friendly
- FREE SHIPPING ON THIS ITEM


Tips On How To Be Efficient When Improving Your House
You may not find a guide that will give you detailed instructions for every type of project you might undertake, though you still need to do sufficient research. Read through the information provided in this article and use it in your home improvement projects.
Add an unusual addition to your home to give it character. Consider installing a wine cellar or library. Not only will you guests be impressed, but if you sell your home in the future, it will entice potential buyers.
You may have occasion to repaint your porch. If so, lean on a quality exterior paint. Always use paint that has the same type of base as the previous coat. An oil-based paint is better for trims and will last a long time but you should use a water-based paint for decks or floors since oil-based paint can become slippery in the winter.
Use a nail and poke holes in the paint can rim. The channel into which the lid fits typically fills with paint, and when you make an attempt to replace that lid, paint spills onto the can sides. If you pound some holes in the top of the can it will prevent this problem from rearing its ugly head.
If you’re purchasing new furniture, it’s best to avoid pieces that have busy upholstery. Buying these items with geometric shapes, patterns, and floral prints may already decide what the home decor has to look like. Purchase furniture that is decorated or made in solid colors and tones, then accessorize with patterns. If you want patterns, use pillows and throw blankets to have patterns but also design control.
Home improvements are something that every homeowner would like to do. The question that needs to be asked is whether the improvements will be successful or not. There are many houses out there that have a lot of improvements that are sub-par because of lack of knowledge. Don’t be that person. Use the advice supplied in the article above and improve your skills when it comes to fixing, demolishing or driving a nail.