Driftwood Wall Art Diy Decor
Welcome to the whimsical world of Driftwood Wall Art DIY Decor! Imagine transforming your space with the natural, serene beauty of driftwood that you can easily craft into stunning pieces of art. You’re about to embark on a creative journey that lets you bring a touch of the ocean’s charm right into your home. Whether you’re sprucing up your living room or adding a unique accent to your bedroom, this guide will show you step-by-step how to make your own driftwood wall art. Get ready to unleash your inner artist and enjoy the delightful process of turning simple driftwood into eye-catching, elegant decor. Have you ever found yourself strolling along the beach, enjoying the sound of the waves and suddenly noticing those beautiful, weathered pieces of wood scattered along the shoreline? Ever thought about how you could transform these natural treasures into stunning pieces of art for your home? Welcome to the charming world of DIY driftwood wall art decor!


Introduction to Driftwood Wall Art
Why Driftwood?
Driftwood isn’t just a byproduct of nature; it’s a piece of history. Each piece tells a story—one that’s been shaped by the elements, smoothed by water, and washed ashore. Its natural beauty, combined with its unique texture and shape, makes it an ideal material for creating rustic, yet elegant, wall art.
The Appeal of DIY Projects
Do-It-Yourself (DIY) projects aren’t just a way to save money. They allow you to add a personal touch to your living space, making your decor truly one-of-a-kind. Plus, there’s something incredibly fulfilling about completing a project with your own two hands!
Getting Started with Driftwood Wall Art
Gathering Materials
Before you get started, you’ll need to gather your materials. Luckily, the main ingredient—driftwood—is freely available if you live near a beach. Here’s a list of essentials to get you started:
| Materials | Description |
|---|---|
| Driftwood | Various sizes, shapes, and tones |
| Sandpaper | For smoothing rough edges |
| Nails and Screws | To join pieces together |
| Fishing Line | For hanging delicate pieces |
| Glue | A strong adhesive for added stability |
| Hooks | For mounting your completed art on the wall |
| Sealant or Finish | To protect and preserve your driftwood artwork |
Preparation and Cleaning
Once you have your materials, the first step is to clean your driftwood. You want to remove any debris, bugs, or salt that could deteriorate your piece over time.
- Rinse Thoroughly: Wash each piece of driftwood with fresh water.
- Soak in a Bleach Solution: Mix one part bleach with nine parts water and soak your driftwood for 30 minutes to an hour.
- Rinse Again: Ensure all bleach is washed off.
- Dry Completely: Let your driftwood dry out thoroughly—this can take several days.
Designing Your Driftwood Art
Creating art from driftwood is a bit like piecing together a puzzle. Here are some tips to help you design your masterpiece:
- Layout on the Ground: Arrange the pieces on the ground before committing to a design. This allows you to experiment with different layouts.
- Symmetry and Balance: Aim for a balanced look, but don’t worry about making it perfect—part of the charm is the natural, organic feel.
- Sketch Your Design: Drawing your plan can help you visualize the end result.

Types of Driftwood Wall Art
Driftwood Mirror Frames
A driftwood mirror frame can add rustic charm to any room. Here’s how you can create your own:
- Select a Mirror: Choose a plain mirror with a simple frame.
- Prepare the Driftwood: Cut driftwood pieces to fit around the mirror.
- Attach with Glue: Use a strong adhesive to attach driftwood to the frame.
- Seal the Wood: Apply a sealant to protect your driftwood.
Driftwood Wall Hangings
Wall hangings can vary from simple to intricate designs. Here’s a basic guide to creating a wall hanging:
- Select a Base: Use a larger piece of driftwood as the base.
- Dangle Smaller Pieces: Use fishing line to dangle smaller pieces of driftwood from the base.
- Add Shells or Beads: For extra flair, consider adding shells or beads between the driftwood pieces.
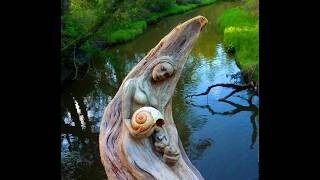
Driftwood Sculptures
Sculptures can be as simple or as complex as you like. Here are some steps to creating a driftwood sculpture:
- Choose a Central Piece: Start with a larger piece of driftwood.
- Add Branches: Attach smaller pieces using nails or screws.
- Enhance with Details: Add sea glass, stones, or other beach finds to embellish your sculpture.
Tools You’ll Need
Having the right tools can make your project a breeze. Here’s a list of tools that might come in handy:
| Tool | Purpose |
|---|---|
| Saw | Cutting driftwood to desired lengths |
| Drill | Making holes for screws or fastening accessories |
| Hammer | Nailing pieces together |
| Tape Measure | Ensuring accurate measurements |
| Clamps | Holding pieces together while glue dries |
| Hot Glue Gun | Quick application of glue |

Techniques for Assembling Driftwood Art
Cutting Driftwood
Cutting driftwood can be tricky due to its irregular shapes and densities. Use a saw designed for wood, and take your time to prevent splitting the wood.
Drilling Holes
A drill is essential for making precise holes to join pieces together. Start with a small drill bit and gradually increase in size if necessary.
Sanding Edges
Sanding removes rough spots and sharp edges, making your piece safer and more polished. Use medium-grit sandpaper to start, followed by finer grits for a smoother finish.
Gluing and Nailing
For a strong bond:
- Apply Wood Glue: Use an appropriate adhesive for wood.
- Press Together: Hold pieces firmly together for a few seconds.
- Reinforce with Nails: For larger pieces, add nails for extra strength.
Finishing Touches
Sealing and Protecting
A sealant will protect your driftwood from moisture and pests. Choose a clear, matte finish to maintain the natural look of the wood.
Adding Hardware
Attach hooks or other mounting hardware securely to the back of your driftwood art to ensure it hangs safely.
Incorporating Other Natural Elements
Incorporating additional beach finds like sea glass, shells, or even small stones can add interesting textures and colors to your driftwood art.
Tips for Displaying Your Driftwood Wall Art
Choosing the Right Location
Your driftwood art deserves a prominent place in your home. Consider high-traffic areas like the living room or entryway.
Lighting Considerations
Place your art where natural light can highlight its textures, or use spotlights for dramatic effect.
Grouping Multiple Pieces
If you have several driftwood pieces, group them together on the same wall for a cohesive look.
Caring for Your Driftwood Art
Driftwood art is relatively low maintenance, but a bit of care can ensure it stays beautiful for years.
- Dust Regularly: Use a soft, dry cloth to remove dust.
- Avoid Excessive Moisture: Keep it away from damp areas to prevent mold and rot.
- Reapply Sealant Annually: A fresh coat of sealant each year can help protect the wood.
Conclusion
Driftwood wall art is more than just a decor trend—it’s a way to bring a piece of the natural world into your home. Crafting your own pieces allows you to create something that’s uniquely yours, with a story and a history that’s all its own. So, next time you’re at the beach, pick up some driftwood and start your creative journey. Your walls will thank you!
Happy crafting! If you try your hand at making driftwood wall art, share your creations and inspire others to do the same. Who knew that a simple walk on the beach could lead to such beautiful DIY decor?