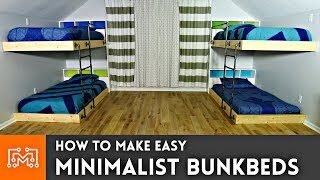
 I added a simple pair of bunk beds to my boys’ room!
Subscribe to my channel: http://bit.ly/1k8msFr
Second Channel: http://bit.ly/iltms-2
MORE PROJECTS, POSTS AND EVENTS
BUNK BED PLANS
https://www.iliketomakestuff.com/product/bunk-beds-digital-plans/
TOOLS & SUPPLIES:
Polycrylic Finish: https://www.amazon.com/dp/B000BZZ3S8?tag=ilik-20
Birch Edge Banding: https://www.amazon.com/dp/B075CHCP7M?tag=ilik-20
Everything else I use can be found in the Kits linked below:
https://kit.com/iliketomakestuff/my-woodworking-tools
https://kit.com/iliketomakestuff/shop-safety-gear
HOMEMADE MODERN’S PIPE VIDEO
Twitch Stream Every Wednesday @ 11am EST: www.twitch.tv/iliketomakestuff
I WROTE A BOOK!!
Want to support ILTMS? Get exclusive content and more…
http://www.iliketomakestuff.com/patreon
BUY A SHIRT, STICKER, DIGITAL PLANS and MORE!!
http://www.iliketomakestuff.com/store
FOLLOW:
Tweets by iliketomakestuf
http://www.twitch.tv/iliketomakestuff
http://instagram.com/iliketomakestuff
http://facebook.com/iltms
As many of you know, we’ve been continually renovating our new house. Upstairs in my boys’ bedroom, its finally time to get the mattresses off the floor and onto a set of awesome double bunkbeds!
You may have seen my boys’ room when we laid down new hardwood flooring. Now that the flooring is finished, it’s time to make some beds. To maximize space in the room and to comfortably fit three boys, I decided on two sets of bunkbeds.
Bunkbeds are pretty straight-forward; like any bed, they need a frame, some rails to hold the mattress, and most often a headboard. A bunk bed is just two of those sets, but one is on stilts. My original design looked something like a animal pen with lots of dimensional lumber and rails to prevent the kids from falling. After many discussions with my wife, she mentioned that she liked the industrial-chique design so we added some iron pipe accents. If you’ve never used iron pipe in a project, be warned, it can get expensive quick (especially for double bunks!). To try and balance the industrial look with non-animal pen construction, we settled on a minimalistic design that is sturdy and functional.
The bed frames are simple 2×6 boxes held together with glue and screws. Where visible, I added some dowel plugs to the screw holes to keep the clean exterior look. I screwed 2×2 runners the length of the frames to hold the 1×4 mattress supports. Because I needed 4 individual beds, I batched out the cutting and the construction. When it came time to mount the beds, I used 3/8 inch lag bolts to attach the top bunks into the corners of the room. I used a temporary brace to hold up the unsupported side of the bed while I drove in the hardware, this keeps the vertical spacing consistent across the bed frames.
Now it was time to piece together the puzzle of iron pipes that would become the guard rail and ladder. Josh and I used the floor at the home center to lay out the arrangement to make sure we bought all the right pieces. Most of the fittings screwed together in the way we intended, except for one side of the ladder. Because the pipes screw together in the same direction, it’s impossible to make put both sides of the ladder together using the threads. I had to grind off the threading on one side of the ladder rungs and friction fit those pieces into the other vertical support. This wasn’t as difficult as I thought and the ladder/guard rail combo was ready…except that the iron pipe we bought had a black coating that was a PAIN to remove. I used some degreaser and some mineral spirits to remove the dirty layer and then sealed the whole thing with paste wax. I attached the iron piping to the bed frames with some lag bolts and nuts for added assurance and the basic frames and supports were finished.
The headboards were made out of 3/4 inch plywood and I used some additional dividers to make some storage cubbies for each bed. I joined the top and bottom headboards with a longer piece of plywood to serve as an additional support for the top bunk. Wanting a pop of color, I painted each headboards’ back panel a bold color that can be removed and repainted if the kids change their minds.
Once the mattresses were added and dressed up with bedding, this project was done. My three boys, and more importantly, my wife was really happy with the final product and it gives the room WAY more floorspace for all sorts of activities! If you liked this project, you can get the plans on my website and you can view my playlists to see more projects.
Easy Double Bunk Beds // Woodworking How To