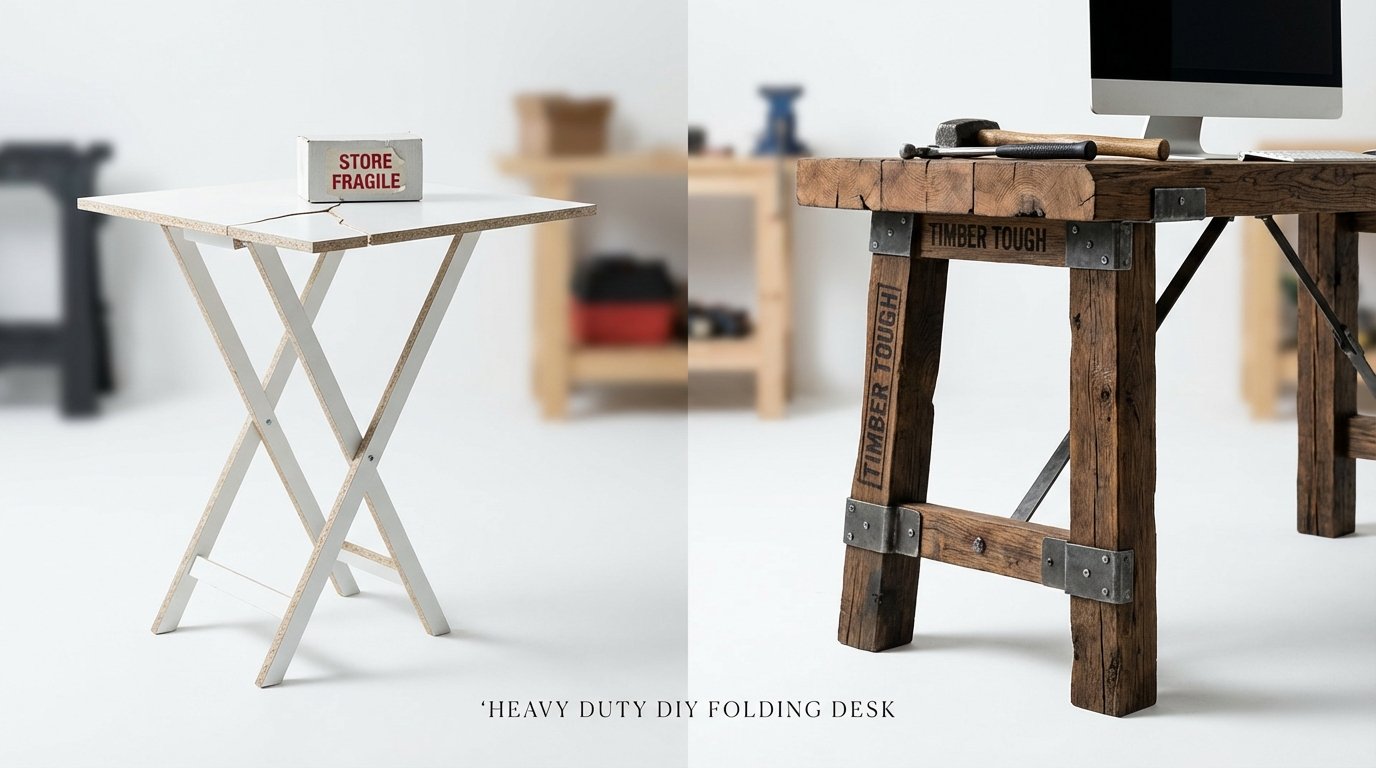
Heavy Duty Diy Folding Desk
Is your desk one heavy coffee mug away from a total collapse? In a world of ‘fast furniture’ that breaks in a year, be the person who builds for a lifetime. This heavy-duty DIY folding desk uses real timber and industrial hardware to handle anything you throw at it—literally. Stability isn’t a luxury; it’s a requirement.
Building your own furniture isn’t just about saving space. It is about taking control of your environment. Most store-bought folding desks rely on thin particle board and flimsy hinges. They wobble when you type and sag under the weight of a single monitor. A heavy-duty DIY folding desk changes the game by combining the warmth of solid wood with the strength of industrial-grade steel brackets.
This project is for the person who needs a professional-grade workspace but lives in a world of limited square footage. Whether you are setting up a home office in a small apartment or adding a secondary workbench to a crowded garage, strength matters. You want a surface that feels like a permanent fixture when it is up, yet vanishes when it is down. This guide will show you how to achieve that balance without compromising on quality.
Heavy Duty Diy Folding Desk
A heavy-duty DIY folding desk is a wall-mounted or freestanding workstation designed to support significant weight while maintaining a collapsible profile. Unlike standard “space-saver” furniture, these builds prioritize structural integrity. They use thick timber slabs and high-capacity hardware to ensure the desk can handle 100 to 500 pounds or more, depending on the setup. You are building a rock, not a tray table.
These desks exist because modern life demands flexibility. In a studio apartment, a desk that takes up five feet of floor space 24/7 is a burden. In a mobile home or van build, every inch of space is a premium. By utilizing a folding mechanism, you reclaim your room when work is over. The “heavy-duty” aspect ensures that when you are working, the desk doesn’t remind you it is temporary. It stays still, silent, and solid.
Think of this desk as a bridge between furniture and infrastructure. It is a tool for productivity that adapts to your needs. Real-world situations for this build include high-end computer setups with multiple monitors, sewing stations that need to handle the vibration of heavy machinery, or even a folding kitchen prep station. If you can dream it, and you build it tough, it will hold.
Choosing Your Timber: Hardwood vs. Softwood
The soul of your desk is the timber you select. Not all wood is created equal. If you want a heavy-duty result, you need to understand the material’s density and durability. Using real timber is a massive step up from the engineered boards found in big-box stores. Solid wood can be sanded, refinished, and repaired over decades.
The Power of Hardwoods
Hardwoods like Oak, Maple, and Walnut are the gold standard for heavy-duty desks. Oak is a traditional favorite because it is incredibly dense and resistant to moisture. It handles screws and nails beautifully, which is vital for hardware that will be under constant stress. White Oak, in particular, offers a robust grain pattern that hides scratches well.
Maple is another fantastic choice if you want a smooth, pale surface. It is one of the hardest woods available and is highly resistant to dents. If you plan on doing a lot of writing or drawing directly on the desk, Maple’s fine grain is your best friend. Walnut is the luxury pick. It offers a rich, dark color and incredible strength, though it comes at a higher price point.
Sustainable Softwoods for Builders on a Budget
You don’t always need to spend a fortune on exotic hardwoods. Softwoods like Pine or Fir can still make a heavy-duty desk if you choose the right thickness. A 1.5-inch thick Pine slab—often sold as “butcher block” or “project panels”—provides plenty of rigidity. While it may dent more easily than Oak, it is significantly cheaper and easier to work with for beginners.
If you choose Pine, look for clear, knot-free boards. Knots can be points of structural weakness, especially where you plan to attach your folding brackets. A well-finished Pine desk, sealed with a tough polyurethane, can last for years and gain character as it ages. It is the perfect entry point for your first custom build.
Industrial Hardware: The Backbone of Your Build
You can have the strongest piece of Oak in the world, but if your hinges are weak, the desk is a hazard. For a heavy-duty folding desk, you must look past standard door hinges. You need industrial folding shelf brackets or heavy-duty locking hinges. These are designed specifically to lock in place and handle shear forces.
Professional-grade brackets, such as those made from thick-gauge steel, are often rated for static weights of 330 to 600 pounds per pair. Some high-end models used in van life or mobile workshops are even tested for dynamic loads—meaning they can handle weight while moving or vibrating. When shopping, look for brackets with a push-button release or a locking arm that clicks into place. This ensures the desk won’t accidentally collapse if you bump into it.
Don’t forget the screws. The hardware is only as good as the fasteners holding it to the wall and the timber. For the wall side, use 3-inch or longer lag screws that penetrate deep into the wall studs. For the timber side, ensure your screws are long enough to grip the wood firmly without poking through the top surface. Stainless steel or zinc-plated hardware will prevent rust and maintain a clean look over time.
How to Build Your Heavy Duty Folding Desk
Ready to start? This process requires patience and precision. You are creating something that needs to be perfectly level and incredibly secure. Follow these steps to ensure your desk is built for the long haul.
Step 1: Planning and Measuring
Start by determining the ideal height for your desk. For most people, a standard height is between 28 and 30 inches from the floor. Use a stud finder to locate the vertical supports behind your drywall. You must mount your brackets directly into the studs. Mark these locations clearly. If your studs don’t align with where you want the desk, you may need to install a horizontal “ledger board” or “back panel” to bridge the gap.
Step 2: Preparing the Timber
Cut your timber to the desired size. For a standard home office desk, 48 inches wide by 24 inches deep is a popular choice. Once cut, sand the surface thoroughly. Start with a coarse 80-grit sandpaper to remove imperfections, move to 120-grit, and finish with 220-grit for a smooth-to-the-touch feel. Round over the edges with a router or a sanding block to prevent sharp corners that could cause injury in tight spaces.
Step 3: Mounting the Brackets to the Wall
Hold your first bracket against the wall at the marked stud location. Use a level to ensure it is perfectly vertical. Drill pilot holes to prevent the wood studs from splitting, then drive in your lag screws. Repeat this for the second bracket. Double-check that both brackets are level with each other. If they are even slightly off, your desk will wobble and the folding mechanism might bind.
Step 4: Attaching the Desk Top
Lay your prepared timber slab on top of the extended brackets. Ensure it is centered and has the desired amount of overhang on the sides. From underneath, mark the screw holes. Remove the slab, drill shallow pilot holes, and then screw the brackets into the wood. Be careful not to drill too deep. Once secured, test the folding mechanism several times. It should lock firmly and release smoothly.
Step 5: Applying the Finish
A heavy-duty desk deserves a heavy-duty finish. Apply at least three coats of a high-quality polyurethane or furniture oil. Polyurethane provides a hard, plastic-like shell that protects against coffee spills and scratches. If you prefer a more natural feel, a hard-wax oil like Rubio Monocoat or Osmo provides a durable, matte finish that is easy to spot-repair later.
Benefits of a Timber Tough DIY Desk
Why go through the effort of building when you can buy a desk in a box? The answer lies in the measurable benefits of solid construction. A DIY desk isn’t just a piece of furniture; it is an investment in your productivity and your home’s value.
- Unmatched Longevity: While mass-produced furniture typically fails within 5 to 7 years due to sagging joints or peeling laminate, a solid timber desk can last 20 to 50 years. It can be sanded and refinished whenever it starts to show wear.
- Custom Fit: You aren’t limited by what a factory decided was “standard.” You can choose the exact species of wood that matches your room and the exact dimensions that fit your workflow.
- Weight Capacity: You can confidently mount heavy monitor arms, studio speakers, or industrial sewing machines without fear of the surface bowing.
- No Harmful Chemicals: Many “fast furniture” items use adhesives containing formaldehyde that can off-gas into your home. Solid timber is a natural, healthy alternative.
- Repairability: If you scratch a solid wood desk, it is a “character mark” you can fix. If you scratch an MDF desk, it is ruined forever.
Challenges and Common Mistakes
Even seasoned DIYers can run into trouble with wall-mounted projects. Understanding where others fail will help you succeed on your first try. The most common mistake is underestimating the leverage exerted on the wall.
Mounting into Drywall Only: This is a recipe for disaster. Drywall anchors are not designed to handle the downward pressure of someone leaning on a desk. Over time, the anchors will pull through the gypsum, leading to a total collapse. Always, without exception, find the studs or use a mounting system that transfers weight to the floor.
Using Underpowered Screws: People often use whatever screws they have lying around. For a heavy-duty build, you need screws with high shear strength. Standard drywall screws are brittle and can snap under tension. Use structural screws or lag bolts for the wall mounting.
Ignoring Wood Movement: Wood is a living material. It expands and contracts with changes in humidity. If you secure your desktop too tightly without allowing for slight movement, the wood may crack or warp. Using hardware that allows for a tiny bit of play—or choosing very stable wood like White Oak—can mitigate this risk.
Limitations: When This May Not Be Ideal
As great as a folding desk is, it isn’t the solution for every scenario. It is important to be realistic about what a wall-mounted surface can and cannot do. Understanding these boundaries will help you decide if this build is right for you.
First, environmental limitations are a factor. If you have extremely old walls—such as lath and plaster in a 100-year-old home—finding secure mounting points can be a nightmare. You might need to build a “frame-on-wall” system first to provide the necessary support. Similarly, if you live in a rental, your landlord might not appreciate four giant lag bolt holes in the studs.
Second, there are weight boundaries. While “heavy-duty” is a relative term, you shouldn’t treat a folding desk like a car jack. Putting 500 pounds on the very edge of the desk creates an incredible amount of leverage on the wall brackets. If you need to support massive weights (like an engine block), a stationary workbench with four legs to the floor is always going to be safer.
Comparison: Store Fragile vs. Timber Tough
Let’s look at how a custom build stacks up against the typical “flat-pack” option you find online. The difference isn’t just cosmetic; it is structural.
| Feature | Store Fragile (MDF/Particle Board) | Timber Tough (DIY Solid Wood) |
|---|---|---|
| Main Material | Compressed wood fibers and glue | Solid Oak, Maple, or Walnut |
| Weight Capacity | 30–50 lbs (typically) | 150–500+ lbs (with proper hardware) |
| Lifespan | 3–7 years | 25–50+ years |
| Repairability | None (peels/bubbles if wet) | High (sand, stain, and reseal) |
| Vibration Stability | Low (rattles when typing) | High (deadens sound and movement) |
Practical Tips and Best Practices
Getting the desk on the wall is half the battle. Making it a joy to use is the other half. These small adjustments and techniques can turn a basic DIY project into a professional-grade workstation.
Cable Management is Key: A folding desk looks messy if wires are dangling everywhere when it is collapsed. Install a cable tray or use adhesive clips on the underside of the desk. You can also use “power grommets”—plugs that are recessed directly into the wood—to keep your chargers accessible but hidden.
Ergonomic Check: Before you bolt everything down, sit in your favorite office chair. Mimic your typing position. If you are tall, you might want your desk at 31 inches. If you are shorter, 27 inches might be more comfortable. Take five minutes to get this right now, or your neck will pay for it later.
The “Blue Tape” Trick: Before you drill a single hole, use painter’s tape to outline the desk’s size on the wall. This helps you visualize how much space the desk will take up when it is open. You might realize that 24 inches of depth is too much for your hallway, allowing you to trim the wood before it is too late.
Advanced Considerations: Beyond the Basics
For the serious practitioner, there are ways to scale this build for even higher performance. If you want a desk that feels like a piece of high-tech gear, consider these advanced modifications.
Gas Strut Integration: Some heavy-duty folding desks use gas struts (like the ones on a car’s trunk) to assist with the lifting. This is particularly useful if you are using a very heavy hardwood slab like 2-inch thick Walnut. The struts provide a “soft-close” and “soft-open” effect, preventing the desk from slamming down.
Integrated LED Lighting: Routing a channel into the back of the timber for an LED strip can provide beautiful bias lighting. This reduces eye strain during late-night work sessions and gives your DIY build a high-end, custom look. You can hide the power supply in your cable management tray for a seamless finish.
Structural Backer Boards: If your home has metal studs (common in modern high-rise apartments), you cannot simply use wood screws. You will need to use toggle bolts or, better yet, mount a large piece of 3/4-inch plywood to the wall first. This plywood acts as a “structural skin,” allowing you to attach your brackets anywhere on its surface with maximum strength.
Example Scenarios
How does this actually look in the real world? Let’s look at two common applications for the heavy-duty DIY folding desk.
The Garage Workshop Station
Imagine a 5-foot long folding workbench made from 1.5-inch thick Pine butcher block. It is mounted with brackets rated for 500 pounds. During the week, it stays folded against the wall, allowing the car to park in the garage. On the weekends, it flips up to support a miter saw, a drill press, and a heavy tool chest. The solid timber absorbs the vibration of the power tools, making for a safer, quieter workspace.
The Ultimate Home Office
In a small bedroom, a 36-inch wide White Oak desk is mounted at sitting height. It features an integrated power strip and a monitor arm bolted through the timber. Even with two 27-inch monitors and a heavy desktop computer, the desk doesn’t budge. When the workday ends, the monitors are swung back, and the desk folds flat, turning the office back into a relaxing bedroom in under 10 seconds.
Final Thoughts
Building a heavy-duty DIY folding desk is about more than just furniture. It is about refusing to settle for the “disposable” culture of modern retail. By choosing real timber and industrial hardware, you are creating a tool that will serve you for decades. You are investing in a workspace that respects your need for both strength and space.
The process of selecting the wood, sanding the grain, and securing the brackets to the wall builds a connection between you and your environment. You aren’t just an observer in your home; you are the architect. Whether you are a beginner or an experienced woodworker, this project offers a rewarding blend of utility and craftsmanship.
Go to your local timber yard. Feel the weight of the boards. Find the studs in your wall and commit to a build that won’t let you down. Stability isn’t a luxury—it’s the foundation of great work. Build it once, build it right, and enjoy the peace of mind that comes with a timber-tough workspace.
Sources
1 upliftdesk.com (https://www.upliftdesk.com/2-leg-standing-desk/) | 2 youtube.com (https://www.youtube.com/watch?v=P51Mm9x8Wo4) | 3 housefulofhandmade.com (https://housefulofhandmade.com/diy-fold-away-desk-from-2x4s/) | 4 localcolorxc.com (http://www.localcolorxc.com/diy-blog/2016/1/17/forget-ikea-build-your-own-folding-desk) | 5 pithandstem.com (https://pithandstem.com/droptop/) | 6 artandcraftfurniture.com (https://artandcraftfurniture.com/blogs/news/5-reasons-why-solid-wood-furniture-lasts-longer-than-engineered-furniture) | 7 holdithome.com (https://holdithome.com/products/best-wood-for-desktop/) | 8 youtube.com (https://www.youtube.com/watch?v=J6MlyOv5NSY) | 9 newenglandtablecompany.com (https://www.newenglandtablecompany.com/article/Is%20furniture%20built%20to%20last) | 10 plankville.co.nz (https://plankville.co.nz/blogs/custom-timber-vs-off-the-shelf-furniture) | 11 duffieldtimber.com (https://duffieldtimber.com/the-workbench/furniture/best-types-of-wood-for-an-office-desk) | 12 lowes.com (https://www.lowes.com/n/how-to/anchor-furniture) | 13 abutterflyhouse.com (https://abutterflyhouse.com/wall-anchor-vs-stud/) | 14 walabot.com (https://walabot.com/blogs/guides/do-wall-mounted-folding-desks-go-in-drywall) | 15 reddit.com (https://www.reddit.com/r/HomeImprovement/comments/1llyiy/how_do_i_install_a_wall_mounted_desk_into_drywall/) | 16 jarrimber.com.au (https://www.jarrimber.com.au/blog/manufactured-wood-vs-solid-wood-furniture/) | 17 gocodeoverland.com (https://gocodeoverland.com/blogs/news/heavy-duty-vs-standard-folding-brackets-whats-the-real-difference-1) | 18 gocodeoverland.com (https://gocodeoverland.com/blogs/news/weight-capacity-guide-how-much-can-your-folding-bracket-really-hold-1)