Integrating Driftwood Lighting Into Home Architecture
Your lighting shouldn’t look like an afterthought; it should look like it grew there. Most lamps are just objects taking up space, tethered to the wall by a cord. But when you use the vertical architecture of driftwood, the light becomes part of the room’s skeleton. It’s the difference between a gadget and a sanctuary. Why clutter your home when you can integrate it with the wild?
Integrating Driftwood Lighting Into Home Architecture
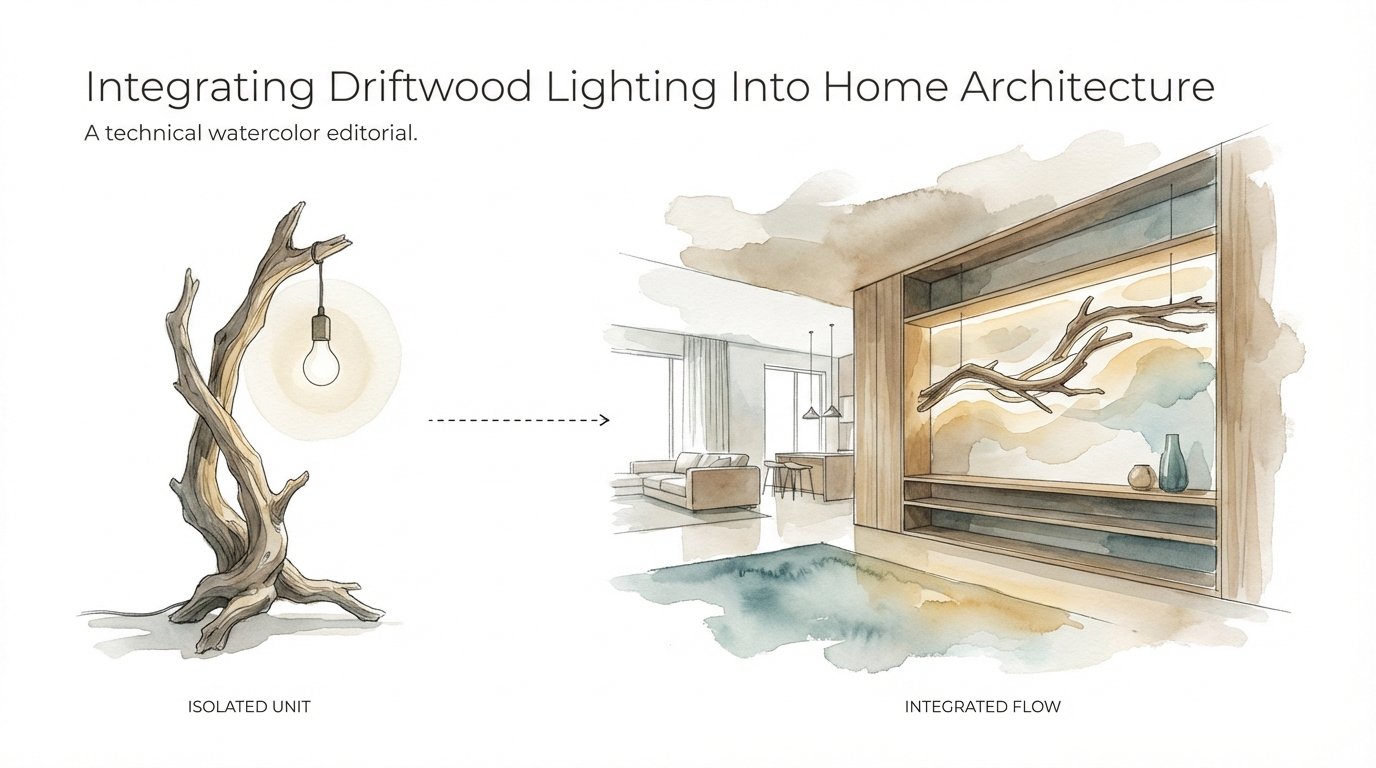
Integrating driftwood lighting into your home’s architecture is about moving beyond the concept of a “lamp” as a standalone product. In traditional interior design, we often deal with an **Isolated Unit**—a fixture purchased from a box, plugged into a socket, and placed on a surface. Architectural integration, however, pursues an **Integrated Flow**, where the illumination originates from the very textures and structures that define the room.
Driftwood serves as the perfect medium for this because it is already a product of structural struggle. Shaped by salt, current, and time, these pieces of wood possess a density and aesthetic “grit” that manufactured materials cannot replicate. When you mount a six-foot branch of sun-bleached cedar directly into a ceiling joist and embed hidden LED channels within its fissures, you aren’t just adding a light; you are extending the home’s anatomy.
This approach is increasingly utilized in modern coastal and rustic-modern designs where the goal is **biophilic connectivity**. Research shows that incorporating natural wood grains and organic shapes into living spaces can reduce stress levels and lower heart rates by mimicking the complexity of the natural world. Instead of a sterile, flat ceiling, an integrated driftwood fixture provides a multisensory experience that grounds the inhabitants in their environment.
How to Do It: From Beach to Beam
The process of turning a raw piece of ocean-tossed wood into a safe, functional architectural element requires patience and a specific sequence of labor. You cannot simply pull a log from the sand and screw it to your wall; it must be stabilized and hollowed with precision.
1. Sourcing and Sterilization
First, find wood that has “good bones.” Look for pieces that are structurally sound, avoiding anything with a soft, punky core. Once you bring it home, you must neutralize any hidden guests. Pests and fungal spores are common in beach-combed finds. A mixture of one part bleach to ten parts water is often used to soak the wood for at least 24 hours to ensure it is sanitary for indoor use. For larger architectural pieces that cannot fit in a tub, a thorough scrubbing with a stiff-bristle brush and a soda-ash solution is recommended to neutralize odors and lift deep-seated grime.
2. Curing and Drying
Moisture is the enemy of electrical stability. After cleaning, the wood must dry completely in a well-ventilated area away from direct sunlight to prevent warping. This “curing” phase can take weeks depending on the thickness of the wood. A moisture meter is a valuable tool here; you want the internal moisture content to be below 10% before you begin drilling or routing.
3. Routing the Veins
To achieve an integrated look, the wiring must be invisible. Using a plunge router or a Dremel with a high-speed carving bit, you can create “veins” or channels along the backside of the driftwood. These channels should be deep enough to house low-voltage LED tape or 18-gauge wire without it protruding. For thick branches, a long-shaft spade bit can be used to tunnel through the center, allowing the wire to pass through the “marrow” of the wood.
4. Electrical Integration
Modern LED technology has revolutionized this craft. Because LEDs emit very little heat compared to traditional incandescent bulbs, they can be safely embedded directly into wood channels. Use high-density LED strips with a high Color Rendering Index (CRI) to ensure the light brings out the natural reds and golds of the wood grain. For a more “pioneer” look, you can use threaded pendant kits with braided cloth cords, wrapping them naturally around the wood’s limbs so the cordage looks like part of the rigging on a ship.
Benefits of Integrated Driftwood Lighting
The most immediate benefit is the psychological impact of **biophilic design**. Unlike a flat, plastic light fixture, a driftwood installation introduces “fractal fluency”—the visual patterns that our brains are evolved to process with ease. This leads to a measurable reduction in cognitive fatigue.
Another advantage is the **sustainability factor**. By repurposing materials that have been naturally discarded by the ecosystem, you are bypassing the industrial manufacturing chain. Every piece of driftwood is a carbon-sequestering object that would otherwise decompose or be burned; instead, it becomes a permanent part of your home’s story.
From a practical design standpoint, driftwood lighting offers **unparalleled customizability**. You aren’t limited by the dimensions of a showroom lamp. If you have a vaulted ceiling that feels too empty, a sprawling driftwood chandelier can fill that volume with a lightweight, airy presence that a heavy wrought-iron fixture could never achieve.
Challenges and Common Mistakes
The irregular shape of driftwood is its greatest beauty and its biggest headache. One common mistake is failing to account for **structural balance**. A piece of wood may look symmetrical, but its density can vary wildly from one end to the other. If you hang a large piece from two points without finding its center of gravity, it will perpetually tilt, putting uneven stress on your mounting hardware.
Another pitfall is **improper sealing**. Driftwood is extremely porous. If left unsealed, it will absorb household oils, dust, and humidity, which can lead to localized rot or discoloration over time. Use a matte-finish polyurethane or a natural tung oil to “lock” the wood without giving it an artificial, plastic shine.
Finally, never overlook **heat dissipation**. While LEDs are cool, the “drivers” or transformers that power them can get hot. Hiding a transformer inside a hollowed-out cavity in the wood without ventilation is a fire hazard. Always mount your power supplies in a metal junction box within the wall or ceiling, or ensure the cavity has enough airflow to prevent heat buildup.
Limitations: When This May Not Work
While driftwood is versatile, it isn’t always the right choice for every room. In environments with **extreme humidity fluctuations**, such as a poorly ventilated bathroom, even treated driftwood can expand and contract enough to crack the delicate LED strips embedded within it.
Furthermore, driftwood is rarely suitable for **task lighting**. If you need a bright, focused beam for chopping vegetables or reading fine print, the shadows cast by the wood’s irregular limbs will be frustrating. Driftwood is best utilized for ambient, accent, or “mood” lighting where the play of light and shadow is the intended effect, rather than a bug.
Comparing Integrated Driftwood to Standard Fixtures
| Factor | Standard Box Fixture | Integrated Driftwood |
|---|---|---|
| Cost | Medium to High | Low (Material) to High (Labor) |
| Installation | Simple / Plug-and-Play | Complex / Requires Carpentry |
| Lifespan | 10-15 Years | Lifetime (if maintained) |
| Aesthetic | Uniform / Mass-produced | Unique / Organic |
| Flexibility | Limited to cord length | Infinite architectural options |
Practical Tips for the Modern Pioneer
- Use a Stud Finder: Never trust drywall alone to hold the weight of a significant driftwood limb. Architectural integration means the wood becomes a part of the house; screw directly into the framing.
- Conceal with Moss: If you have a small gap where the wood meets the wall, use preserved reindeer moss to bridge the divide. It hides the mounting hardware and enhances the “grown there” look.
- Choose the Right Bulbs: Stick to 2700K or 3000K color temperatures. The blue light of “Daylight” bulbs (5000K+) will make natural driftwood look gray and sickly. Warm light makes the texture pop.
- Dimmability is Key: Because driftwood lighting is about atmosphere, always use a dimmable driver. The ability to drop the light to a “candlelight” level transforms the wood into a glowing ember at night.
Advanced Considerations for Serious Practitioners
For those looking to take this further, consider **smart home integration**. Using Zigbee or Z-Wave controllers, you can program your driftwood light to mimic the cycle of the sun—shifting from a bright, cool glow in the morning to a deep, amber hue as evening approaches. This aligns with your circadian rhythm and maximizes the biophilic benefits.
Think about **structural driftwood** as well. In some custom builds, large-diameter driftwood logs have been used as non-load-bearing “faux” beams. By hollowing out the top of the beam and installing upward-facing LEDs, you create a “cove lighting” effect that makes the ceiling appear to float, removing the need for any visible light bulbs at all.
Examples of Architectural Success
Imagine a dark, narrow hallway that feels like a tunnel. Instead of a series of recessed cans in the ceiling, a designer installs a ten-foot, sun-bleached branch of ghost wood along the upper corner where the wall meets the ceiling. LED tape is hidden on the “top” side of the branch, reflecting light off the white ceiling. The result is a soft, indirect glow that feels like sunlight filtering through a canopy.
In another scenario, a kitchen island is illuminated by three pendant bulbs suspended from a single, gnarled piece of Manzanita driftwood. The wood is suspended by thin aircraft cables that disappear into the ceiling, making the entire heavy limb look as though it is levitating. The wiring is woven through the natural twists of the wood, hidden from view but easily accessible for maintenance.
Final Thoughts
Building with driftwood isn’t just a design choice; it’s a commitment to a different kind of living. It requires you to look at the “waste” of the natural world and see the structural potential hidden beneath the salt and sand. When you integrate these elements into your home, you’re breaking the cycle of disposable, plastic decor and replacing it with something that has survived the ocean’s fury.
The beauty of this approach lies in its honesty. You aren’t pretending that the light isn’t there, but you are refusing to let it be a mere gadget. By making the light a part of the room’s skeleton, you create a sanctuary that feels ancient and modern all at once. Take the time to find the right piece, treat it with respect, and let it illuminate your home in a way that feels as natural as the sunrise.
Sources
1 veranda.com (https://www.veranda.com/decorating-ideas/advice-from-designers/a69514939/lighting-trends-2026/) | 2 goodearthplants.com (https://goodearthplants.com/wood-as-a-biophilic-element/) | 3 powerpartnermn.com (https://www.powerpartnermn.com/holiday-electrical-safety-tips-how-to-plan-for-lighting-and-decor/) | 4 dksstores.com (https://vertexaisearch.cloud.google.com/grounding-api-redirect/AUZIYQHIvq_zYkt3Kw504R_u8K5Debz8rwSLAXvZY-n0BNlRZTm9CjODFdSsnNxmMdUuWUhuVh6krbY-Hfy2T8QpZR2uGYRMM_ADLAl42UdCf2RdzQvT76Tba3_pQi_aUg==) | 5 warriorwoodworkingaz.com (https://www.warriorwoodworkingaz.com/post/incorporating-led-lighting-into-your-wood-wall-design-tips-and-tricks) | 6 dtwooddecor.com (https://www.dtwooddecor.com/driftwood-coffee-table-care-and-maintenance/)