Passive Root Cooling With Driftwood Vs Electric Systems
Stop paying for electricity to fight the heat when the ocean has provided a passive thermal battery for your roots. Most coastal gardens die from ‘cooked roots’ long before the leaves wilt. Instead of fighting the sun with high-energy cooling, the resilient cottage gardener uses the thermal mass of driftwood. These sea-cured logs hold moisture and maintain a steady, cool temperature underground, regardless of the heatwave above.
[affiai]Many gardeners spend their summers tethered to a hose or watching their utility bill climb as they run misting systems and electric fans to save a few tomatoes. There is a quieter, older way to manage the brutal heat of a coastal summer. By looking to the shoreline, you can find the very tools needed to build a garden that breathes with the tide and laughs at the sun.
This method is not about flashy technology or expensive gadgets. It is about understanding the simple physics of the earth. When you bury heavy, seasoned timber beneath your soil, you are creating a subterranean reservoir. This reservoir does more than just hold water; it acts as a thermal anchor, keeping the delicate rhizosphere of your plants at a consistent, life-saving temperature while the surface air sizzles.
Passive Root Cooling With Driftwood Vs Electric Systems
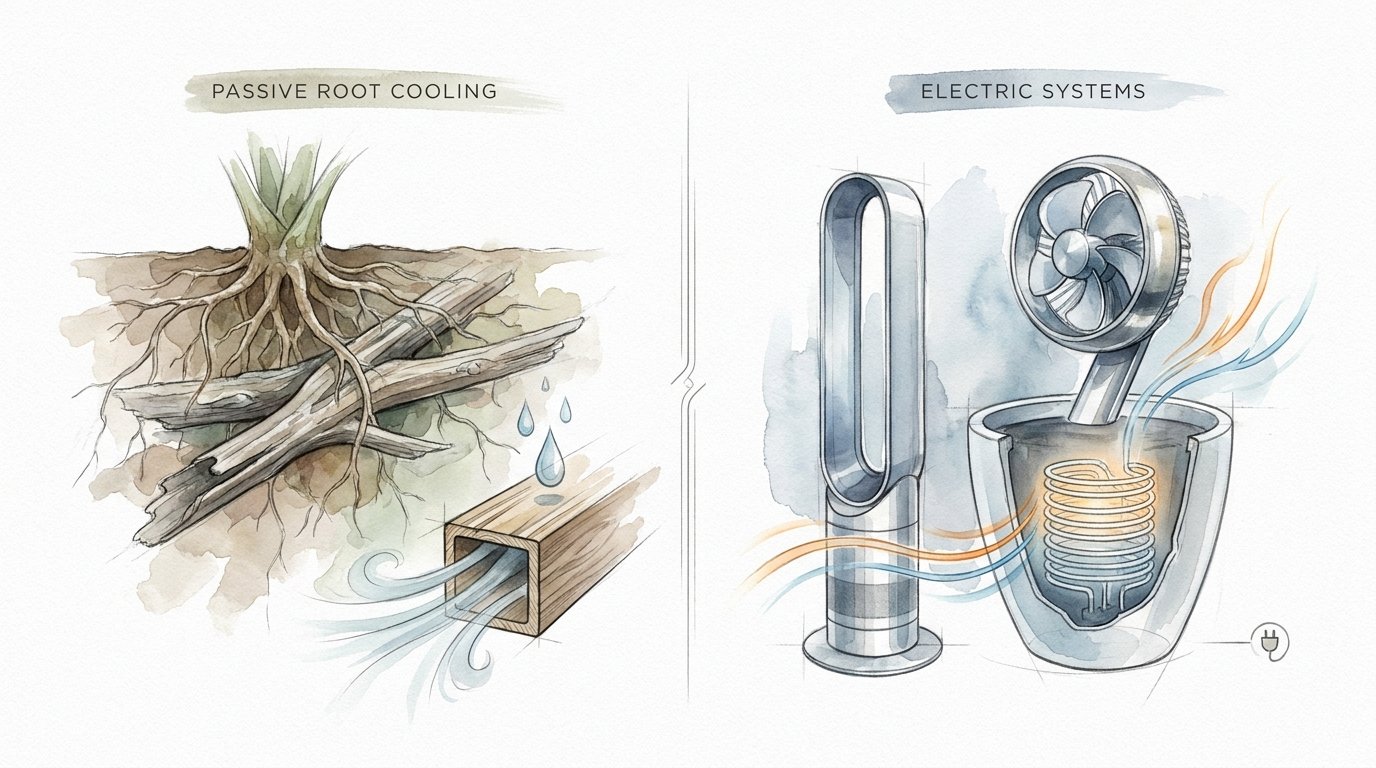
Passive root cooling is the practice of using natural materials with high thermal mass to regulate the temperature of the soil where plant roots live. Unlike active cooling, which relies on mechanical force to move air or water, passive systems use the inherent properties of the material itself. In the case of driftwood, we are utilizing “sea-cured” timber that has spent years absorbing minerals and being shaped by the elements.
Electric systems, such as misting lines or soil-cooling fans, are the modern answer to garden heat. They work by using evaporation and forced convection to pull heat away from the plant. While effective in the short term, these systems are fragile. They require a constant supply of energy and water, and they fail the moment the power goes out or a nozzle clogs. They treat the symptoms of heat, but they do not change the environment of the root zone.
Driftwood burial, often referred to as a coastal variation of Hugelkultur, changes the fundamental structure of the ground. When a log is buried, it becomes a massive thermal battery. Because wood is a poor conductor of heat but a great holder of moisture, it takes a tremendous amount of energy to change its internal temperature. While the top three inches of sandy coastal soil might reach 110 degrees Fahrenheit in the midday sun, the soil directly surrounding a buried driftwood log remains significantly cooler, often hovering in the 70s. This temperature gradient is what allows a “resilient cottage garden” to survive a heatwave that would kill a standard raised bed.
The Mechanics of the Subterranean Sponge: How It Works
The process of using driftwood for cooling is a multi-stage endeavor that begins at the tide line and ends deep beneath your mulch. It is a slow-motion transformation that requires patience and a bit of “pioneer grit” to execute correctly.
Sourcing and Leaching the Salt
The first challenge with driftwood is the sea salt. Salt is a desiccant; if you bury a fresh piece of salt-saturated driftwood directly under your roses, you will likely kill them. The wood must be leached. This is the process of replacing the sodium trapped in the wood fibers with fresh water.
The best driftwood for this purpose is wood that has been “sun-bleached” and sitting above the high-tide line for several seasons. Nature has already started the work for you. To finish it, you must soak the timber. A seasoned gardener will often leave their driftwood out in the open air for a full winter of rain, or submerge it in a freshwater stock tank for several weeks, changing the water whenever it becomes tea-colored or “brackish.”
The Burial Process
Once the wood is leached, the actual construction begins. You aren’t just tossing a log in a hole; you are building a biological machine.
- The Trench: Dig a trench at least 18 to 24 inches deep. This depth ensures the wood is far enough below the surface to stay insulated from the sun’s direct radiation.
- The Placement: Lay the heaviest logs at the bottom. These are your primary batteries. Fill the gaps between the large logs with smaller branches, “sea-bleached” sticks, and organic debris.
- Eliminating Air Pockets: This is a critical step. Air pockets act as insulation in the wrong way—they can cause “air pruning” where roots stop growing because they hit a void. Pack native soil, compost, and perhaps some leaf mold into every crevice.
- The Soil Cap: Finish with at least 6 to 10 inches of high-quality topsoil. This acts as the buffer zone where the plants will initially establish themselves before their roots find the cool, damp timber below.
Thermal Stability and Moisture Wicking
Once buried, the driftwood begins its second life as a sponge. During the rainy season, the wood fibers swell as they absorb water. Because the wood is buried deep, this water does not evaporate. During the height of summer, the wood slowly releases this moisture through capillary action into the surrounding soil. This “slow-leak” irrigation keeps the roots hydrated and, more importantly, keeps the soil temperature stable through the latent heat of evaporation occurring within the wood itself.
The Long-Term Benefits of Timber Burial
The advantages of this method extend far beyond a single summer. While an electric cooling system is a recurring expense, a driftwood bed is a long-term investment in soil health and resilience.
1. Massive Reduction in Water Usage: After the first two years of establishment, many driftwood-based beds require almost no supplemental irrigation, even in coastal environments. The wood holds enough “banked” water to carry the plants through several weeks of drought.
2. Microbial Infrastructure: Decomposing wood is the preferred habitat for mycorrhizal fungi. These fungi form a symbiotic relationship with plant roots, extending their reach and helping them pull nutrients and water from the wood fibers. This creates a living network that makes the plants naturally more robust.
3. Carbon Sequestration: By burying wood, you are locking carbon into the soil for decades. As the wood slowly breaks down into humus, it improves the cation exchange capacity (CEC) of the soil, meaning your garden becomes better at holding onto nutrients instead of letting them leach away through sandy coastal soil.
4. Wind Resistance: Coastal gardens often suffer from “salt spray” and high winds. Plants grown in a driftwood-cooled bed often develop deeper, more extensive root systems as they seek the moisture in the timber. This deep anchoring makes them much less likely to be uprooted during a storm.
Common Mistakes and Practical Pitfalls
Even the most seasoned pioneer can run into trouble if they rush the process. Most failures in driftwood gardening come from a lack of preparation or a misunderstanding of the wood’s chemistry.
The “Salt-Wilt” Error: The most common mistake is failing to properly leach the wood. If your plants look “burnt” or “crispy” shortly after planting, check your soil salinity. High salt levels pull moisture out of the roots, effectively dehydrating the plant even if the soil is wet. Always test your wood or the soil around it before planting sensitive crops like strawberries or leafy greens.
The Nitrogen Tie-Up: As wood decomposes, the bacteria doing the work require nitrogen. If you bury “fresh” or “green” wood, those bacteria may steal all the available nitrogen from the soil to break down the carbon in the wood, leaving your plants yellow and stunted. The solution is to add a high-nitrogen amendment—like well-rotted manure or blood meal—when you first build the bed.
The Sinkhole Effect: Wood rots. It is supposed to. However, as it rots, it loses volume. If you don’t pack your soil tightly during the initial build, you may find your garden bed “collapsing” or developing large holes after a heavy rain. Always overbuild the height of your bed initially, knowing it will settle by 20-30% over the first year.
Limitations: When Driftwood Is Not the Answer
While this technique is a powerful tool for the coastal cottage gardener, it is not a universal solution. There are specific environmental constraints where burying timber may cause more harm than good.
Poorly Draining Clay: If your garden sits on heavy, “greasy” clay that holds water like a bathtub, burying driftwood can create a swamp. Instead of a cool thermal battery, you end up with a pit of anaerobic rot that will drown your plant roots and produce a foul “rotten egg” smell. In these conditions, mounded Hugelkultur above the ground is better than sunken burial.
Termite Territories: In areas with high subterranean termite pressure, burying large amounts of wood directly against your home’s foundation is an invitation for trouble. Always keep driftwood-cooled beds at a safe distance from permanent wooden structures.
Regulatory Restrictions: Many coastal areas have strict laws regarding the removal of driftwood from beaches. Driftwood serves as a vital habitat for coastal birds and insects, and it helps prevent beach erosion. Always check local ordinances before harvesting timber from the shore. In many cases, it is better to “harvest” wood from inland storms or local tree trimmers and use the driftwood concept as a design philosophy rather than literally taking wood from the beach.
Comparing Passive Timber vs Active Electric Cooling
To understand the value of this approach, it helps to look at the measurable differences in a direct comparison.
| Factor | Passive Driftwood Burial | Electric Cooling Systems |
|---|---|---|
| Initial Cost | Low (Labor intensive, but materials are free) | Medium to High (Pumps, timers, nozzles) |
| Operating Cost | $0 (Powered by the sun and rain) | Monthly utility cost for power and water |
| Maintenance | Minimal (Occasional soil topping) | High (Cleaning nozzles, replacing pumps) |
| Thermal Effect | Steady, long-term root zone stability | Rapid, surface-level cooling only |
| Soil Health | Builds organic matter and fungi | None (May lead to salt buildup from tap water) |
| Lifespan | 10 to 20 years per installation | 2 to 5 years before hardware failure |
Practical Tips for the Resilient Gardener
Building a thermal battery is as much an art as it is a science. Here are a few “best practices” to ensure your garden thrives in the face of the heat.
- Char the Wood: If you are worried about rapid rot or termites, lightly char the outside of your driftwood logs before burying them. This “Yakisugi” style treatment creates a layer of carbon that resists rot and pests while still allowing the wood to hold moisture.
- Use Pioneer Species First: For the first year of a new driftwood bed, plant “hardy” crops like beans or peas. These plants fix nitrogen in the soil, which helps offset any nitrogen tie-up from the decomposing wood.
- The “Vertical Log” Trick: If you cannot dig a full trench, bury a few logs vertically so that the top few inches are exposed above the soil. This acts as a “wick” that pulls rainwater directly down into the deeper soil layers during a storm.
- Mix Your Woods: Use a combination of “hardwoods” (which last a long time) and “softwoods” (which break down quickly). This ensures that your garden gets an immediate boost of nutrients from the softwood and a long-term thermal battery from the hardwood.
Advanced Considerations: The Physics of Thermal Mass
For the serious practitioner, understanding why this works can help you tune the system for your specific climate. The effectiveness of a thermal battery is determined by its density and its moisture content.
Water has a very high “specific heat capacity,” meaning it takes a lot of energy to raise its temperature. Wood, especially when it is partially decomposed, is essentially a series of microscopic tubes (xylem) that are perfect for holding water. When you bury driftwood, you aren’t just burying wood; you are burying a massive block of “contained water.”
In a desert-coastal environment, where the day-to-night temperature swing can be 40 degrees or more, this mass acts as a “phase shifter.” It absorbs the heat of the day but doesn’t release it into the root zone until well after the sun has set, at which point the air is cool again. This results in a root zone that stays within a 5-degree window, regardless of what the thermometer on the porch says.
Example Scenario: The Sun-Drenched Coastal Patch
Consider a gardener on the central coast of California. The soil is 80% sand, and the afternoon sun is relentless. They have a 10×10 patch where they want to grow heirloom tomatoes and perennial herbs.
Instead of a standard raised bed, they dig a trench 2 feet deep. They harvest three large logs of sun-bleached cypress driftwood that have been sitting above the tide line for a year. They soak these logs in a freshwater pond for two weeks, then bury them with a mixture of native sand and store-bought compost. They add a few pounds of alfalfa meal to boost nitrogen.
By year two, the tomatoes in this patch require watering only once every ten days, even in July. When the neighbor’s tomatoes are wilting and dropping their blossoms due to “heat stress,” this garden remains vibrant. The gardener notices that the soil 6 inches down feels cool to the touch at 2 PM, while the surface sand is hot enough to sting. This is the thermal battery in action.
Final Thoughts
The modern world teaches us to solve environmental problems with more consumption—more electricity, more plastic, more complex systems. But the “resilient cottage gardener” knows that the most effective solutions are often found in the debris left behind by the sea. Driftwood is more than just a decorative accent for a mantle; it is a gift from the ocean that, when used with intent, can transform the very foundation of your garden.
By burying these sea-cured logs, you are building a legacy of soil health that will feed your plants and cool their roots long after the electric fans have rusted away. It is a return to a “pioneer-grit” way of thinking, where we observe the patterns of nature and use them to our advantage.
Take a walk along the shore after the next big storm. Look past the beauty of the silvered wood and see the potential for a self-watering, self-cooling garden. With a bit of sweat equity and a lot of patience, you can build a thermal battery that will protect your garden for decades to come. Experiment with different depths, different wood types, and different placements. The ocean has given you the tools; the rest is up to your hands and your heart.
Sources
1 youtube.com (https://www.youtube.com/watch?v=txuz80_g0wg) | 2 youtube.com (https://www.youtube.com/watch?v=2CFfw5OXWM0) | 3 rimol.com (https://rimol.com/posts/passive-vs-active-greenhouse-ventilation-/) | 4 wikihow.com (https://www.wikihow.com/Clean-Driftwood) | 5 monsterfishkeepers.com (https://www.monsterfishkeepers.com/forums/threads/how-do-i-ensure-a-driftwood-does-not-leach-tanins-and-stain-my-water.360015/) | 6 youtube.com (https://www.youtube.com/watch?v=LB9kW1EFqTo) | 7 permies.com (https://permies.com/t/52077/Buried-Wood-Beds) | 8 reddit.com (https://www.reddit.com/r/Permaculture/comments/kd8oab/common_hugelkultur_errors_and_how_to_fix_them/) | 9 youtube.com (https://www.youtube.com/watch?v=CdnJs9X7u64) | 10 waldeneffect.org (https://www.waldeneffect.org/blog/Hugelkultur/) | 11 houzz.com (https://www.houzz.com/discussions/2162823/how-to-sterizilize-driftwood) | 12 nih.gov (https://pmc.ncbi.nlm.nih.gov/articles/PMC10940466/) | 13 davesgarden.com (https://davesgarden.com/community/forums/t/1287912/)