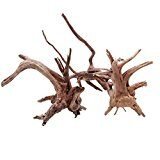
Small Aquarium Driftwood (3-6 Inches)
Small Aquarium Driftwood (3-6 Inches)


Product Description
Though most driftwood will remain submerged underwater, some driftwood remains slightly buoyant until it is fully saturated and “waterlogged.” Soak the driftwood in a large bucket as long as possible making sure the entire piece is completely underwater. A minimum period of 1 to 2 weeks is recommended to allow total saturation. Soaking also allows excess tannins that can darken and discolor the water, to leach out. The discoloration caused by the tannins will not harm your aquarium inhabitants but it will lower the pH slightly over time. Some hobbyists take advantage of this feature and utilize the tannins to achieve soft water conditions preferred by many tropical fish. Bleeding Heart Tetras Monitor the soaking driftwood regularly to see if the water needs to be changed. As the water darkens, empty all of the water and gently rinse the driftwood. Fill the bucket with clean dechlorinated or RO water and continue soaking the driftwood. As you repeat this process, you will notice that the water will be less “tea-stained.” When you no longer notice any significant discoloration for several days in a row, the driftwood is ready for placement. Boiling Driftwood: Boiling driftwood has several benefits. Just like steeping a tea bag in hot water, boiling driftwood in a large stockpot encourages more tannins to leech out faster, thereby shortening the curing process. More importantly, boiling sterilizes the driftwood, killing algal or fungal spores that can take hold once introduced into the aquarium with the driftwood. Boiling the driftwood for 1-2 hours will sterilize the driftwood.
Price: $3.95
- You get one untreated driftwood (3-6 Inches) for aquariums
- Give your fish tank a natural aquatic look
- Perfect for attaching anubias, java ferns or mosses
- Provides hiding places for small fish and invertebrates
- Please note the wood will need to be cured to acclimate to water. Please read description below


Great Tips On Home Improvement And How To Get Started
A belief system called Feng Shui suggests that if you rearrange your furniture, the alignment of the room’s spiritual forces will change. You may have better luck by using feng shui in your decorating technique. Read on for more ideas about using feng shui in your home.
Sign a contract before a contractor starts working on your home. You may even be better off if the contract is looked over by an attorney before the first hammer is raised. Beginning and end dates, guarantees, deadlines, cost and the work that will be performed should be defined.
Change your door hinge as a start to your home improvement projects. It’s easy to buy door hinges at any home improvement center. Just take the hinge off and attach the new hinge on the door and then the frame. After that, just get your hinge pieces aligned and your pins replaced.
For any home improvement project, be crafty and determine exactly what you want the outcome to be, prior to starting. By doing this, once you’ve started a project, you can put your complete focus on the build, not on design decisions. Talk to friends and family before you engage in a home improvement project.
When it comes to home improvement projects, having fun is essential. While you should be careful, you should also enjoy yourself. In fact, viewing your project as a chore can make you more prone to mistakes. Think about finding a professional to do the job for you if cannot do it yourself.
Exploring and trying out the ideas of feng shui can improve the look of your home by arranging your belongings in a pleasing manner and perhaps even increasing your good fortune. This is considered a type of home improvement, since moving your furniture can provide your home with a new look.