Sustainable Diy Driftwood Lighting Guide
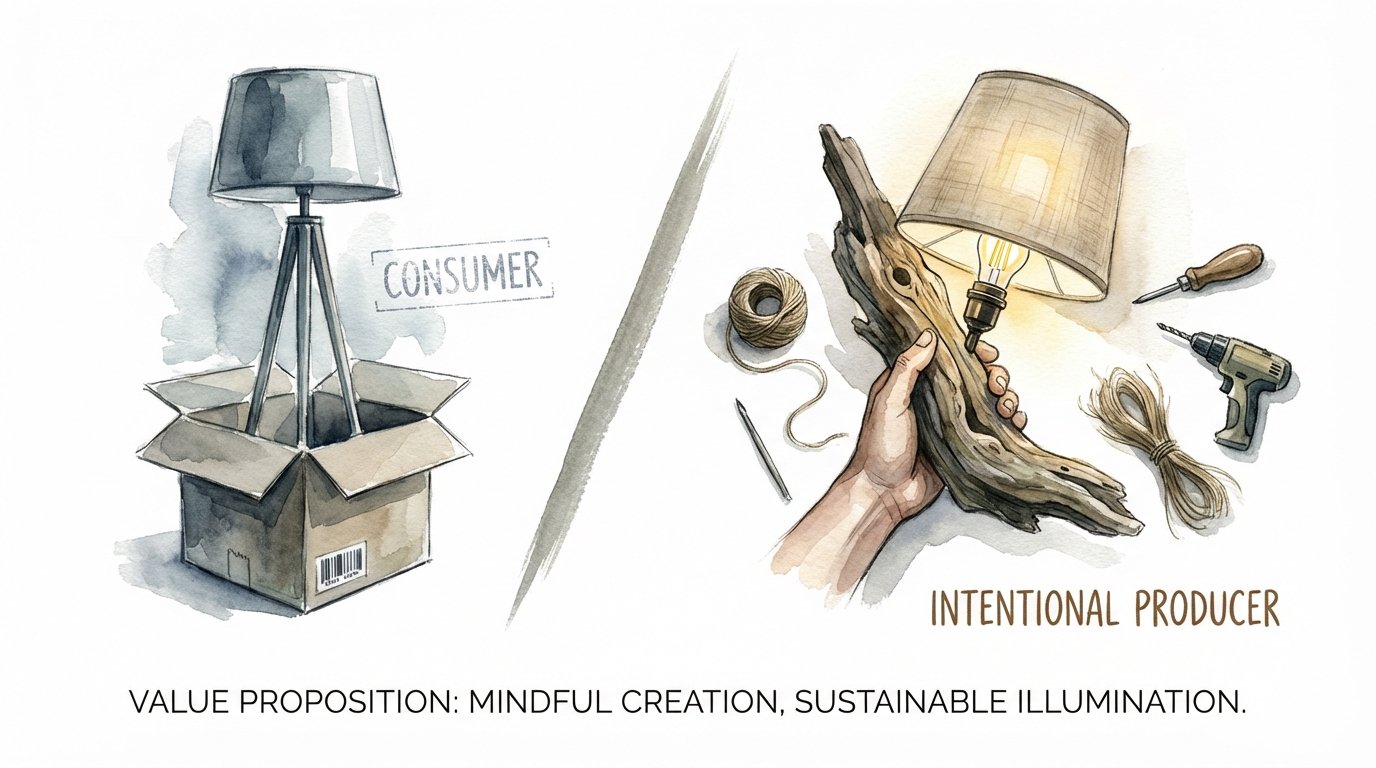
In a world of disposable goods, you can either buy a replacement or harvest a legacy. The most beautiful thing in your home shouldn’t be something you found in a catalog. It should be something you rescued from the tide. Break the consumer cycle and start producing your own atmosphere.
Bringing a piece of the coast into your living space is more than just a design choice; it is an act of reclaiming the discarded. When you pick up a piece of wood that has been tumbled by the sea and seasoned by the sun, you are looking at a story. Turning that story into a functional source of light bridges the gap between the anonymous consumer and the intentional producer.
This guide will walk you through the grit and the glory of crafting your own driftwood lighting. We will cover everything from the initial beachcombing to the final electrical connections, ensuring your creation is as safe as it is striking.
Sustainable Diy Driftwood Lighting Guide
Sustainable DIY driftwood lighting is the practice of repurposing weathered wood found in nature—specifically along coastlines, riverbanks, and lake shores—to create unique, eco-friendly light fixtures. Unlike mass-produced lamps made of plastic or unsustainable timber, these pieces utilize materials that have already been “processed” by the environment. The salt, water, and sun act as natural artisans, stripping away bark and softening edges until only the resilient hardwood core remains.
In real-world terms, this approach reduces the demand for new manufacturing and keeps natural debris from being treated as waste. It exists at the intersection of coastal decor and functional art. You might see a massive driftwood chandelier hanging in a high-end beach resort or a simple, gnarled table lamp in a quiet cottage. Both serve the same purpose: they provide light while anchoring the room in a natural, grounded aesthetic.
Think of it like this: a store-bought lamp is a finished product with zero history. A driftwood lamp is a collaboration between you and the ocean. It requires patience to find the right piece and the skill to wire it, but the result is a fixture that can never be replicated by a machine.
Sourcing and Preparing Your Reclaimed Wood
The first step in any sustainable lighting project is the hunt. You aren’t just looking for any stick; you are looking for hardwood that has survived the elements. Hardwoods like oak, maple, or even cypress are ideal because they retain their structural integrity even after years in the water. Avoid softwoods like pine, which tend to crumble or rot more quickly when exposed to moisture.
Once you have found your piece, you cannot simply bring it inside and plug it in. Driftwood is often home to microscopic organisms, sand gnats, and various mites. You must clean and stabilize the wood before it becomes a permanent part of your home.
- Initial Cleaning: Use a stiff brush and fresh water to scrub away loose sand, mud, and salt. A nail brush works well for getting into the tight crevices and knots.
- The Disinfecting Soak: Submerge the wood in a solution of one part bleach to ten parts water. Let it soak for 24 to 48 hours to kill any bacteria or pests. If you prefer a chemical-free approach, you can use a concentrated soda bath using washing soda, though this may take longer to penetrate the wood.
- Drying: This is the most critical stage. Driftwood must be completely dry before you apply any finish or begin drilling. Leave it in a sunny, low-humidity spot for at least a week. For smaller pieces, some crafters use a low-heat oven (around 200 degrees Fahrenheit) for two to four hours to ensure all moisture and remaining larvae are gone.
How to Build Your Driftwood Lamp: Step-by-Step
Building a lamp requires a blend of woodworking and basic electrical skills. You will need a lamp kit, which typically includes a socket, a cord with a plug, and a threaded rod (the “pipe” the wire travels through).
1. Designing the Structure
Determine if your driftwood will be the primary support or if it will wrap around a central metal rod. For a “pioneer-grit” look, drilling directly through the wood is the most seamless method. If the wood is too gnarled to drill through entirely, you can secure the wire to the back of the wood using small insulated staples or carve a discreet channel along the grain.
2. Drilling the Wire Path
Using a long-shaft spade bit, drill a hole through the center of your wood piece. If the wood is long, you may need to drill from both ends and meet in the middle. Take your time; forcing the drill can split the wood, especially if there are hidden internal cracks.
3. Stabilizing the Base
Driftwood is rarely balanced. You will likely need a base made of a heavier material like a slab of reclaimed oak, a piece of stone, or even a heavy metal plate. Drill a hole through the base that aligns with the hole in your driftwood. Use a threaded lamp rod to connect the wood to the base, securing it with a washer and nut on the underside.
4. Wiring the Socket
Thread your lamp cord through the base and up through the driftwood. Strip about half an inch of insulation from the ends of the wires. Most modern lamp kits use “polarized” plugs—one prong is wider than the other. Ensure the ribbed wire (neutral) connects to the silver screw on the socket, and the smooth wire (hot) connects to the brass screw. Tighten the screws firmly and snap the socket shell into place.
Benefits of Handcrafted Lighting
Choosing to build your own driftwood lighting offers measurable advantages over buying commercial products. Beyond the obvious aesthetic appeal, there are practical reasons to embrace this craft.
Environmental Impact: You are actively reducing the carbon footprint associated with manufacturing, shipping, and packaging. Every piece of driftwood used is one less piece of virgin timber harvested.
Durability and Longevity: High-quality driftwood is incredibly dense. Because it has already been “stress-tested” by the ocean, it is less likely to warp or crack over time compared to cheap, kiln-dried pine found in many budget furniture stores.
Customization: You are the designer. You can choose the height, the number of bulbs, and the exact texture of the wood. This level of control ensures the light fixture fits your specific space perfectly, whether you need a narrow desk lamp or a sprawling floor lamp.
Challenges and Common Mistakes
Even experienced builders run into hurdles when working with natural materials. Driftwood is unpredictable, and treating it like standard dimensional lumber is a recipe for failure.
- The Stability Trap: Many beginners underestimate the top-heavy nature of driftwood. A lamp that looks beautiful but tips over at a slight breeze is a fire hazard. Always ensure your base is wide enough and heavy enough to counter the weight of the wood and the lampshade.
- Poor Cleaning Habits: Skipping the soak or drying phase can lead to “weeping” wood, where moisture trapped inside begins to rot or attract mold once the lamp is in a warm, indoor environment. Worse, dormant insect eggs can hatch weeks after you have finished the project.
- Wiring Safety: Never use a cord that has been nicked during the threading process. If the drill bit catches the wire, it can strip the insulation, leading to a short circuit. Always test your connections with a voltage tester before plugging the lamp into a wall outlet.
Limitations of Reclaimed Materials
While driftwood is a fantastic resource, it is not a universal solution for every lighting need. There are realistic constraints to consider.
One major limitation is legal. In many coastal regions, there are strict laws regarding the removal of driftwood, as it provides vital habitat for local ecosystems and helps prevent beach erosion. Always check local regulations before you start “harvesting” your materials.
Another constraint is the structural limit of the wood. Because driftwood is shaped by decay and erosion, some pieces may have internal “punky” spots that are soft and weak. These pieces cannot support the weight of a heavy harp and lampshade. Furthermore, if you are building a large-scale fixture like a chandelier, the sheer weight of multiple large driftwood branches may exceed the load-bearing capacity of standard ceiling boxes, requiring specialized mounting hardware.
Comparison: Handcrafted vs. Retail Lighting
| Factor | DIY Driftwood Lamp | Mass-Market Retail Lamp |
|---|---|---|
| Cost | Low (Cost of kit and base) | Moderate to High |
| Uniqueness | 100% Unique | Mass-Produced |
| Materials | Reclaimed Hardwood | Plastic, Metal, or Veneer |
| Assembly Time | 4–7 Days (Including drying) | Instant |
| Environmental Impact | Positive (Waste diversion) | Negative (Manufacturing footprint) |
Practical Tips for a Better Build
If you want your driftwood lamp to look like a professional piece of art rather than a high school science project, attention to detail is paramount.
- Choose the Right Shade: Natural wood pairs best with natural fabrics. Look for linen or burlap shades in neutral tones like sand, oatmeal, or slate gray. The texture of the shade should complement, not compete with, the texture of the wood.
- Finish Sustainably: Avoid high-gloss polyurethane, which can make the wood look like plastic. Instead, use a matte finish like Tung oil or Hemp oil. These oils penetrate the wood and protect it from within while maintaining the raw, “sun-bleached” appearance.
- Conceal the Cord: If you cannot drill through the center, use a dark-colored cord (brown or black) that mimics the shadows in the wood’s crevices. You can also use “rope cord” kits that wrap the wire in jute or hemp, allowing the cord to become a design element rather than an eyesore.
Advanced Considerations for Serious Crafters
For those looking to move beyond simple table lamps, the world of driftwood lighting gets much more complex. Scaling up to a chandelier or a wall-mounted sconce requires a deeper understanding of leverage and electrical distribution.
When creating a multi-light chandelier, you must consider the “spider” wiring method. This involves running individual wires from each light socket back to a central junction box hidden within or above the main piece of wood. This requires precision drilling and often the use of epoxy resin to hide the exit points of the wires.
Furthermore, consider the “aging” of the light itself. LED bulbs are non-negotiable for driftwood projects. Traditional incandescent bulbs produce significant heat, which can cause the wood to further dry out and potentially crack or, in extreme cases, create a fire risk. LEDs remain cool to the touch and offer various color temperatures—aim for a “warm white” (around 2700K) to highlight the golden and gray tones of the wood.
Project Scenario: The Weekend Floor Lamp
Imagine you found a five-foot-long piece of silver-gray cedar on a riverbank. It has a slight curve and a thick, sturdy base. Here is how you would turn that into a floor lamp in a single weekend (assuming the wood was already cleaned and dried).
On Saturday morning, you would start by squaring off the bottom of the wood with a hand saw so it sits flush against your base. You decide to use a 12-inch circular slab of black walnut for the base. You drill a 3/8-inch hole through the center of the walnut and the first foot of the cedar. Because the cedar curves, you can’t drill all the way through. Instead, you use a dremel tool to carve a thin channel along the “back” of the curve to hide the wire.
By Saturday afternoon, you have sanded the channel smooth and applied a coat of dark raw Tung oil to both pieces. On Sunday, after the oil has cured, you thread a 12-foot brown fabric-covered cord through the base, up the channel (securing it with tiny brass staples), and into a heavy-duty brass socket at the top. You top it with a simple drum shade. By Sunday evening, you have a fixture that would cost $800 in a boutique, made for the price of a $30 wiring kit and a bit of sweat.
Final Thoughts
Sustainable DIY driftwood lighting is a testament to the idea that we do not need more things; we need better things. By taking what the earth has already weathered and giving it a new purpose, you are creating something that is both functional and deeply personal. It is a slow process that demands respect for the material and the safety of the craft.
The value of these pieces lies in their imperfection. The cracks, the knots, and the salt-bleached grain are what make them beautiful. When you flip the switch on a lamp you built yourself, the light it casts feels warmer because you know exactly where the wood came from and the effort it took to bring it into your home.
Do not be afraid to experiment with different shapes and sizes. Whether you start with a small piece for your nightstand or a massive branch for your dining room, each project will teach you something new about the resilience of nature and your own capacity to create. Take the first step, head to the water, and see what the tide has left for you.
Sources
1 youtube.com (https://www.youtube.com/watch?v=bibML6DW_7Y) | 2 instructables.com (https://www.instructables.com/Making-a-Driftwood-Lamp/) | 3 diydriftwood.com (https://diydriftwood.com/make-driftwood-pendant-light/) | 4 hawk-hill.com (https://www.hawk-hill.com/how-to-clean-driftwood/) | 5 aprettyfix.com (https://aprettyfix.com/disinfect-driftwood/) | 6 sunmory.com (https://www.sunmory.com/blogs/resources/how-to-make-driftwood-floor-lamp) | 7 injaf.org (https://injaf.org/articles-guides/general-guides/guide-to-aquarium-wood/) | 8 youtube.com (https://www.youtube.com/watch?v=IdUMy3NZg5s) | 9 instructables.com (https://www.instructables.com/Driftwood-Chandelier/) | 10 diydriftwood.com (https://diydriftwood.com/how-to-create-a-driftwood-lamp/) | 11 chalkingupsuccess.com (https://chalkingupsuccess.com/diy-driftwood-finish/)