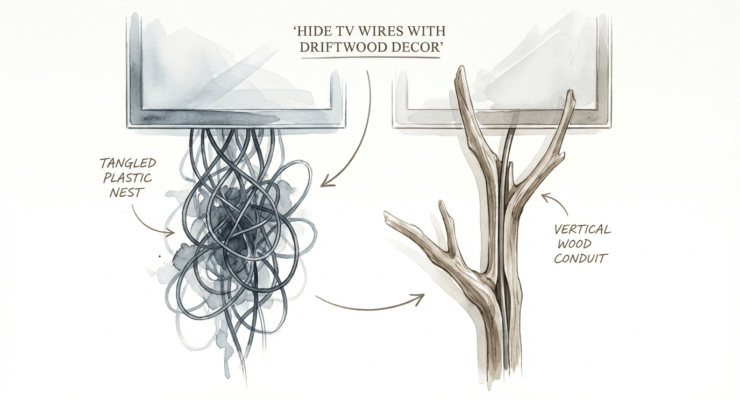
Don’t let a ‘rat’s nest’ of wires ruin your aesthetic when nature provided the perfect vertical hideaway. The biggest vibe-killer in a small apartment is cable clutter. I used a single piece of hollow driftwood to turn a mess of wires into a vertical art installation.
Imagine your living room transformed from a tech-cluttered hub into a serene, organic sanctuary. Traditional cable management often involves bulky plastic boxes or drilling massive holes into drywall, but there is a more soulful way to handle the chaos. Using a weathered piece of wood found on a shoreline or in a forest allows you to bridge the gap between modern technology and the raw beauty of the outdoors.
This approach is about more than just hiding a few cords. It is about reclaiming your space and treating your home like a gallery rather than a server room. When you choose a vertical wood conduit over a tangled plastic nest, you are making a statement that functionality does not have to be ugly.
Natural materials bring a warmth that synthetic solutions simply cannot replicate. A piece of driftwood has a history, shaped by water and time, which provides a grounding contrast to the sleek, cold glass of a television screen. This guide will walk you through the process of selecting, preparing, and installing a driftwood cable cover that serves as both a utility and a masterpiece.
Hide Tv Wires With Driftwood Decor
Hiding TV wires with driftwood decor is a creative DIY method that uses natural, salt-washed, or river-worn wood to conceal the unsightly bundle of cables hanging from a wall-mounted television. Instead of using a standard plastic raceway, you use a long, often hollowed-out or channeled piece of wood that serves as a decorative conduit. This technique is especially popular in coastal, bohemian, and rustic interior designs where organic textures are prioritized over industrial finishes.
In the real world, this method is used by interior designers and home-staging experts to create a “wow” factor in living rooms, bedrooms, and even home offices. It solves the practical problem of cable management while adding a unique architectural element to a flat wall. Because every piece of driftwood is unique, no two installations look exactly alike, giving your home a custom, artisanal feel.
Driftwood works well in this capacity because it is often already partially hollow or soft enough to be modified easily. Its neutral, sun-bleached tones allow it to blend seamlessly with various wall colors, from crisp white to moody charcoals. Think of it as a sculptural mask for your technology—a way to keep the convenience of a smart home without the visual noise of its infrastructure.
How to Create Your Own Driftwood Cable Conduit
Transforming a raw piece of wood into a functional cord cover requires a systematic approach to ensure both beauty and safety.  . You cannot simply grab a branch from the beach and nail it to the wall. The process involves sourcing, cleaning, hollowing, and mounting.
1. Sourcing the Right Piece
Finding the perfect candidate is the most rewarding part of the journey. Look for pieces of driftwood that are relatively straight and long enough to span the distance from the bottom of your TV to your power outlet or media console. Ideal pieces are “ghost wood” or sun-bleached cedar, which are known for their durability and interesting textures. If you cannot find a naturally hollow piece, look for a “half-log” shape or a branch thick enough to accommodate a channel being cut into the back.
2. Cleaning and Sanitizing
Nature often leaves behind guests in the form of insects, sand, or fungi. Before bringing driftwood into your home, you must deep clean it. Start by dry brushing the wood to remove loose debris and sand.  . Next, soak the wood in a solution of water and bleach (about 1 to 2 cups of bleach per gallon of water) for 12 to 24 hours to kill any bacteria or spores. For smaller pieces, baking the wood in an oven at 200 degrees Fahrenheit for 2 to 4 hours is an effective way to ensure it is completely sterilized.
3. Creating the Channel
If your driftwood is not naturally hollow, you will need to create a path for the wires. A woodworking router is the best tool for this job, allowing you to carve a consistent “C-shape” or U-channel into the flat side of the wood that will face the wall. If you do not have a router, you can use a hammer and chisel to manually carve out the center. The channel needs to be wide enough to fit your thickest cable—usually the power cord or a heavy-duty HDMI—with some extra room to prevent heat buildup.
4. Sanding and Finishing
Raw driftwood can be prone to splintering once it dries out completely. Sand the edges of your channel and any rough spots on the face of the wood using 120-grit followed by 220-grit sandpaper. To preserve the wood and give it a soft sheen, apply a light coat of linseed oil or a matte polyurethane. This protects the wood from the heat generated by the cables and prevents it from becoming brittle over time.
5.  . Mounting the Conduit
There are several ways to attach the wood to the wall. One of the cleanest methods is using a French cleat system, where one piece is attached to the wall and the other to the back of the wood, allowing it to slide into place. Alternatively, you can use heavy-duty keyhole brackets or even simple L-brackets hidden behind the wood’s curves. Ensure the mount is secure, as some driftwood pieces can be surprisingly heavy.
Benefits of Natural Wood Cable Management
Choosing driftwood over standard plastic solutions offers several measurable advantages that go beyond mere looks.
- Unparalleled Aesthetics: Plastic raceways always look like an afterthought. A driftwood conduit looks like a deliberate art choice that anchors the room’s decor.
- Sustainability: By using found wood, you are repurposing a natural material that would otherwise decompose or be discarded, making this an eco-friendly DIY project.
- Durability: Once properly treated and dried, driftwood is incredibly stable. It has already survived years of exposure to the elements, so it won’t warp or degrade in a climate-controlled home.
- Custom Fit: Unlike store-bought covers that come in fixed lengths and widths, a DIY wood conduit can be shaped to fit the exact number of cables you have and the specific height of your TV mount.
- Added Property Value: Unique, high-end DIY features often serve as talking points during home tours and can contribute to a home’s perceived value by showcasing a high level of craftsmanship.
Challenges and Common Mistakes
Working with natural materials presents hurdles that you won’t find with manufactured products. Being aware of these pitfalls can save you hours of frustration.
Ignoring Pest Control: The most common mistake is failing to properly sanitize the wood. Driftwood can harbor termites, carpenter ants, or mold spores. If you skip the bleach soak or the oven-baking step, you risk introducing these pests into your home’s structure.
Underestimating Cable Width: Many DIYers carve a channel that is just barely large enough for their current cables. However, if you decide to add a soundbar or a gaming console later, you may find that the new wires won’t fit. Always carve the channel 25% larger than your current needs to allow for future tech upgrades.
Improper Drying: If the wood is still damp when you mount it, it may shrink or crack as it dries indoors. This can cause the mounting brackets to loosen or the finish to peel. Ensure the wood is bone-dry—this may take several days of sun drying or a few hours in a low-heat oven—before you begin the finishing process.
Poor Cable Ventilation: Wires, especially power cords, generate a small amount of heat. If you pack too many cables into a tight wooden space without any airflow, the heat can degrade the cable insulation over time. Ensure there is a small gap at the top and bottom of the conduit to allow air to circulate.
Limitations of This Method
While driftwood is a beautiful solution, it is not ideal for every scenario. It is important to understand the trade-offs before committing to this project.
One major limitation is the lack of flexibility. Once a driftwood conduit is mounted, it is difficult to move. Unlike plastic clips that can be popped open, adding a new wire usually requires taking the entire piece of wood off the wall. This makes it less ideal for people who frequently change their home theater setup.
Environmental factors also play a role. In extremely humid environments, wood can expand slightly, which might affect the fit of your mounting brackets. Furthermore, driftwood is a combustible material. While electrical cables are generally safe, you must ensure that your wiring is in good condition. Frayed or damaged cords should never be encased in wood, as they pose a potential fire hazard.
Finally, there is the skill ceiling. This project requires basic power tool knowledge, including the use of a drill, and ideally, a router or chisel. If you are uncomfortable with these tools, a standard plastic cover might be the safer, though less attractive, choice.
Vertical Wood Conduit vs. Tangled Plastic Nest
To understand the value of this project, it helps to compare it directly to the alternative: the standard plastic cable management kit.
| Feature | Tangled Plastic Nest (Standard) | Vertical Wood Conduit (Driftwood) |
|---|---|---|
| Visual Impact | Industrial, distracting, looks like utility. | Organic, sculptural, looks like art. |
| Customization | Limited to paintable plastic. | Infinite shapes, textures, and finishes. |
| Complexity | Very low; peel and stick. | Moderate; requires cleaning and carving. |
| Material Cost | $15 – $30 per kit. | Free (found) to $50 (purchased art piece). |
| Longevity | Adhesives may fail; plastic can yellow. | Extremely durable; gets better with age. |
Practical Tips for Best Results
To ensure your driftwood cable management project is a success, keep these best practices in mind:
- Use Velcro Ties: Instead of zip ties, use velcro cable wraps inside the channel. They allow you to bundle the wires neatly and make it much easier to adjust them later.
- Label Your Cords: Before you tuck the wires into the conduit, label both ends of every cable (e.g., “HDMI 1 – TV”, “HDMI 1 – Xbox”). This prevents confusion if you ever need to troubleshoot your connections.
- Check for Fire Safety: Only use cables that are in good repair. For an extra layer of protection, you can line the inside of your wooden channel with fire-resistant tape or a thin strip of flame-retardant PVC.
- Incorporate Lighting: For a high-end look, hide a small LED strip behind the driftwood. This creates a “halo” effect against the wall, emphasizing the wood’s texture and providing ambient backlighting for your TV.
- Match the Grain: If you are using other wooden furniture in the room, try to find driftwood that complements those tones. A dark walnut-stained driftwood piece can look stunning against a mid-century modern credenza.
Advanced Considerations
For those who want to take this concept even further, consider the structural and electrical integration of the piece.
Serious practitioners might explore the idea of seasoning the wood properly. Seasoning involves letting the wood sit in the environment where it will be installed for several weeks. This allows the moisture content to reach an equilibrium with your home’s air, preventing any further warping after the piece is mounted.
Another advanced technique is the use of embedded grommets. You can drill precise holes into the side of the driftwood and insert plastic or metal grommets where the wires enter and exit. This protects the cable sheathing from the rough interior of the wood and provides a more “finished” look at the connection points.
If you are dealing with a heavy piece of wood, you must consider wall anchorage. Standard drywall anchors may not be enough for a 10-pound piece of solid wood. Always try to hit at least one wall stud with your mounting hardware, or use heavy-duty toggle bolts to ensure the piece stays exactly where you put it.
A Practical Scenario: The Living Room Upgrade
Let’s look at how this works in a real-world setting. Imagine a coastal cottage with a 55-inch TV mounted on a white shiplap wall. Below the TV is a tangle of three black HDMI cables, an optical audio cable, and a thick power cord. The black wires are a massive eyesore against the white wood.
The homeowner finds a 4-foot piece of cedar driftwood on a local beach. They clean it using the bleach-soak method and let it dry for three days in the sun. Using a router, they carve a 1.5-inch deep channel down the center of the back. They mount the wood vertically, perfectly centered under the TV.
The cables are bundled with velcro and tucked into the channel. The driftwood is then secured to the wall using a hidden French cleat. The result? The black wires are completely invisible. From the front, it looks like a beautiful, weathered pillar of wood supporting the TV, transforming a messy tech corner into a curated design feature.
Final Thoughts
Don’t let the functional necessities of modern life dictate your home’s style. Hiding TV wires with driftwood is a perfect example of how a bit of pioneer grit and creativity can turn a mundane problem into a stunning architectural feature. It is a project that rewards patience and attention to detail, resulting in a space that feels both high-tech and high-touch.
By following the steps of cleaning, hollowing, and mounting, you can move away from the sterile look of plastic and embrace the warmth of the natural world. This method is more than just cable management; it is a way to tell a story through the materials you bring into your home.
Whether you are a seasoned woodworker or a beginner looking for your first meaningful DIY project, the vertical wood conduit offers a rewarding path toward a cleaner, more intentional living space. Take the time to find the right piece of wood, treat it with respect, and enjoy the peace that comes with a clutter-free, aesthetically grounded home.
Sources
1 youtube.com (https://www.youtube.com/watch?v=hfbKwC5M03w) | 2 youtube.com (https://www.youtube.com/watch?v=av0HHeP90f8) | 3 hawk-hill.com (https://www.hawk-hill.com/how-to-clean-driftwood/) | 4 dksstores.com (https://vertexaisearch.cloud.google.com/grounding-api-redirect/AUZIYQEzlr-hjmiQoH4sZ5wS_YOQ5klah1x0p-Bqx5crpS6sSZX8k5itK9gudJrszwUOTyES0fk9AQkj8qKZB7KTyiezLWbgI6oZ102Hwbr8WeVBBsoACblpJxlFftX6) | 5 shieldenstrut.com (https://shieldenstrut.com/blogs/news/emt-vs-pvc-conduit/) | 6 flyachilles.com (https://flyachilles.com/blogs/default-blog/comprehensive-guide-how-to-prevent-electrical-shock-and-fire-in-wooden-houses) | 7 mockett.com (https://www.mockett.com/blog/blog-2025-proper-wiremanagement.html) | 8 raiderfireprotection.com (https://raiderfireprotection.com/2021/11/poor-cable-management-can-be-a-fire-hazard/) | 9 thediyplaybook.com (https://thediyplaybook.com/drill-hole-for-cords/)