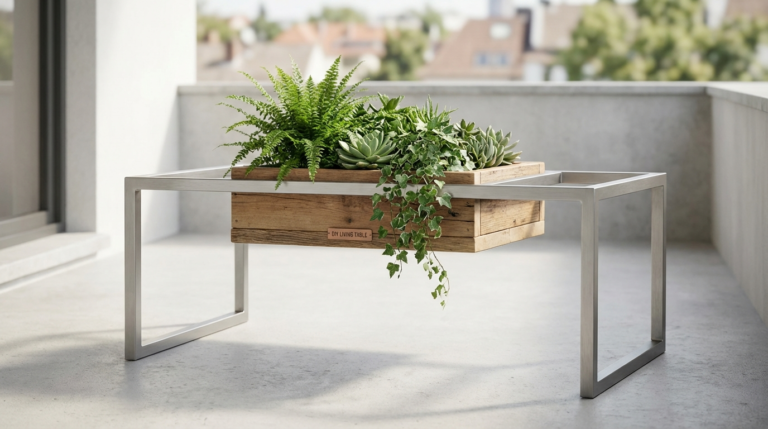
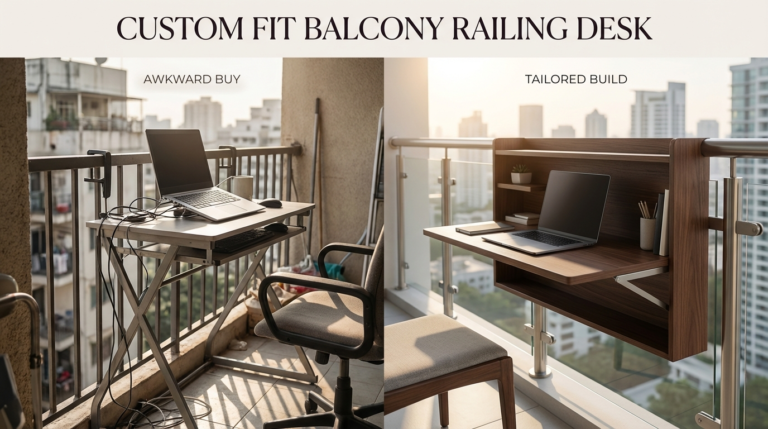
• Skip to main content
  • Skip to primary sidebar
  • Terms and Conditions
  • Privacy Policy
  • Contact

Driftwood 4 Us

Just About Driftwood

Driftwood

Driftwood Mushroom Art

May 31, 2025 by admin

Have you ever walked along a beach and noticed pieces of driftwood, gnarled and weathered by time and tides? These naturally sculpted forms have captured the imagination of artists and crafters for generations. But have you thought about harnessing their raw, rustic charm to create something truly unique, like driftwood mushroom art?

Driftwood Mushroom Art

Understanding Driftwood Mushroom Art

Driftwood mushroom art combines the natural beauty of driftwood with the whimsical form of mushrooms, creating pieces that bring a touch of nature indoors. These works of art can be complex sculptures or simplistic accents, but they all share a love for the natural world.

What is Driftwood?

Driftwood is wood that has been washed onto a shore or beach of a sea, lake, or river by the action of winds, tides, or waves. Over time, the elements strip it of bark and smooth its surfaces, often creating unique patterns and textures. Driftwood has become a favorite medium for artists due to its organic shapes and versatility.

The Fascination with Mushrooms

Mushrooms have fascinated humans for centuries with their mysterious growth habits and variety of forms. As a symbol of nature’s hidden wonders, mushrooms add an element of magic and curiosity when incorporated into art. Their varying sizes and shapes provide a rich subject for artistic interpretation.

Creating Driftwood Mushroom Art

Creating driftwood mushroom art requires a combination of artistic vision, practical skill, and a love for natural materials. Whether you’re a seasoned artist or a beginner, making driftwood mushroom art can be a rewarding experience.

Materials You’ll Need

For creating driftwood mushroom art, you will need some basic materials. Here’s a list to get you started:

MaterialDescription
Driftwood piecesGather from beaches or rivers, with sizes that suit your vision
Sculpting clayFor crafting the mushroom caps and stems
Paints and brushesTo add color and detail to your mushrooms
SealantProtects the final artwork and enhances wood texture
ToolsKnife, drill, or rotary tool for shaping and carving

The Artistic Process

The process of creating driftwood mushroom art involves several steps. Each allows you to express your creativity while working closely with nature’s offerings.

Selecting the Driftwood

Begin by selecting pieces of driftwood that speak to you. Consider their shapes, sizes, and textures as potential foundations for your mushroom installations. Each piece of driftwood has its unique character, guiding your artistic vision.

Crafting the Mushroom Sculptures

Using sculpting clay, create the mushroom caps and stems. Naturalistic or fantastical designs can add a personal touch to the artwork. Experiment with shapes and sizes to find a composition that complements the driftwood.

Assembling Your Artwork

With the components ready, it’s time to assemble them. Drill or carve holes where you want to attach the mushrooms. Secure each piece with glue or screws, ensuring stability without compromising the aesthetic.

Adding Color and Texture

Paint your mushrooms, taking inspiration from real-life examples. Whether aiming for realism or whimsy, this is where your creativity shines. Finish by sealing the artwork with a clear coat to protect and enhance both the wood and clay components.

Displaying Your Artwork

Once complete, displaying your driftwood mushroom art in a setting that highlights its natural elegance is crucial. Consider spaces that complement the artwork’s earthy tones and wild inspirations.

Inspiration and Variations

Driftwood mushroom art is as varied as nature itself. Whether you aim for a naturalistic representation or a more abstract concept, there are endless possibilities for creativity and innovation.

Naturalistic Styles

Some artists strive for realism, mimicking the appearance of wild mushrooms closely. This approach often requires careful study of mushroom species and attention to detail in texture and color.

Abstract and Fantastical Ideas

For those with a more whimsical bent, driftwood mushroom art can venture into the realms of fantasy. Imagine mushrooms that glow in dark spaces or structures that seemingly defy gravity. Let your imagination run wild as you create art that feels like it belongs in a fairy tale.

Environmental Themes

Driftwood art inherently highlights themes of sustainability and nature’s beauty. Artists often use this medium to comment on environmental issues, drawing connections between their work and the natural environments they source it from.

Benefits of Driftwood Mushroom Art

Engaging with driftwood mushroom art offers several benefits beyond simply creating visually appealing pieces.

Foster Creativity

Working with natural materials encourages you to think outside the box. The irregularities of driftwood challenge you to adapt and innovate, often leading to surprising and rewarding artistic outcomes.

Connect with Nature

Collecting driftwood and designing your art can deepen your connection to nature. It enhances appreciation for the small details that make natural environments so awe-inspiring.

Eco-Friendly Art Form

Using driftwood is a sustainable practice that repurposes a natural element already in the ecosystem. It reduces the need for manufactured materials, aligning your artwork with eco-friendly principles.

Driftwood Mushroom Art

Tips and Techniques

As you embark on your journey into driftwood mushroom art, consider these tips to refine your technique and overcome common challenges.

Selecting Quality Driftwood

Choose well-weathered and sturdy pieces to ensure durability. Avoid wood that’s too soft, as it may crumble or rot over time. If possible, select pieces free of insects or signs of decay.

Experiment with Shapes

Don’t be afraid to experiment with unexpected shapes and forms. Driftwood’s natural curvature can inspire creative compositions, and the imperfections often add character to your work.

Using Color Effectively

Color can transform your driftwood mushroom art by highlighting specific features or setting a mood. Use paints selectively to accentuate the natural wood grain or to enhance the lifelike appearance of your mushrooms.

Protect Your Artwork

Applying a protective sealant to your finished piece is crucial. Not only does it enhance the natural beauty of the wood and clay, but it also offers protection from moisture and dust.

Challenges to Overcome

Like any artistic endeavor, creating driftwood mushroom art comes with its own set of challenges. Addressing these head-on will help ensure a successful and enjoyable crafting experience.

Drifting Diversity

Finding driftwood that fits your artistic vision can sometimes be challenging due to the unpredictable nature of this material. Patience is key, as each piece of driftwood is unique with its own story to tell.

Preserving Organic Form

Balancing the rustic appeal of driftwood with your artistic modifications requires practice. It’s important to preserve the natural texture and lines while still making them part of a cohesive piece.

Durability Concerns

Driftwood’s natural softness can be a concern for long-term durability. Using the right sealants and structural supports will help maintain your artwork over time.

Driftwood Mushroom Art in the Community

As interest in driftwood mushroom art grows, so does its impact in artistic communities. Engaging with other artists and enthusiasts can enrich your own practice.

Workshops and Collaborations

Consider joining local art workshops focusing on nature-inspired art. Collaborative projects with other artists can provide fresh perspectives and techniques, enhancing your skills and expanding your network.

Sharing Your Work

Online platforms and community exhibitions offer opportunities to share your driftwood mushroom art with others. They also provide a space to receive feedback and inspire future creations.

Educational Outreach

Some artists use their skills to educate others about the environment through driftwood art. By holding workshops for schools or community groups, they share insights into sustainable art practices and the importance of environmental conservation.

Conclusion

Driftwood mushroom art is a captivating way to bring elements of nature into artistic expression. Through collected materials and imaginative sculptures, this form of art fosters creativity, sustainability, and connection with the environment. Whether you’re an artist looking to explore new materials or someone who appreciates the raw beauty of nature, driftwood mushroom art offers an exciting and rewarding pursuit. Remember to enjoy the process, respect the natural origins of your materials, and let the journey guide you to unexpected places. Your creations will not only enrich your surroundings but also reflect the deep bond between art and nature.

Filed Under: Driftwood Ideas Tagged With: Driftwood, Handmade, Mushroom, Nature Art, Sculpture

Driftwood Mobile With Beads

May 31, 2025 by admin

Are you looking to bring a touch of the ocean into your home with a unique piece of art? Creating a driftwood mobile with beads could be the perfect project for you. This stunning combination of natural materials and vibrant colors can transform any space into a serene seaside retreat. Not only is this craft a delightful way to spend an afternoon, but it also results in a captivating piece of decor that you can proudly say you made yourself.

Driftwood Mobile With Beads

Understanding Driftwood and Its Appeal

Driftwood is wood that has been washed onto a shore or beach of a sea or river by the action of winds, tides, waves, or man. It’s known for its beautiful smooth texture and the natural shapes it forms, often twisted and weathered, telling a story of its journey across waters. Using driftwood in art and decoration has become increasingly popular due to its unique appearance and the tranquil coastal vibes it brings to interior spaces.

Why Choose Driftwood?

Driftwood is an eco-friendly choice for your crafts. By repurposing wood that the ocean has already processed, you’re not contributing to deforestation. Additionally, using driftwood in your home can add a sense of calm and connection to nature, creating a peaceful atmosphere. The natural patterns and colors of driftwood make each piece unique, ensuring your mobile is one-of-a-kind.

Gathering Your Materials

Before creating your driftwood mobile, it’s essential to gather all the necessary materials. This ensures the crafting process goes smoothly and you can focus on the creative aspect.

Essential Materials and Tools

To create a driftwood mobile with beads, you will need:

  • Driftwood: Various sizes and shapes, depending on the final look you want.
  • Beads: Choose from glass, ceramic, or wooden beads. Consider the color scheme that will best complement the natural hues of the driftwood.
  • Fishing Line or Twine: Clear fishing line for an invisible look or rustic twine for a more natural appearance.
  • Drill: A small handheld drill with a fine bit for drilling holes in the driftwood for the line.
  • Scissors and Pliers: For cutting the line and securing your beads and pieces of driftwood.
  • Hooks or Loops: To hang the mobile from the ceiling or any desired location.

Optional Materials

  • Paint or Stain: If you wish to add color or enhance the natural tones of the driftwood.
  • Shells or Feathers: For added decoration that complements the beachy theme.

Designing Your Mobile

Now that you have your materials, the next step is designing your mobile. This stage allows you to express your creativity and visualize how the final piece will look.

Choosing a Style

  • Simple and Minimalist: Opt for small pieces of driftwood and a restricted color palette for the beads.
  • Bold and Colorful: Use vibrant beads and larger pieces of driftwood for a statement piece.
  • Natural and Organic: Add shells, feathers, or stones for an earthy, bohemian vibe.

Planning the Layout

Sketch a rough design of your mobile. Consider the length of each string of beads and driftwood, how they will hang in relation to each other, and how many strands you will need. Remember, the balance is vital in a mobile; each section should counterbalance the others for a harmonious look.

Crafting the Mobile

With your design in mind, it’s time to start crafting. Follow these steps to bring your driftwood mobile to life.

Preparing the Driftwood

  1. Cleaning: Thoroughly clean each piece of driftwood to remove sand and debris. You can use a soft brush and warm water.
  2. Drying: Let the wood dry completely. This might take a few days, depending on the humidity level.
  3. Drilling Holes: Use the drill to make holes in the driftwood where you will attach the line. Be careful not to crack the wood.

Stringing the Beads and Driftwood

  1. Cutting the Line: Measure and cut lengths of fishing line or twine according to your design.
  2. Threading Beads: Start threading your beads onto the line. You can tie knots between beads to hold them in place or keep them loose for movement.
  3. Attaching Driftwood: Tie or loop the line securely through the holes in the driftwood, making sure it aligns with your design plan.

Assembling the Mobile

  1. Connecting Strands: Tie the strands of beads and driftwood to a central piece of driftwood that will act as the anchor.
  2. Balancing: Adjust the lengths and positions of each strand to achieve a balanced look where all parts move freely.
  3. Securing Knots: Double-check all knots to ensure they are tight and secure.

Driftwood Mobile With Beads

Hanging Your Mobile

The final step in creating your driftwood mobile is finding the perfect spot to display it. Choose a location where it can gently sway and catch the light.

Ideal Locations

  • Windows: Hang your mobile near a window where natural light can shine through the beads.
  • Porches or Patios: Take advantage of the breeze to add movement to your mobile.
  • Ceiling Corners: Add a decorative touch to an otherwise unused space.

Installing Safely

Use a sturdy hook or loop to ensure your mobile is secure. Consider the weight of your creation and the strength of the materials used when choosing your hanging solution.

Personalizing Your Mobile

One of the most appealing aspects of crafting your driftwood mobile is the opportunity to personalize it to your taste. Consider incorporating elements that hold special meaning or represent a significant memory.

Adding Personal Touches

  • Engraving: Use a wood-burning tool to add initials or meaningful symbols to pieces of driftwood.
  • Photo Charms: Attach small photo charms to capture moments or loved ones in your piece.
  • Inspirational Quotes: Add beads with engraved words or phrases that inspire you.

Experimenting with Color and Texture

Experiment with different textures and colors for a vibrant, eclectic look. Mix glossy and matte beads, or use colored twine for a unique touch that suits your style.

Caring for Your Driftwood Mobile

To ensure your driftwood mobile remains beautiful, consider its exposure to elements and take steps to preserve its condition.

Protecting Your Mobile

  • Indoor Placement: If you’re worried about wear and tear, keeping your mobile indoors can protect it from weathering.
  • Occasional Cleaning: Dust your mobile gently with a soft cloth or feather duster to maintain its sparkle and beauty.

Long-term Preservation

For long-term preservation, consider applying a sealant to the driftwood. This protects the wood from moisture while enhancing its natural colors.

Conclusion

Creating a driftwood mobile with beads is a rewarding project that combines art, nature, and personal expression. By weaving together the organic beauty of driftwood with the vibrant allure of beads, you craft a piece of decor that not only reflects your style but also tells a story. Whether you choose to make a simple or elaborate design, the process allows you to connect with your creativity and bring a piece of the maritime world into your home. Enjoy the journey of making and displaying your driftwood mobile, and let it infuse tranquility and charm into your living space.

Filed Under: Driftwood Ideas Tagged With: Beads, Driftwood, Handmade, home decor, Mobile

Driftwood Moss

May 30, 2025 by admin

Have you ever wondered about the beauty and mystery of driftwood moss and how it combines elements of nature to create a unique visual experience? Driftwood moss brings together elements of the land and sea in a way that fascinates both nature enthusiasts and art lovers alike. It’s an accidental artwork, produced over time where the organic meets the ocean’s edge, creating a display as intriguing as it is beautiful. Let’s embark on a journey to understand what driftwood moss is, how it forms, and how you can incorporate its rustic charm into your own spaces.

What is Driftwood Moss?

Driftwood moss is a natural phenomenon where moss grows on driftwood. It is often found on coastal shores and riverbanks, where pieces of wood float freely, only to be washed ashore after an extended period. In these damp environments, moss finds a perfect home. The moss clings to the rough surfaces of the driftwood, breaking up the wood’s otherwise stark appearance with a rich tapestry of green hues.

The Anatomy of Driftwood

Driftwood pieces vary in shape, size, and texture, which depends on the type of wood and the journey it has taken. The exposure to saltwater, sun, and sand often strips the wood of bark, resulting in a smooth, weathered surface. This surface is ideal for moss growth, as its texture allows moss to adhere easily while providing pockets where moisture can collect, sustaining the plant life.

The Role of Moss

Moss is a small, non-vascular plant that thrives in moist environments. It doesn’t produce flowers or seeds but rather reproduces through spores. The ability of moss to retain water and nutrients makes it a resilient plant, capable of thriving on surfaces like driftwood that might otherwise seem inhospitable. Along with its functional benefits for the ecosystem, moss adds aesthetics to driftwood by covering it with textures and shades of green.

The Ecosystem of Driftwood Moss

Driftwood with moss not only looks captivating but also harbors a mini-ecosystem. It provides a home for small insects, birds, and aquatic organisms that can shelter within its crevices or use it as a temporary perch. This interaction fosters a symbiotic relationship, where the wood, moss, and small wildlife support one another and enrich the biodiversity of the shorelines or riversides.

Environmental Importance

Driftwood moss plays an important role in erosion control and habitat formation. It helps to stabilize the sandy or rocky shores and prevents excess loss of soil into the waterways. Driftwood logs can slow down water flow and provide barriers against tides, minimizing erosion. They also offer a breeding ground for various microorganisms that are vital in breaking down organic materials, thus enriching the ecosystem.

Driftwood Moss

Gathering Driftwood Moss

If you are intrigued by driftwood moss and planning to collect some for personal or decorative purposes, there are a few things to consider. Respecting nature and non-disruptive collection methods are crucial to maintaining the health of coastal environments.

Ethical Collection Tips

  1. Seek Permission: Make sure to check local regulations, as some areas protect driftwood for conservation reasons.
  2. Minimal Impact: Collect smaller pieces to avoid disturbing existing wildlife habitats.
  3. Leave Some Behind: For every piece you collect, leave several behind to ensure the ecosystem continues to thrive.
  4. Avoid Living Habitat Disruption: Only gather pieces that are not actively part of a larger, living habitat.

Best Locations for Collection

Driftwood moss is most commonly found along coastal beaches, riverbanks, and lakeshores. Look for areas where water interactions are consistent, and the environment is moist yet open to sunlight, creating ideal conditions for moss growth.

Using Driftwood Moss in Décor

Driftwood moss can be a striking addition to home décor. Its natural aesthetic is versatile enough to fit various styles, from rustic to coastal, offering a touch of natural beauty to interior spaces.

Creative Ideas for Integration

  • Centerpieces: Use smaller driftwood pieces as unique centerpieces.
  • Wall Art: Attach hooks to create a driftwood moss hanging frame.
  • Planters: Hollow logs can be repurposed as planter beds for succulents.
  • Candle Holders: Smaller pieces can be shaped into rustic candle holders.
  • Aquarium Décor: Driftwood moss provides a natural feel to fish tanks and enhances aquatic settings.

Care and Maintenance

Even though driftwood moss is quite resilient, consider the following measures to ensure it stays vibrant:

  1. Moisture: Keep the moss moist by spritzing it with water regularly, especially indoors where the air is drier.
  2. Light: Position it where it receives indirect sunlight; too much direct sun can dry out the moss.
  3. Cleaning: Dust the driftwood occasionally with a soft brush or cloth to maintain its appearance without disrupting the moss.
  4. Avoid Chemicals: Do not apply any fertilizers or chemicals, as they can harm the moss.

Driftwood Moss

Driftwood Moss in Art and Craft

The natural beauty of driftwood moss has inspired many artists and crafters to use it as a medium or subject. Its organic shapes and calming colors offer endless possibilities for creativity.

Artistic Inspiration

  • Photography: Capture the intricate textures and interplay of light and shadow on driftwood adorned with moss.
  • Sculpture: As a natural canvas, the driftwood’s form can be enhanced with additional materials like clay or metal.
  • Mixed Media Art: Combine moss-covered driftwood with other natural elements like stones, shells, and feathers.
  • Mosaics: Use the natural curvature of the wood to influence mosaic designs, incorporating small tiles or colored glass.

Scientific Interest in Driftwood Moss

Scientists and ecologists find driftwood moss an interesting subject for study due to its unique properties and its role in ecosystem functioning.

Research Topics

  1. Biodiversity: Exploring how driftwood moss contributes to local biodiversity.
  2. Ecosystem Services: Understanding the environmental benefits it provides, such as carbon storage and erosion control.
  3. Moss Adaptation: Studying how moss species adapt to varying climates and moisture levels.
  4. Decay Processes: Analyzing how driftwood breaks down over time and the influence of moss in this process.

Preserving Driftwood Moss

For enthusiasts passionate about driftwood moss, preservation goes a long way towards sustainability and conservation.

Conservation Efforts

  • Educate: Raise awareness about the importance of driftwood ecosystems to visitors and local communities.
  • Support Local Regulations: Encourage the implementation of conservation laws and support local efforts financially or through volunteer work.
  • Participate in Clean-ups: Join community clean-up efforts to remove litter from beaches, ensuring a thriving environment for driftwood moss.

Frequently Asked Questions

How Long Does Driftwood Moss Last?

The lifespan of driftwood moss largely depends on its environment. When maintained properly indoors with adequate moisture and light, driftwood moss can remain vibrant for several months to years. Outdoors, it has a natural resilience and can continue to thrive with minimal interference.

Is Driftwood Moss Safe for Indoor Use?

Yes, driftwood moss is safe for indoor use. However, ensure that it is free from any harmful insects or fungi before bringing it indoors. Cleaning the wood properly while preserving the moss is key to maintaining safety and aesthetics.

Can I Grow Moss on Driftwood Myself?

Absolutely! You can cultivate your own driftwood moss by choosing the right wood, moistening it, and placing moss spores or pieces on it. Ensure the moss receives proper moisture and indirect sunlight to encourage growth.

How Can I Tell if My Driftwood is Ready for Use?

Before using driftwood, ensure it’s thoroughly dried, free from salt residues (if collected from the ocean), and absent of any pests or fungi. You might need to soak it in freshwater and let it dry completely under the sun before use.

In understanding and appreciating driftwood moss, you gain insight into the intricate beauty nature creates over time through interactions of seemingly simple elements. Whether you’re using it to enhance your home, creating art pieces, or studying it scientifically, driftwood moss beckons with its quiet allure and subtle resilience.

Filed Under: Driftwood Ideas Tagged With: Coastal, Driftwood, Eco-friendly, Moss, Natural Art

Driftwood Mosaic

May 30, 2025 by admin

Have you ever wandered along a beach, pausing to admire the scattered pieces of driftwood washed ashore by the tides? This natural artistry, created by the sea and sand, begs the question: How can these seemingly random pieces be transformed into a stunning masterpiece like a driftwood mosaic?

What is a Driftwood Mosaic?

A driftwood mosaic is an artistic assembly of driftwood pieces arranged to form a coherent pattern or image. It’s a unique art form that combines the natural beauty of driftwood with the skill and creativity of the artist. Like traditional mosaics that use small pieces of glass or tiles, driftwood mosaics employ wood pieces of varied shapes, sizes, and textures to create captivating works.

The Origin of Driftwood

Driftwood begins its journey as a part of a tree. It becomes adrift when it’s washed into the ocean, often due to storms, floods, or erosion. Across potentially long distances, these wood pieces are weathered by saltwater and sand, giving them a smooth and textured appearance. This transformation is nature’s way of crafting art, as the sea’s relentless erosive power and the journey through the ocean shape each piece uniquely.

Cultural and Aesthetic Significance

Driftwood has long held a place of importance in various cultures. Beyond its natural charm, it has been used in crafting tools, creating sculptures, and even in spiritual or ritualistic practices. Each piece carries its history and character, adding depth to any artwork it becomes part of. The aesthetic appeal lies in its texture and color, with tones ranging from light blond to deep brown, enhancing the visual interest in any mosaic setting.

The Craft of Creating Driftwood Mosaics

Creating a driftwood mosaic involves several steps, skill, and creativity. It’s about selecting the right pieces, conceptualizing a design, and carefully assembling them into a coherent image or pattern.

Collecting Driftwood

The first step in creating a driftwood mosaic is gathering the raw material. Searching for driftwood can be a therapeutic activity, giving you a chance to connect with nature. Look for pieces of varying shapes and sizes, as this will provide more options when piecing together your mosaic.

Consider these tips when collecting driftwood:

  • Check local regulations: Ensure collecting driftwood is permitted in your area.
  • Look for distinct shapes and textures: Interesting textures can add depth to your mosaic.
  • Ensure it’s dry: Wet driftwood can be heavy and might not hold up well when used in art pieces.

Preparing Driftwood for Use

Before you can start creating your mosaic, you need to prepare the driftwood to ensure it is clean and suitable for artwork.

  1. Cleaning: Remove any dirt, algae, or salt deposits by soaking the wood in freshwater. Scrubbing gently can help in cleaning stubborn dirt.

  2. Drying: It’s crucial to let the driftwood dry completely to avoid mold or decay. Place it in a sunny spot or a well-ventilated area for several days.

  3. Sanding: Use sandpaper to smoothen any rough edges. This not only makes handling the wood easier but also enhances its natural beauty.

Planning Your Design

Planning is crucial to achieving a harmonious and aesthetically pleasing mosaic. Begin with an idea or sketch of the design you want to create. This could be abstract, like a pattern or form, or something representational, like an animal or landscape.

Consider these design elements:

  • Color Harmony: Utilize the natural color variations in driftwood to add depth.
  • Contrast and Texture: Different textures can make sections stand out, capturing attention.
  • Scale and Proportion: Varying the size of the wood pieces can add dynamism to the artwork.

Assembling the Mosaic

Once your pieces are collected and the design is planned, the assembly begins. This is where creativity meets patience, as arranging the wood pieces can be compared to solving a complex puzzle.

Tools Required

You may need several tools to aid in the process:

  • Adhesives: Strong wood glue will ensure pieces stay in place.
  • Clamps: Helpful to hold pieces together while they dry.
  • Saw: A small saw might be needed to trim larger pieces.
  • Brushes: For applying adhesives uniformly.

Start with the larger pieces and gradually fill in with smaller ones. This method gives you a robust framework to build upon and ensures stability. Take time to assess the fit of each piece; it should seamlessly fit with its neighbor, much like puzzle pieces.

Securing the Mosaic

Once your mosaic is complete, securing it properly will ensure it lasts for a long time. Check all the joins and ensure the adhesive has bonded firmly. You might also want to apply a sealant or varnish to protect the wood and enhance its color and texture.

Driftwood Mosaic

The Benefits of Creating Driftwood Mosaics

Aside from producing a beautiful piece of art, creating driftwood mosaics offers numerous benefits. It’s not just about the finished product but also the experience and satisfaction of the journey.

Therapeutic Experience

Working with driftwood can be incredibly soothing. It allows for a meditative escape as you connect with natural elements. Being immersed in this creative process can reduce stress and induce a state of calm.

Eco-Friendly Art

Driftwood mosaics utilize natural materials, making it a sustainable form of art. By re-using nature’s leftovers, you contribute to positive environmental practices. Instead of letting driftwood waste away, you’re transforming it into something beautiful and lasting.

Boosting Creativity

Engaging in driftwood mosaic art can significantly enhance your creativity. Each piece of driftwood presents a unique challenge; arranging them into a cohesive artwork nurtures problem-solving skills and innovative thinking.

Unique Decor

Adding a driftwood mosaic to your home or garden introduces a unique decor element. Each mosaic is distinct due to the multitude of available wood types and configurations, ensuring a personalized touch that other forms of art may lack.

Driftwood Mosaics in Modern Art

Driftwood art isn’t just a pastime; it’s gaining recognition in contemporary art galleries and shows. Artists around the world are beginning to explore the potential of driftwood as a medium, showcasing its versatility and aesthetic appeal.

Influences in Interior Design

Interior designers have started incorporating driftwood pieces in their projects, especially in spaces intended to invoke a natural or coastal theme. These artworks offer a balance between sophistication and rustic charm, making them a popular choice for various settings.

Public and Outdoor Installations

Some artists take driftwood mosaics into larger scales, creating public installations that capture the imagination of many. Such pieces often act as focal points, drawing attention and encouraging viewers to perceive their surroundings in new ways.

Driftwood Mosaic

Tips for Beginners

If you’re new to creating driftwood mosaics, here are some helpful tips to get you started:

  1. Start Small: Begin with a small project. This way, you can get the hang of the process without becoming overwhelmed.

  2. Gather Abundantly: When collecting driftwood, gather more than you think you’ll need. Having options allows for more creativity when assembling.

  3. Patience is Key: Take your time arranging and rearranging pieces until you’re satisfied with the design.

  4. Experiment: Don’t be afraid to try different patterns, textures, or shapes. Driftwood art is all about creativity and personal expression.

  5. Learn from Others: Join online forums or local art classes to gather inspiration and get feedback on your work.

Inspiring Driftwood Artists

Several artists have made significant contributions to the driftwood mosaic art form, garnering attention worldwide. Their work can be a source of inspiration as you start your driftwood journey:

Debra Bernier

Known for her hypnotic driftwood sculptures, Debra Bernier incorporates natural elements seamlessly within her mosaics, often highlighting feminine and organic forms.

James Doran-Webb

Specializing in large-scale driftwood sculptures, James creates lifelike animal figures. His work demonstrates the structural capabilities and expressive potential of driftwood.

Danielle Creenaune

Danielle explores the intersection of nature and human narrative, using driftwood to tell intricate stories through her detailed mosaics and installations.

Conclusion

Creating driftwood mosaics is a rewarding artistic endeavor that blends the natural world with personal creativity. With each piece of driftwood carrying its own history, you have the opportunity to craft a unique artwork that tells your story. Whether practiced as a hobby or presented in an art gallery, driftwood mosaics offer endless possibilities for exploration and expression. By understanding the process and tapping into your creativity, you can craft pieces that not only represent personal achievement but also serve as tributes to the beauty and resilience of nature’s cycles.

Filed Under: Driftwood Ideas Tagged With: Art, DIY, Driftwood, Handmade, Mosaic

Driftwood Mobile Diy Drift Wood

May 30, 2025 by admin

Have you ever stumbled upon a piece of driftwood along the shore and wondered about all the creative possibilities it holds? Driftwood, with its unique shapes and weathered textures, can be a magical find for a do-it-yourself (DIY) enthusiast. Creating a driftwood mobile is not only a fantastic way to use these natural treasures but also an excellent way to bring a piece of nature into your home. Let’s begin this crafty journey together, exploring everything you need to know to make your very own driftwood mobile.

Driftwood Mobile Diy Drift Wood

Understanding Driftwood

Before diving into the DIY project, it’s essential to gain a better understanding of driftwood — its origins, characteristics, and varieties. This helps you appreciate your materials and make informed decisions when selecting pieces for your mobile.

What is Driftwood?

Driftwood is essentially any type of wood that has been washed onto the shore by winds, tides, or waves. Over time, pieces of wood that come from various sources such as tree branches, logs, or even man-made sources are sculpted by water and sand into beautiful, smooth forms. Driftwood is unique and full of character due to the countless hours nature has spent perfecting it.

Characteristics of Driftwood

Driftwood typically displays colors ranging from pale beige to brown and even gray, depending on its exposure to sun, salt, and other elements. It’s often lightweight due to the natural drying process. The pieces might have holes, knots, and other features formed by marine life or the natural erosion process, offering a rustic charm.

Sourcing Driftwood

You might be wondering where to find driftwood for your project. Fortunately, there are a few ways to source it. You can collect driftwood during walks along lakeshores, rivers, and beaches. Remember to check local regulations on collecting natural materials. If that’s not an option, craft stores, online marketplaces, or specialized decor shops often sell driftwood for crafting purposes.

Preparing Your Driftwood

Before you start crafting, some preparation is necessary. Preparing your driftwood ensures you have clean, sturdy pieces that will make a gorgeous and durable mobile.

Cleaning Your Driftwood

Start by removing sand, dirt, and any potential critters from the wood. A simple but effective cleaning method involves rinsing the driftwood under tap water. If there are hard-to-remove debris, an old toothbrush can be handy for scrubbing. For added disinfection and to kill bacteria or mold, let your driftwood soak in a mixture of water and a small amount of bleach (1 part bleach to 9 parts water) for about 24 hours. After soaking, rinse them thoroughly.

Drying the Driftwood

Once cleaned, allow the driftwood to dry completely. Place it in a well-ventilated, sunny location. Depending on the size and density of the wood, drying can take anywhere from a couple of days to a week. Proper drying prevents future mold growth and helps retain the driftwood’s wonderful texture.

Designing Your Driftwood Mobile

Now comes the exciting phase of designing your mobile. This process involves deciding on the style, layout, and overall appearance of your mobile.

Choosing a Style

The style of your driftwood mobile can range from simple and minimalist to intricate and decorative. Here are a few style ideas to consider:

  • Natural and Organic: Focus on showcasing the rustic beauty of the wood.
  • Seaside-inspired: Incorporate shells, miniature buoys, or other marine-themed items.
  • Bohemian/Eclectic: Use colorful threads, beads, or crystals to enhance the driftwood’s natural appeal.

Deciding on a Layout

Consider how you want the pieces to hang and move in space. A balanced and visually harmonious layout often uses symmetry or asymmetry to create interest. You might want a central piece of driftwood with others suspended around it or a cascading design, where pieces of decreasing size hang below one another.

Sketching Your Design

Before threading and assembling your mobile, sketch out your design on paper. This plan will guide you during the assembly process and help you determine the number and size of pieces you need. Be flexible; inspiration might strike as you physically work with your materials.

Gathering Materials and Tools

Beyond the pieces of driftwood you’ve collected, you’ll need additional materials and tools to create your mobile.

Essential Materials

MaterialFunction
DriftwoodThe main focus and structure of your mobile
Strong twine or threadFor hanging the driftwood pieces
Hooks or screwsFor attaching pieces or hanging the mobile
Decorative accentsOptional: shells, beads, feathers
Drill or screwdriverFor making holes (optional)

Tools You May Need

  • Scissors: For cutting twine or thread
  • Tape measure or ruler: To ensure even spacing and length
  • Hot glue gun or strong adhesive: To secure decorative elements or joints

By ensuring you’ve gathered all necessary materials before starting, you can streamline your crafting process and focus on the creative aspects.

Driftwood Mobile Diy Drift Wood

Creating Your Driftwood Mobile

With preparation complete, you’re ready to start assembling your driftwood mobile. This hands-on part of the process is where your creativity truly comes to life.

Drilling Holes (if necessary)

If your design requires, use a small drill bit to carefully make holes in your pieces of driftwood. Drilling should be done with care to avoid splitting the wood. This is often required only if your assembly involves threading driftwood onto a central support wire or if you want to precisely thread your twine through each piece.

Threading and Knotting

Take your chosen thread or twine and begin assembling your mobile by threading it through or around each piece of driftwood following your design. Use secure knots to ensure the pieces stay in place. Here are some knot types you can consider:

  • Overhand Knot: Simple and effective for securing ends.
  • Square Knot: Ideal for joining two strings together.
  • Lark’s Head Knot: Good for attaching items like beads or feathers.

Balancing Your Mobile

Achieving balance is crucial to ensuring your mobile hangs properly. Check the balance by hanging the mobile temporarily and observing how it settles. Adjust by trimming twine, moving pieces, or adding additional weight where necessary.

Adding Decorative Elements

If you opted for a more eclectic or themed mobile, now is the time to attach decorative accents like beads, feathers, or crystals. Use your hot glue gun or adhesive to secure them. Just remember to maintain balance and don’t overload any section.

Displaying Your Driftwood Mobile

Finally, it’s time to hang and display your creation where it can be fully appreciated. Consider locations such as:

  • Near a sunny window to highlight shadows and movement
  • In a breezy spot for gentle motion
  • As a focal point in a room to enhance natural or coastal decor

Secure your mobile with appropriate fixtures to ensure it is safely mounted.

Caring for Your Driftwood Mobile

To keep your mobile looking fresh and beautiful:

  • Dust it regularly with a dry cloth.
  • Occasionally check knots and connections for security.
  • Avoid overly humid areas to prevent potential wood warping.

Dive into the Creative Process

Crafting a driftwood mobile is more than a mere DIY project; it’s an exploration of creativity and nature. As you place each piece on your mobile, you’re not just connecting elements of wood; you’re connecting stories, memories, and personal touches into a beautiful, harmonious display. Enjoy every step of crafting and remember that every imperfection adds character and uniqueness to your creation. Let your artistic instincts guide you, and have fun bringing a piece of the outdoors into your heart and home.

Filed Under: Driftwood Ideas Tagged With: crafts, DIY, Driftwood, home decor

Driftwood Mobile Diy

May 29, 2025 by admin

Have you ever wandered along a sunlit beach and stumbled upon a uniquely shaped piece of driftwood, its weathered texture telling a story of time and tide? If so, you’re not alone! Driftwood’s natural beauty and rustic charm make it a popular choice for home decor, especially when it comes to creating stunning mobiles. Making a driftwood mobile can be a delightful and creative way to bring a piece of nature into your home. Not only is it an enjoyable project, but it also offers a wonderful opportunity to express your creativity.

Driftwood Mobile Diy

What is Driftwood?

Driftwood is essentially any piece of wood that has been washed ashore by the action of tides, winds, or currents. Over time, the continuous motion of the sea smooths its surface, creating an organic, natural texture that is both visually appealing and tactile. These pieces can vary greatly in size, shape, and color, making each piece unique.

Where to Find Driftwood

Finding the right piece of driftwood is the first step in creating your mobile. Often, you’ll find driftwood on beaches along lakes, rivers, and oceans. It’s important to check local regulations before collecting driftwood, as some areas consider it a protected resource. Plan your collection during low tide when the shoreline is more exposed.

Why Choose Driftwood for a Mobile?

Driftwood is not only visually appealing but also highly durable. Its natural resilience to water makes it a lasting part of any decor feature. Moreover, using driftwood supports a sustainable lifestyle by repurposing natural materials rather than relying on manufactured products. A driftwood mobile can effortlessly blend with various interior design themes, whether you prefer modern minimalistic, rustic, or coastal.

Materials You’ll Need

Getting started on your driftwood mobile DIY project is exciting. Let’s prepare by gathering the materials and tools necessary for this craft. Ensure you have the following items ready before you start:

Material/ToolPurpose
Driftwood piecesThe main component of your mobile.
Fishing line or twineFor suspending the driftwood pieces.
Hooks or eye screwsTo attach pieces of driftwood to each other.
Beads and seashellsOptional decorations to add visual interest.
ScissorsTo cut the line or twine to the desired length.
Drill or screwdriverFor making holes in driftwood, if needed.
SandpaperTo smooth any rough edges or surfaces on the driftwood.

Tips on Selecting Your Materials

Choose driftwood pieces of varying lengths and widths for an attractive, layered effect. It’s essential to ensure that the twine or fishing line is durable enough to support the weight of each piece. Lightly sanding the driftwood can help ensure a safer handling experience and improve the longevity of your mobile.

Preparing Your Driftwood

Once you’ve collected your driftwood and gathered necessary materials, the next step is preparation. Preparing the driftwood is a straightforward process that ensures your creation is both a lasting and beautiful one.

Cleaning and Drying

Cleaning your driftwood before use is important to remove any residual sea salt, sand, or potential pests that might inhabit the wood. Here’s a simple cleaning process:

  1. Rinse the driftwood pieces thoroughly with fresh water to wash away salt and sand.
  2. Soak them in a mixture of water and mild bleach for a few hours. This step helps in disinfecting them.
  3. Rinse again and let them dry completely in a sunny spot. This could take a few days, depending on the size and thickness of the wood.

Inspecting and Sanding

After your pieces are cleaned and dried, inspect them for any sharp edges or splintering. Using sandpaper, smooth out any rough areas to prevent injury and to ensure the pieces look polished once they’re assembled.

Designing Your Mobile

The design phase is where your creativity truly gets to shine. Consider the final location of your mobile and how it might complement or contrast with existing decor.

Determining the Arrangement

A balanced design starts with experimentation. Lay out your driftwood pieces on a large flat surface and try several configurations until you find one that pleases you. Consider varying the distance between pieces and testing different combinations of long and short pieces.

Adding Additional Elements

Adding beads, seashells, or other natural elements can enhance your mobile’s aesthetic. Incorporate these elements by threading them onto the fishing line or twine, placing them between each driftwood piece for added visual interest.

Driftwood Mobile Diy

Assembling Your Driftwood Mobile

With a design in mind and supplies ready, it’s time to bring your mobile to life. The assembly process requires a bit of patience and precision to ensure each piece hangs correctly.

Drilling and Connecting

For large or heavy pieces, drilling small holes for hooks or eye screws is the first step. Ensure the holes are centered to maintain balance. For lighter pieces, a simple knot may suffice.

  1. Drill holes where necessary on each piece of driftwood.
  2. Attach the eye screws or hooks.
  3. Tie the fishing line or twine to each piece, leaving enough length for it to dangle at your desired height.

Balancing Your Mobile

Achieving balance is crucial to ensure that your mobile hangs freely and doesn’t tip. Make adjustments as necessary by shortening or lengthening the line between pieces or shifting the position of the line along the driftwood. This process might need some trial and error, so don’t hesitate to rearrange until you’re satisfied with the balance.

Displaying Your Driftwood Mobile

Your mobile is now assembled and ready to display! Consider where it will have the most visual impact and be sure it’s safe from playful pets or areas of high traffic that could cause it to swing aggressively.

Best Places to Hang a Mobile

Driftwood mobiles look stunning in a variety of settings:

  • Living rooms: An ideal space, especially near a window where natural light accentuates the wood texture.
  • Bedrooms: Above the bed or in a reading nook as a comforting, calming piece.
  • Outdoor spaces: Hang it on a porch or patio, but ensure it’s protected from extreme weather when necessary.

Proper Hanging Techniques

When hanging your mobile, ensure that the overhead support can handle the weight of the mobile. Using a strong ceiling hook is essential. If hanging near a window, confirm that the mobile won’t be obstructed by curtains or blinds.

Maintenance and Care

To keep your driftwood mobile looking pristine, periodic maintenance is necessary. This involves gentle cleaning and inspection to ensure the safety and aesthetic integrity of the mobile.

Cleaning Your Mobile

Over time, dust accumulation is expected. Use a soft cloth or feather duster to gently remove dust from the driftwood and additional elements. If your mobile includes easily removable decorations, you might want to clean them separately.

Long-Term Tips

Avoid exposing your mobile to excessive moisture, which could lead to mold or mildew growth. Consider occasionally inspecting the twine or fishing line for wear, which can weaken over time and potentially cause your mobile to fall.

Conclusion

Creating a driftwood mobile is an enriching experience that combines collecting, crafting, and decorating. It not only adds a personal touch to your home decor but also reminds you of the serene beauty of nature. Whether placed in your living room, bedroom, or outdoor patio, a driftwood mobile captures attention and resonates with calm. With the right tools, creativity, and a bit of patience, you can craft a piece that is distinctly yours.

If you haven’t already tried making your own driftwood mobile, maybe it’s time to plan a beach trip or visit your local lakefront for some inspiration. Remember to enjoy the process—it’s just as beautiful as the result!

Filed Under: Driftwood Ideas Tagged With: craft, DIY Project, Driftwood, home decor, Mobile

Driftwood Miniature Houses Diy

May 28, 2025 by admin

Have you ever gazed at a piece of driftwood and wondered about the story it might tell? There’s something inherently captivating about these naturally weathered pieces of wood—perhaps it’s their journey through rivers and oceans, or the way nature shapes them into unique forms. If you’ve ever felt inspired to create something magical from these pieces, then driftwood miniature houses could be your new favorite project. Let’s explore how you can transform ordinary driftwood into enchanting little homes!

Driftwood Miniature Houses Diy

Understanding Driftwood

What is Driftwood?

Driftwood is wood that has been washed onto a shore, riverbank, or beach by the action of winds, tides, or waves. These pieces often have a distinctive, weather-beaten appearance, resulting from prolonged exposure to water and sunlight. Each piece of driftwood is unique, with its own distinct shape, color, and texture.

Why Use Driftwood for Miniature Houses?

Driftwood offers a natural, rustic charm that perfectly complements miniature houses. Its varied shapes and textures provide endless creative possibilities. Using driftwood also embraces sustainability, repurposing natural materials instead of synthetic ones.

Gathering Your Materials

Selecting the Right Driftwood

Before starting your project, you need the right pieces of driftwood. Look for pieces that have interesting shapes or resemble structures you might use in a house, such as flat pieces for roofs or long, slender pieces for chimneys or fence posts.

Additional Materials

Apart from driftwood, here are some essentials you’ll need:

  • Glue: A strong adhesive, such as wood glue or a hot glue gun, to hold your structures together.
  • Cutting Tools: A small saw or craft knife to shape your pieces as needed.
  • Paint and Brushes: For adding color or details to your houses.
  • Sealer: To protect the wood and give it a finished look.
  • Additional Decorations: Items like pebbles, moss, shells, or miniature accessories to enhance your design.

Preparing the Driftwood

Cleaning and Drying

It’s crucial to clean your driftwood before use. Start by rinsing it thoroughly to remove sand and debris. For a more thorough clean, soak the wood in a solution of water and vinegar, which can help remove any remaining salt and potential pests. Once cleaned, let the wood dry completely—this may take several days depending on the humidity and size of the wood.

Shaping Driftwood

While driftwood comes in many interesting shapes, you might need to refine it a bit. Use a saw to cut larger pieces down to size or a craft knife for more precise shaping. Remember to work with the natural form of the wood to maintain its unique character.

Constructing Your Driftwood Miniature House

Creating the Base

Start by choosing a sturdy, flat piece of driftwood to serve as the base of your house. This will provide stability for your structure and a starting point for layout. You can place additional smaller pieces around the base to create the appearance of landscape or garden elements.

Building the Structure

Once you have your base, begin by arranging the main elements of your house. Use flat, wide pieces for floors and roof panels, stacking or layering them to create walls. Secure each piece with glue, allowing sufficient time for it to set before moving on to the next.

Adding Details

This is where you can let your creativity shine. Consider carving or affixing door and window shapes onto the walls. Use slender bits of driftwood for railings, fences, or chimney stacks. This is your chance to personalize the house with unique touches.

Painting and Sealing

You have the option to paint your driftwood house, though many prefer to leave the wood’s natural hues. If you decide to add color, use water-based paints for a more subtle, washed-out effect. Lastly, apply a sealant to protect your house from moisture and ensure it withstands the elements.

Driftwood Miniature Houses Diy

Decorating and Finishing Touches

Landscaping with Natural Elements

Enhance your driftwood house with elements like moss roofs, pebble pathways, and tiny shell gardens. These natural additions create a whimsical, enchanted appearance befitting of a fairy tale.

Incorporating Miniature Accessories

Seek out miniature furniture or inhabitants that can bring your driftwood house to life. Consider tiny figurines, miniature garden tools, or little lanterns to give a sense of occupancy and activity.

Displaying Your Driftwood Creation

Indoor Display Ideas

Your driftwood house can become a conversation piece indoors. Place it on a shelf with complementary decorations, perhaps accompanied by coastal-themed art or a collection of other unique miniatures.

Outdoor Display Ideas

If you’ve treated your house with weatherproof sealant, consider displaying it in the garden. Nestle it amongst plants or create a designated area for a fairy garden, where it can be surrounded by flowers and nature.

Additional DIY Driftwood Projects

Beyond Houses: Other Driftwood Crafts

Once you’ve mastered making miniature houses, consider expanding into other projects. Driftwood can be used to create picture frames, decorative wall art, or even functional furniture like tables and coat racks. The possibilities are boundless.

Sharing Your Craft

Consider sharing your driftwood creations with a community of crafters. Join online forums dedicated to driftwood art or participate in local craft fairs. Many find joy in both creating and sharing their work with others.

Safety and Preservation Tips

Crafting Safely

Always prioritize safety while crafting. Use tools with care, and have a first-aid kit handy for any minor injuries. Work in a well-ventilated area, especially when using glue and sealants.

Maintaining Your Driftwood Pieces

Over time, exposure to elements can cause driftwood to degrade. Periodically check your creations for signs of wear, and reapply sealant as needed to extend their lifespan.

Conclusion

Creating driftwood miniature houses is a delightful way to use natural materials to craft something extraordinary. It’s a hobby that combines art, nature, and storytelling, offering endless opportunities to express your creativity. Whether you keep your creations for personal enjoyment or share them with others, each piece is a testament to the beauty and wonder that can come from the simplest materials. So next time you see a piece of driftwood, remember the enchanting little world you can build just beneath the surface.

Filed Under: Driftwood Ideas Tagged With: crafts, DIY Projects, Driftwood, home decor, Miniature Houses

Driftwood Mini Uggs

May 28, 2025 by admin

Are you looking for the perfect pair of cozy and stylish shoes for the chilly months ahead? Let’s talk about Driftwood Mini Uggs and why they might just be the ideal addition to your wardrobe. With a rich history and a reputation for combining comfort with fashion, these iconic boots deserve attention. So, let’s jump in and uncover all there is to know about them.

Driftwood Mini Uggs

The Origin of Ugg Boots

From the Sea to the Streets

Ugg boots have a fascinating history that stretches back to the early 20th century. Originally worn by Australian surfers to keep their feet warm after catching waves, the design has long surpassed its humble beginnings. You might be surprised to learn that these boots had already gained popularity among aviators during World War I, who prized them for their warmth at high altitudes.

The Journey to Global Fame

Although these boots began in Australia, their global recognition took off in the late 20th century when they were introduced to a broader audience. With endorsements from celebrities and appearances in media, Uggs transitioned from niche footwear to a global fashion staple. This journey to fame was not just about celebrity influence but also the boots’ undeniable comfort, which won over the masses.

What Sets Driftwood Mini Uggs Apart?

The Perfect Blend of Style and Comfort

The Driftwood Mini Uggs are a standout model among the diverse range of Ugg boots. These boots are designed with a shorter shaft, allowing for easy wear and versatility in styling. Not only do they provide the signature comfort Uggs are known for, but their mini size offers a sleek and modern look, perfect for both casual and slightly dressier occasions.

Quality Materials

When you invest in a pair of Driftwood Mini Uggs, you benefit from high-quality materials. The boots are typically crafted from premium sheepskin, known for its natural insulation properties, keeping your feet warm in winter and cool in summer. The outer suede not only looks luxurious but also wears well over time, developing a unique character as you use them.

Styling Your Driftwood Mini Uggs

Versatile Pairing Options

One of the greatest advantages of Driftwood Mini Uggs is their versatility. You can pair them with almost any outfit, be it jeans, leggings, or even a casual dress. The neutral tones available make them easy to integrate into your wardrobe, complementing a wide range of colors and styles.

Transitioning Through Seasons

These boots aren’t confined to a single season either. While they are certainly cozy enough for the colder months, their breathability means you can wear them during transitional times like spring or autumn. Consider them a year-round companion that adapts to your needs.

Caring for Your Uggs to Ensure Longevity

Cleaning and Maintenance Tips

To keep your Driftwood Mini Uggs looking their best, some care and maintenance are necessary. Regularly brushing the suede helps retain its softness and sheen. When they encounter dirt or stains, using a gentle cleaning solution specifically designed for Uggs can make all the difference. Always follow any cleaning with a protective spray to shield the boots from moisture and spots.

Storage Suggestions

Proper storage is essential for maintaining the shape of your boots. It’s advisable to avoid leaving them in direct sunlight or damp environments, which can damage the materials. Instead, store them in a cool, dry place, ideally standing upright or on a shoe rack.

Driftwood Mini Uggs

Debunking Myths About Uggs

Are They Ethical and Sustainable?

Uggs often come under scrutiny regarding their sourcing of materials. However, the company has been working diligently to improve their sustainability practices. They now implement strict guidelines to ensure humane treatment of animals and are investing in sustainable materials to reduce their environmental impact.

The Comfort vs. Fashion Debate

A common myth is that comfortable footwear can’t be fashionable. With Driftwood Mini Uggs, you don’t have to sacrifice style for comfort. The sleek design and luxurious feel allow you to enjoy the best of both worlds, keeping you in vogue without compromising on foot comfort.

Conclusion

Why Driftwood Mini Uggs Are Worth the Hype

The allure of Driftwood Mini Uggs lies not just in their comfort but also in their timeless style and quality craftsmanship. They bridge the gap between practicality and fashion, making them a go-to choice for those who appreciate versatility and comfort. Understanding the history, material quality, and versatility of these boots can help you make an informed decision, ensuring you enjoy every step in them.

Whether you’re considering your first pair or adding to your collection, Driftwood Mini Uggs are indisputably a wise choice that you can rely on for many seasons to come.

Filed Under: Driftwood Ideas Tagged With: Driftwood, footwear, Style, Uggs, Winter

Driftwood Mirror Diy How To Make

May 28, 2025 by admin

Have you ever admired the rustic charm and natural beauty of driftwood mirrors in coastal or bohemian interiors and thought to yourself, “Could I create something like that?” The good news is that not only is it possible, but making a driftwood mirror is an enjoyable and satisfying project you can tackle on your own! In this guide, I will walk you through everything you need to know to create your own stunning driftwood mirror. From sourcing your driftwood to putting the final touches on your masterpiece, you’ll learn all the steps necessary to craft a mirror that will be the envy of anyone who steps into your home.

Understanding Driftwood

What is Driftwood?

Before you begin collecting materials for your DIY project, it helps to understand what driftwood is. Driftwood refers to pieces of wood that have been washed onto shores by the action of tides, winds, or waves. Over time, these pieces of wood are naturally weathered, giving them their unique appearance. The natural sculpting process creates interesting shapes and textures, making each piece one-of-a-kind.

Why Use Driftwood?

Driftwood is not only beautiful; it is sustainable and eco-friendly. By using driftwood, you repurpose materials already in existence, minimizing environmental impact. This makes driftwood an excellent choice for those who want to incorporate more environmentally responsible pieces into their home decor.

Finding Driftwood

Driftwood can often be found along beaches, riverbanks, or lakeshores. Each location offers unique characteristics to the driftwood, whether it’s the type of wood or the way it’s been shaped by nature. When collecting driftwood, always ensure it’s legal to do so in your chosen location and that you’re not disrupting any natural habitats.

Gathering Materials for Your Driftwood Mirror

Before you roll up your sleeves and get started, you’ll need to gather all your materials. Here’s what you’ll need to craft your driftwood mirror:

Materials Needed

  • Driftwood Pieces: Gather a variety of pieces in different sizes and shapes.
  • Mirror: Choose a base mirror of your desired size and shape.
  • Strong Adhesive: Opt for industrial-strength adhesives like Epoxy or a hot glue gun for bonding the driftwood to the mirror.
  • Backing Board: This could be plywood or MDF to provide extra stability, especially if your mirror will be large.
  • Sandpaper: To smooth any rough edges on the driftwood.
  • Saw: For trimming driftwood as needed.
  • Cloth and Water: For cleaning the driftwood pieces.
  • Hangers: To mount the finished mirror on a wall.

Optional Materials

  • Wood Finish: For those who want to give the driftwood a polished or stained look.
  • Tapestry Needles: Useful if you are threading smaller pieces together before attaching them to the mirror.
  • Protective Gear: Gloves and goggles to keep you safe while working with tools and adhesives.

Driftwood Mirror Diy How To Make

Preparing Your Driftwood

Cleaning Driftwood

Once you have your driftwood, it’s important to clean it thoroughly. Given that driftwood comes from natural bodies of water, it might be covered in algae, salt, sand, or even insects. Here’s how you can clean your driftwood:

  1. Rinse Thoroughly: Use water and a sturdy brush to clean off any debris or dirt.
  2. Soak in Water: Submerge your driftwood in water for several hours to dissolve any ocean salt or trapped sand.
  3. Use Mild Soap: For particularly stubborn dirt, consider using a mild soap to help lift it away.
  4. Dry Completely: After cleaning, let the driftwood pieces dry completely. Place them in a well-ventilated area for several days to ensure they are fully dried.

Treating Driftwood

For additional preservation and to avoid any potential pests:

  • Boil the Driftwood: If your pieces fit into a pot, boiling them for an hour can help eliminate pests.
  • Freeze Method: Alternatively, placing driftwood in the freezer for a week can also help kill any insects.

Optional Sanding

Using sandpaper, gently sand any edges or surfaces you prefer to be smoother. This can make handling the driftwood easier and may enhance the final appearance by giving a more finished look.

Designing Your Driftwood Mirror

Plan Your Design

The first step in designing your mirror is to plan how you want your driftwood to be laid out around it. Here’s how you can approach this:

  • Arrange Without Glue: Place your driftwood pieces around your mirror to get an idea of how you want them arranged.
  • Mix Sizes and Shapes: Use a variety of shapes and sizes to create an appealing and natural look. Sporadically placing larger and smaller pieces can give a balanced aesthetic.
  • Consider Depth and Layers: Think about layering some pieces on top of others for added depth.

Finalizing the Design

Once you’re satisfied with your layout, take a photograph or sketch it out. This will help you remember the placement when it’s time to attach the pieces.

Driftwood Mirror Diy How To Make

Assembling Your Driftwood Mirror

Attaching Driftwood to a Backing Board

For larger mirrors, using a backing board can add stability. Here’s how you can do it:

  1. Cut the Backing Board: Ensure it matches the dimensions of your mirror. You can extend it slightly if desired for a ‘floating’ look.
  2. Attach the Mirror to the Board: Use your strong adhesive to attach the mirror securely onto the backing board’s center.

Gluing the Driftwood

With your arrangement in mind, begin attaching the driftwood pieces:

  • Apply Adhesive: Generously apply adhesive to the driftwood and press it onto the mirror’s border or the backing board.
  • Press Firmly: Hold each piece for a few seconds to ensure it adheres securely.
  • Work in Sections: Attach one section at a time, referring back to your photo or sketch for accuracy.

Let it Set

Allow the adhesive to cure according to its instructions. This can take anywhere from a few hours to a full day. Patience during this step is crucial for ensuring your mirror is sturdy and safe for hanging.

Finishing Touches

Sealing the Wood

If you opted to use a wood finish, now is the time to apply it. Sealing the wood can enhance the color, give it a uniform appearance, and provide a layer of protection.

Attach Hanging Hardware

Once your mirror is fully assembled and the glue has dried:

  • Choose Hanging Hardware: D-rings and picture wire, or sawtooth hangers, are popular choices.
  • Align to the Backing Board: Ensure the hardware is aligned so the mirror will hang straight and securely.

Positioning Your Mirror

Find the ideal spot on your wall to hang your mirror. Consider factors like lighting, visibility, and what it will reflect back into your space.

Troubleshooting Tips

Problematic Adhesion

If your driftwood pieces do not stick well:

  • Check Adhesive Use: Make sure you’re using enough adhesive and pressing firmly.
  • Surface Prepping: Lightly scuff the back of the wood or the adhesive area to give a better grip.

Warping Over Time

If any driftwood pieces warp:

  • Secure Reinforcement: You may need to remove and reattach these pieces or reinforce them with additional adhesive or a small wood nail.

Caring for Your Driftwood Mirror

Regular Maintenance

Maintaining your driftwood mirror will keep it looking beautiful for years to come:

  • Dust Regularly: Use a soft cloth or duster to keep the mirror and wood clean.
  • Avoid Moisture: Keep it away from high-moisture environments unless treated to handle humidity.

Restoring Luster

If the driftwood’s color fades over time:

  • Reapply Wood Finish: Refresh the driftwood by applying a wood finish or wax to restore its appearance.

Congratulations! You’ve now created your own driftwood mirror. Your handmade piece isn’t just a safe guarder of reflection; it’s a story of sustainability, creativity, and natural beauty. Hopefully, this driftwood mirror instills in your home a touch of nature’s coastline charm. If you have any thoughts or additional tips to share about making driftwood mirrors, feel free to contribute. Your experiences will surely inspire and aid other aspiring DIY enthusiasts.

Filed Under: Driftwood Ideas Tagged With: crafts, DIY, Driftwood, Home Projects, Mirror

Driftwood Mirror Bathroom

May 27, 2025 by admin

Have you ever considered how the right mirror can transform your bathroom into a sanctuary? A thoughtfully chosen mirror not only serves a functional purpose but can also become a statement piece. Specifically, have you thought about a driftwood mirror for your bathroom? With its natural appeal and rustic charm, a driftwood mirror is more than just a reflective surface—it’s an art piece that enhances your space with character and warmth.

Driftwood Mirror Bathroom

Understanding Driftwood Mirrors

What is Driftwood?

Driftwood is wood that has been washed onto a shore or beach by the action of winds, tides, or waves. It is often weathered by saltwater and offers unique textures and shapes as a result of natural wear over time. This weathering process gives driftwood its distinctive, rustic appearance that many people find appealing.

The Appeal of Driftwood Mirrors

Driftwood mirrors capture the essence of nature’s raw beauty. Each piece of driftwood is unique, carrying with it the story of its journey—a narrative that’s etched into its grooves and curves. These mirrors add a warm, organic feel to any space and can complement a variety of design styles, from coastal and rustic to modern and eclectic.

Why Choose Driftwood Mirrors for Your Bathroom?

Unique Aesthetic

The allure of a driftwood mirror lies in its uniqueness. No two pieces of driftwood are the same, meaning every mirror crafted with it is one-of-a-kind. This singular quality can turn an ordinary bathroom into a personal retreat that reflects your individual taste and style.

Versatility in Design

Driftwood mirrors fit seamlessly into numerous design themes. Whether your bathroom embodies a sleek modern look or a cozy rustic vibe, a driftwood mirror can enhance the space. Its natural texture pairs beautifully with both neutral tones and bold colors, bridging various design elements effortlessly.

Eco-Friendly Choice

By choosing driftwood, you’re selecting a sustainable and environmentally friendly option. Driftwood is a natural, biodegradable, and often reclaimed material that doesn’t require additional resources to produce. Incorporating it into your home is a responsible choice that supports environmental conservation efforts.

How to Integrate Driftwood Mirrors in Your Bathroom

Finding the Perfect Spot

Placement is key when adding a driftwood mirror to your bathroom. Consider the lighting in your space; placing the mirror where it can reflect natural light enhances its beauty and brightens the room. Positioning it above the sink is a common choice, but feel free to get creative!

Complementing Existing Decor

While a driftwood mirror is versatile, it’s beneficial to consider how it will harmonize with your existing decor. If your bathroom has wooden elements, a driftwood mirror can tie these features together. Similarly, if your fixtures are modern and sleek, the contrast with the organic texture of driftwood can create an exciting design dynamic.

Size and Scale

Selecting the right size is crucial. A large mirror can serve as a focal point, making your bathroom feel more spacious and open. However, if your bathroom is on the smaller side, a medium-sized or even compact mirror can add charm without overwhelming the space.

Maintaining Driftwood Mirrors

Cleaning and Care

Keeping your driftwood mirror looking its best involves regular maintenance. Clean the surface with a soft, damp cloth to avoid scratches. For the driftwood frame, avoid using harsh chemicals; a gentle dusting should suffice. Occasionally, you can apply a light coat of beeswax or mineral oil to the wood to preserve its natural luster.

Handling Humidity

Bathrooms are inherently humid environments, which can affect the durability of driftwood. To mitigate any potential damage, ensure your bathroom is well-ventilated. Installing an exhaust fan can help regulate moisture levels and preserve the condition of your driftwood mirror.

Driftwood Mirror Bathroom

Driftwood Mirrors: A Craft Project?

D.I.Y. Enthusiasts

If you’re a D.I.Y. enthusiast, crafting your own driftwood mirror might be an exciting project. Gathering pieces of driftwood during a walk on the beach can be a fulfilling experience—and assembling your custom mirror adds a personal touch to your bathroom decor.

Crafting Your Own

Start by collecting driftwood pieces that appeal to you. Consider their shapes and sizes to envision a cohesive final look. Next, you’ll need a basic mirror and a strong adhesive suitable for wood. Arrange the driftwood around the mirror’s edge, experimenting until you find the perfect configuration. Once satisfied, secure the driftwood in place and let it dry thoroughly before hanging your masterpiece.

Choosing the Right Driftwood Mirror for Your Bathroom

Shopping Tips

When purchasing a driftwood mirror, consider the quality and craftsmanship. Look for mirrors made with authentic driftwood rather than synthetic alternatives. Examine the construction to ensure it’s sturdy and well-assembled—quality materials and good craftsmanship mean your mirror will last for years to come.

Budget Considerations

Driftwood mirrors can range extensively in price. If budget is a concern, shop around for the best deals, or consider secondhand options that may offer the desired look at a fraction of the price. Sometimes, local artisans or craft markets can be great places to find unique and affordable driftwood mirrors.

The Broader Impact: Driftwood’s Environmental Role

Shoreline Ecosystems

Driftwood plays a vital role in shoreline ecosystems. It provides habitat for wildlife, from small invertebrates to birds. As it decomposes, it contributes nutrients to surrounding soil and plants. By collecting driftwood responsibly or purchasing from ethical sources, you help preserve its ecological roles.

Balancing Aesthetics and Ecology

While driftwood is beautiful in home decor, balancing its use with environmental considerations is crucial. Ensure that any driftwood you use is collected sustainably, without disrupting coastal ecosystems. Purchasing driftwood from reputable suppliers who practice ethical sourcing is one way to enjoy its beauty responsibly.

Conclusion

By choosing a driftwood mirror for your bathroom, you’re embracing a piece of nature that offers both aesthetic appeal and ecological consciousness. Its unique charm transforms your space, making it more than just a functional room but a reflection of nature’s beauty infused into your daily life. With thoughtful care and integration into your decor, a driftwood mirror can become a cherished aspect of your home, offering both utility and a touch of seaside serenity. Appreciate the narratives told by each ripple and curve of the wood, and let it inspire a deeper connection to the natural world within your sanctuary.

So, are you ready to let a driftwood mirror enhance your bathroom’s charm and functionality?

Filed Under: Driftwood Ideas Tagged With: Bathroom, DIY, Driftwood, Mirror, Rustic

  • Page 1
  • Page 2
  • Page 3
  • …
  • Page 158
  • Next Page »

Primary Sidebar

Driftwood4us.com, is a participant in the Amazon Services LLC Associates Program, an affiliate advertising program designed to provide a means for sites to earn advertising fees by advertising and linking to amazon.com.