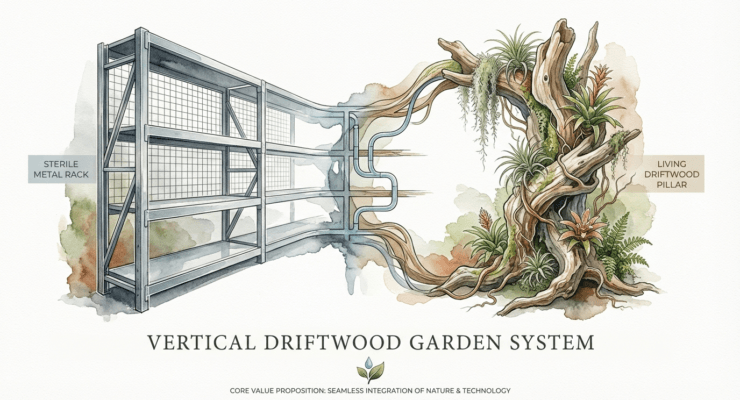
Is your small-space decor a sterile graveyard or a thriving coastal ecosystem? Trade your dusty metal racks for a vertical driftwood pillar that feeds and houses your indoor plants naturally. It’s not just a shelf; it’s a living, breathing neighborhood for your greens.
Most urban dwellers treat plant styling like a game of Tetris. We stack pots on cold, industrial wire racks or hide them away in corners where light goes to die. But there is a sturdier way—a method born from the salt-sprayed grit of the coast and the resourcefulness of the pioneer spirit.
A vertical driftwood garden system brings the raw, weathered textures of the shoreline into your living room. It utilizes the natural crevices and porous surfaces of salvaged wood to provide a permanent home for plants that don’t need soil to survive. This isn’t just about decoration; it’s about building a functional habitat that mimics how these plants grow in the wild.
In this guide, we will walk through the process of selecting, curing, and mounting a living driftwood pillar. You will learn how to turn a piece of ocean-worn timber into a vertical ecosystem that saves space and transforms your home’s atmosphere.
Vertical Driftwood Garden System
A vertical driftwood garden system is a freestanding or wall-mounted structure that uses a central wood pillar as a substrate for epiphytic plants. Unlike traditional planters that rely on pots and soil, this system leans into the biology of plants that naturally cling to trees or rocks. It is a fusion of sculpture and horticulture, designed for spaces where floor real estate is at a premium.
These systems exist because they solve a fundamental problem for the indoor gardener: the lack of horizontal surface area. By going vertical, you capitalize on the height of your room. In the real world, you see these concepts in high-end biophilic office designs or coastal porch setups where salt-resistant timber is abundant. However, the true beauty of a driftwood pillar lies in its adaptability for a small apartment or a sunlit studio.
Think of the driftwood as the skeleton of your garden. It provides the structural support, while the plants provide the skin and life. Because driftwood is often hollowed out by the tides or features deep fissures from years of exposure, it creates natural “pockets” for moss and roots to take hold. It is an efficient, self-contained unit that replaces the need for five or six individual pots with one striking, cohesive element.
How to Build Your Vertical Driftwood Pillar
Building this system requires patience and a bit of manual labor. You cannot simply pull a piece of wood from the beach and slap a plant on it. That path leads to rot, pests, and heartbreak. You need to prepare the wood with the same care a shipwright would use for a mast.
Step 1: Sourcing and Selecting Wood
Look for hardwoods that have been thoroughly seasoned by the water. Cedar, cypress, and oak are ideal because they resist rot naturally. Avoid soft, “punky” wood that crumbles when you press your thumb into it. You want a piece with character—curves, holes, and interesting textures—that can stand upright without wobbling or be easily anchored to a wall.
Step 2: Cleaning and Sterilization
Raw driftwood often carries salt, bacteria, or hitchhiking insects. To make it safe for indoor use, you must sterilize it. If the piece is small enough, boiling it for 15 to 20 minutes is the gold standard; it kills everything and leaches out excess tannins. For larger pillars, a 10% bleach-to-water solution is necessary. Scrub the wood with a stiff nylon brush, soak it in the solution for 24 hours, and then rinse it thoroughly until the chlorine scent is gone.
Step 3: Curing the Wood
Once cleaned, the wood needs to dry. Place it in a sunny, well-ventilated area for at least two weeks. This “pioneer-grit” patience ensures the wood is stable and won’t warp or mold once you introduce moisture to the plants. A properly cured piece of driftwood will feel lighter and sound hollow when tapped.
Step 4: Selecting Your Plants
Since there is no soil, you must use epiphytes. For a dry environment, Tillandsias (Air Plants) are the best choice. If you intend to keep the pillar in a more humid area or are willing to mist frequently, consider Bromeliads, Java Ferns, or Anubias. These plants use their roots primarily for anchoring, absorbing nutrients through their leaves and the surrounding air.
Step 5: Mounting and Anchoring
Use clear fishing line or copper wire to secure the plants into the wood’s natural crevices. You can tuck a small amount of damp sphagnum moss around the base of the plant to help hold moisture. Wrap the wire firmly but not so tight that it cuts into the plant’s tissue. Over time, many of these species will grow their own “holdfast” roots, and the wire can eventually be removed.
Benefits of a Living Driftwood Garden
The practical benefits of this system extend beyond simple aesthetics. First and foremost is the optimization of vertical space. In a small apartment, floor space is precious. A vertical pillar allows you to house a dozen plants in the footprint of a single coffee mug.
From a health perspective, these systems are powerhouses for biophilic design. Authentic wood surfaces have been shown to lower stress and improve focus. Unlike a STERILE METAL RACK, which reflects sound and feels cold, wood naturally diffuses noise and adds a tactile warmth to a room. It creates a “material connection to nature” that is proven to enhance the well-being of anyone occupying the space.
Additionally, a driftwood garden acts as a natural humidity regulator. As you mist the plants and the wood absorbs small amounts of moisture, it slowly releases it back into the room. This can be particularly beneficial during winter months when indoor air becomes dry and harsh on the respiratory system.
Challenges and Common Mistakes
One of the most frequent errors is failing to remove the salt from beach-sourced driftwood. Salt is a desiccant; it will pull moisture directly out of your plants’ roots, killing them regardless of how much you water. If you see a white, crusty film forming on the wood after it dries, it still has salt in it and needs another deep soak in fresh water.
Another challenge is the “gravity trap.” In a vertical system, water naturally flows downward. If you are using a misting system, the top plants might dry out in hours while the bottom ones sit in a pool of water, leading to rot. You must balance your plant placement: put the most drought-tolerant species at the top and the moisture-lovers near the base where the runoff settles.
Weight is also a factor that beginners often overlook. A large, water-saturated piece of driftwood is significantly heavier than a dry one. Ensure your mounting hardware—whether it’s a floor base or a wall bracket—is rated for at least double the dry weight of the wood to account for the “water weight” after a heavy misting session.
Limitations and Environmental Constraints
This system is not a “set it and forget it” solution. Because there is no soil to hold a reservoir of water, your plants are entirely dependent on you or an automated system for hydration. If you travel frequently without a neighbor to help, your driftwood pillar can turn into a skeleton of dead leaves very quickly.
Light is another constraint. Driftwood pillars are often placed in corners to save space, but epiphytes generally need bright, indirect light to thrive. You may need to supplement the setup with a dedicated grow light to ensure the plants on the “dark side” of the pillar don’t wither.  . Without adequate light, the plants will lose their color and fail to anchor themselves to the wood.
Finally, there is the limitation of plant variety. You cannot grow traditional heavy-rooting plants like monsteras or fiddle-leaf figs on a driftwood pillar without complex, bulky moss poles. You are largely limited to smaller, slow-growing species. If you want a lush, jungle-sized canopy, a vertical driftwood system might be a supplementary feature rather than your primary garden.
Comparison: Living Driftwood Pillar vs. Metal Plant Rack
When deciding how to display your greens, it helps to look at the measurable factors of each approach. While a metal rack is easy to buy, the driftwood pillar is a long-term investment in your home’s ecosystem.
| Feature | Living Driftwood Pillar | Sterile Metal Rack |
|---|---|---|
| Aesthetic | Natural, sculptural, unique | Industrial, repetitive, generic |
| Space Efficiency | High (Vertical focus) | Medium (Takes floor space) |
| Maintenance | High (Frequent misting) | Low (Standard watering) |
| Biophilic Value | Proven stress reduction | Minimal |
| Customization | Infinite (Nature-made shapes) | Limited to shelf adjustments |
Practical Tips for Maintenance
To keep your vertical garden thriving, you need to master the art of the “soak and spray.” While daily misting is helpful, it often only hydrates the surface of the leaves. Once a month, if the pillar is portable, take it to the shower and give the entire structure a gentle, luke-warm rinse. This washes away dust and allows the wood itself to hydrate, which provides a moisture buffer for the roots.
- Use Distilled Water: Most epiphytes are sensitive to the minerals and chlorine in tap water. Using rainwater or distilled water prevents unsightly mineral buildup on the wood and the plants.
- Incorporate Live Moss: Tucking live sheet moss or sphagnum into the crevices helps retain moisture.
 . It also acts as a visual indicator; when the moss turns crispy, it is time to water.
 - Prune for Airflow: Vertical gardens can become crowded. Trim away dead leaves or overgrown sections to ensure air can circulate around the wood, which prevents mold growth.
- Rotate for Light: If your pillar is freestanding, give it a quarter-turn every week. This ensures all plants receive equal light and prevents the pillar from looking “lopsided” as plants grow toward the sun.
 . It also acts as a visual indicator; when the moss turns crispy, it is time to water.
Advanced Considerations: Integrated Irrigation
For those who want to scale their driftwood garden into a permanent wall installation, manual misting becomes impractical. Advanced practitioners often integrate a hidden drip irrigation system. This involves running a thin, flexible poly-tubing line up the back of the wood, with small emitters tucked into the planting pockets.
When designing an integrated system, you must consider drainage. A “catch basin” at the base of the pillar is essential to prevent water from ruining your flooring. This can be a decorative stone trough or a hidden tray filled with pebbles. By automating the water flow with a simple tap timer, you can create a truly self-sustaining coastal ecosystem that thrives even when you are away.
Another advanced technique involves “inoculating” the wood with beneficial fungi or liquid fertilizers. Since the wood is the primary substrate, applying a diluted kelp or compost tea directly to the driftwood allows the wood to hold those nutrients, making them available to the plant roots over a longer period.
Scenario: The Urban Studio Transformation
Imagine a 400-square-foot studio apartment with one large window. A traditional metal rack would block half the light and create a cluttered, “grid-like” feel. Instead, the resident installs a 6-foot cedar driftwood pillar in the corner adjacent to the window.
They mount ten Tillandsia xerographica at various heights and three Neoregelia bromeliads near the center. The pillar takes up only 10 inches of floor space. Within three months, the air plants have started to send out wiry roots that grip the cedar’s grain. The room feels wider because the eye is drawn upward, and the natural scent of the cedar provides a subtle, grounding aroma that masks the “city smell” of the street below.  . This is theory translated into a living, breathing reality.
Final Thoughts
The vertical driftwood garden system is more than a trendy decor choice; it is a return to a more intentional way of living with nature. It requires you to understand the materials you use and the biology of the plants you house. By trading the STERILE METAL RACK for a weathered pillar, you choose character over convenience and life over static storage.
This approach rewards the patient gardener. As the wood ages and the plants mature, the structure will evolve, becoming more beautiful and integrated with each passing season. It is a testament to the idea that even in the smallest spaces, we can build something that feels ancient, sturdy, and alive.
If you are ready to move beyond the “graveyard” of potted plants, start by finding your wood. Search the coastlines, the riverbanks, or reputable salvage dealers. Treat it with respect, prepare it with care, and let it become the backbone of your new vertical ecosystem. The transition from a dusty shelf to a living pillar is a journey worth taking for any serious practitioner of indoor horticulture.
Sources
1 fishgeeks.com (https://fishgeeks.com/driftwood-cleaning/) | 2 wikihow.com (https://www.wikihow.com/Preserve-Driftwood) | 3 reddit.com (https://www.reddit.com/r/PlantedTank/comments/lnjhag/anyone_know_of_a_comprehensive_list_of_plants/) | 4 simplydiscus.com (https://www.simplydiscus.com/library/biotopes/natural/driftwood_treatment.shtml) | 5 thermory.com (https://thermory.com/blog-and-news/biophilic-design-for-what-and-whom/) | 6 solisstrata.com (https://solisstrata.com/how-to-water-a-tall-vertical-garden/) | 7 elmwoodreclaimedtimber.com (https://www.elmwoodreclaimedtimber.com/blog/biophilic-design-benefits-reclaimed-sustainable-woods/) | 8 stugastudio.com (https://stugastudio.com/blogs/inspiration/wood-wellbeing-biophilic-design) | 9 taigaconcept.fi (https://taigaconcept.fi/blog/wooden-surfaces-in-biophilic-design-bringing-calm-and-focus) | 10 aquasabi.com (https://www.aquasabi.com/aquascaping-wiki_aquatic-plants_epiphytes) | 11 buceplant.com (https://buceplant.com/blogs/aquascaping-guides-and-tips/how-to-plant-aquatic-plants-epiphytes) | 12 community-gardening.org (https://www.community-gardening.org/what-are-the-problems-with-vertical-greenery/)