• Skip to main content
  • Skip to primary sidebar
  • Terms and Conditions
  • Privacy Policy
  • Contact

Driftwood 4 Us

Just About Driftwood

Holiday decor

Driftwood Christmas Gnomes

September 2, 2024 by admin

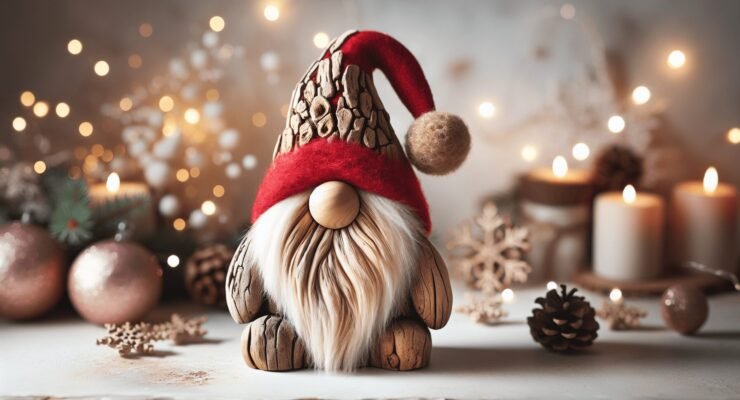
Have you ever wondered how to bring a fun and rustic charm to your holiday decorations? Driftwood Christmas Gnomes might be the answer you’re looking for! These adorable gnomes made from driftwood are the perfect DIY project to add a unique touch to your festive décor. Let’s dive into everything you need to know about creating these whimsical little characters.

What Are Driftwood Christmas Gnomes?

Driftwood Christmas Gnomes are festive decorations made primarily from driftwood and other natural materials. Drawing inspiration from Scandinavian folklore, these gnomes are often characterized by their long beards, pointy hats, and festive attire. They bring a cozy, rustic feel to your holiday decor, and best of all, they can be handmade with a personal touch.

Materials You’ll Need

Before you start, gather all the materials you’ll need to create your own Driftwood Christmas Gnome. Here’s a checklist to get you started:

  • Driftwood pieces (various sizes)
  • Hot glue gun and glue sticks
  • Paint and paintbrushes
  • Felt (various colors)
  • Crafting wire or pipe cleaners
  • Faux fur or wool (for the beard)
  • Small pom-poms or bells (for hat decorations)
  • Scissors
  • Clear varnish (optional)

Having all these materials ready will make your crafting process smooth and enjoyable.

Driftwood Christmas Gnomes

Finding the Perfect Driftwood

Where to Look

Driftwood is a fundamental element in this project, so finding the right pieces is crucial. These tips will help you find good-quality driftwood:

  • Beaches and Lakeshores: These are the most common places to find driftwood. Look for pieces that have been smoothed by water over time.
  • Riversides: Driftwood can also be found along river banks.
  • Local Craft Stores: If natural driftwood is not accessible, many crafting stores offer pre-scrubbed and processed driftwood.

Selecting Pieces

Choose pieces that will fit well together and have a character that suits a gnome. Flat, broad pieces work well for the body, while slender pieces can be used for arms or legs.

Preparing Your Driftwood

Once you’ve collected your driftwood, some preparation steps are necessary to ensure it’s safe and ready for crafting.

Cleaning

  • Rinse Thoroughly: Use a hose or a sink to rinse off sand, dirt, and any debris.
  • Soak: Soak the driftwood in a mixture of water and mild bleach for 24 hours to kill off any bacteria or pests.
  • Dry Completely: Allow the driftwood to dry completely in the sun. This can take several days.

Sanding

  • Smooth Edges: Use sandpaper to smooth out any rough edges.
  • Remove Splinters: Ensure there are no splinters that could be a hazard during crafting.

Driftwood Christmas Gnomes

Assembling Your Gnome

Creating the Body

Start with the main body of your gnome. Use a broad, flat piece of driftwood for the base.

  • Positioning: Lay your chosen piece flat. This will form the core of your gnome.
  • Glue the Base: If you want your gnome to stand upright, glue a flat piece perpendicular to the base for stability.

Adding the Head

Choose a smaller, round piece of driftwood for the head.

  • Glue Securely: Attach this piece using a generous amount of hot glue.
  • Check Stability: Make sure it’s stable and centered.

Making the Hat

Hats are a defining feature of Christmas gnomes. Use felt or fabric for this part.

  • Cutting the Felt: Cut a triangle shape out of felt. The size should match the proportion of the head.
  • Forming the Hat: Roll the felt into a cone shape and secure it with hot glue.
  • Decorations: Add small pom-poms or bells to the tip of the hat for extra festive flair.

Attaching the Hat

  • Positioning: Place the hat on the head with the seam at the back.
  • Secure with Glue: Use hot glue to attach the hat securely.

Crafting the Beard

A fluffy, long beard is essential for a gnome.

  • Cutting the Fur: Cut a piece of faux fur or wool into a beard shape.
  • Glue to Face: Attach the beard just below the hat, covering the face portion.

Adding Final Touches

Arms and Legs

  • Choosing Pieces: Use slender pieces of driftwood for the arms and legs.
  • Gluing: Attach these to the sides and bottom of the body using hot glue.

Painting Details

  • Eyes and Nose: Use small dots of paint to add eyes, and a painted bead or small piece of felt for the nose.
  • Accessories: Consider adding small, festive accessories like tiny presents or ornaments.

Sealing Your Gnome

If you plan to keep your gnome outside or want it to last for many holidays to come, applying a clear varnish can protect it from the elements.

  • Spray or Brush On: Apply a clear varnish over the entire gnome, allowing it to dry completely.

Displaying Your Driftwood Gnome

These gnomes can be a versatile addition to your holiday decorations.

Indoors

  • Mantelpiece: They look charming on a fireplace mantel.
  • Table Centerpiece: Use them as part of a holiday-themed centerpiece.
  • Shelves: Place them on shelves for a rustic touch.

Outdoors

  • Porch Decor: Place them on your porch to greet visitors.
  • Garden Decorations: They add a whimsical touch to your garden.

Benefits of Making DIY Driftwood Gnomes

Creating these gnomes isn’t just about the end product; the process itself has numerous benefits.

Environmental Impact

Using driftwood is an eco-friendly way to create decorations. You’re repurposing natural materials without adding waste to the environment.

Cost-Effective

Driftwood gnomes are a budget-friendly decoration option. Most of the materials, especially the driftwood, can be found for free.

Family Activity

Crafting these gnomes can be a fun and engaging family activity. It provides an opportunity to bond and create lasting memories.

Other Driftwood Crafting Ideas

If you find yourself with leftover driftwood, don’t let it go to waste. Here are some other DIY craft ideas:

  • Driftwood Frames: Create rustic frames for your family photos.
  • Driftwood Shelves: Simple shelves made from driftwood pieces can give any room a coastal vibe.
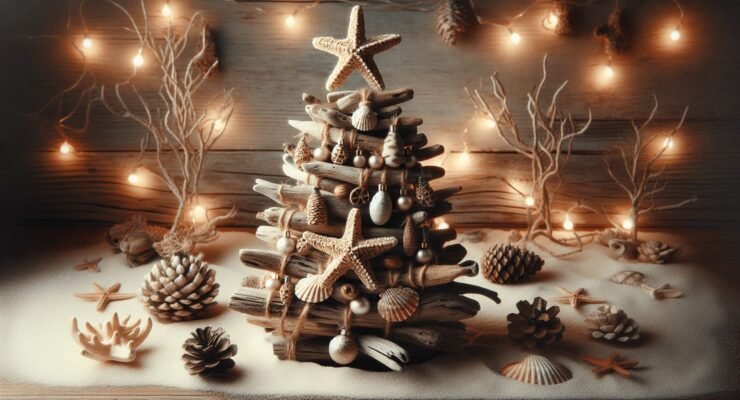
  • Driftwood Christmas Trees: Use various sizes of driftwood to create a mini Christmas tree.

Common Mistakes and How to Avoid Them

Even with the best materials and intentions, it’s easy to make mistakes. Here are some common pitfalls and how to avoid them:

Incorrect Sizing

Ensure that your pieces of driftwood are proportionate. A too-large head or too-small body can make your gnome look awkward.

Weak Assembly

Make sure to use enough glue when attaching pieces. If parts aren’t securely fastened, your gnome might fall apart.

Lack of Stability

Place your gnome on a flat surface and ensure it stands upright without wobbling. Adding a flat base piece can help with stability.

Frequently Asked Questions

How Long Does It Take to Make a Driftwood Gnome?

On average, crafting a driftwood gnome takes about 2-3 hours, depending on the complexity of your design and your crafting skill level.

Can I Use Real Fur for the Beard?

Yes, you can use real fur, but faux fur is more ethical and easier to handle.

Are There Alternatives to Hot Glue?

Yes, you can use strong crafting glue or wood glue as alternatives, though they might take longer to dry.

Can I Add Lights to My Driftwood Gnome?

Absolutely! Small, battery-operated fairy lights can be woven into the hat or around the body for a magical touch.

Final Thoughts

Driftwood Christmas gnomes are delightful, easy-to-make decorations that bring a touch of rustic charm to your home for the holidays. They’re not only visually appealing but also offer a great way to spend time and create memories with your loved ones. By following the steps outlined here, you’ll be well on your way to crafting the perfect festive gnome.

Happy crafting!

Filed Under: Driftwood Ideas Tagged With: christmas, Driftwood, Gnomes, Handmade Decorations, Holiday decor

Driftwood Reindeer

September 2, 2024 by admin

Have you ever found yourself walking along a beach, noticing scattered pieces of driftwood, and wondering what you could create with them? Driftwood, molded by nature’s forces, carries a certain rustic charm that can inspire interesting and unique creations. One delightful project you might consider is crafting a driftwood reindeer. These whimsical creatures make beautiful additions to your home decor, especially during the holiday season.

Driftwood Reindeer

What is Driftwood?

Driftwood is any kind of wood that has washed up onto shores, riverbanks, or beaches through the action of winds, tides, and waves. Over time, it becomes weathered and smooth, creating a unique look that’s prized by artists and DIY enthusiasts. In essence, driftwood combines nature’s raw beauty with your creativity, offering endless possibilities for hand-crafted projects such as driftwood reindeer.

Materials You’ll Need

Getting started with a driftwood reindeer project involves gathering the right materials. Let’s break down the essentials:

Driftwood

Of course, the star component of this project is driftwood. You’ll need a good amount of it in various shapes and sizes. Collect pieces of different lengths and thicknesses to give your reindeer a natural look.

Tools

You’ll also need a set of basic tools. Here’s a table that lists the needed tools along with their uses:

ToolUse
Hand sawCutting the driftwood to desired sizes
SandpaperSmoothing rough edges
DrillCreating holes for connecting pieces
Screws or NailsSecuring the pieces together
Wood GlueAdding additional support
ClampsHolding pieces together while glue dries

Additional Materials

Don’t forget to gather some optional materials that can add detail and flair to your reindeer:

MaterialUse
PaintAdding color to your reindeer
Small TwigsCreating antlers or additional details
VarnishSealing and protecting your creation
Buttons or BeadsMaking eyes or embellishments

Step-by-Step Guide

Creating a driftwood reindeer might seem challenging, but breaking it down into manageable steps can make it easier. Let’s begin!

Step 1: Planning and Designing

Before you start cutting or gluing anything, sketch a rough design of your reindeer. Consider what kind of stance you want it to have and how detailed you’d like it to be. This planning phase can save you time and headaches later on.

Step 2: Collecting Driftwood Pieces

Spend some time walking along a beach or a riverbank collecting driftwood. Look for pieces that suggest legs, bodies, heads, and antlers. Bring more than you’ll likely need; it’s always good to have options.

Step 3: Preparing the Driftwood

Once you have gathered your pieces, clean them thoroughly. Driftwood often has salt, sand, or debris on it. Give it a good rinse and let it dry completely. You might also want to sand the pieces down to remove any rough spots.

Step 4: Constructing the Body

Start with the body of the reindeer. Choose a sturdy, elongated piece of driftwood for the torso. Use your saw to cut it to the desired length. Drill holes where you plan to attach the legs and head. Using wood glue and screws, attach four driftwood pieces for the legs. The screws and glue will ensure that the legs are stable and can support the body.

Step 5: Adding the Neck and Head

For the neck, select a piece of driftwood that’s sturdy but flexible enough to give a natural curve. Cut it and attach it to the body using wood glue and screws. Next, choose a piece for the head. This piece should have a shape that resembles a reindeer’s head. Attach it to the neck in the same manner.

Step 6: Crafting the Antlers

Antlers are the trickiest part but also add the most character. Smaller twigs or branching driftwood pieces work well here. Attach them to the head using small screws or strong glue.

Step 7: Detailing and Finishing Touches

Now that your basic reindeer shape is complete, it’s time for the details. Paint the eyes or use buttons for a whimsical look. Add varnish to protect the wood and bring out its natural beauty. Consider other embellishments like a small red bead for a nose to mimic Rudolph.

Displaying Your Driftwood Reindeer

Once your driftwood reindeer is complete, think about how to display it. These can stand alone in the yard, atop a mantelpiece, or even incorporated into a holiday centerpiece. The simplicity and rustic charm make it a versatile decor item any time of year, though particularly festive during the winter months.

Driftwood Reindeer

Customization Ideas

Driftwood reindeer are highly customizable. Here are some ideas to inspire you:

Seasonal Themes

You can adapt the decoration to fit various seasons. For winter holidays, add small pine cones, holly berries, or a tiny Santa hat. In the fall, surround it with miniature pumpkins and autumn leaves.

Adding Light

For a magical touch, weave small LED fairy lights through the antlers or around the body. It not only looks stunning but also provides soft lighting for a cozy atmosphere.

Color Variations

While the natural look of driftwood is beautiful, you can also paint your reindeer in various colors to match your home decor. Metallic paints can offer a modern, chic version, while pastel colors might give it a whimsical touch.

The Benefits of Driftwood Crafts

Eco-Friendly

Using driftwood is an eco-friendly way to decorate your home. Since driftwood is essentially recycled by nature, you’re giving new life to something that would otherwise be waste.

Therapeutic

Crafting can be a therapeutic activity. The process of creating something with your hands can be incredibly satisfying and a great way to reduce stress.

Unique Decor

Each piece of driftwood is unique, which means no two reindeer will be exactly alike. This ensures that your creation is truly one-of-a-kind.

Safety Tips

When working with tools and materials, always follow safety guidelines.

  1. Wear Safety Goggles: Protect your eyes from sawdust and wood chips.
  2. Use Gloves: This helps to prevent splinters and improve grip.
  3. Work in a Well-Ventilated Area: Especially important if you’re using varnish or paint.
  4. Keep Tools Away from Children: Ensure that all tools are stored safely out of reach when not in use.

Troubleshooting Common Issues

Sometimes things don’t go as planned. Here are some common issues and how to solve them:

Wobbly Legs

If your reindeer’s legs are not stable, try reinforcing the connections with additional screws or glue. You can also use small clamps to hold joints in place while the glue dries.

Uneven Antlers

Uneven antlers can add a lot of character. However, if you prefer symmetry, spend some extra time finding matching pieces of driftwood and cut them to ensure they’re the same length.

Cracked Wood

Driftwood can be fragile. If you notice a crack, use wood glue to seal it. Small cracks can also be filled with wood filler and then sanded smooth.

Sustainable Crafting

As you embark on your driftwood reindeer project, consider the environmental impact. Sustainable crafting practices not only benefit the planet but also give added value to your creative endeavors.

  1. Responsible Collection: Only gather driftwood that has naturally washed ashore. Avoid taking wood from live trees or protected areas.
  2. Non-Toxic Materials: Use non-toxic glue, paint, and varnish whenever possible.
  3. Recycling and Reusing: Try to use leftover materials from other projects, and always recycle scraps responsibly.

Conclusion

Crafting a driftwood reindeer is a rewarding project that combines creativity, nature, and woodworking skills. By following this guide, you’ll be able to create a piece that is not only unique and beautiful but also eco-friendly. The time and effort invested in every step—from planning and collecting materials to the final touches—will be evident in the charming character of your reindeer. Use this creative endeavor to not only brighten up your home but also to relish the therapeutic and satisfying process of crafting with nature’s gifts.

Filed Under: Driftwood Ideas Tagged With: crafting, DIY, Driftwood, Holiday decor, Reindeer

Driftwood Projects Christmas

May 22, 2024 by admin

Looking for a unique way to celebrate the holiday season? “Driftwood Projects Christmas” offers you a delightful blend of creativity and nature’s beauty to make your wintertime truly special. Imagine the joy of transforming ordinary pieces of driftwood into enchanting Christmas decorations that will warm your home and heart. Whether you’re looking to craft elegant ornaments, rustic centerpieces, or personalized gifts, this guide has everything you need to get started. Unleash your artistic side and bring a touch of seaside charm into your festivities with these inspiring driftwood projects!

Driftwood Projects Christmas

Introduction: Have You Ever Thought About Creating Christmas Decorations with Driftwood?

Christmas is a time of joy, festivity, and creative expression. You may already be planning the décor at your place, but have you ever considered giving your decorations a twist with driftwood projects for Christmas? It’s not only an eco-friendly option but also offers a rustic and unique touch to your festive settings. Let’s dive into the world of driftwood projects and discover how you can craft stunning Christmas decorations that you’ll love!

Why Choose Driftwood for Christmas Projects?

Driftwood is an excellent material for holiday projects because it’s natural, versatile, and free (especially if you live near a coast). It has a weathered, rustic charm that can bring a warm, earthy feel to your Christmas décor. Plus, working with driftwood allows you to recycle and reuse materials, making your festive period a bit greener.

Driftwood Projects Christmas

Gathering Driftwood: What You Need to Know

Where to Find Driftwood

The search for driftwood can be an adventure in itself. If you live near a coastline, you’re in luck! Simply head to the beach after high tides or strong winds, and you may find pieces washed ashore. Riverbanks and lakesides are also good places to look.

LocationProsCons
CoastlinesAbundant supply; various shapesSalt and sand can make pieces harder to clean
RiverbanksEasier to access in inland areasMay be less weathered or smaller in size
LakesidesFreshwater pieces may be cleanerLimited variety compared to oceans

Ethical and Legal Considerations

Before you start collecting, check local regulations regarding the collection of driftwood. Some areas may have restrictions to protect the local environment. Also, always make sure to leave enough for wildlife that might rely on the debris for their habitats.

Preparing Your Driftwood

Once you’ve gathered your driftwood, it’s essential to prepare it properly for crafting. Here’s a simple cleaning process:

  1. Rinse: Wash off any sand, salt, or dirt.
  2. Soak: Soak in a mix of water and white vinegar for about 24 hours to kill any insects or mold.
  3. Dry: Let the wood air dry completely, which could take a few days depending on the size.

Driftwood Christmas Projects: Ideas and Tutorials

Driftwood Christmas Tree

A driftwood Christmas tree is a spectacular and minimalist alternative to traditional trees. It can be made in various sizes for different spaces, from a tabletop model to a full-sized centerpiece. Here’s how you can make one:

Materials:

  • Driftwood pieces
  • Drill and screws
  • Wooden dowel or rod for the tree body
  • Base (wooden block or pot with rocks)

Instructions:

  1. Select Your Pieces: Choose driftwood pieces ranging from small to large.
  2. Drill Holes: Drill holes through the center of each piece.
  3. Assemble: Thread the pieces onto the dowel, starting with the largest at the base and tapering to the smallest at the top.
  4. Secure Base: Attach or insert the dowel into the base.
  5. Decorate: Add lights, ornaments, and a star on top if desired.

Driftwood Garland

Creating a driftwood garland is another simple but effective project. It can be used to decorate your fireplace, staircase, or even your Christmas tree.

Materials:

  • Small driftwood pieces
  • Twine or wire
  • Drill
  • Decorative elements (optional, like beads or small ornaments)

Instructions:

  1. Drill Holes: Drill small holes in each piece of driftwood.
  2. String Together: Thread the twine or wire through the holes in a random pattern.
  3. Add Decorations: Incorporate beads or ornaments if desired.
  4. Hang: Drape the garland where you’d like.

Driftwood Candle Holders

Candle holders made from driftwood can bring a cozy ambiance to your holiday table.

Materials:

  • Small to medium driftwood pieces
  • Tea light candles
  • Drill with a hole saw bit (size corresponding to your candles)
  • Sandpaper

Instructions:

  1. Select and Prepare Wood: Choose pieces that can sit flat and are sturdy enough to hold a candle.
  2. Drill Holes: Use a hole saw bit to create space for the tea lights.
  3. Smooth Edges: Sand the edges of the holes to ensure a snug fit.
  4. Insert Candles: Place the tea lights in the drilled holes.

Driftwood Ornaments

Driftwood ornaments are the perfect touch for a nature-inspired Christmas tree. They can be as simple or intricate as you like.

Materials:

  • Small driftwood pieces
  • Twine or ribbon
  • Hot glue
  • Decorative elements (mini pinecones, bells, etc.)

Instructions:

  1. Select Wood: Pick small, lightweight pieces.
  2. Attach Hangers: Glue loops of twine or ribbon to each piece for hanging.
  3. Decorate: Add any decorative elements you desire.

Driftwood Reindeer

A driftwood reindeer can be a charming addition to your Christmas décor, offering a fun and whimsical touch.

Materials:

  • Driftwood pieces of various shapes
  • Dowel rods (for legs and antlers)
  • Hot glue or wood glue
  • Small pinecones (optional, for tails)

Instructions:

  1. Select and Prepare Wood: Choose a sturdy piece for the body and a smaller piece for the head.
  2. Construct Legs and Antlers: Use dowel rods for legs and antlers, attaching them with glue.
  3. Attach Head to Body: Secure the head piece to the body.
  4. Add Finishing Touches: Attach a small pinecone for a tail and other decorative elements as desired.

Driftwood Projects Christmas

Tips for Working with Driftwood

Choosing the Right Tools

When working with driftwood, having the right tools is crucial. Here are some you might need:

  • Saw: For cutting pieces to size.
  • Drill: For creating holes and securing pieces together.
  • Sandpaper: To smooth rough edges.
  • Glue: Wood glue or hot glue for assembly.
  • Protective Gear: Gloves and safety glasses to protect yourself.

Safety Considerations

Working with driftwood can be fun, but remember to take safety precautions:

  • Work in a ventilated area: This is especially important when using tools like a saw or drill to avoid inhaling dust.
  • Wear protective gear: Gloves and safety glasses are a must.
  • Secure your pieces: Ensure the driftwood is stable while you are working on it to prevent accidents.

Adding Finishing Touches

To make your projects stand out, consider the following finishing touches:

  • Paint and Stain: You can paint or stain driftwood to match your décor scheme.
  • Sealant: Applying a sealant can protect your projects and give them a polished look.
  • Decorations: Ribbons, bells, greenery, and other festive touches can enhance the rustic charm of driftwood.

Inspired by Nature: Bringing the Outdoors In

One of the greatest joys of working with driftwood is the opportunity to bring a piece of nature into your home. Driftwood projects blend seamlessly with other natural elements like pinecones, holly, and evergreen branches.

ElementHow to Use
PineconesGlue to driftwood pieces, use in garlands
HollyDecorate driftwood wreaths, candle holders
Evergreen BranchesAdd to driftwood frames or trees

Working with these materials can help create a cohesive, nature-inspired theme that is both beautiful and calming.

Kid-Friendly Driftwood Projects

If you have kids, why not involve them in your crafting? Here are a few simple driftwood projects suitable for younger hands:

Driftwood Picture Frames

Materials:

  • Small driftwood pieces
  • Frame base (cardboard or old frame)
  • Hot glue
  • Paint (optional)

Instructions:

  1. Create the Base: Use an old frame or cut a rectangle from cardboard.
  2. Glue Pieces: Have the kids glue driftwood pieces around the frame.
  3. Decorate: Let them paint or add other decorations if desired.

Driftwood Angels

Materials:

  • Small driftwood pieces
  • Small wooden balls (for heads)
  • Paint
  • Hot glue

Instructions:

  1. Select Pieces: Choose two pieces for the body and wings.
  2. Paint the Head: Let kids paint the wooden ball for the angel’s head.
  3. Assemble: Glue the head to the body piece and attach the wings.

Driftwood Stars

Materials:

  • Small driftwood pieces
  • Twine or string
  • Hot glue
  • Glitter (optional)

Instructions:

  1. Form the Star: Help kids arrange and glue pieces into a star shape.
  2. Add Twine: Loop twine around the points for hanging.
  3. Decorate: Let them add glitter or other festive touches.

Sustainability and Driftwood: Making Your Christmas Green

Using driftwood not only adds a unique, rustic charm to your Christmas decorations but also promotes sustainability. By utilizing this natural resource, you reduce waste and avoid buying mass-produced, plastic decorations.

Reducing Environmental Impact

Creating with driftwood has many benefits:

  • Recycling: Reusing natural wood prevents it from becoming waste.
  • No Need for Processing: Unlike commercially produced decorations, driftwood requires minimal processing.
  • Biodegradable: Driftwood decorations will naturally break down over time, unlike synthetic alternatives.

Supporting Local Ecosystems

When collecting driftwood, make sure you’re doing so responsibly to protect local ecosystems. Follow these tips:

  • Leave Enough for Wildlife: Driftwood can be vital for local wildlife.
  • Avoid Over-Collecting: Only take what you need.
  • Check Local Regulations: Adhere to local guidelines and restrictions on driftwood collection.

Driftwood Christmas Projects: Final Thoughts and Inspiration

Driftwood projects offer endless possibilities for adding a unique, personal touch to your Christmas décor. Whether you’re creating a full-sized driftwood tree or simple ornaments, these projects allow for creativity and sustainability.

Inspirational Stories

Many crafters find deep satisfaction in creating with driftwood. For instance, Julie from OceanCrafts shares, “Working with driftwood has not only brought a unique aesthetic to my home but has also connected me with nature. Each piece tells a story of its journey, making our Christmas truly special.”

Keep It Fun and Simple

Remember, the goal is to enjoy the process. Don’t stress over perfection. As you work with driftwood, you’ll appreciate the natural imperfections that make each piece unique.

Conclusion: Your Next Driftwood Project Awaits

As you embark on your driftwood crafting journey this Christmas, remember to enjoy the process. Relish the hunt for driftwood, the creativity of the crafting process, and the satisfaction of displaying your unique decorations. Whether you’re creating a rustic driftwood tree, a charming garland, or whimsical reindeer, your handmade decorations will add a heartfelt touch to your festive celebrations. Merry crafting and happy holidays!

Filed Under: Driftwood Ideas Tagged With: Christmas decorations, DIY Christmas, Driftwood Crafts, Handmade projects, Holiday decor

  • « Previous Page
  • Page 1
  • Page 2

Primary Sidebar

Driftwood4us.com, is a participant in the Amazon Services LLC Associates Program, an affiliate advertising program designed to provide a means for sites to earn advertising fees by advertising and linking to amazon.com.