family movie night backyard
The best seat in the house is actually in the yard. Why spend $100 at the theater when you can create a magical, low-cost movie night in your own backyard? Here is everything you need for the ultimate DIY cinema.
[affiai]Backyard movies turn a regular Tuesday into a neighborhood event. You do not need a massive budget to make it happen. Most of the gear you need is either already in your house or available for the price of a few movie tickets.
Forget the sticky floors and overpriced popcorn. Your yard offers fresh air and total control over the experience. This guide walks you through every technical detail and cozy touch to ensure your first screening is a massive success.
family movie night backyard
A family movie night backyard setup is a temporary outdoor theater designed for comfort and cinematic immersion. It relies on a projector to throw a large image onto a screen, paired with external speakers to fill the open air with sound. It is not just about watching a film; it is about creating a “third space” where the family can disconnect from devices and reconnect with each other.
These setups exist because modern projectors have become incredibly affordable and portable. You no longer need a dedicated media room to get a 100-inch screen experience. Real-world situations range from a simple sheet hung over a fence to a permanent timber-framed screen wall that doubles as a garden feature.
Think of it as a modern drive-in theater, but without the exhaust fumes and cramped seats. You have the freedom to hit pause for bathroom breaks or restock the snack bar whenever you like. It brings the grandeur of the big screen to the intimate setting of your own home.
How to Build Your Backyard Cinema Step by Step
Building an outdoor theater requires five main components: the projector, the screen, the audio system, the media source, and the seating. Getting these right ensures the picture is sharp and the sound doesn’t lag.
Step 1: Choose the Right Projector
Brightness is the most important factor for outdoor viewing. Look for projectors measured in ANSI lumens, not “marketing lumens” or “LED lumens” which can be misleading. For total darkness, a projector with 200 to 500 ANSI lumens is sufficient. If you want to start at dusk, aim for at least 1,000 to 3,000 ANSI lumens to cut through the ambient light.
Resolution matters too. While 4K is impressive, 1080p is the sweet spot for backyard screens. It provides a crisp image without the premium price tag. Ensure the projector has an HDMI port for easy connectivity to your streaming devices.
Step 2: Set Up the Screen
You have three main options for a screen surface. A simple white bedsheet is the cheapest, but it often wrinkles and lets light pass through. A better DIY option is a 9×12 painter’s tarp or blackout cloth, which provides a more solid surface for the light to hit.
Stability is key. You can build a frame using 3/4-inch PVC pipes and elbow fittings for a lightweight, collapsible setup. For a more permanent look, use 2×4 timber to build a rigid frame that can be anchored into the ground. Use ball bungees or grommets to pull the material tight and eliminate wrinkles that distort the image.
Step 3: Solve the Audio Puzzle
Projector speakers are usually too weak for open-air environments. A portable Bluetooth speaker is the most common solution, but it can introduce “lip-sync” issues where the audio lags behind the video. Connecting via a 3.5mm auxiliary cable or a dedicated soundbar is the best way to ensure perfect synchronization.
Step 4: Connect Your Media
Most people use a streaming stick like a Roku, FireStick, or Google Chromecast. Simply plug the stick into the projector’s HDMI port. Ensure your home Wi-Fi signal reaches the yard; if not, you may need a Wi-Fi extender or a long HDMI cable connected to a laptop inside the house.
Step 5: Create the Atmosphere
Atmosphere is what makes the night magical. Use string lights or lanterns to illuminate paths to the house so guests can move safely. Pile up outdoor rugs, inflatable mattresses, and plenty of blankets to create a “lounge” feel that beats any theater chair.
Benefits of the Backyard Cinema Experience
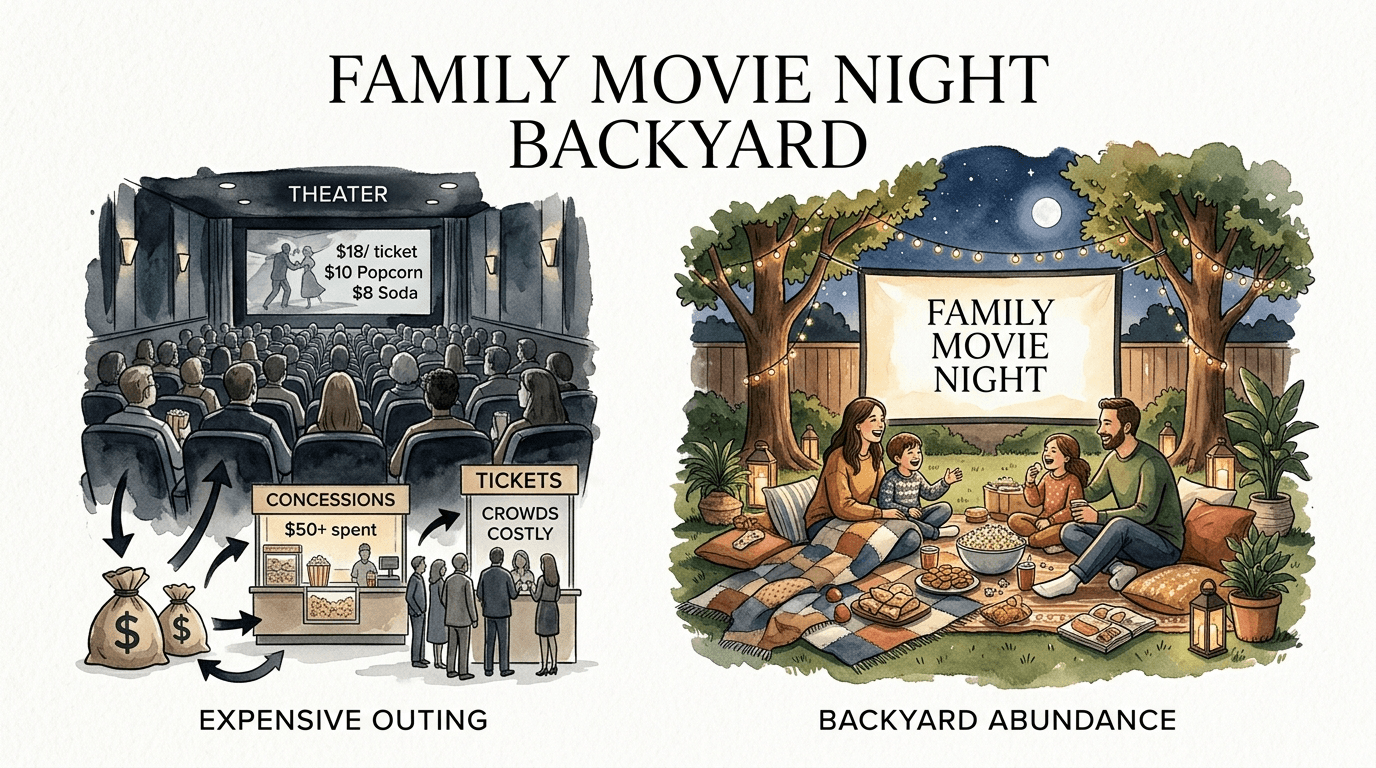
The most immediate benefit is the cost. A single night at a commercial theater for a family of four can easily exceed $100 after tickets and snacks. A DIY setup pays for itself after just a few uses. You own the equipment, meaning every movie night after the initial investment is essentially free.
Customization is another major win. You choose the movie, the start time, and the volume. There are no strangers whispering behind you or bright cell phone screens distracting you during the climax. You can even theme your snacks to match the film, like serving “ratatouille” during the movie of the same name.
It also serves as a social magnet. Hosting a backyard movie night is an easy, low-pressure way to invite neighbors over. It builds community in a way that sitting in a dark, silent theater never can. Kids get to experience the novelty of being “outside after dark,” which adds an extra layer of excitement to the evening.
Challenges and Common Mistakes
Audio lag is the number one complaint for DIY setups. This happens because Bluetooth technology takes time to process the sound. To fix this, check your streaming device settings and switch the audio output to “PCM” instead of “Dolby” or “Best Available.” This reduces the processing load and often fixes the delay.
Light pollution can ruin a great movie. Even a single porch light or a bright streetlight can wash out the colors on your screen. Position your screen away from direct light sources. If you cannot avoid the light, consider a “high-gain” screen material that reflects more light back toward the audience.
Wind is the enemy of the “sheet on a string” method. Even a light breeze will cause the screen to flap, making the characters on screen look like they are in a funhouse mirror. Always anchor the bottom of your screen. If you are using a frame, use sandbags or stakes to keep it from tipping over in a gust.
Limitations and Realistic Constraints
Weather is the ultimate gatekeeper. Rain is an obvious deal-breaker for electronics, but dew is often overlooked. As the temperature drops at night, moisture can collect on your projector lens and screen. Always bring your gear inside immediately after the movie ends to prevent moisture damage.
Sound travel is another constraint to keep in mind. Sound carries much further at night in an open yard than it does during the day. Be mindful of your neighbors. Keep the volume at a reasonable level or consider a “silent cinema” setup where everyone wears wireless headphones connected to a single transmitter.
Ambient noise from the environment can also be a factor. Crickets, traffic, or a neighbor’s air conditioner can compete with the movie’s dialogue. A high-quality soundbar or placing your speakers closer to the audience can help overcome these environmental distractions.
DIY Backyard Cinema vs. Professional Movie Theater
Choosing between staying home and going out often comes down to the type of experience you want. While a theater offers the latest releases and massive sound systems, the backyard offers comfort and intimacy.
| Feature | Commercial Theater | DIY Backyard Cinema |
|---|---|---|
| Cost per Night | $60 – $120+ | $5 – $10 (Snacks only) |
| Seating | Standard Recliners | Rugs, Air Beds, Pillows |
| Intermissions | None (Miss the movie) | Unlimited (Pause anytime) |
| Food Quality | Standard Concessions | Homemade / Full Meals |
| Environment | Climate Controlled | Fresh Air / Under Stars |
The DIY route is about “Backyard Abundance.” It is the realization that your home can provide a world-class experience with just a little effort. You trade the absolute technical perfection of a professional cinema for the comfort and joy of your own space.
Practical Tips and Best Practices
Start your movie about 20 minutes after sunset. This is when the “blue hour” fades and the darkness is deep enough for your projector’s contrast to really pop. Check your local sunset times before inviting guests over so they aren’t sitting in the light for an hour waiting for the show.
Keep the bugs away without the smell of heavy chemicals. Place a few citronella candles around the seating area or use a fan to create a light breeze. Mosquitoes are weak fliers, and a simple oscillating fan can keep them from landing on your guests while they try to enjoy the movie.
Create a dedicated snack station. Instead of passing around bags of chips, set up a small table with a “Popcorn Bar.” Provide different seasonings like cinnamon sugar, nutritional yeast, or truffle salt. Using individual popcorn boxes prevents people from reaching into the same bowl in the dark.
- Test the Wi-Fi: Run a speed test in your yard before the guests arrive.
- Power Safety: Use a surge protector and keep extension cords tucked away to prevent tripping.
- Pre-load Content: If your Wi-Fi is spotty, download the movie to a laptop or USB drive beforehand.
- Seating Layers: Put a waterproof tarp down first, then rugs, then cushions to keep ground moisture away.
Advanced Considerations for Enthusiasts
For those looking to level up, look into “throw distance.” This is the specific distance the projector needs to be from the screen to fill it completely. Most budget projectors have a fixed throw, but higher-end models offer “short-throw” lenses that allow you to place the projector just a few feet from the screen.
Consider the “Gain” of your screen. A standard white wall has a gain of 1.0. A high-gain screen (1.5 or higher) uses reflective coatings to make the image appear brighter. However, this can reduce the “viewing angle,” meaning people sitting on the far sides might see a dimmer image than those in the center.
Power management is also a professional touch. A portable power station (like a Jackery or Yeti) allows you to host a movie night in the middle of a field or at a park without dragging hundreds of feet of extension cords. These units are silent and can easily power a projector and soundbar for three to four hours.
Example Scenario: The “Under $200” Setup
Imagine you want to host a movie night this weekend but don’t want to break the bank. You purchase a 1080p budget projector for $80 and a 120-inch foldable screen for $20. For the frame, you spend $30 at the hardware store on PVC pipes and fittings.
You already own a rugged Bluetooth speaker. By connecting it to your laptop via a $5 auxiliary cable, you eliminate all audio lag. You grab the inflatable mattress from the guest room and drag out every throw pillow from the couch. Total investment: $135.
This setup provides a massive, high-definition image that rivals a 75-inch TV. The sound is clear, the seating is more comfortable than any theater, and the total cost is roughly what you would spend on two nights out at the cinema. From this point on, every movie night is a “win” for the family budget.
Final Thoughts
The best seat in the house truly is in the yard. Transforming your outdoor space into a cinema is one of the most rewarding DIY projects you can undertake. It combines the thrill of technology with the simple joy of being outdoors with people you love.
Success comes from planning the technical details like lumens and audio sync while never losing sight of the comfort factors. A sharp image means nothing if everyone is cold or being bitten by bugs. Balance the gear with the “cozy” and you will have a winning tradition.
Start small and upgrade as you go. You don’t need a 4K laser projector on day one. A simple sheet and a budget-friendly machine are all it takes to spark the magic. Once you see the look on your family’s faces as the opening credits roll under the stars, you will never want to go back to the theater again.
Sources
1 reddit.com (https://www.reddit.com/r/projectors/comments/1lfu0hg/want_an_outdoor_projector_for_backyard_viewing/) | 2 awolvision.com (https://awolvision.com/blogs/awol-vision-blog/backyard-movie-night-setup-guide) | 3 nsastorage.com (https://www.nsastorage.com/blog/how-to-set-up-an-outdoor-movie-night/) | 4 projectorreviews.com (https://www.projectorreviews.com/budget-friendly-outdoor-projectors/) | 5 aurzen.com (https://aurzen.com/blogs/news-discoveries/best-projector-for-backyard-movies-2025) | 6 crutchfield.com (https://www.crutchfield.com/learn/diy-backyard-movie-theater-guide.html) | 7 valerion.com (https://www.valerion.com/blog/diy-outdoor-projector-screen) | 8 pipsnacks.com (https://www.pipsnacks.com/blogs/dv/5-essentials-including-the-1-snack-for-a-comfy-outdoor-movie-night) | 9 xgimi.com (https://us.xgimi.com/blogs/tips-tutorials/bluetooth-audio-delay-projector) | 10 youtube.com (https://www.youtube.com/watch?v=GgYWYuh6T3Y&vl=en-US) | 11 seenebula.com (https://support.seenebula.com/s/article/How-to-Solve-an-HDMI-Audio-Image-Delay-on-My-Cosmos-Solar-or-Solar-Portable-Projector) | 12 youtube.com (https://www.youtube.com/watch?v=1iXrZn8aU10)