Professional Driftwood Inlay Techniques
The difference between ‘beach craft’ and ‘coastal art’ is all in how you handle the gaps. Anyone can glue a stick to a board, but a master knows how to integrate the ocean’s curves into a functional masterpiece. Learn the professional secrets of precision inlay that turn beach finds into boutique-level decor.
[affiai]Working with driftwood requires a specific kind of patience and a deep respect for the history written in its grain. This wood has been tumbled by tides, bleached by the sun, and scoured by sand, leaving behind only the most resilient fibers. While most see a simple piece of debris, a professional woodworker sees a unique opportunity for high-end furniture and art.
Precision inlay takes these irregular, organic shapes and beds them into a solid base of walnut, oak, or cherry. This process creates a “seamless fusion” where the wild spirit of the coast meets the disciplined geometry of traditional joinery. Understanding this balance is what separates a weekend hobbyist from a serious artisan.
Professional Driftwood Inlay Techniques
Professional driftwood inlay is the art of embedding weathered, water-scoured wood into a secondary wooden substrate. Unlike standard marquetry that uses flat veneers, driftwood inlay often deals with three-dimensional textures and varying densities. It is a technique used to create high-value tables, wall panels, and structural accents that feel as though they grew together naturally.
This method exists because driftwood carries a “patina of time” that cannot be replicated in a factory. The ocean acts as a giant lathe, smoothing edges and revealing hidden grain patterns that fresh-cut timber simply doesn’t possess. In the world of high-end coastal decor, these pieces are prized for their storytelling ability and rugged aesthetic.
Think of it like setting a diamond into a ring. The base wood provides the strength and the standard dimensions, while the driftwood serves as the “jewel.” To make this work, the artisan must bridge the gap between two very different materials, ensuring they bond for a lifetime despite their different histories.
How to Execute a Master-Level Inlay
The journey from the shoreline to the showroom begins with rigorous preparation. You cannot simply pull a piece of wood from the surf and expect it to behave under a router. The process involves multiple stages of cleaning, stabilizing, and precision carving.
Step 1: Cleaning and Decontaminating
Start by removing all sand, salt, and biological debris. Use a stiff-bristled brush and an air compressor to clear the deep crevices and knots where grit hides. Professionals often soak the wood in a solution of one part bleach to nine parts water to kill mold and parasites, followed by a thorough rinse in fresh water.
Step 2: Reaching the Hard Core
Most driftwood has a “punky” or soft exterior that will not hold a finish or a bond. Use a carving gouge or a small router blade to scrape away the rotten layers until you reach the hard, resonant core. You’ll know you’ve arrived when the wood “squeals” against the steel, indicating a dense, healthy fiber remains.
Step 3: Moisture Stabilization
Driftwood is notoriously unstable because it has been saturated and dried repeatedly. Use a moisture meter to ensure the wood has reached a stable 6% to 8% moisture content before beginning the inlay. If the wood is too soft, use a resin-impregnation technique or wood hardeners to give it the structural integrity required for a permanent fit.
Step 4: Templating and Routing
Trace the irregular outline of your driftwood onto the base wood with a fine marking knife. Professional artisans often use a handheld plunge router with a small bit to hog out the bulk of the material, finishing the edges with sharp hand chisels. The goal is a “snug fit” where the driftwood sits in the pocket without rocking or visible gaps.
The Benefits of Precision Inlay
Choosing a professional inlay approach over a simple surface glue-up provides immediate structural advantages. Embedding the driftwood into a recess protects the edges from chipping and prevents the wood from shearing off the surface over time. This creates a piece of furniture that is actually “functional,” capable of withstanding daily use without falling apart.
Beyond durability, the aesthetic benefit is undeniable. A recessed inlay allows for a flush finish, meaning the entire surface can be sanded and sealed as one continuous plane. This makes the driftwood look as if it is an organic inclusion in the base wood, rather than a separate piece tacked on as an afterthought.
There is also a significant increase in market value. Boutique decor galleries look for “master joinery” details that prove the artist’s skill. An inlaid piece commands a much higher price point because it demonstrates a level of craftsmanship that cannot be mass-produced by machines.
Challenges and Common Pitfalls
The biggest challenge is dealing with “wood movement.” Every piece of wood expands and contracts with the seasons, but driftwood and kiln-dried hardwoods move at different rates. If the bond is too rigid or the pocket is too tight without room for movement, the wood may crack or warp as the humidity changes.
Salt content is another hidden enemy. If the driftwood isn’t properly rinsed, residual salt can draw moisture from the air, causing the finish to cloud or the glue to fail. This is why the “decontamination phase” is never optional for a professional.
Mistakes often happen when an artisan rushes the drying process. Rushing driftwood through a kiln can cause deep checking and internal cracks that aren’t visible until you start routing. Patience is the only way to ensure the material is truly ready for fine woodworking.
Limitations and Constraints
Not every piece of wood found on the beach is a candidate for inlay. Extremely small or brittle pieces may disintegrate under the pressure of a router or sander. There are also legal limitations; many coastal areas have strict rules about removing large quantities of driftwood, so checking local regulations is a prerequisite for any project.
Environmental constraints also play a role. If you are building a piece for a high-humidity environment, the choice of epoxy and base wood becomes critical. Some woods, like oily teak or resinous pine, require special primers to bond effectively with the epoxy resins used in professional inlays.
Finally, there is a limit to the “depth” of the inlay. Going too deep into a structural base can compromise its strength. A master always balances the visual impact of the driftwood with the engineering requirements of the piece, ensuring a table can actually hold weight without sagging.
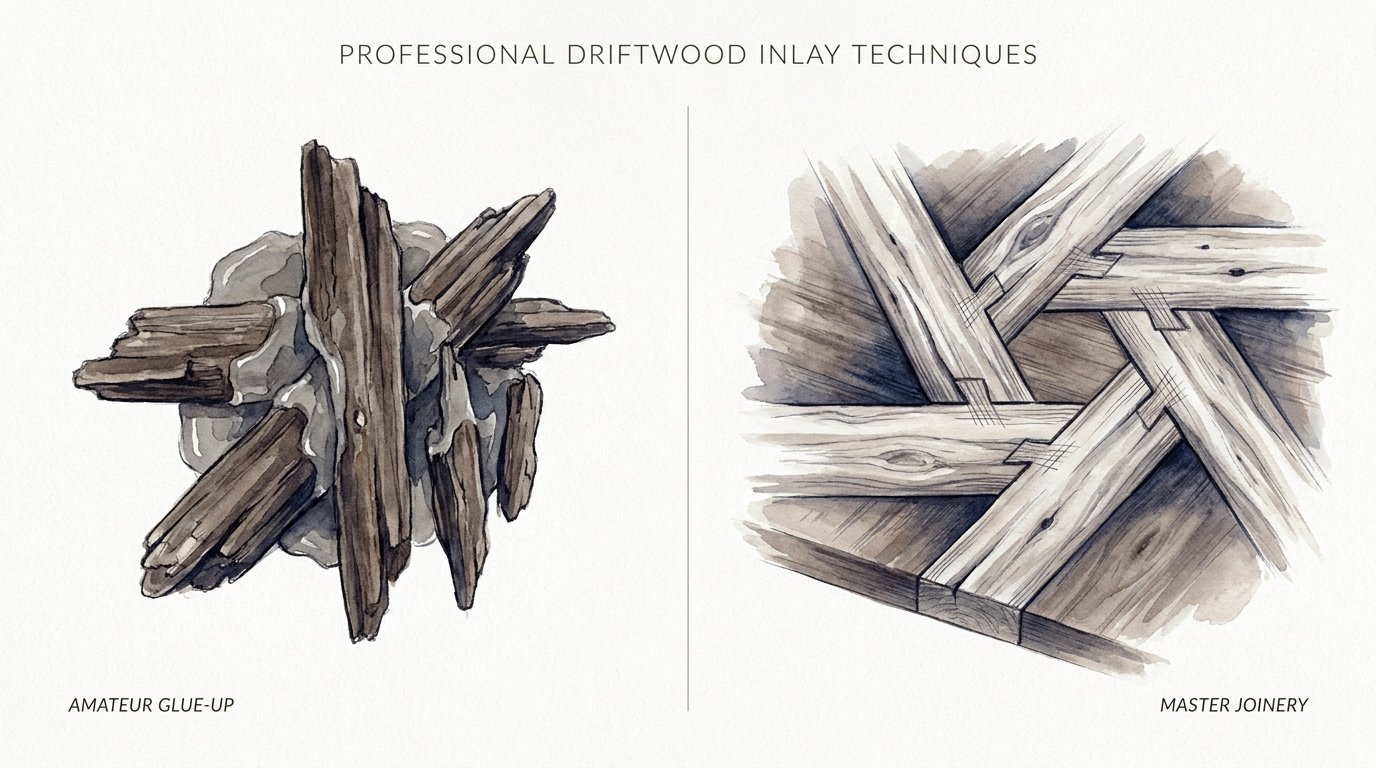
Master Joinery vs. Amateur Glue-Up
To understand the difference in quality, it helps to compare the two most common approaches to working with beach finds. The table below outlines why precision matters.
| Feature | Amateur Glue-Up | Master Joinery |
|---|---|---|
| Visual Finish | Surface mounted; visible gaps. | Flush inlay; seamless transition. |
| Durability | Prone to shearing or peeling. | Mechanically locked into the base. |
| Tactile Feel | Rough edges; snagging hazard. | Smooth, continuous surface. |
| Investment Value | Low; often sold at craft fairs. | High; boutique and gallery ready. |
Practical Tips and Best Practices
To achieve a flawless fit, always use a “marking knife” instead of a pencil. A pencil line has thickness that can lead to loose joints, while a knife severing the wood fibers provides a precise wall for your chisel to follow. This results in the tight, professional look seen in high-end furniture.
When it comes to adhesives, don’t rely on standard wood glue for driftwood. Because driftwood can be porous and inconsistent, a high-quality epoxy resin is often the better choice. It fills the micro-gaps and provides a structural bond that wood glue simply cannot match on weathered surfaces.
Keep your tools “pioneer-sharp.” Carving through the dense, mineralized grain of old driftwood will dull a blade faster than fresh timber. Frequent stropping of your chisels and plane blades is essential to avoid tearing the delicate fibers of the beach wood.
Advanced Considerations for Professionals
Serious practitioners often look into “vacuum stabilization.” This involves placing the driftwood in a chamber with a specialized stabilizing resin and pulling a vacuum to suck the air out of the wood cells. When the pressure is released, the resin is forced deep into the heart of the wood, turning even “punky” pieces into rock-hard material suitable for high-polish finishing.
Another advanced technique involves “hybrid pours.” This is where the driftwood is inlaid into the base, but any remaining voids or interesting cracks are filled with translucent or colored epoxy. This doesn’t just hide mistakes; it highlights the unique topography of the wood, creating a “river” effect within the inlay itself.
Always consider the “UV stability” of your finish. Driftwood is beautiful because of its silver-gray sun-bleached look. However, many oils will turn it yellow or amber. Using a water-based polyurethane or a specialized UV-resistant wax will help maintain that “raw beach” aesthetic while providing the necessary protection.
Case Study: The Driftwood River Mantle
Consider the creation of a fireplace mantle using a large slab of reclaimed cedar and a central inlay of wave-scoured redwood. The artisan first levels the cedar slab to ensure a flat working surface. They then select a long, winding piece of redwood driftwood that mimics the flow of water.
By routing a 1/2-inch deep pocket into the cedar and carefully chiseling the complex curves, the redwood is bedded into the mantle. The small gaps around the edges are filled with a mix of cedar sawdust and clear epoxy to create a “shadow line” that makes the inlay pop. After sanding to 400 grit, the entire piece is finished with a matte sealer, resulting in a structural beam that appears to have an ocean current running through its center.
This example shows how theory translates to practice. It requires an understanding of depth, grain direction, and the chemical properties of the resins used to hold the “wild” wood in place within the “tame” base.
Final Thoughts
Mastering the art of driftwood inlay is about more than just making pretty furniture. it is about honoring the journey of the wood and the discipline of the craft. By moving away from amateur glue-ups and embracing the precision of master joinery, you elevate a simple beach find into a legacy piece that can be passed down through generations.
The secrets of a professional finish are found in the details: the sharpness of the chisel, the patience of the drying phase, and the integrity of the bond. These techniques require “pioneer grit”—a willingness to do the hard, slow work that others avoid. But for those who commit to the process, the reward is a piece of art that truly captures the raw, untamed beauty of the coast.
Don’t be afraid to experiment with different wood pairings and stabilization methods. Every piece of driftwood is a new puzzle, and every successful inlay is a victory for the craft. As you grow in skill, you will find that the ocean provides an endless supply of inspiration for those who know how to handle the gaps.
Sources
1 diydriftwood.com (https://diydriftwood.com/creating-a-driftwood-finish/) | 2 northwestdriftwoodartists.org (https://www.northwestdriftwoodartists.org/lesson-center/about-the-art/the-luron-method/) | 3 woodsculptingtools.com (https://woodsculptingtools.com/blogs/news/the-fine-art-of-inlay-tools-for-wood-carving-decorations) | 4 stackexchange.com (https://woodworking.stackexchange.com/questions/2654/techniques-for-working-with-driftwood) | 5 andersonwoodwork.net (https://andersonwoodwork.net/2025/08/16/mastering-joinery-for-furniture-17-expert-techniques-for-strong-beautiful-designs/?v=92a31fc033f7) | 6 wikihow.com (https://www.wikihow.com/Inlay-Wood) | 7 knappconnectors.com (https://knappconnectors.com/blog/how-to-resources/the-complete-guide-to-inlay-techniques-in-wooden-designs/)