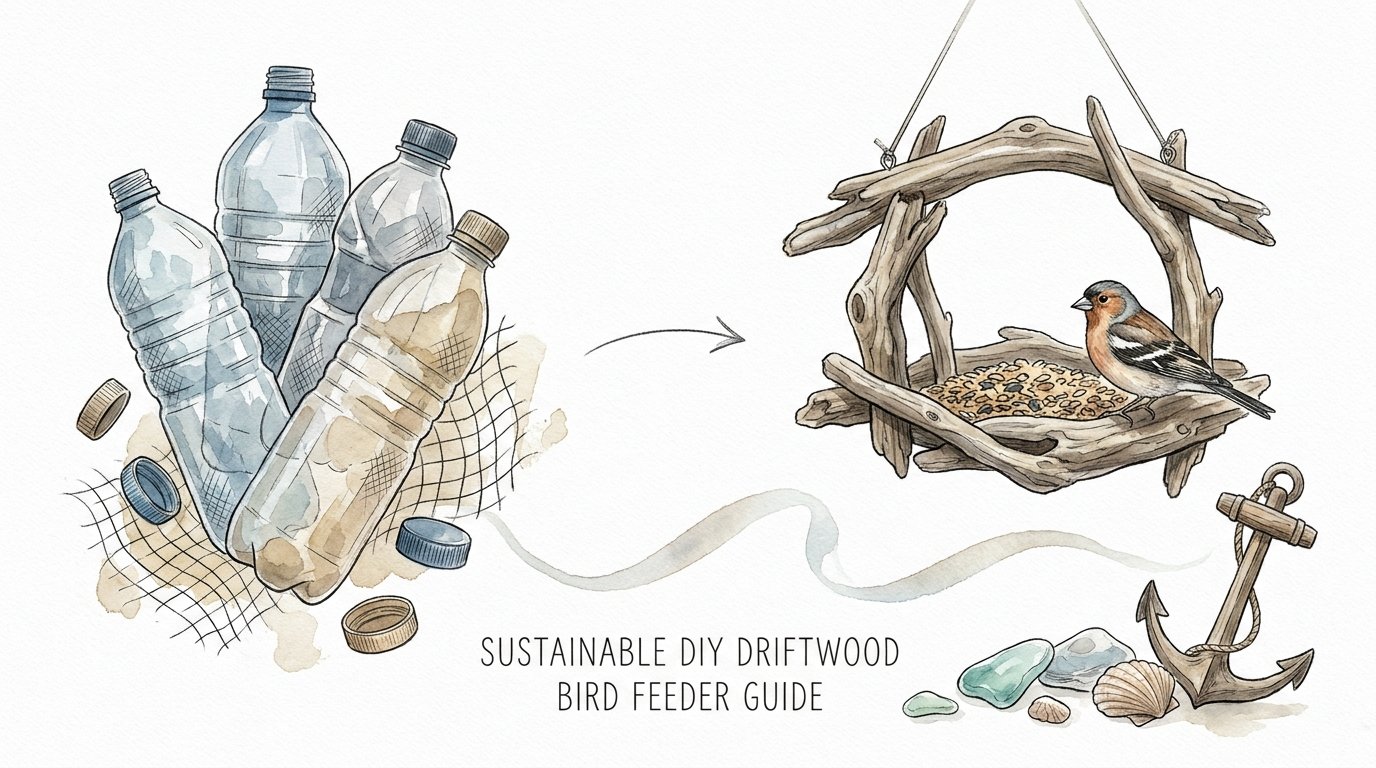
Sustainable Diy Driftwood Bird Feeder Guide
Will your garden decor be in a landfill next year, or will it become a permanent sanctuary for local wildlife? Most store-bought bird feeders are designed to break within two seasons. Between sun-bleaching and winter cracks, you’re just buying future trash. This weekend, I harvested a legacy from the tide—a feeder that has already survived the Atlantic and will likely outlast the house it hangs beside.


Building a bird feeder from driftwood is more than just a weekend project. It is an act of reclamation that turns coastal debris into a functional piece of garden architecture. Unlike mass-produced plastic tubes that brittle under UV rays, driftwood has already been tested by the harshest elements on earth. Every knot and salt-crusted grain tells a story of survival, making it the perfect material for a structure intended to support life.
You are not just hanging a food dispenser; you are providing a high-traction, thermally stable platform that mimics the natural environment of your feathered visitors. Birds often hesitate at the slippery surfaces of acrylic or metal. Wood feels right under their talons, offering the security they need to linger and feed. This guide will walk you through the grit and grace of creating a feeder that honors the coast and serves the sky.
Sustainable Diy Driftwood Bird Feeder Guide
A sustainable DIY driftwood bird feeder is a wildlife feeding station constructed from wood that has been washed ashore by tides, winds, or waves. This material is inherently eco-friendly because it requires no new timber harvesting and utilizes wood that has already undergone a natural “seasoning” process in saltwater. These feeders exist as a marriage between functional woodworking and environmental stewardship, providing a rustic alternative to the “throwaway” culture of modern garden accessories.
In the real world, driftwood is prized for its unique, weathered patina and its incredible resistance to pests. The salt saturation often found in coastal wood acts as a natural preservative, deterring wood-boring insects that typically plague backyard pine or plywood. When you choose driftwood, you are opting for a material that has survived years of immersion and abrasion, ensuring your feeder remains structural for decades rather than months.
Visualizing this concept is simple. Think of a platform or hopper feeder that looks less like a product from a big-box store and more like a fallen branch that happened to grow a roof. Its irregular shapes and greyed-out textures allow it to disappear into the landscape, reducing the visual clutter of your garden while providing a familiar landing spot for local species. It is a piece of the ocean relocated to the forest edge.
The Preparation Process: From Shoreline to Shop
Turning a raw piece of beach-found wood into a safe feeding station requires a methodical approach to cleaning and stabilizing the material. You cannot simply pull a log from the sand and nail it together. Proper preparation ensures that you aren’t introducing harmful bacteria or ocean-borne hitchhikers into your backyard ecosystem.
Step 1: The Initial Scrub
Freshly harvested driftwood is often caked in dried salt, sand, and microorganisms. Start by using a stiff-bristled nylon brush to remove loose debris. Avoid using wire brushes on softer wood species, as they can gouge the delicate, sun-bleached fibers that give driftwood its character. If the wood has deep crevices, an air compressor or a water flossing tool can blast out stubborn sand deposits that would otherwise dull your drill bits later.
Step 2: Deep Sanitization
Bacteria and mold can hide deep within the pores of the wood. Submerge your pieces in a solution of one part bleach to nine parts water for at least six to twelve hours. This soak kills pathogens and helps lighten the wood to a uniform, silver-grey tone. If you prefer a more natural approach, a high-concentration vinegar bath can also work, though it may not be as effective against certain resilient fungal spores.
Step 3: Salt Leaching and Drying
Salt is a double-edged sword; it preserves wood but can also attract excess moisture or deter some sensitive bird species. After the sanitizing bath, soak the wood in fresh water for another 24 hours to leach out surface salts. Once finished, the wood must dry completely. Air-drying in a sunny, well-ventilated spot for a week is ideal. For those in a hurry, placing small pieces in an oven at 110 degrees Fahrenheit for several hours will kill any remaining insects and ensure the core is moisture-free.
Design and Assembly: Building for the Birds
Design should follow the function of the specific birds you wish to attract. A “one size fits all” approach often leads to wasted seed and frustrated visitors. Driftwood lends itself particularly well to platform (tray) feeders and hopper-style feeders because of its natural flat surfaces and sturdy “branches” that serve as built-in perches.
Choosing Your Design Style
A platform feeder is the most straightforward driftwood project. It consists of a flat base with low “driftwood twig” railings to keep seed from blowing away. This design attracts ground feeders like Sparrows, Juncos, and Towhees. If you prefer to attract climbing birds like Nuthatches or Woodpeckers, a “suet log” style is better. This involves drilling large-diameter holes into a thick piece of driftwood and filling them with high-energy suet.
Assembly Techniques and Hardware
Standard wood glues will fail under the constant expansion and contraction of outdoor exposure. Use a high-quality, waterproof adhesive like Titebond III, which is FDA-approved for indirect food contact and holds up against heavy rain. For structural integrity, always supplement glue with stainless steel or galvanized screws. These won’t rust and bleed dark streaks down your beautiful wood.
* Pilot Holes: Always drill pilot holes before driving screws into driftwood. Weathered wood is prone to splitting along old stress lines.
* Drainage: Every feeder needs drainage. Drill several 1/4-inch holes in the floor of the feeder to prevent seed from becoming a soggy, fermented mess after a rainstorm.
* Perch Placement: Use smaller 1-inch to 2-inch diameter driftwood branches as perches. These should be placed about 2 to 3 inches away from the feeding ports to allow birds easy access.
Benefits of Driftwood Over Traditional Materials
Practical benefits of driftwood extend beyond its rugged aesthetics. The primary advantage is its superior grip. Most plastic feeders are slick, forcing birds to exert extra energy just to stay upright. The deep grain and textured surface of salt-weathered wood provide an effortless foothold, making your feeder a preferred stop for older or smaller birds.
Thermal stability is another overlooked factor. Metal feeders can become dangerously hot in the summer sun or freezing cold in winter. Wood acts as a natural insulator, keeping the seed at a stable temperature and providing a comfortable landing spot regardless of the weather. Furthermore, the grey and brown tones of driftwood act as a natural camouflage, protecting feeding birds from the keen eyes of hawks and other aerial predators.
Environmental impact is the most significant measurable benefit. By repurposing beach wood, you are diverting waste and reducing the demand for chemically treated lumber. Most commercial wooden feeders use pressure-treated pine, which can leach arsenic or copper into the soil and food. Driftwood is a “clean” material, seasoned by the earth itself, ensuring that your backyard sanctuary remains truly non-toxic.
Challenges and Common Mistakes
Working with driftwood presents unique challenges that you won’t encounter with straight, milled lumber from a hardware store. One of the most frequent errors is failing to account for the wood’s structural integrity. Some driftwood may look solid on the outside but be “punky” or rotten at the core. Always test the density of your wood by pressing a screwdriver into it; if it sinks in easily, that piece is better suited for decoration than for supporting a heavy load of birdseed.
Another pitfall is the “oil sponge” effect. Wood is porous, and birdseeds like sunflower and nyjer are rich in natural oils. Over time, these oils can soak into the wood, creating a rancid smell that attracts unwanted guests like raccoons or even bears. To prevent this, you can seal the *interior* tray of the feeder with a food-grade mineral oil. This creates a barrier that prevents the seed oils from penetrating deep into the fibers while remaining safe for the birds to touch.
Many DIYers also forget about the weight of wet wood. Driftwood can be incredibly heavy when it absorbs rainwater, especially if it hasn’t been properly sealed. If your mounting hardware—such as hooks or chains—isn’t rated for at least twice the dry weight of the feeder, you risk a catastrophic collapse during a storm. Always over-engineer your hanging points to account for “water weight” and the weight of several large birds feeding at once.
Limitations and Environmental Constraints
While driftwood is a legacy material, it is not invincible. It is not ideal for every climate or every garden setup. In extremely humid, tropical environments, even salt-seasoned wood can succumb to white rot or fungal colonies if it never has a chance to dry out. If you live in a rainforest climate, a driftwood feeder will likely require more frequent cleaning and UV-stable non-toxic finishes to survive more than five years.
There are also legal and ethical limitations to consider. In many states, like Michigan or certain parts of California, removing driftwood from state parks is strictly prohibited to prevent shoreline erosion and preserve natural habitats. Always check local regulations before heading out with a truck. A sustainable project is only sustainable if it doesn’t degrade the ecosystem from which the materials were sourced.
The irregularity of the wood also limits the complexity of the design. If you are looking for a precision-engineered feeder with specific seed-dispensing mechanisms, driftwood may frustrate you. It is a material that dictates the design to the builder, rather than the other way around. You must be willing to embrace “imperfection” and work with the curves the ocean gave you.
Comparison: Driftwood vs. Commercial Alternatives
Deciding whether to build or buy often comes down to a few key metrics: cost, longevity, and bird safety. Below is a comparison of how driftwood stacks up against common retail materials.
| Feature | Driftwood DIY | Polycarbonate Plastic | Pressure-Treated Wood |
|---|---|---|---|
| Longevity | 10–20+ Years | 2–5 Years (UV brittle) | 5–10 Years |
| Bird Traction | Excellent (Natural) | Poor (Slippery) | Good (Rough) |
| Chemical Safety | High (No toxins) | Medium (Microplastics) | Low (Treatment salts) |
| Cost | Near Zero | $20–$60 | $40–$80 |
Practical Tips and Best Practices
Success with a driftwood feeder depends largely on where and how you place it. Birds are most vulnerable when they are eating, so location is a matter of life and death. Place your feeder approximately 10 to 12 feet away from dense shrubs. This distance is close enough for birds to fly to safety if a hawk appears, but far enough that a stalking cat cannot pounce from the shadows of the bushes.
Maintenance is the key to preventing the spread of avian diseases like Salmonellosis or Mycoplasmal conjunctivitis. Because driftwood is porous, it can harbor bacteria if old seed is allowed to mold. Clean your feeder every two weeks by emptying the seed and scrubbing it with a brush and a weak vinegar solution. Ensure the wood is completely dry before refilling it to prevent the new seed from absorbing moisture trapped in the wood grain.
* Squirrel Proofing: Use a metal baffle on the pole or a specialized “squirrel-proof” hanger. Driftwood is easy for squirrels to climb, so physical barriers are necessary.
* Seed Variety: Use high-quality black oil sunflower seeds or peanuts. Avoid “filler” mixes with red milo or wheat, as birds will simply toss these on the ground, where they will rot and attract rodents.
* Seasonal Adjustments: In winter, increase the amount of suet or high-fat nuts. The driftwood structure will hold these better than plastic mesh feeders that often clog with ice.
Advanced Considerations for the Serious Practitioner
For those who have mastered the basic platform, advanced joinery can elevate a driftwood feeder into a work of art. Consider using “found” objects from the beach to enhance the build. A large, flat sea shell can be mounted as a natural water basin or a “roof” for a small nesting box attached to the side of the feeder. Integrating a water feature—even a simple dripping bottle—will triple the number of bird species that visit your yard.
Structural joinery in driftwood often requires the use of dowels. Because of the irregular shapes, traditional miter joints are rarely possible. Use a Forstner bit to drill clean holes into the joining pieces and use hardwood dowels with waterproof glue to create a “mechanical” lock. This is much stronger than screws alone when dealing with the curved, twisting grain found in shoreline cedar or oak.
Think about “avian psychology” when choosing your driftwood pieces. Some birds prefer “cavity” feeding. If you find a piece of driftwood with a natural hollow, don’t fill it in. Instead, reinforce it and use it as a nesting site or a protected feeding nook. These natural features are what make driftwood feeders superior to anything you can buy; they provide the specific environmental cues that tell a bird “this is a safe, natural place to be.”
Example Scenario: The Atlantic Survivor Feeder
To understand how this works in practice, let’s look at a project built from a single 3-foot section of salt-bleached Atlantic Cedar. The builder found a piece that was naturally “L-shaped,” which provided a built-in vertical mounting post and a horizontal base. Instead of cutting the wood into uniform boards, the builder used the natural curve of the wood to create a “sheltered cove” for the seed.
The builder used three smaller driftwood twigs as “rafters” to support a roof made from reclaimed cedar shingles. By using the natural knots in the wood as mounting points for the perches, the finished product required only six stainless steel screws and a small amount of Titebond III. Because the wood was already deeply seasoned by years of saltwater exposure, the feeder has remained outdoors in a coastal Maine garden for twelve years without a single sign of rot or structural failure.
This project demonstrates the power of “pioneer-grit” woodworking. By looking at the wood and seeing the structure it *wants* to be, you reduce the need for complex tools and artificial materials. The result is a feeder that looks like it belongs in the trees because, in a sense, it never truly left nature.
Final Thoughts
Creating a sustainable DIY driftwood bird feeder is a journey that begins on the shoreline and ends with a thriving backyard ecosystem. It is a rejection of the “plastic-convenience” mindset that dominates modern gardening. When you take the time to clean, season, and build with found wood, you are creating something that has character, longevity, and a deep connection to the earth.
The practical value of these feeders cannot be overstated. They provide better grip, better insulation, and better safety for birds than almost any commercial alternative. While they require more initial effort in preparation and design, the payoff is a piece of garden architecture that will outlast you. It is a legacy project in the truest sense—a gift back to the wildlife that makes our gardens come alive.
I encourage you to head to the nearest legal beachcombing spot after the next big storm. Look for the wood that has been stripped of its bark and polished by the sand. Bring it home, treat it with respect, and build something that honors the tide. Your local birds will notice the difference, and your garden will be all the better for it.
Sources
1 driftwoodbay.com (https://driftwoodbay.com/birdhouse-specifications-and-install-ideas/) | 2 youtube.com (https://www.youtube.com/watch?v=Pkznsw5bV8Q) | 3 hawk-hill.com (https://www.hawk-hill.com/how-to-clean-driftwood/) | 4 chirpforbirds.com (https://chirpforbirds.com/how-to/5-common-bird-feeding-mistakes-and-how-to-fix-them/) | 5 stevecreek.com (https://stevecreek.com/creating-unique-bird-perches-from-driftwood/) | 6 mymumthedreamer.com (https://mymumthedreamer.com/how-to-clean-driftwood-for-crafting/) | 7 farmanddairy.com (https://www.farmanddairy.com/columns/wood-plastic-how-to-choose-a-bird-feeder/523615.html) | 8 dansbirdbites.com (https://dansbirdbites.com/the-most-common-bird-feeding-mistakes-beginners-make-and-how-to-avoid-them/) | 9 hubpages.com (https://discover.hubpages.com/art/driftwood-art-how-to-make-a-driftwood-birdhouse)