• Skip to main content
  • Skip to primary sidebar
  • Terms and Conditions
  • Privacy Policy
  • Contact

Driftwood 4 Us

Just About Driftwood

Nature Crafts

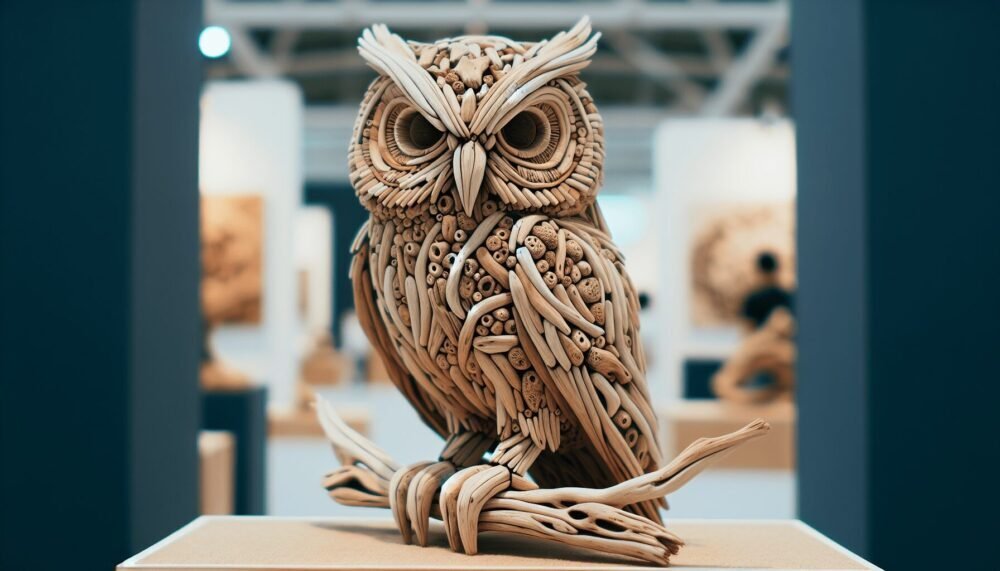
Driftwood Owl

August 22, 2024 by admin

Have you ever come across a piece of driftwood and wondered what kinds of art you could create with it? Driftwood is a versatile material that can be shaped and transformed into various forms of artistic expression. One such unique and captivating creation is the Driftwood Owl. It’s fascinating how bits of wood that have been naturally smoothed and shaped by water can be assembled to resemble the wise and majestic owl, an animal known for its mysticism and symbolism.

What is a Driftwood Owl?

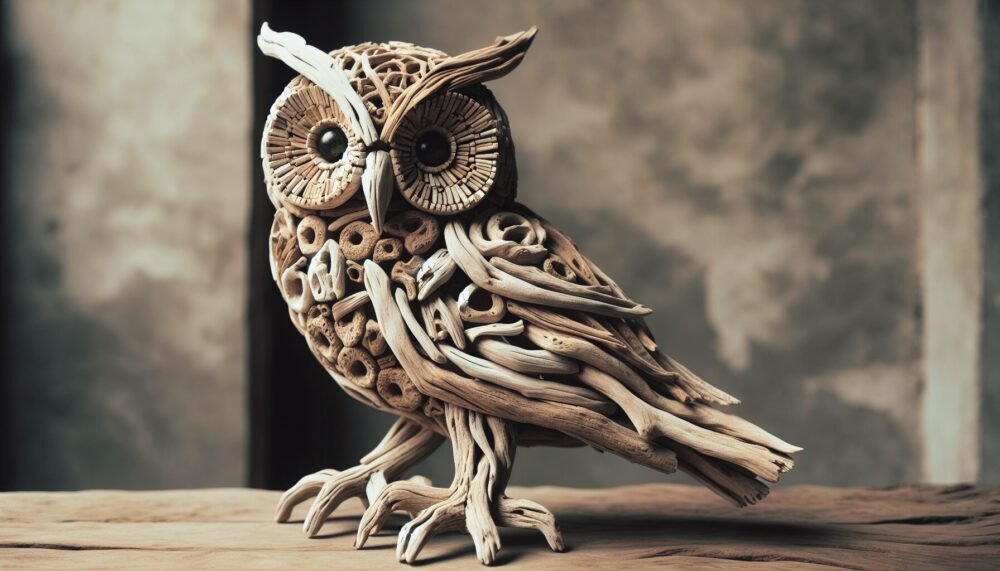
A Driftwood Owl is an artistic representation of an owl made entirely out of driftwood pieces. These pieces are collected from beaches, lakes, and rivers where the wood has been worn down by water and time. Artists then use the naturally smooth and uniquely shaped pieces to craft an owl, paying close attention to details like the eyes, feathers, and posture to make the piece as lifelike as possible.

Why Choose Driftwood?

Driftwood offers a unique texture and natural beauty that other materials cannot replicate. Its aged appearance creates a rustic and weathered look, making each piece distinctive. The process of selecting pieces of driftwood and envisioning how they can come together to form a cohesive artwork is itself a form of artistic expression. Plus, using driftwood is eco-friendly, as it repurposes nature’s discarded items into something beautiful and meaningful.

Materials Needed for Creating a Driftwood Owl

Before you begin your project, you’ll need to gather some materials. Here’s a basic list to help you get started:

MaterialDescription
Driftwood PiecesVarious sizes, shapes, and textures. Ensure they are clean and dry.
GlueStrong adhesive like wood glue or epoxy is recommended.
Base PlatformFor stability, you might want a wooden board or another sturdy surface.
ToolsScissors, a small saw, sandpaper, and tweezers.
Paint and BrushesOptional, for additional detail and coloration.

Collecting Driftwood

One of the main components of creating a Driftwood Owl is, of course, the driftwood itself. You can find driftwood at your local beach, lake, or river. When collecting driftwood, consider the following:

  • Shape and Size: Look for pieces that resemble different parts of an owl’s body, like wings, beak, and feet.
  • Smoothness: Ensure the pieces are smooth and free from sharp edges.
  • Dryness: The wood should be completely dry before using it to avoid any mold growth.

Choosing the Right Glue

The choice of glue is crucial for making sure your Driftwood Owl stays intact. Here are some options:

  • Wood Glue: Strong and durable, great for indoor pieces.
  • Epoxy Glue: Waterproof and very strong, ideal for outdoor displays.
Driftwood Owl

Step-by-Step Guide to Making Your Driftwood Owl

Creating a Driftwood Owl can be an enriching and fulfilling project. Here’s a step-by-step guide to help you through the process:

Step 1: Plan Your Design

Start by envisioning your finished owl. You might want to sketch a rough design to help guide you in selecting the driftwood pieces.

Step 2: Select Your Driftwood Pieces

Lay out your collected driftwood pieces and choose the ones that will best represent different parts of the owl:

  • Body: A large, broad piece of wood.
  • Wings: Longer, flatter pieces.
  • Beak: A pointed piece.
  • Eyes: Circular or rounded pieces.

Step 3: Prepare the Base

Select a sturdy base platform for your owl. This could be a plank of wood or any other solid surface. Ensure it is stable enough to hold the weight of the driftwood.

Step 4: Assemble the Body

Start by gluing the largest piece of driftwood to the base. This will serve as the body of your owl. Allow it to dry completely before adding more pieces.

Step 5: Attach the Wings and Head

Next, attach the wing pieces to either side of the body. Then, find a suitable piece for the head and glue it on top of the body.

Step 6: Add Details

  • Eyes: Use rounded pieces or even a small circular object and paint it to resemble eyes. Attach them to the head.
  • Beak: Glue a pointed piece to the center of the face.
  • Feet: You can use smaller pieces of wood to create feet and attach them to the base.

Step 7: Finishing Touches

Once everything is in place, look for areas that need sandpapering to smooth rough edges. Optionally, you can paint your owl to add more character and detail.

Creative Ideas and Variations

While the basic concept of a Driftwood Owl remains the same, the possibilities for creativity are endless. Here are some variations you can try:

Adding Other Natural Elements

Incorporate other materials like stones, shells, or leaves to enhance your owl’s appearance. These elements can be used to add texture or additional details like eyebrows or feathering.

Themed Driftwood Owls

Why not create a Driftwood Owl that aligns with a particular theme? For example, you could create a winter owl with fake snow and frost or a Halloween owl with a spooky face and cobwebs.

Scale and Size

Experiment with different scales and sizes. Create a family of Driftwood Owls in varying heights for a more dynamic display. Small owls could serve as adorable indoor decorations, while larger ones might impress as outdoor statues.
Driftwood Owl

The Symbolism of the Owl

The owl has been a significant symbol in many cultures throughout history. Understanding this symbolism can add depth and meaning to your Driftwood Owl.

Wisdom and Knowledge

Owls are often seen as symbols of wisdom and knowledge. In Greek mythology, the owl is associated with Athena, the goddess of wisdom. By creating a Driftwood Owl, you might be channeling that same energy of intelligence and insight.

Protection and Guardianship

Some cultures believe that owls offer protection and ward off negative forces. Having a Driftwood Owl in your home or garden could serve as a protective charm.

Mystery and Magic

Owls are often seen as mysterious creatures, primarily because of their nocturnal nature. Including driftwood owls in your art collection might evoke a sense of wonder and magic.

Caring for Your Driftwood Owl

Taking care of your Driftwood Owl ensures it stays in good condition for years to come.

Indoor Care

If keeping your Driftwood Owl indoors, ensure it’s not exposed to direct sunlight for prolonged periods, as this can cause the wood to fade or crack. Dust it regularly and check for any loose pieces that might need re-gluing.

Outdoor Care

For outdoor Driftwood Owls, consider applying a sealant to protect it from the elements. Position it in an area where it won’t be continuously exposed to harsh weather conditions.

Conclusion

Creating a Driftwood Owl is a delightful way to channel your creativity while making use of natural materials. From collecting the driftwood to assembling and detailing your owl, each step of the process is filled with opportunities for imagination and expression. Plus, you’ll end up with a unique piece of art that carries the timeless symbolism of the owl—wisdom, protection, and mystery. Whether you display it indoors or outdoors, your Driftwood Owl is sure to be an enchanting centerpiece that sparks conversation and admiration. So, why not give it a try and see where your creativity takes you?

Filed Under: Driftwood Ideas Tagged With: DIY, driftwood art, Nature Crafts, Owl Sculpture

Driftwood Garden

July 26, 2024 by admin

Welcome to the enchanting world of Driftwood Garden, where nature and artistry blend seamlessly under your nurturing care. As you delve into the heart of this article, you’ll discover the magic that lies in transforming simple pieces of driftwood into a breathtaking garden masterpiece. Each page will guide you through the creative process, offering tips and inspiration to help you develop your own unique garden oasis with personality and charm. Embrace the journey and let your imagination soar as you explore the endless possibilities of your Driftwood Garden. Have you ever strolled along a beach and stumbled upon a weathered piece of driftwood, a fragment of nature’s art sculpted by time and tide? If so, you may have wondered how to incorporate these extraordinary works of natural beauty into your home or garden. Whether you’re a seasoned gardener or a novice, the idea of creating a “Driftwood Garden” might have already crossed your mind. And if it hasn’t, it’s about to!

Creating Your Driftwood Garden

What Exactly is a Driftwood Garden?

Before diving into the nitty-gritty of setting up your driftwood garden, it’s essential to understand what it is. A driftwood garden features pieces of driftwood as central elements in the design. These pieces can serve various purposes, from structural roles like trellises and borders to decorative touches that add rustic charm. The beauty of using driftwood lies in its uniqueness; no two pieces are identical, ensuring a garden that’s one-of-a-kind.

Why Driftwood?

You may be wondering why driftwood is so special. Driftwood undergoes a natural process of being weathered by water, wind, and waves, giving it a unique, smooth texture and an appealing organic shape. Incorporating driftwood into your garden can create a coastal ambiance and add a touch of whimsy and elegance. Plus, using natural materials like driftwood aligns with eco-friendly gardening practices.

Gathering Your Driftwood

First things first, if you’re collecting driftwood from a beach, be aware of local regulations. Some areas have restrictions to protect natural habitats and ecosystems. Once you’re clear to gather, aim for pieces that catch your eye — those that have interesting shapes or textures. Ensure the wood is smooth and free from pests and rot.

Checklist for Gathering Driftwood:

ItemDescription
Permit/PermissionEnsure you’re allowed to collect driftwood in your area
Shape and TextureLook for interesting shapes and smooth surfaces
SizeVarying sizes for different uses in the garden
ConditionCheck for rot and pests

Preparing Driftwood for Use

Now that you have your driftwood, preparation is key. Cleaning the wood removes any salt, debris, and potential pests. You can clean driftwood by scrubbing it with a brush and soaking it in a mixture of water and vinegar. Let it dry completely before incorporating it into your garden.

Basic Tools and Supplies

You’ll need some basic tools and supplies to handle and install driftwood. Here are some essentials:

Tools List:

ToolUse
Brush and ScrubberCleaning driftwood before use
HandsawCutting larger pieces to desired lengths
Drill and ScrewsSecuring driftwood pieces
SandpaperSmoothing out rough edges
SealantProtecting the wood if necessary

Driftwood Garden Design Ideas

Driftwood as Plant Supports

One of the simplest and most practical uses for driftwood in your garden is as plant supports. Driftwood pieces can be used as natural trellises for climbing plants like ivy, roses, or cucumbers.

How to Create a Driftwood Trellis:

  1. Select Your Driftwood: Choose sturdy, long pieces of driftwood that can support the weight of climbing plants.
  2. Prepare the Site: Ensure the soil is loose and well-draining where you want to place the trellis.
  3. Install the Driftwood: Dig holes for the driftwood pieces and anchor them securely in the ground.
  4. Tie the Plants: Use garden twine to gently tie the plant stems to the driftwood.

Driftwood Garden Borders

Creating borders in your garden can define spaces and add an aesthetic appeal. Driftwood can be laid out to create beautiful, natural-looking garden edges.

Steps to Make Driftwood Garden Borders:

  1. Collection and Selection: Gather pieces that are relatively uniform in thickness and length.
  2. Plan Your Border: Lay out the driftwood around your garden beds to visualize the final look.
  3. Installation: Partially bury the driftwood pieces vertically in the soil to keep them stable.
  4. Filling: Fill the gaps with smaller rocks or pebbles to add stability and enhance the look.

Driftwood Garden Sculptures

If you have artistic inclinations or just want a stunning focal point, consider creating driftwood sculptures. These can range from simple arrangements to intricate designs.

Simple Steps for Driftwood Sculptures:

  1. Select Driftwood Pieces: Choose pieces that naturally fit together or can be easily connected.
  2. Plan the Design: Sketch out your sculpture design beforehand.
  3. Assembly: Use screws, nails, or wood glue to assemble your sculpture. For larger pieces, a drill might be necessary.
  4. Placement: Choose a prominent spot in your garden to place your sculpture.

Driftwood Pathways

Create a magical pathway with driftwood planks or slices. This can be an inviting way to wander through your garden.

Creating a Driftwood Pathway:

  1. Choose the Path: Mark the area where you want the pathway.
  2. Prepare the Ground: Clear the area of debris and level the soil.
  3. Lay the Driftwood: Place your driftwood pieces along the marked pathway in your desired pattern.
  4. Secure the Path: Partially bury the pieces in the ground and surround them with mulch or gravel to keep them stable.

Driftwood Planters

How about using driftwood as natural planters? You can hollow out larger pieces or even create frames for pots.

Making Driftwood Planters:

  1. Select Your Driftwood: Find large, thick pieces that can hold soil and plants.
  2. Hollow Out the Wood: If the piece isn’t naturally hollow, use a chisel and hammer to create space for soil.
  3. Prepare for Planting: Fill the hollowed space with soil and plant your chosen flora.
  4. Placement: Decide whether it will be a hanging planter or rest on the ground.

Driftwood Accents

Sometimes, the smallest touches make the biggest impact. Use smaller pieces of driftwood as garden accents.

Simple Driftwood Accents:

  1. Identify Spots for Accents: Look for empty spots in your garden that could use a little something extra.
  2. Place Small Driftwood Pieces: Strategically place small driftwood pieces to draw the eye.
  3. Combine with Other Elements: Pair driftwood accents with stones, shells, or small statuettes to create a cohesive look.

Driftwood Garden

Maintaining Your Driftwood Garden

Seasonal Maintenance

To ensure your driftwood garden remains beautiful and functional, regular maintenance is essential. Inspect the driftwood regularly for any signs of wear or damage. If you’re in an area with heavy rainfall, consider using a water-resistant sealant to protect the wood.

Pests and Protection

While driftwood is generally pest-resistant, it’s always a good idea to keep an eye out for any pests like termites that may find their way into your garden. Regular cleaning and inspection can help keep unwanted guests at bay.

Eco-Friendly Gardening Practices

Using driftwood aligns with eco-friendly gardening practices. Repurposing naturally fallen or washed-up wood reduces waste and lessens the need for man-made materials. This approach not only benefits the environment but also imbues your garden with a sense of natural harmony.

Driftwood Garden

Conclusion

Your driftwood garden doesn’t have to be perfect on the first try. Part of the charm and creativity of incorporating driftwood into your garden lies in experimenting with different setups and designs. Over time, you’ll find what works best for your space and aesthetic preferences. Remember, every piece of driftwood tells a story, and by bringing it into your garden, you’re weaving that story into your own gardening journey. So, roll up your sleeves and let your imagination drift away. Happy gardening!

Filed Under: Driftwood Ideas Tagged With: DIY, Driftwood, Garden Design, Landscaping, Nature Crafts

Driftwood Projects For Kids

May 25, 2024 by admin

Sure! Here’s your friendly introduction:

“Driftwood Projects For Kids” is your go-to guide for sparking creativity and adventure in young minds. In this article, you’ll discover an array of fun, easy, and imaginative projects using nothing more than simple driftwood. Perfect for both sunny days at the beach and rainy days indoors, these activities are designed to keep kids entertained while teaching them about nature’s beauty. Dive into our collection of ideas that turn ordinary pieces of driftwood into extraordinary treasures, creating cherished memories along the way.

Driftwood Projects For Kids

Have you ever stumbled upon a beautiful piece of driftwood while on a beach walk and wondered how to make something fun out of it with your kids? Driftwood projects are not only a marvelous way to spend quality time together, but they can also inspire creativity and introduce your children to the joys of upcycling natural materials. Plus, driftwood crafts can serve as unique decor items, making your home feel cozy and full of memories.

Driftwood Projects For Kids

Why Driftwood Is Perfect For Crafting

Driftwood, with its naturally worn appearance and unique shapes, is a wonderful material for crafting. Beach-worn and smoothed from water, it’s safe for little hands and easy to work with. It’s also versatile, providing endless opportunities for children to turn their imaginative ideas into tangible creations.

Benefits of Using Driftwood in Kids’ Projects

Using driftwood in your child’s crafting adventures can have numerous benefits. Here are just a few reasons why you should consider it:

  • Eco-friendly: Driftwood is an excellent way to recycle natural materials.
  • Educational: Kids learn about natural processes and the environment.
  • Creative Development: Encourages creativity and problem-solving skills.
  • Cost-effective: Beachcombing is free, making it an affordable crafting option.

Getting Started With Driftwood Projects

Before diving into specific projects, let’s cover some basics to make sure you’re prepared!

Safety First

Even though driftwood is generally safe, there are some precautions you should take to ensure your kids have a safe crafting experience:

  1. Inspect the Wood: Check for sharp edges or splinters.
  2. Clean the Wood: Rinse the driftwood in warm water to remove sand and debris. Soak it if necessary.
  3. Dry Completely: Make sure the driftwood is entirely dry before starting any project.

Essential Supplies

Depending on what you decide to create, you might need some additional supplies. Here’s a basic list to get you started:

  • Non-toxic paint and brushes
  • Hot glue gun or strong craft glue
  • String, yarn, or twine
  • Scissors
  • Small nails or tacks (if needed)
  • Beads, shells, or other decorative elements

Fun Driftwood Projects For Kids

Now that you’re ready, here are some fun and easy driftwood projects perfect for kids of all ages.

Driftwood Mobile

A driftwood mobile is an enchanting craft that adds a whimsical touch to any room.

Materials Needed:

MaterialQuantity
Small Driftwood Sticks5-10 pieces
String or YarnAs per requirement
Beads and ShellsOptional, for decor
Hot Glue Gun1

Steps:

  1. Gather Materials: Collect small pieces of driftwood, along with any decorative items like beads or shells.
  2. Prepare Your Driftwood: Ensure the pieces are clean and dry.
  3. Design Your Mobile: Arrange the driftwood in a pleasing pattern on a flat surface.
  4. Tie the Driftwood: Use string or yarn to tie the driftwood together. Make sure to leave some string at the top for hanging.
  5. Decorate: Add beads, shells, or other decorations as desired.
  6. Hang It Up: Find a suitable spot to hang your new mobile!

Driftwood Picture Frame

Creating a driftwood picture frame can be a memorable way to display family photos.

Materials Needed:

MaterialQuantity
Medium-sized Driftwood4-6 pieces
Cardboard Frame1
Hot Glue Gun1
Paint (Optional)As per requirement

Steps:

  1. Select Your Driftwood: Choose pieces that are relatively straight and flat.
  2. Prepare the Frame: Start with an inexpensive cardboard frame.
  3. Attach the Driftwood: Use a hot glue gun to attach the driftwood pieces to the frame, covering as much of the cardboard as possible.
  4. Optional Painting: You can paint the driftwood or leave it natural.
  5. Display Your Photos: Insert a favorite photo and display your handcrafted frame.

Driftwood Wind Chime

A driftwood wind chime is a straightforward yet delightful project.

Materials Needed:

MaterialQuantity
Driftwood Pieces5-7
String or YarnAs per requirement
Small Nails/Tacks5-10 (Optional)
Beads (Optional)As per requirement

Steps:

  1. Collect Driftwood: Gather driftwood pieces of various sizes.
  2. Prepare and Clean: Make sure the driftwood is dry and clean.
  3. Assemble the Chime: Tie each piece of driftwood to a longer vertical piece using string or yarn.
  4. Decorate: Add beads to the string for an extra flourish.
  5. Hang: Find a windy spot outdoors and hang your wind chime.

Driftwood Planter

A driftwood planter can be a beautiful addition to any home garden.

Materials Needed:

MaterialQuantity
Large Driftwood Piece1
Small Plants or SucculentsAs per preference
SoilAs per requirement
Utility Knife1

Steps:

  1. Select Your Driftwood: Choose a driftwood piece that has some indents or hollows.
  2. Carve Out Space: Use a utility knife to carve out a small area for the plants.
  3. Add Soil: Fill the carved-out space with soil.
  4. Plant: Insert small plants or succulents.
  5. Display: Place your new driftwood planter in a suitable location.

Advanced Driftwood Projects

Once you’ve mastered the simpler projects, you and your kids might want to try some more advanced creations.

Driftwood Birdhouse

Building a driftwood birdhouse can be an exciting and educational project.

Materials Needed:

MaterialQuantity
Assorted Driftwood PiecesEnough to build a small house
Non-toxic PaintAs per requirement
Hot Glue Gun1
Small Wood Saw1
Nails or ScrewsAs per requirement
Hammer or Screwdriver1

Steps:

  1. Plan Your Design: Sketch out the design for your birdhouse.
  2. Build the Frame: Use larger pieces of driftwood to create the base and walls.
  3. Attach Walls and Roof: Use nails or hot glue to attach all pieces securely.
  4. Decorate: Paint or add additional decorations if desired.
  5. Mount: Find a safe spot outdoors to mount your new birdhouse.

Driftwood Sculpture

Creating a driftwood sculpture will turn your collected pieces into a work of art.

Materials Needed:

MaterialQuantity
Various Driftwood PiecesA variety
Hot Glue Gun1
Base for Sculpture1 (such as a wooden board)

Steps:

  1. Select Driftwood Pieces: Choose an assortment of shapes and sizes.
  2. Design Your Sculpture: Experiment with arrangements until you find a visually appealing design.
  3. Attach to Base: Use a hot glue gun to affix the driftwood to your base.
  4. Add Detailing: Paint or add other decorative elements if desired.
  5. Display: Place your finished sculpture indoors or in a sheltered outdoor spot.

Driftwood Projects For Kids

Tips For Success

To help make your driftwood projects as enjoyable and successful as possible, consider these additional tips:

Incorporate Nature

Use other natural materials like shells, stones, and sea glass to enhance your driftwood projects.

Be Patient

Crafting takes time and patience. Encourage your kids to take their time and enjoy the process.

Encourage Creativity

Let your kids lead the way with their ideas. It’s a fantastic opportunity to let them express their creativity and original thinking.

Document Your Projects

Take photos of the different steps and the final product to build a memory album of your crafting journey.

Conclusion

Driftwood projects for kids are an incredible way to nurture creativity, learn about nature, and create lasting memories. From simple mobiles to intricate sculptures, there’s a driftwood project suitable for every age and skill level. The key is to have fun, be patient, and let the beauty of nature inspire you and your children.

Next time you’re on a beach walk, remember to collect some driftwood. You never know what amazing creations are waiting just around the corner to become a treasured part of your home. Happy crafting!

Filed Under: Driftwood Ideas Tagged With: crafts, DIY Projects, Driftwood, Kids Activities, Nature Crafts

Driftwood Ideas Projects

May 24, 2024 by admin

Welcome to “Driftwood Ideas Projects,” where the beauty of nature meets your creativity! In this engaging guide, you’ll discover a world of possibilities with driftwood, transforming these ocean treasures into stunning décor and practical items for your home. Imagine crafting rustic picture frames, unique coat racks, or even elegant candle holders, all while bringing a piece of the beach into your living space. Dive into these thoughtfully curated projects, and let your imagination drift as you create something special with your own hands.

Driftwood Ideas Projects

Have you ever stumbled upon a piece of driftwood during a beach stroll and wondered how you might transform it into something captivating? Driftwood, with its natural beauty and unique shape, presents endless possibilities for crafting.

Whether you’re a seasoned DIY enthusiast or just itching to try something new, there’s a driftwood project for everyone. We’ll dive into various ways you can repurpose driftwood into stunning home décor, functional items, and even gifts.

Driftwood Ideas Projects

What Makes Driftwood Special?

Driftwood is more than just a piece of wood that’s been floating in water. Its journey through rivers, lakes, or seas gives it a unique texture and weathered look that can’t be replicated. Because of its natural aesthetic and durability, it has become a favorite material for many DIY projects.

Characteristics of Driftwood:

  1. Texture: Softened edges, often with a smoother, polished feel.
  2. Colors: Ranges from light beige to dark browns, depending on the type of wood.
  3. Shapes: Varies in size, from small twigs to large logs, making it suitable for diverse projects.

Preparing Driftwood for Projects

Before you dive into creating with driftwood, it’s essential to prepare it properly. This ensures it’s clean, safe, and ready for your next crafting adventure.

Cleaning Driftwood

  1. Rinse: Begin by rinsing off any sand, dirt, or salt with fresh water.
  2. Sterilize: To remove any trace of bacteria or insects, soak the driftwood in a solution of water and bleach (1 cup of bleach per gallon of water) for 24 hours.
  3. Dry: After soaking, let it dry thoroughly. This can take several days to weeks depending on the size. Sun-drying is ideal.

Sanding and Sealing

  1. Sanding: Use sandpaper to smooth out any rough edges if necessary. This is especially important for projects that will have close human contact.
  2. Sealing: Depending on your project, you may want to seal the driftwood to protect it from further wear and tear. Use a clear wood sealer for a natural look or a varnish for a glossy finish.

Driftwood Projects You’ll Love

Now that your driftwood is prepped, let’s explore some fantastic projects that range from simple to intricate. There’s something here for every skill level!

Driftwood Candle Holders

A perfect starting point if you’re new to driftwood projects. These create a cozy and rustic ambiance in any space.

Materials Needed:

  • Small pieces of driftwood
  • Tea light candles
  • Power drill with a spade bit

How to Make:

  1. Select pieces of driftwood with flat surfaces.
  2. Use the spade bit to drill shallow holes the size of your tea lights.
  3. Place the tea lights in the drilled holes, and voila! Instant rustic charm.

Driftwood Wall Art

Showcase the natural beauty of driftwood by creating custom wall art that stands out in any room.

Materials Needed:

  • Various sizes of driftwood
  • Strong glue or a nail gun
  • Canvas or wooden backing board

How to Make:

  1. Arrange pieces of driftwood on the canvas to create your desired pattern or design.
  2. Secure each piece with strong glue or a nail gun.
  3. Once the glue is dry, hang your new masterpiece on the wall.

Driftwood Mirror Frame

A driftwood mirror frame adds a beachy, natural flair to any bathroom or hallway.

Materials Needed:

  • A basic mirror with a flat frame
  • Driftwood pieces of various lengths
  • Wood glue
  • Clamps

How to Make:

  1. Lay your mirror flat on a work surface.
  2. Arrange driftwood pieces around the mirror frame, cutting pieces to fit if necessary.
  3. Secure each piece with wood glue, allowing it to dry between adding more pieces.
  4. Clamp the pieces in place and let the glue dry thoroughly before hanging.

Driftwood Coat Rack

Functional and stylish, a driftwood coat rack is both practical and pleasing.

Materials Needed:

  • A long, sturdy piece of driftwood
  • Coat hooks (metal or wood)
  • Drill and screws

How to Make:

  1. Find a piece of driftwood that is sturdy and long enough to hold several coat hooks.
  2. Mark where each hook will be placed, ensuring they are evenly spaced.
  3. Drill holes for the screws and attach the hooks.
  4. Mount the coat rack to the wall using appropriate hardware.

Driftwood Christmas Tree

Perfect for the holiday season, a driftwood Christmas tree is whimsical and eco-friendly.

Materials Needed:

  • Various lengths of driftwood
  • A long dowel rod or metal pipe (for the trunk)
  • A sturdy base (wooden block or heavy pot)
  • Wood screws
  • Drill

How to Make:

  1. Arrange driftwood pieces from shortest to longest to form the tree shape.
  2. Drill a hole through the center of each piece.
  3. Stack the driftwood pieces onto the dowel rod, starting with the longest at the bottom.
  4. Secure the dowel rod into the base.
  5. Decorate with lights and ornaments as desired.

Driftwood Shelves

Driftwood shelves lend a rustic look to your home while providing functional storage space.

Materials Needed:

  • Sturdy driftwood pieces
  • Shelf brackets
  • Screws and wall anchors
  • Drill

How to Make:

  1. Select pieces of driftwood that are long and sturdy enough to support weight.
  2. Attach shelf brackets to the wall at the desired height and spacing.
  3. Secure the driftwood shelves to the brackets using screws.

Driftwood Lamps

A driftwood lamp can add a warm, natural glow to any room while functioning as a conversation piece.

Materials Needed:

  • Driftwood pieces
  • Lamp kit (socket, cord, and switch)
  • Drill
  • Light bulb

How to Make:

  1. Arrange driftwood pieces in a way that will create a stable base and interesting shape for your lamp.
  2. Drill holes as needed to pass the lamp cord through the driftwood.
  3. Assemble the lamp kit according to the instructions and secure it within the driftwood base.
  4. Insert a light bulb, and your new lamp is ready to light up your space.

Advanced Driftwood Projects

If you’re ready to take your driftwood creations to the next level, try your hand at these more intricate projects.

Driftwood Furniture

Creating furniture pieces from driftwood can be challenging but incredibly rewarding. Imagine a beautiful driftwood coffee table or a rustic headboard.

Driftwood Coffee Table

Materials Needed:

  • Large, flat piece of driftwood for the tabletop
  • Smaller pieces for the legs or base
  • Wood screws
  • Saw
  • Clear epoxy resin (optional for a smooth finish)

How to Make:

  1. Choose a large, flat piece of driftwood for your tabletop.
  2. Cut smaller pieces to create the legs or base. Make sure they can support the weight of the tabletop.
  3. Attach the legs to the tabletop using wood screws.
  4. Use clear epoxy resin to give the tabletop a smooth and shiny finish, if desired.

Driftwood Headboard

Materials Needed:

  • Several long driftwood pieces
  • Wooden frame
  • Wood screws
  • Saw

How to Make:

  1. Cut the driftwood pieces to your desired length for the headboard height.
  2. Arrange them within a wooden frame to ensure they fit snugly.
  3. Attach the pieces to the frame using wood screws.
  4. Mount the headboard to your bed frame or wall.

Driftwood Sculptures

For those who enjoy artistic endeavors, sculpting with driftwood can be a fulfilling project. Create abstract forms, animal shapes, or whatever your imagination conjures.

Materials Needed:

  • Various sizes and shapes of driftwood
  • Strong adhesive or nails
  • Base for the sculpture (wooden block or stone)

How to Make:

  1. Plan your sculpture by arranging the driftwood pieces into your desired formation.
  2. Secure the pieces together using strong adhesive or nails.
  3. Attach the sculpture to a sturdy base.
  4. Consider adding finishing touches like painting or varnishing parts of the sculpture.

Driftwood Ideas Projects

Tips for Successful Driftwood Projects

Safety First

Always wear protective gear such as gloves, safety glasses, and masks when working with tools and materials. Driftwood can sometimes splinter, and proper safety measures will prevent accidents.

Tools of the Trade

Having the right tools can make a significant difference in the ease and quality of your projects. Common tools you might need include:

  • Saw
  • Drill and drill bits
  • Sandpaper
  • Wood screws
  • Glue gun

Sourcing Driftwood

While driftwood is often found washed up on beaches, it’s important to collect it responsibly. Some beaches and natural reserves prohibit driftwood removal to preserve the natural environment. Check local regulations before collecting.

Maintain Your Driftwood Projects

Driftwood can be somewhat brittle over time, particularly in dry indoor environments. To keep your creations looking their best:

  1. Dust Regularly: Use a soft cloth to wipe off any dust.
  2. Humidity: Avoid placing driftwood in areas with extreme dryness. A balanced indoor climate will help maintain its integrity.
  3. Sealant Touch-ups: If you’ve used a sealant, check periodically and reapply as needed to maintain the protective layer.

Driftwood Projects as Gifts

Handmade driftwood projects make incredibly personal and meaningful gifts. They show thoughtfulness and effort, often much more appreciated than store-bought items.

Custom Driftwood Picture Frame

A driftwood picture frame is both a thoughtful and practical gift that captures memories beautifully.

Materials Needed:

  • Driftwood pieces
  • Plain picture frame
  • Strong glue
  • Sandpaper
  • Decorations (optional, like shells or beads)

How to Make:

  1. Sand the edges of the driftwood to ensure no rough spots.
  2. Arrange the driftwood pieces around the frame.
  3. Glue the pieces in place and let them dry completely.
  4. Add any additional decorations, if desired.

Driftwood Jewelry Holder

With a unique and rustic charm, a driftwood jewelry holder can be a perfect gift for someone who loves both nature and accessories.

Materials Needed:

  • Flat, wide piece of driftwood
  • Small hooks
  • Drill and drill bits
  • Wood screws or strong adhesive (for wall mounting)

How to Make:

  1. Decide where you’d like to place the hooks for necklaces, bracelets, and earrings.
  2. Drill pilot holes and screw in the hooks.
  3. Optionally, attach a mounting bracket on the back for wall hanging.

Closing Thoughts on Driftwood Projects

Driftwood, with its storied journey from tree to sea to shore, offers a unique canvas for your creativity. Whether you’re making simple décor items or complex pieces of furniture, working with driftwood can be an incredibly rewarding experience.

So, the next time you’re on a beach stroll and you see a piece of driftwood, imagine the possibilities it holds. Happy crafting!

Remember, the beauty of driftwood projects lies in their variability and the natural charm each piece carries. So, let your creativity flow and transform driftwood into something spectacular!

Filed Under: Driftwood Ideas Tagged With: craft ideas, Driftwood, home decor, Nature Crafts, Upcycling

Primary Sidebar

Driftwood4us.com, is a participant in the Amazon Services LLC Associates Program, an affiliate advertising program designed to provide a means for sites to earn advertising fees by advertising and linking to amazon.com.