Welcome to the world of Outdoor Driftwood Wall Art, where the beauty of nature meets the creativity of your imagination. In this enchanting journey, you’ll discover how to transform simple pieces of driftwood into stunning, personalized wall art that adds a natural and rustic charm to your outdoor spaces. With just a few tools and a bit of inspiration, you’ll create captivating art pieces that reflect both your artistic spirit and the ever-changing beauty of the outdoors. Dive in and let your creativity flow as you bring the serene and timeless elegance of driftwood into your outdoor decor! Have you ever thought about bringing the beauty of nature into your outdoor space through art? If you have, then outdoor driftwood wall art might just be the perfect addition for you!
Driftwood, shaped by the waves, wind, and salt, can add a rustic yet unique charm to any yard, garden, patio, or deck. Imagine the organic curves and textures of driftwood combined with your creativity to make an aesthetically pleasing piece of art.

What is Driftwood?
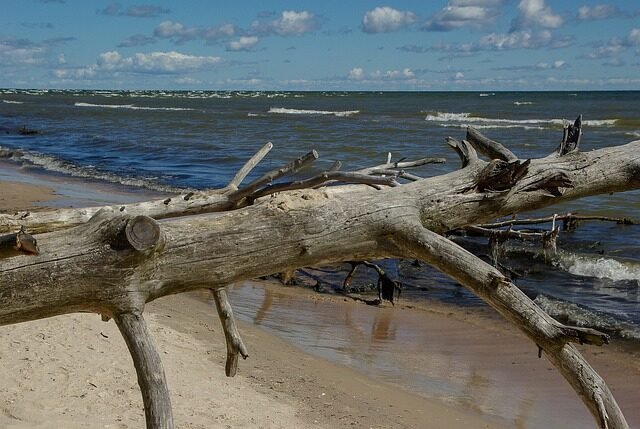
Driftwood refers to any wood that has been washed onto the shore of a sea, river, or lake by the action of winds, tides, or waves. Over time, these pieces of wood tell a story, which is what makes each one unique and fascinating.
Types of Driftwood
The world of driftwood is diverse, and you may encounter various types based on their origin. Here are some common types of driftwood:
| Type | Source | Characteristics |
|---|---|---|
| Beach Driftwood | Ocean Shores | Smooth and weathered |
| Lake Driftwood | Lakesides | Often lighter and less weathered |
| River Driftwood | Riverbanks | Gnarled and intricate shapes |
Knowing the type of driftwood you have can help in determining its best use in your wall art.
Why Choose Driftwood for Outdoor Art?
Driftwood is naturally beautiful and can turn any outdoor space into a captivating area. Here’s why driftwood could be an excellent choice for your wall art project:
Eco-Friendly
Using driftwood provides an eco-friendly alternative to other materials. By upcycling wood washed ashore, you’re giving it a second life and helping to clean up the environment.
Unique and Customizable
No two pieces of driftwood are the same. Each piece has its own character, ensuring that your wall art will be one-of-a-kind.
Versatile
Driftwood can be incorporated into various design styles, from rustic and bohemian to modern and minimalist. You can pair it with other materials like metal, fabric, or glass to create different looks.
Gathering Driftwood
Before you can create your driftwood wall art, you’ll need to gather some driftwood. Here’s how you can do it safely and responsibly:
Where to Find Driftwood?
You can typically find driftwood along beaches, rivers, and lakes. Here are some tips for finding high-quality pieces:
- Tide Schedule: Check the tide schedule, as driftwood is more likely to appear after high tides.
- Weather Conditions: Look after storms, when the waves have deposited new driftwood on the shore.
- Remote Locations: Explore less frequented areas to find untouched pieces.
Ethical and Legal Considerations
Not all places allow you to collect driftwood freely. Always make sure to:
- Check Local Regulations: Ensure it’s legal to collect driftwood in your area.
- Avoid Protected Areas: Don’t collect from areas where removal is restricted to protect wildlife habitats.
Tools for Collecting Driftwood
Consider taking these items along:
- Bag or Cart: To carry your finds.
- Gloves: To protect your hands from splinters.
- Waterproof Boots: For walking along wet areas.
Preparing Driftwood for Art
Once you’ve gathered your driftwood, you’ll need to prepare it for creating wall art. Here’s how:
Cleaning Driftwood
Driftwood can contain salt, sand, and tiny critters that need to be removed. Here’s a simple cleaning process:
- Rinse Thoroughly: Use a hose to remove loose dirt and sand.
- Soak: Submerge the wood in a bucket of fresh water for 1-2 weeks, changing the water regularly to remove salts.
- Scrub: Use a brush to scrub off any remaining debris.
- Dry: Let the driftwood dry completely, preferably in the sun, to prevent mold and mildew.
Sanding and Shaping
Sanding driftwood can enhance its natural beauty and make it easier to work with. You can use:
- Sandpaper: For gentle smoothing.
- Electric Sander: For larger pieces or more intricate work.
- Chisel and Hammer: To shape the wood.
Always wear a mask while sanding to avoid inhaling dust.

Design Ideas for Driftwood Wall Art
Now that your driftwood is ready, it’s time to get creative. Here are some design ideas to inspire you:
Driftwood Mirrors
Create a unique mirror frame using driftwood pieces. Arrange the wood around a mirror, securing each piece with strong adhesive or nails.
Driftwood Shelves
Attach driftwood to brackets or directly into the wall to create functional yet beautiful shelves.
Driftwood Sculptures
Let your creativity run wild by assembling driftwood pieces into sculptures. Use wood glue or screws to hold the pieces together.
Driftwood Signs
Create personalized signs by painting or carving words into the driftwood. This can be a fun way to add inspirational quotes or welcome signs to your space.
Tools and Materials Needed
Creating outdoor driftwood wall art requires a few basic tools and materials. Here’s a checklist to help you get started:
| Tools Required | Materials Needed |
|---|---|
| Saw | Driftwood |
| Hammer | Nails or Screws |
| Drill | Adhesive (wood glue, epoxy) |
| Sandpaper | Mirror (for mirror frame) |
| Brush | Paint (optional) |
Step-by-Step Guide to Creating Driftwood Wall Art
Here’s a comprehensive step-by-step guide to help you create your own piece of driftwood art:
Step 1: Planning Your Design
Before you start drilling and nailing, plan what you want your driftwood wall art to look like. Sketch out your ideas or gather inspiration from online sources.
Step 2: Arranging the Driftwood
Lay out your driftwood pieces on the ground or a flat surface to see how they fit together. This is where you can play with composition and find an arrangement that you enjoy.
Step 3: Cutting and Shaping
Trim any pieces as needed using a saw. Shape the ends or surfaces to fit together better. Sand any rough edges to avoid splinters.
Step 4: Assembling the Art
Start assembling your driftwood art piece. Use wood glue or epoxy to adhere smaller pieces together. For larger pieces, use nails or screws to ensure stability.
Step 5: Painting and Finishing
If desired, paint your driftwood or add any finishing touches to enhance its appearance. Consider sealing the wood with a protective coat to ensure it withstands outdoor conditions.
Step 6: Mounting
Secure your finished piece of art to the wall. Use appropriate hardware that can support the weight of the driftwood and withstand outdoor elements.
Caring for Your Driftwood Art
Outdoor art pieces can be exposed to varying weather conditions, so proper care is crucial.
Regular Maintenance
- Cleaning: Gently clean your driftwood art to remove dirt and debris.
- Re-sealing: Reapply a protective finish every year to prolong the lifespan of the wood.
- Inspecting: Regularly check for any signs of damage or wear and repair as needed.
Protecting Against Elements
- Weatherproof Coating: Apply a weatherproof coating to protect against sun, rain, and humidity.
- Sheltered Location: Place the art in a sheltered location to reduce direct exposure to harsh weather.
Benefits of Driftwood Wall Art
Creating and displaying driftwood wall art comes with several benefits:
Aesthetic Appeal
Driftwood’s natural texture and unique forms bring a beautiful, organic element to any outdoor space. It can complement garden settings, patios, or outdoor living areas.
Personal Satisfaction
There’s immense satisfaction in creating something beautiful with your own hands. Building driftwood wall art is a rewarding process that allows you to showcase your creativity and craftsmanship.
Conversation Starter
Your custom driftwood art will likely attract attention and curiosity, serving as a great conversation starter when entertaining guests.
Conclusion
Outdoor driftwood wall art combines the raw beauty of nature with artistic creativity, resulting in unique pieces that enhance any outdoor space. By responsibly collecting and preparing driftwood, planning your designs, and using the right tools and materials, you can create stunning artistic displays.
Whether you choose to make a driftwood mirror, shelf, sculpture, or sign, your creation will be a distinctive and personal addition to your outdoor decor. Plus, it’s a fantastic way to connect with nature and upcycle materials, making your art both beautiful and eco-friendly.
So, next time you’re at the beach, river, or lake, keep an eye out for those perfect pieces of driftwood. Happy crafting!