Balanced Driftwood Sailboat Engineering
The difference between a ‘stick boat’ and a masterpiece is the five seconds you spend finding the center of gravity. Anyone can tie two sticks together, but it takes a precision mindset to make driftwood sing. Most amateurs try to force the wood to stand up; the pro finds the exact point where the ocean’s curves meet the earth’s pull. When you master the ballast of your sculptures, they stop looking like ‘crafts’ and start looking like impossible artifacts. Elevate your coastal game with the science of balance.


Creating a driftwood sailboat is often seen as a simple weekend craft, but there is a profound difference between a decorative trinket and a piece of functional art. When you approach a piece of weathered timber, you aren’t just looking for a hull; you are looking for a vessel that understands the physics of the sea. True craftsmanship requires an eye for the natural “spirit” of the wood combined with the cold, hard logic of marine engineering.
Most beginners struggle with the “lean.” They build a beautiful mast and set a perfect sail, only to find the boat listing to the side or dipping its nose into the sand. This is usually the result of ignoring the invisible forces that govern buoyancy and weight distribution. By learning the principles of balance, you can transform a random find from the tideline into a perfectly trimmed miniature that commands attention in any room.
This guide will walk you through the technical nuances of sailboat engineering, tailored specifically for the irregular, beautiful world of driftwood. Whether you are building a static display piece or a model meant for a garden pond, the underlying science remains the same. It is time to move past the amateur “stick boat” and start engineering coastal masterpieces.
Balanced Driftwood Sailboat Engineering
Balanced driftwood sailboat engineering is the application of naval architecture principles to the unpredictable shapes of salt-worn wood. Unlike traditional boat building, where you start with a symmetrical plan, driftwood engineering is a process of reverse discovery. You must find the balance within the chaos of the wood’s natural growth and erosion.
At its core, this discipline focuses on the relationship between two critical points: the Center of Gravity (CG) and the Center of Buoyancy (CB). In a successful build, these forces work together to keep the vessel upright and stable. If the weight is too high, the boat becomes “tender” or tippy; if it is too low or off-center, the boat will never sit level on a shelf or in the water.
Real-world engineers use these concepts to build everything from racing yachts to massive cargo ships. In the context of driftwood, we use these principles to ensure that a heavy, gnarled mast doesn’t overwhelm a lightweight hull. We use ballast—usually in the form of lead, stones, or hidden metal—to anchor the piece to the earth, giving it a sense of permanence and “groundedness” that is visually striking.
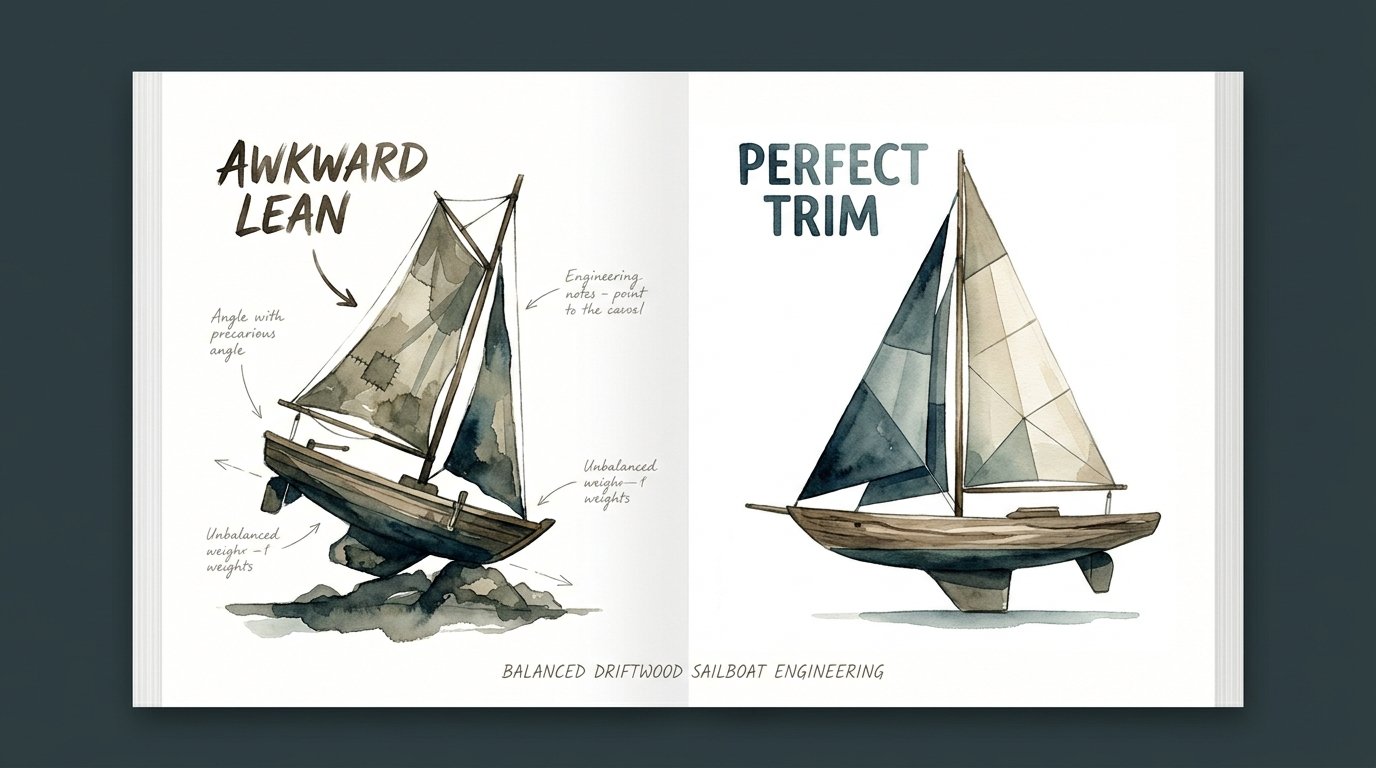
Visualize a tall ship in a storm. It doesn’t capsize because the heavy keel deep under the water acts as a counterweight to the wind pushing against the sails. Your driftwood sailboat needs that same internal logic. Even if it never touches the water, the human eye can “feel” when a sculpture is properly balanced. It gives the piece a “Perfect Trim” that looks right from every angle.
How to Do It: Finding the Soul of the Wood
The first step in engineering a driftwood sailboat is selecting a hull that can support your vision. Look for pieces that have a natural “flat” side, which will serve as the bottom of your boat. If the wood is too rounded, it will roll; if it is too irregular, it will look like a pile of debris rather than a purposeful vessel. Use a level to find the wood’s natural resting point.
Once you have your hull, you must locate the longitudinal center of gravity. Balance the piece of wood on a thin edge, like a ruler or your finger, until it sits level without tipping forward or backward. This is the spot where your mast should ideally be placed. If you place the mast too far forward (the “bow”), the boat will look “heavy-headed.” Too far back (the “stern”), and it looks like it is dragging its tail.
Drilling the mast hole is a critical moment. You want a vertical hole that is deep enough to provide structural support but not so deep that it cracks the hull. Use a drill bit that matches the diameter of your chosen mast stick. For a “pioneer-grit” finish, avoid using perfectly straight dowels; find a sturdy, tapered piece of driftwood that mimics the look of a hand-hewn mast from a century ago.
For the rigging and sails, you have to account for the “Center of Effort” (CE). This is the imaginary point where all the wind force (or visual weight) of the sails is concentrated. If your sails are massive but your hull is small, you will need to add ballast to the bottom. A common trick is to hollow out a small section in the underside of the hull and fill it with lead shot or small stones, then seal it with wood glue or resin.
Step-by-Step Tuning for Stability
Once the mast and sails are dry-fitted, perform a “lean test.” Set the boat on a flat surface and gently nudge the top of the mast. If it wobbles excessively or tips over easily, your Center of Gravity is too high. You can fix this by shortening the mast, using a lighter fabric for the sails, or adding more weight to the very bottom of the hull.
If you are building for the water, you must also consider the “Center of Lateral Resistance” (CLR). This is the point where the water’s pressure acts against the hull. For a boat to sail straight, the CE of the sails should be slightly behind the CLR of the hull. This creates what sailors call “weather helm,” a natural tendency for the boat to turn into the wind, which is a hallmark of a well-engineered vessel.
Benefits of Proper Engineering
The most immediate benefit of a balanced build is visual harmony. A sculpture that obeys the laws of physics feels “true” to the viewer. When a sailboat has a Perfect Trim, it conveys a sense of motion and grace even when it is standing still. It looks like it just sailed out of a foggy harbor and onto your mantle.
Structural longevity is another major advantage. When a boat is properly balanced, there is less stress on the glue joints and the wood fibers. A top-heavy boat is constantly pulling at its mast-step, which can lead to cracking or snapping over time. By distributing the weight correctly, you ensure that your masterpiece will last for decades rather than just a few seasons.
Furthermore, an engineered approach allows for greater creative freedom. When you understand how to use ballast and counterweights, you can design “impossible” boats with towering masts or massive sails that would otherwise fall over. You gain the ability to push the boundaries of the medium because you know how to anchor the piece’s soul to its center of gravity.
- Increased Durability: Less tension on joints and connections.
- Professional Aesthetic: Avoids the “craft store” look of amateur stick boats.
- Design Flexibility: Allows for taller masts and larger sail areas.
- Stability: Ensures the piece won’t tip over on uneven surfaces.
Challenges and Common Mistakes
The most frequent error is the “Awkward Lean.” This happens when the builder chooses a beautiful piece of wood for the mast but ignores how heavy it is compared to the hull. Driftwood can be surprisingly dense, especially if it was recently soaked in salt water. If your mast is made of a heavy hardwood and your hull is light pine, the boat will be inherently unstable.
Another pitfall is “Symmetrical Thinking.” Beginners often try to make everything perfectly centered, but driftwood is rarely symmetrical. If you force a mast into the geometric center of an irregular piece of wood, it might actually be off-balance because one side of the wood is denser than the other. You must find the balance point by feel and gravity, not by a tape measure.
Glue failure is a silent killer in this hobby. Driftwood is porous and often contains salt and sand. If you don’t clean the wood and use a high-quality wood glue or epoxy, the mast will eventually wobble. Always blow out the drill holes with compressed air and ensure the wood is bone-dry before you start the final assembly. Moisture trapped inside the wood can cause the mast to tilt as the wood shrinks over time.
Limitations of Driftwood as a Medium
It is important to acknowledge that driftwood has realistic constraints. Unlike kiln-dried lumber, driftwood is often in a state of slow decay. It may have internal rot or “soft spots” that you can’t see from the surface. This means you cannot always rely on it for heavy load-bearing or complex mechanical rigging without some reinforcement.
Size is also a limiting factor. As you scale up, the physics of a “find-and-fit” sailboat become much harder to manage. A 12-inch boat is easy to balance; a 4-foot driftwood schooner requires significant internal structural engineering, often involving metal rods or hidden wooden “skeletons” to keep the fragile driftwood from snapping under its own weight.
Environmental factors can also play a role. If you live in a high-humidity area, the driftwood will absorb moisture and change its weight slightly. In very dry climates, it may crack. A perfectly balanced boat in July might develop a slight list in January as the wood breathes. This is why many pro builders incorporate a tiny bit of adjustable ballast—like a small hidden weight that can be shifted slightly—to account for these changes.
Comparing the Approaches
When you are deciding how to build your next vessel, it helps to compare the standard decorative approach with the engineered approach. While the decorative method is faster, the results often lack the “pioneer-grit” soul of a truly engineered piece.
| Feature | Decorative “Stick Boat” | Engineered Masterpiece |
|---|---|---|
| Stability | Low; prone to tipping. | High; grounded by science. |
| Visual Appeal | Looks like a craft project. | Looks like a maritime artifact. |
| Complexity | Simple; 30-minute build. | Moderate; requires tuning. |
| Durability | Fragile; temporary. | Strong; heirloom quality. |
Practical Tips and Best Practices
To achieve that Perfect Trim, start by drying your driftwood thoroughly. This can take several weeks in a warm, dry room. If you rush the process, you are engineering with a moving target, as the center of gravity will shift as the water evaporates. Once dry, sand the bottom of the hull just enough to create a stable “flat” while preserving the weathered texture.
Use a “plumb line” (a string with a weight on the end) to ensure your mast is perfectly vertical relative to the boat’s resting plane. It is a common mistake to eyeball it, but even a two-degree tilt can make the boat look amateurish. If you want a “raked” mast (tilted backward), do it intentionally and consistently across all masts on the vessel.
For the sails, use heavy canvas or linen that has been aged. You can “tea-stain” the fabric to give it a nostalgic, salt-worn look. When attaching the sails, leave a bit of slack. In real sailing, sails are rarely tight; they have a “belly” that catches the wind. This curve adds a sense of realism and helps lower the visual center of effort, making the boat look more stable.
- Pre-drill everything: Driftwood is prone to splitting. Never force a screw or a nail.
- Weight the keel: If the boat is for water, use lead; if for a shelf, a flat stone glued to the bottom works well.
- Use natural cordage: Hemp or jute twine fits the aesthetic better than nylon string.
- Finish with wax: A light coat of beeswax can preserve the wood without making it look “plastic” or overly shiny.
Advanced Considerations for the Serious Builder
For those who want to go beyond the basics, consider the “moment of inertia.” This is a measure of how hard it is to change the rotation of an object. In sailboat terms, a boat with weight concentrated in the center (near the mast) will rock quickly and nervously. A boat with weight distributed toward the bow and stern will have a much slower, more majestic “roll” that looks more like a real ship.
You can also experiment with “hull speed” logic. Even in a static model, the shape of the bow—whether it is a “plumb bow” or a “clipper bow”—tells a story about the era of the ship. Engineering these details into a piece of driftwood requires a fine chisel and a deep understanding of maritime history. You are essentially “finding” a 19th-century hull inside a piece of 21st-century ocean debris.
Another advanced technique is the use of “standing rigging” vs “running rigging.” In a truly engineered model, the rigging isn’t just decorative; it actually holds the mast in place. By using functional shrouds and stays, you can create a much taller mast that is supported by tension rather than just the glue in the hull. This creates a “stiff” boat that can handle significantly more sail area.
Engineering Scenario: The “Gnarled Cedar” Sloop
Imagine you find a piece of gnarled cedar about 18 inches long. It has a beautiful curve but is very light. You want to add a 24-inch mast. Because the cedar is light and the mast is tall, the Center of Gravity is dangerously high. Without ballast, this boat will tip if a door is closed too hard nearby.
To solve this, you drill a 1-inch diameter hole into the bottom of the hull directly under the mast step. You fill this hole with lead fishing weights and seal it. By adding 8 ounces of lead at the very bottom, you have lowered the CG by several inches. Now, the boat sits firmly on its “keel.” Even though the cedar remains light and airy to the touch, the “physics” of the piece have been corrected, and it now possesses a Perfect Trim that defies its top-heavy appearance.
Final Thoughts
Mastering balanced driftwood sailboat engineering is about more than just making a pretty object. It is a tribute to the ancient relationship between wood, wind, and water. When you take the time to find the center of gravity and calculate the proper ballast, you are honoring the “pioneer-grit” of the sailors who once manned the vessels that inspired your art.
Do not be afraid to fail on your first few builds. Engineering is a process of iteration. Every time a boat leans or a mast wobbles, it is telling you something about the physics of the material. Listen to the wood, watch how it reacts to the weight, and keep refining your technique until you can make even the most awkward piece of driftwood stand proud.
As you continue to experiment, you will find that the five seconds you spend finding the center of gravity are the most important seconds of the entire build. Those moments are where the craft ends and the masterpiece begins. Now, head down to the shoreline, find your next hull, and start building something that doesn’t just sit there—make it sing.
Sources
1 proboat.com (https://www.proboat.com/2026/04/keeping-it-upright-notes-on-vessel-stability/) | 2 gcwmultimedia.com (https://www.gcwmultimedia.com/diy-driftwood-sailboat/) | 3 quantumsails.com (https://www.quantumsails.com/en/resources-and-expertise/articles/finding-balance) | 4 jordanyachts.com (https://www.jordanyachts.com/4023) | 5 usvmyg.org (https://usvmyg.org/articles/sailing/helm-balance-with-simple-calculations-of-center-of-effort-and-center-of-lateral-resistance/) | 6 spinsailing.com (https://www.spinsailing.com/post/2018/11/25/physics-of-sailing-pt1-theory) | 7 boatdesign.net (https://www.boatdesign.net/threads/wooden-boats-and-bouyancy.13842/) | 8 modernwoodenboat.com (https://www.modernwoodenboat.com/boat-stability-for-dummies/) | 9 navymuseum.co.nz (https://navymuseum.co.nz/wp-content/uploads/Science-Behind-the-Concept-Cards_Science-of-Hulls.pdf) | 10 harvard.edu (https://sciencedemonstrations.fas.harvard.edu/presentations/stability-flotation)