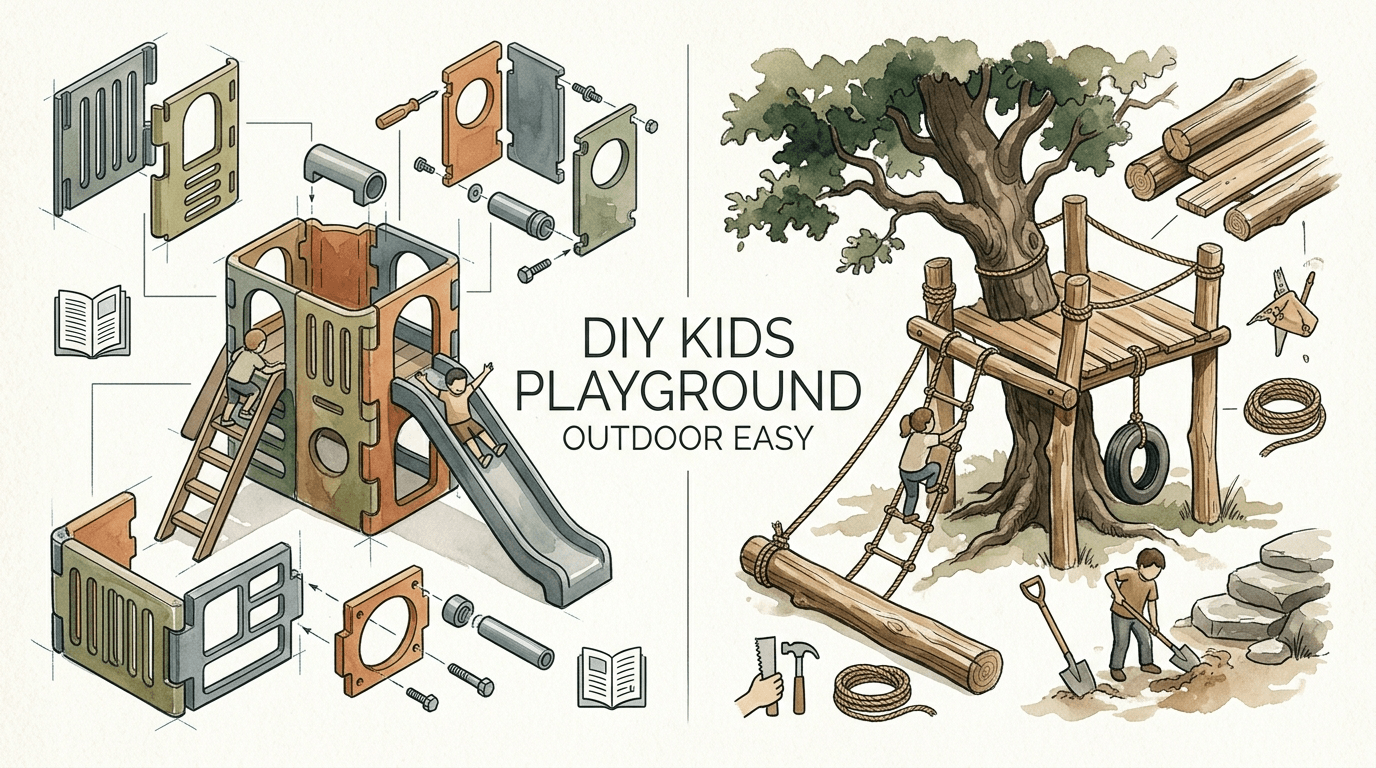
diy kids playground outdoor easy
Stop buying play. Start building an environment. Why settle for disposable plastic when you can build a natural sanctuary? These easy DIY projects use real materials to create a play space that grows with your children.
[affiai]A backyard shouldn’t be a storage unit for primary-colored plastic. It should be a laboratory for discovery. You can transform a patch of grass into a high-functioning ecosystem of adventure with just a few weekends of work and some raw materials. This guide will show you how to ditch the kit and become a builder.
diy kids playground outdoor easy
A natural playground is an outdoor space designed with organic materials like logs, boulders, sand, and living plants rather than manufactured metal or plastic equipment. These spaces focus on open-ended play where the environment itself provides the prompts for imagination. Instead of a slide that only does one thing, a grassy mound becomes a mountain, a lookout, or a fortress depending on the day.
This approach exists because modern childhood has become increasingly sedentary and structured. Natural play spaces bring back the sensory richness of a wild forest while keeping it within the safety of your property. Real-world situations like schools and parks are moving toward this model because it supports “risky play,” which helps children develop confidence and physical coordination. You use these spaces to bridge the gap between a sterile backyard and the untamed woods.
How to Build Your Natural Sanctuary
Building a nature-based playground requires more observation than engineering. You aren’t just assembling parts; you are layering experiences. Follow these steps to build the foundation of your space.
Step 1: Define the Zones
Clear zones help organize play and prevent “collision” between different activities. Mark out an area for “Quiet/Creative” (mud kitchens, art), “Active” (climbing, balancing), and “Sensory” (sand, water). Use natural barriers like low logs or stone paths to delineate these areas.
Step 2: Source Your Materials
Look for locally sourced or reclaimed materials to keep costs low. Fallen trees from a local arborist can become balance beams or stepping stones. River rocks from a landscaping yard serve as climbing features. Avoid pressure-treated wood that contains harsh chemicals; choose cedar, redwood, or locust for natural rot resistance.
Step 3: Construct the Core Elements
Start with the easiest projects first. A log balance beam involves stripping the bark from a fallen limb and half-burying it in the ground to prevent rolling. Create a “stump jump” by sinking tree discs of varying heights into the soil. For a mud kitchen, use an old wooden pallet as a base and mount a stainless steel bowl as a sink.
Step 4: Install the Safety Surface
Safety is paramount, especially under climbing features. Use engineered wood fiber (EWF) or a thick layer of double-shredded bark mulch. Aim for a depth of 9 to 12 inches to provide adequate impact attenuation for falls.
Benefits of the Natural Builder Approach
The shift from “The Plastic Kit” to “The Natural Builder” offers measurable advantages for both parents and children. Nature-based play isn’t just an aesthetic choice; it is a developmental upgrade.
- Enhanced Creativity: Plastic sets have a “scripted” use. A natural playground offers “loose parts” that can be anything from a pirate ship to a laboratory.
- Physical Resilience: Navigating uneven surfaces like rocks and logs builds core strength and balance better than flat, uniform stairs.
- Reduced Stress: Exposure to natural textures and greenery has been shown to lower cortisol levels in children and improve focus.
- Cost Efficiency: You can build a robust natural space for $200 to $500, whereas high-quality plastic sets often start at $1,500.
- Environmental Connection: Children who play with sticks, stones, and plants develop an early affinity for the natural world.
Challenges and Common Mistakes
Building with nature means dealing with the elements. New builders often overlook the maintenance required for organic materials.
One common mistake is failing to account for drainage. If you dig a pit for a sand area without a permeable liner or a gravel base, you will end up with a muddy soup after the first rain. Always ensure your play zones are slightly elevated or equipped with a way for water to escape.
Another pitfall is ignoring the “splinter factor.” Raw wood looks great, but it requires sanding. Spend time smoothing out the edges of logs and stumps. Check your equipment regularly for rot, especially where wood meets the soil. Insects like carpenter ants or wasps may also find your natural structures appealing, so monthly inspections are mandatory.
Limitations: When Nature Needs a Helping Hand
A natural playground is not a “set it and forget it” solution. Organic materials eventually decay. Depending on your climate, a log beam might only last five to seven years before needing replacement.
If you have a very small urban lot, some natural elements like large boulders or sprawling willow tunnels may be impractical. In these cases, you might need to blend natural elements with traditional hardware. There is also a “learning curve” for parents. You must be comfortable with the idea of your child getting dirty and engaging in “risky play” that doesn’t involve the padded corners of a factory-made set.
The Plastic Kit vs. The Natural Builder
Choosing between these two paths depends on your priorities for time, budget, and child development.
| Feature | The Plastic Kit | The Natural Builder |
|---|---|---|
| Setup Time | 4-8 hours (Assembly) | 2-4 weekends (Sourcing & Building) |
| Material Life | 10-15 years (Fades/Cracks) | 5-10 years (Organic Decay) |
| Skill Level | Beginner (Screwdriver/Wrench) | Intermediate (Shovel/Saw/Sand) |
| Play Value | Static (Fixed activities) | Dynamic (Open-ended/Evolving) |
| Cost | Moderate to High ($800+) | Low to Moderate ($200+) |
Practical Tips for a Better Play Space
Maximize the impact of your DIY playground with these actionable best practices.
- Use Native Plants: Surround your play area with plants like sage, sunflowers, or edible herbs. They attract pollinators and provide sensory scents without the risk of toxicity.
- Incorporate Loose Parts: Provide a bin of “loose parts” like pinecones, smooth stones, and small branches. These are the “batteries” of a natural playground.
- Check for Heat: Light-colored mulch and shaded areas are essential. Dark rubber or metal can reach dangerous temperatures in direct summer sun.
- Involve the Kids: Let your children help with the sanding or the planting. They will respect the environment more if they helped create it.
- Monitor Ground Contact: Use “ground-contact” rated wood or set your logs on a bed of gravel to slow down rot.
Advanced Considerations for Growing Kids
As your children get older, the playground must evolve. A simple mud kitchen for a toddler won’t satisfy a ten-year-old.
Consider adding verticality. You can build a “timber tower” or a more complex climbing wall using weather-resistant holds bolted into a sturdy wooden frame. Introduce simple machines like a bucket and pulley system attached to a high branch. This allows children to experiment with physics while moving materials around their “construction site.” You can also integrate “citizen science” stations, such as a rain gauge or a bird-watching blind, to keep the space intellectually stimulating as they mature.
Example: The “Backyard Forest” Scenario
Imagine a standard 20×20 foot corner of a suburban yard. Instead of one large swing set, you create a winding “discovery path” made of wood chips.
The path starts at a cluster of tree stumps (sunk 6 inches into the ground for stability). These lead to a 6-foot log balance beam (stripped and sanded). Next to the beam is a “dig zone” filled with play sand and surrounded by large, smooth river boulders that act as seating or climbing points. The back of the area is fenced with a living willow tunnel that provides shade and a secret hideout. This setup uses $350 in materials and provides dozens of ways to play, whereas a plastic set in the same space would offer exactly three: swing, slide, and climb the ladder.
Final Thoughts
Creating a DIY outdoor playground is an investment in your child’s independence and creativity. By stepping away from the “plastic kit” and embracing “the natural builder” mindset, you provide a space that is as much a classroom as it is a play area.
Success doesn’t require a master’s in carpentry. It requires a willingness to source real materials, a bit of sweat equity, and a focus on safety standards like proper surfacing depth. Start with one element, like a mud kitchen or a stump jump, and watch how the environment changes the way your children interact with the outdoors.
Experiment with your layout. Add more loose parts as they grow. The most beautiful thing about a natural sanctuary is that it is never truly finished; it grows and changes alongside your family.
Sources
1 youtube.com (https://www.youtube.com/watch?v=licLVfAGwsE) | 2 yogaloreandmore.com (https://yogaloreandmore.com/natural-playground-ideas/) | 3 hendersonplay.com (https://www.hendersonplay.com/natural-playground-equipment/) | 4 ourstoriedhome.com (https://ourstoriedhome.com/create-an-outdoor-playscape-on-a-budget/) | 5 childhoodbynature.com (https://www.childhoodbynature.com/set-up-a-loose-parts-playground/) | 6 mosquitojoe.com (https://mosquitojoe.com/blog/how-to-build-a-natural-playground/) | 7 eartheasy.com (https://eartheasy.com/blogs/live/how-to-create-a-natural-playground-at-home) | 8 youtube.com (https://www.youtube.com/watch?v=rhHqQ_2XOrU) | 9 yardtopia.com (https://yardtopia.com/articles/natural-playground-ideas) | 10 miracle-recreation.com (https://www.miracle-recreation.com/blog/nature-inspired-playground-equipment/) | 11 synkd.io (https://www.synkd.io/synkd-news/state-of-play-with-natural-elements) | 12 parknplaydesign.com (https://www.parknplaydesign.com/post/how-to-create-a-natural-playground-at-home) | 13 permies.com (https://permies.com/t/208818/Store-Bought-Playground-Nature-Pros) | 14 eartheasy.com (https://eartheasy.com/blogs/live/how-to-create-a-natural-playground-at-home) | 15 earlyyearsresources.co.uk (https://www.earlyyearsresources.co.uk/blog/7-outdoor-loose-parts-play-activity-ideas-and-benefits/) | 16 kinderberryhill.com (https://kinderberryhill.com/make-the-most-of-your-backyard-with-loose-parts/) | 17 playmatters.org.au (https://playmatters.org.au/blog/transitioning-from-plastic-fantastic-to-nature-based-play-spaces)