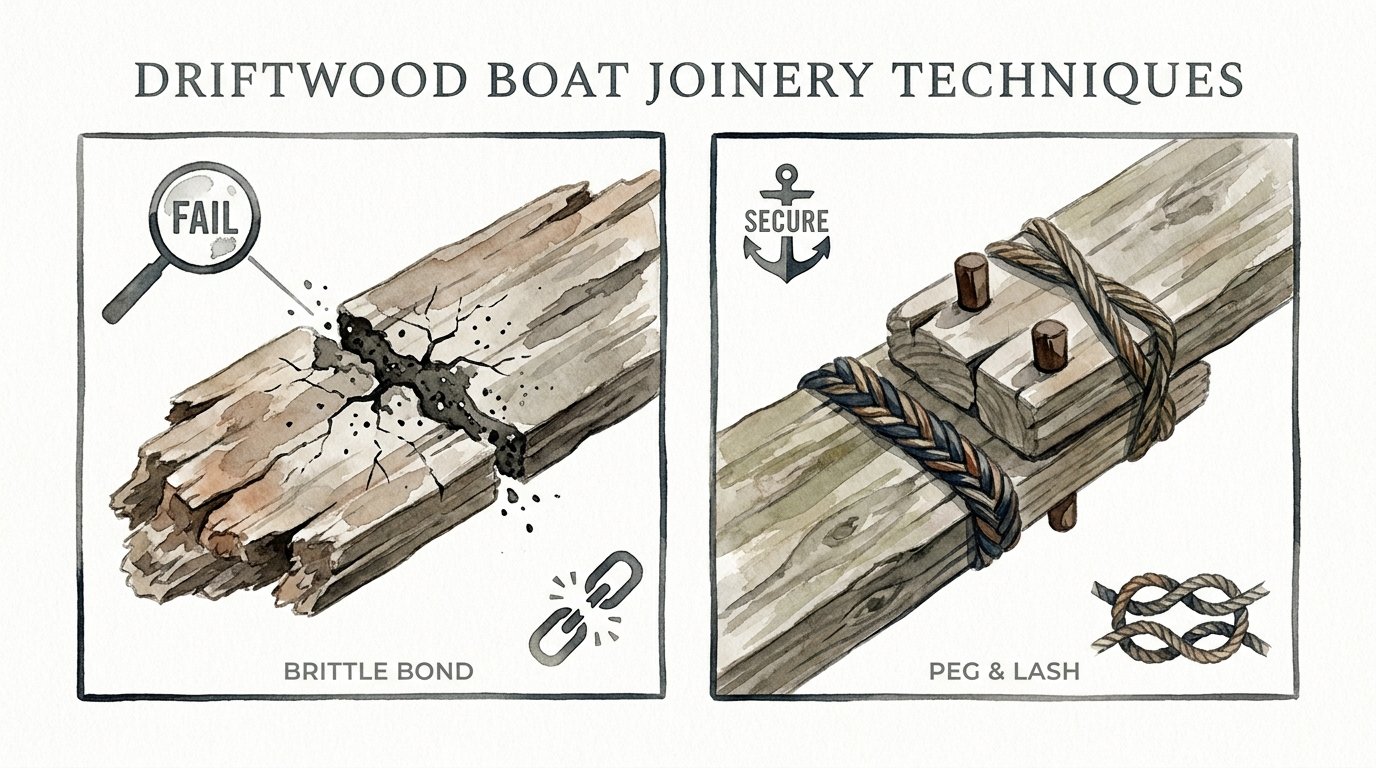
Driftwood Boat Joinery Techniques
Glue is for projects that sit on a shelf; lashing is for vessels that actually meet the waves. In the world of coastal crafts, rigidity is your enemy. A glued joint is a point of failure, but a lashed joint is a living system that absorbs energy. Learn to build for the movement of the water.
[affiai]When you stand on a shoreline littered with driftwood, you are looking at more than just debris. You are looking at timber that has already been tested by the ultimate auditor: the sea itself. Most modern builders reach for a bottle of epoxy or a box of galvanized screws when they want to join two pieces of wood. They want a bond that stays still, assuming that stillness equals strength.
The ocean disagrees. Waves do not apply a static load; they deliver a rhythmic, punishing series of torques and compressions. A boat held together by chemical bonds is a BRITTLE BOND. When the hull twists in a cross-sea, those rigid joints must either hold or shatter. A lashed joint, however, is a PEG & LASH system. It allows for microscopic movement, dissipating the ocean’s energy through friction and tension rather than resisting it until it breaks.
Building a driftwood vessel is an exercise in listening to the material. You aren’t just making a boat; you are assembling a flexible skeleton that can breathe with the tide. This guide will walk you through the ancient, grit-tested methods of lashing and pegged joinery that kept our ancestors afloat long before the first factory produced a drop of glue.
Driftwood Boat Joinery Techniques
Driftwood boat joinery is the art of connecting salt-seasoned timber using mechanical friction and tension. Unlike cabinet making, where the goal is to hide the joint and keep it stationary, maritime joinery prioritizes resilience and repairability. In the context of driftwood, which often has irregular shapes and varied densities, traditional methods like lashing and treenailing (using wooden pegs) are far more effective than modern fasteners.
Lashing involves using cordage—either natural fibers like manila and hemp or modern synthetics like waxed polyester—to bind members together. This technique is the foundation of skin-on-frame kayaks and Austronesian outriggers. It works by wrapping the cordage around a joint multiple times, creating a cumulative strength that far exceeds the breaking point of a single strand. Each wrap adds a layer of safety.
Pegged joinery, or the use of treenails (trunnels), involves driving a wooden dowel through a pre-drilled hole in two overlapping pieces of wood. Historically, these were used to fasten planks to the ribs of a ship. When the wooden peg gets wet, it expands, creating a “hydraulic lock” that is nearly impossible to pull apart. This makes it an ideal technique for driftwood, which is often porous and ready to drink up the spray.
These techniques exist because they rely on the properties of the wood itself. Driftwood has often lost its natural oils and resins, making it less than ideal for glues that need to penetrate fibers to hold. Mechanical connections, however, don’t care about surface oils or salt content. They rely on the physical interaction between the peg, the cord, and the timber.
The Living Joint Philosophy
To understand why these techniques matter, you must visualize a boat as a spring. A rigid boat is like a piece of glass; it is incredibly strong until the moment it exceeds its limit, at which point it disintegrates. A lashed boat is like a wicker basket. It can deform under the weight of a wave and then snap back into its original shape. This “living joint” is what allows lightweight driftwood frames to survive conditions that would snap a modern fiberglass hull.
How It Works: The Mechanics of Flex and Friction
The secret to a successful lashed or pegged joint lies in how it manages energy. When a wave hits a hull, the force travels through the wood. In a lashed joint, the cordage stretches slightly, and the wood surfaces rub together. This friction converts the kinetic energy of the wave into a tiny amount of heat, effectively acting as a shock absorber for the entire vessel.
Selecting the Right Driftwood
Not every piece of wood on the beach is fit for a frame. You want pieces that have “pioneer grit”—wood that has been stripped of its bark and soft outer layers by the sand and surf. Look for cedar, spruce, or larch if you can find them. These species have a high strength-to-weight ratio and natural rot resistance. Avoid wood that feels “punky” or soft when you press a fingernail into it; that wood has already surrendered to decay.
The Step-by-Step Lashing Process
- Notching the Joint: Never rely on the cordage alone to keep two pieces of wood from sliding. Cut a shallow “seat” or notch into the main structural member (like the gunwale) where the rib or thwart will sit. This provides a physical stop that the lashing simply holds in place.
- The Foundation Knot: Start with a clove hitch or a timber hitch around the sturdier of the two pieces. This anchors your line so you can apply maximum tension.
- The Wraps: Pass the cordage around both pieces in a square or diagonal pattern. Pull every single wrap as tight as humanly possible. In traditional building, makers would use a “toggling” stick to lever the cordage even tighter before the next pass.
- The Frapping: This is the most critical step. Instead of continuing to wrap around both pieces of wood, you wrap the cordage between the two pieces, around the lashing itself. This “chokes” the wraps, pulling them inward and increasing the tension exponentially.
- The Finishing Knot: Secure the line with another clove hitch or a series of half-hitches. If using synthetic line, a small flame can be used to melt the end, but a well-tied knot is the mark of a true craftsman.
Creating Treenails (Trunnels)
If you are joining thicker driftwood logs for a raft or a heavy-framed boat, treenails are your best friend. To make them, find a piece of straight-grained hardwood like oak or locust. Split the wood into small square blanks rather than sawing them; splitting ensures the grain runs the full length of the peg, which prevents it from snapping. Drive these blanks through a “draw plate” (a metal plate with holes of decreasing size) to round them out. For the best fit, your treenail should be slightly larger than the hole you’ve drilled, requiring a mallet to drive it home.
Benefits of Traditional Joinery
The primary advantage of lashing and pegging is durability through flexibility. A boat that can “give” a little is a boat that lasts. This is particularly important for coastal travelers who might need to drag their boat over rocks or beach it in heavy surf. A rigid joint would crack under those localized impacts, but a lashed joint simply shifts and resets.
Another major benefit is field repairability. If a lashed joint fails in the middle of a trip, you don’t need a workshop or twenty-four hours for epoxy to cure. You need a length of cordage and a knife. You can re-lash a frame sitting on a sandbar in ten minutes. Similarly, a treenail can be replaced by any sturdy branch found on the shore, shaped with a hatchet, and driven into the existing hole.
Finally, these methods allow for resourceful construction. When you aren’t tied to the need for flat, perfectly milled lumber for gluing, you can use the natural curves of driftwood to your advantage. A piece of wood with a natural “crook” becomes a perfect rib or stem-piece, joined to the frame with a lashing that follows its organic shape perfectly.
Challenges and Common Mistakes
The most frequent error in driftwood joinery is insufficient tension. A loose lashing is worse than no lashing at all; it allows the wood to “chatter” and rub, which eventually saws through the cordage. If you can move the joint by hand after tying it, you haven’t frapped it tight enough. Use your body weight and leverage tools to ensure the connection is rock-solid.
Another pitfall is ignoring grain orientation when using treenails. If you drive a hardwood peg through a softwood driftwood piece without regard for the grain, you risk splitting the main timber like a wedge. Always drill your holes carefully and ensure the peg is not so oversized that it acts as a splitting maul rather than a fastener.
Mistakes also happen during material selection. Beginners often use natural sisal or cheap jute for lashing. These fibers rot quickly when exposed to wet-dry cycles. While traditional builders used natural fibers, they were often treated with pine tar or made from specific barks like cedar or spruce root. If you aren’t prepared to process your own traditional fibers, stick to high-quality synthetics or heavily waxed lines to avoid a structural failure six months down the line.
Limitations: When to Avoid These Methods
While lashing is superior for flexibility, it is not ideal for high-speed motorized vessels. The vibration from an outboard motor can eventually loosen even the tightest lashings, leading to a “noodle” effect where the hull loses its hydrodynamic shape. For boats meant to plane at high speeds, the rigidity of a BRITTLE BOND (epoxy and glass) is often necessary to maintain the hull’s precise lines.
Environmental constraints also play a role. In extremely arid environments, wood can shrink significantly. A treenail or lashing that was tight in the humid coastal air might become dangerously loose if the boat is moved inland and allowed to bake in the sun. This requires the builder to either keep the vessel hydrated or use “draw-boring” techniques where the peg holes are slightly offset to maintain tension even during shrinkage.
Weight is the final trade-off. A lashed boat often requires more individual pieces of wood (cleats and lugs) to provide lashing points, which can increase the overall weight compared to a modern “stitch and glue” plywood boat. If your primary goal is the absolute lightest racing kayak, you may find traditional joinery to be a heavy, albeit beautiful, burden.
Comparison: Methods of Connection
Deciding which technique to use depends on your environment and the intended use of the vessel. Below is a comparison of how different joinery methods handle the stresses of the water.
| Feature | Lashing (Cordage) | Treenails (Pegs) | Modern Glue (Epoxy) |
|---|---|---|---|
| Flexibility | Extreme – Absorbs shock | Moderate – Expands/contracts | None – Rigid bond |
| Failure Mode | Ductile – Loosens slowly | Ductile – Shears gradually | Brittle – Snaps suddenly |
| Repair Difficulty | Easy – Requires cordage | Medium – Requires carving | Hard – Requires sanding/curing |
| Tool Requirement | Knife, Toggling stick | Drill, Mallet, Draw plate | Clamps, Mixing cups, Heat |
| Cost | Low | Very Low (Scrap wood) | High |
As the table shows, the PEG & LASH approach favors those who value self-sufficiency and sea-kindliness over the laboratory precision of modern adhesives. While glue has its place in the shipyard, it rarely belongs on the beach.
Practical Tips for the Coastal Builder
To get the most out of your driftwood boat, follow these best practices discovered through generations of trial and error:
- Char the Pegs: Before driving a treenail, lightly char the tip in a fire. This hardens the point for easier driving and provides a layer of carbon that resists rot inside the hole.
- Pre-Stretch Your Line: If using synthetic cordage, hang a heavy weight from it overnight before using it to lash. This removes the initial “constructional stretch,” ensuring your joints stay tight.
- Use the “Bone-Dry” Rule: When fitting treenails, ensure the peg is significantly drier than the surrounding wood. As the peg absorbs moisture from the frame and the sea, it will expand into the hole, creating a permanent bond.
- Avoid Cross-Grain Lashing: Whenever possible, ensure the lashing cord doesn’t rub against a sharp edge of the wood. Use a rasp to round over any corners where the line will pass to prevent chafe.
Applying a coating of pine tar and linseed oil over your finished lashings will not only protect the fibers but also “glue” the knots in place, preventing them from vibrating loose while still allowing the core of the joint to flex.
Advanced Considerations: Hydraulic Expansion
For the serious practitioner, the behavior of wood at the cellular level is a tool. When a treenail is driven into a hole, it is under compression. Once the boat is launched, the wood cells in the peg absorb water and attempt to expand. Because the hole in the hull is a fixed diameter, the peg cannot expand outward; instead, it exerts massive internal pressure against the walls of the hole.
This pressure creates a seal that is more watertight than most caulking. In advanced ship construction, builders would “wedge” the ends of the treenails. By cutting a small slit in the end of the peg and driving a tiny wedge of hardwood into it after it was seated, they ensured that the peg could never back out, even if the wood eventually dried out. This is the pinnacle of the PEG & LASH philosophy—using the wood’s own biology to create a permanent, mechanical lock.
Example Scenario: The Intertidal Raft
Imagine you are building a simple “scavenger raft” to transport gear across an estuary. You have collected six large cedar logs and several spruce cross-beams. Instead of trying to find massive screws that will eventually rust and pull out, you use a Square Lashing for the main deck and Treenails for the corner braces.
During the first crossing, you hit a submerged rock. A glued or screwed frame might have splintered at the point of impact. Instead, your lashings groan and shift. The spruce beam moves half an inch, absorbing the energy of the collision. Once you are in calm water, you use a mallet to tap the beams back into place and tighten a single frapping turn. The raft is as good as new. That is the power of building for the movement of the water.
Final Thoughts
Building with driftwood joinery is about more than just making a boat; it is about adopting a mindset of resilience. In a world that prizes the BRITTLE BOND—the quick fix, the rigid structure, and the permanent adhesive—there is a profound wisdom in the PEG & LASH. It is the wisdom of the willow that bends in the storm rather than the oak that snaps.
When you master the art of lashing and treenailing, you are no longer dependent on the hardware store. You become a part of a lineage of builders who could look at a pile of beach-wrack and see a vessel. You learn to trust friction, tension, and the natural expansion of the wood fibers. You learn that a boat should be a living system, capable of meeting the waves on their own terms.
Take your cordage and your knife to the shore. Experiment with the knots. Feel the tension as you frap a joint until it sings. The sea is a harsh teacher, but she rewards those who build with her movements in mind. Start small, build often, and always remember: rigidity is a lie told by those who stay on land.
Sources
1 youtube.com (https://www.youtube.com/watch?v=I27pngMOCqI) | 2 shipsofscale.com (https://shipsofscale.com/sosforums/threads/making-treenails.14750/) | 3 shapertools.com (https://www.shapertools.com/en-us/blog/joinery-guide) | 4 wikipedia.org (https://en.wikipedia.org/wiki/Lashed-lug_boat) | 5 oldtimeworld.com (https://oldtimeworld.com/blogs/lapstrake-vessels-a-history/) | 6 coeurcustoms.com (https://www.coeurcustoms.com/uncategorized/best-wood-for-building-a-boat/) | 7 exoticwoodzone.com (https://exoticwoodzone.com/blogs/e/the-art-of-boat-building-choosing-the-right-wood) | 8 erinrope.com (https://erinrope.com/blog/natural-vs-synthetic-rope-choosing-the-right-material-for-the-job/) | 9 boatus.com (https://www.boatus.com/expert-advice/expert-advice-archive/2026/february/guide-to-marine-woods) | 10 samsonrope.com (https://www.samsonrope.com/resources/recreational-marine/selecting-the-right-line) | 11 xlrope.com (https://www.xlrope.com/Comparing-Synthetic-Vs-Natural-Marine-Ropes-Pros-And-Cons-id43962906.html) | 12 amishfurniturefactory.com (https://www.amishfurniturefactory.com/amishblog/a-guide-to-wood-joinery/) | 13 kregtool.com (https://learn.kregtool.com/learn/joining-wood/) | 14 classicboat.co.uk (https://www.classicboat.co.uk/news/guide-to-buying-rope-a-riggers-life-in-cordage/) | 15 boatdesign.net (https://www.boatdesign.net/threads/first-timer-what-wood-to-use.3721/) | 16 hamstersahoy.com (https://www.hamstersahoy.com/knowledge-base/boat-building-techniques/woodwork-joinery/traditional-wooden-boat-joinery-techniques-building-strong-timber-joints-that-last.html) | 17 tropicalforestproducts.com (https://tropicalforestproducts.com/tropical-hardwoods-the-cornerstone-of-wooden-boat-building/) | 18 youtube.com (https://www.youtube.com/watch?v=0Vb1dfvWG1A)