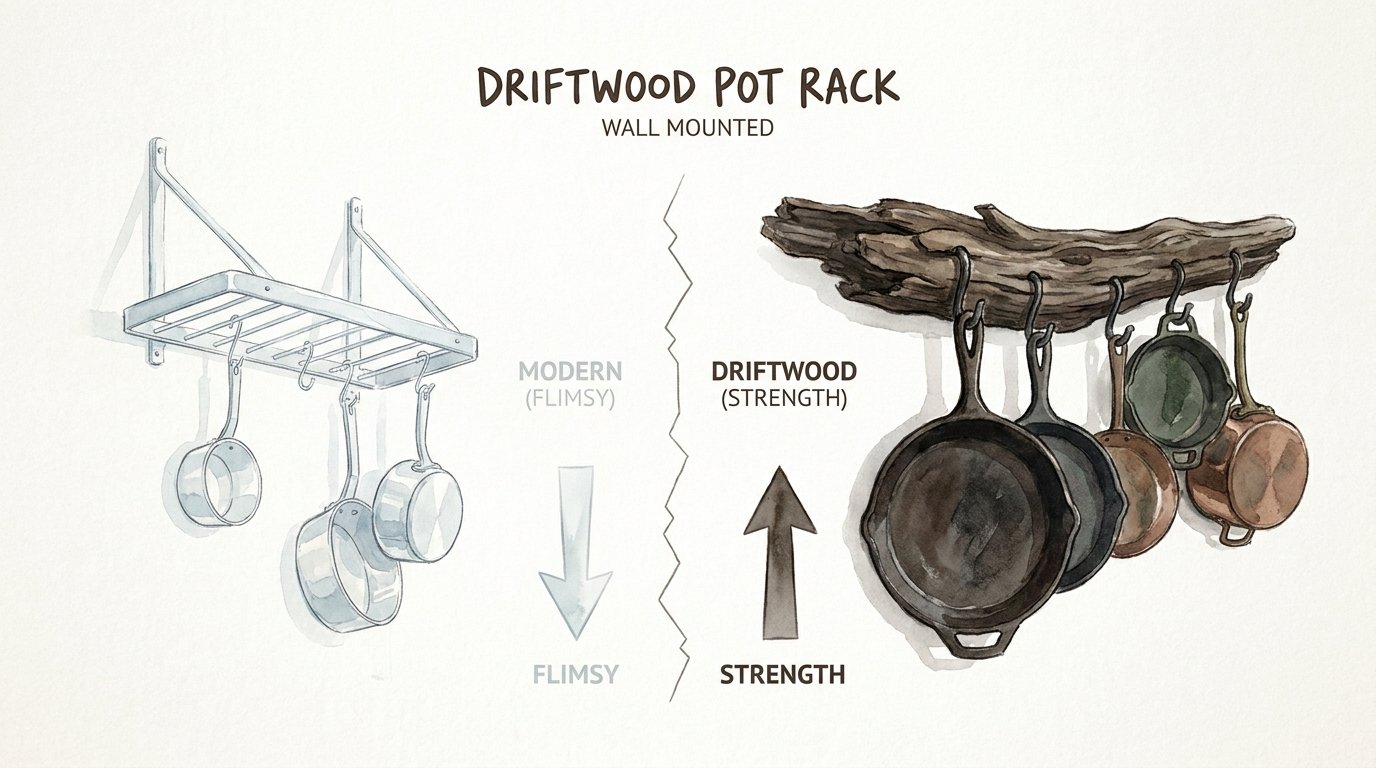
Driftwood Pot Rack Wall Mounted
Why trust your heaviest iron to a bracket made in a factory when you can hang it from a limb that survived a thousand storms? We’ve been conditioned to buy kitchen hardware designed for planned obsolescence. But the wood that survived the Pacific is built on a different timeline. This driftwood pot rack isn’t just a space-saver; it’s a testament to a time when tools were built to last forever. One piece of wood, zero plastic, infinite strength.
[affiai]Choosing to build or install a wall-mounted driftwood pot rack is a rejection of the flimsy. It is about bringing the raw, unyielding power of nature into the heart of the home. Modern kitchens are often filled with hollow cabinets and stamped metal that buckles under the weight of a serious cast-iron skillet. A piece of salt-weathered timber, properly cured and anchored, offers a level of forged strength that mass-produced alternatives simply cannot match.
Every piece of wood has a story, and when that story includes decades of tumbling through saltwater and baking under a coastal sun, it earns a density and character you won’t find at a big-box retailer. This guide will walk you through the process of selecting, treating, and mounting a driftwood pot rack that can hold your heaviest gear for a lifetime.
Driftwood Pot Rack Wall Mounted
A driftwood pot rack wall mounted in a kitchen serves as both a functional tool and a piece of organic art. It is essentially a horizontal or vertical section of salvaged timber, cleaned and preserved, then secured to wall studs to provide a sturdy hanging point for cookware. In the world of homesteading and high-end rustic design, these racks are prized for their ability to turn “dead space” on a wall into a high-capacity storage zone.
Unlike ceiling-mounted racks that can feel intrusive in smaller kitchens, a wall-mounted version sits flush against the vertical plane. This makes it ideal for narrow galleys or kitchens with low ceilings where every inch of clearance matters. Imagine a massive limb of cedar or oak, smoothed by the tides, holding your 12-inch skillets and copper pots within arm’s reach of the stove. It simplifies the workflow, moving your most-used tools out of dark, cluttered cabinets and into the light.
The beauty of this system lies in its versatility. Because no two pieces of driftwood are identical, every rack is a unique installment. You aren’t just installing a shelf; you are mounting a fragment of the wild. This connection to the natural world provides a grounding element to the kitchen, contrasting the sterile surfaces of stainless steel and tile with the rugged, tactile history of weathered wood.
How to Select and Prep Your Timber
The foundation of a reliable pot rack is the wood itself. You cannot simply pull any branch from a riverbank and expect it to hold fifty pounds of iron. Selection requires an eye for structural integrity. Look for hardwoods like oak, ash, or hickory if you can find them, as these species offer the highest load-bearing capacity. Avoid wood that feels “punky” or soft to the touch, as this indicates internal rot that will fail under tension.
Once you have found your piece, the preparation process is a test of patience. Raw driftwood often carries salt, microorganisms, and hidden pests that must be neutralized before the wood enters your home. Start by scrubbing the surface with a stiff-bristled brush to remove sand and loose bark. If the wood is particularly grimy, a quick rinse with fresh water is necessary, but the real work happens during the soak.
Disinfecting for Indoor Use
To ensure the wood is safe for a food-prep environment, you must disinfect it thoroughly. A common and effective method is a bleach soak. Mix a solution of one part bleach to ten parts water in a large tub or trough. Submerge the wood completely for at least 24 hours. This kills any mold, fungi, or wood-boring insects hiding deep within the fibers. If you prefer a less caustic approach, a solution of water and washing soda can also lift tannins and surface grime, though it may not be as effective against deep-seated bacteria.
Curing and Drying
After the soak, the wood must be cured. This is where many DIYers fail by rushing the process. Forcing wet wood onto a wall will lead to warping and potential mold growth behind the mount. Place the timber in a well-ventilated, low-humidity area. Do not use artificial heat sources like space heaters, as rapid drying can cause the wood to check or crack. Depending on the thickness of the branch, this can take anywhere from two to four weeks. The wood is ready when it feels significantly lighter and rings with a clear, resonant sound when tapped.
Benefits of a Natural Wood Rack
A driftwood pot rack offers more than just rugged good looks. There are practical, measurable benefits to moving your cookware onto a wall-mounted wooden system. When you compare this to standard metal rails or crowded cabinets, the advantages become clear.
- Unmatched Durability: Solid hardwood that has survived the elements is incredibly dense. It doesn’t bend or sag over time like thin-gauge steel or aluminum.
- Superior Airflow: Hanging pots allow for 360-degree air circulation. This is critical for cast iron, as it prevents trapped moisture from causing rust, and it allows copper to stay dry and tarnish-free.
- Custom Hook Placement: Unlike pre-drilled metal racks, a wood rack allows you to place hooks exactly where you need them. You can space them out for wide Dutch ovens or cluster them for small saucepans.
- Visual Depth: The gray, sun-bleached tones of driftwood add a layer of texture that paint or polished metal cannot replicate. It creates a focal point that feels permanent and intentional.
Beyond the physical benefits, there is a psychological advantage. There is a specific grit involved in using tools that feel “hewn” rather than “bought.” It changes the way you interact with your kitchen, moving the experience away from modern convenience and toward a more traditional, hands-on style of living.
Challenges and Common Mistakes
The biggest challenge with driftwood is its unpredictability. Unlike a 2×4 from the lumber yard, driftwood is rarely straight or uniform in diameter. This makes mounting difficult. If you don’t account for the natural curves, the rack may sit at an awkward angle, making it hard to hang pots securely. Always use a level across multiple points of the wood during the installation process.
Another common error is failing to find the studs. A driftwood rack, once loaded with cast iron, can easily weigh over 100 pounds. Screwing into drywall—even with high-end plastic anchors—is a recipe for disaster. You must use a stud finder to locate the vertical framing members of your wall. If the studs don’t align with the aesthetic placement of your wood, you may need to mount a “backing board” first, which then holds the driftwood.
Ignoring the “salt factor” is a mistake unique to coastal finds. If you don’t soak the wood in fresh water long enough, salt can leach out over time, especially in a humid kitchen. This salt can corrode your pot hooks or even the pots themselves. A thorough, multi-day fresh-water soak is the only way to ensure the timber is truly neutralized.
Limitations and Environmental Constraints
While a driftwood pot rack is exceptionally strong, it is not indestructible. Environmental factors in a kitchen—namely heat and steam—can affect the wood over time. If the rack is mounted directly above a high-output range without proper ventilation, the constant cycle of moisture and drying can cause the wood to become brittle or develop surface cracks.
There are also legal and ethical limitations to consider. In some coastal regions, removing driftwood is restricted or requires a permit, as it provides essential habitat for local ecosystems. Always check local regulations before harvesting wood from public beaches. Furthermore, avoid wood that shows signs of “heart rot”—where the center is soft or hollow—as it will never be safe for a load-bearing application.
Comparison: Driftwood vs. Industrial Metal Racks
When deciding between a natural driftwood mount and a standard industrial metal rack, it helps to look at the trade-offs in complexity and longevity.
| Feature | Driftwood Pot Rack | Industrial Metal Rack |
|---|---|---|
| Material Source | Salvaged, organic hardwood | Stamped steel or aluminum |
| Weight Capacity | Variable (can exceed 150 lbs) | Fixed (typically 40–80 lbs) |
| Customization | Infinite (hook placement/length) | Limited by pre-drilled holes |
| Installation | Higher (requires custom fitting) | Low (standard hardware) |
| Aesthetic | Rustic, unique, textured | Modern, uniform, sleek |
While the metal rack is easier to install “out of the box,” it lacks the character and extreme weight-bearing potential of a thick, seasoned piece of timber. For the serious cook with a heavy collection of iron, the driftwood rack is the clear winner for long-term reliability.
Practical Tips for a Secure Install
To ensure your driftwood pot rack wall mounted setup is as safe as it is beautiful, follow these best practices. First, use heavy-duty lag bolts (at least 3.5 inches long) to secure the wood into the studs. Drill pilot holes into the driftwood first to prevent it from splitting, as old hardwood can be incredibly brittle.
When it comes to hooks, choose hand-forged iron S-hooks or heavy-duty screw-in hooks. Avoid thin wire hooks that can straighten under the weight of a Dutch oven. If you are using screw-in hooks, ensure the “shank” of the hook is long enough to bite deep into the heartwood of the branch.
Finally, consider the height. You want the pots to be easily accessible but not so low that they interfere with counter space. A standard mounting height is usually between 48 and 60 inches from the floor, depending on the length of your cookware. Always do a “dry run” by holding a few pots against the wall before you commit to the final bolt placement.
Advanced Considerations: Finishing and Sealing
For those who want to go beyond the raw look, applying a finish can help preserve the wood and make it easier to clean. In a kitchen, a food-safe wax or mineral oil is often the best choice. It penetrates the fibers and provides a slight moisture barrier without the plastic-like sheen of a polyurethane finish.
If you prefer a more polished look, a matte lacquer can be sprayed on in thin coats. This seals the wood completely, preventing grease and cooking oils from soaking into the grain. For the truly ambitious, you can even use countersunk holes and wood plugs made from the same driftwood to hide the lag bolts, creating a seamless, “floating” appearance on the wall.
Example Scenario: The Cast Iron Collection
Consider a homestead kitchen with a collection of six Lodge skillets and two heavy Dutch ovens. The total weight of the cookware alone is roughly 75 pounds. A standard 24-inch metal rail from a department store is rated for only 50 pounds and spans two studs. Under the full load, the metal begins to bow, and the middle hooks become difficult to move.
By replacing this with a 4-foot section of salt-weathered oak driftwood, the homeowner is able to span four studs. By using 3/8-inch lag bolts and forged iron hooks, the rack easily supports the 75 pounds of iron plus the 20-pound weight of the wood itself. The result is a rock-solid installation that provides peace of mind every time a heavy pot is hung up.
Final Thoughts
A driftwood pot rack is more than a simple DIY project; it is a way to bring a sense of permanence and history into your kitchen. By choosing wood that has survived the harshest environments, you are investing in a storage system that honors the tools it holds. It is a functional piece of furniture that rejects the “flimsy modern” ethos in favor of forged strength and natural beauty.
Whether you are a professional chef or a backyard pioneer, the process of finding and preparing your own timber creates a connection to your home that no store-bought item can match. It requires effort, patience, and a bit of grit, but the result is a kitchen centerpiece that will serve you for decades.
Don’t settle for hardware that feels like a compromise. Look to the coast, find a limb that has stood the test of time, and build something that is as enduring as the meals you prepare. Experiment with different wood species and hook styles to create a system that is uniquely yours.
Sources
1 manateepants.com (https://manateepants.com/a-place-to-hang-your-pots/) | 2 handylaundry.com (https://www.handylaundry.com/blog/cooking-pan-racks) | 3 youtube.com (https://www.youtube.com/watch?v=zXRXeBJdLYw) | 4 re-store.org (https://re-store.org/how-to-choose-the-perfect-wood-species-for-your-diy-project/) | 5 wikihow.com (https://www.wikihow.com/Preserve-Driftwood) | 6 parklanejewelry.com (https://www2.parklanejewelry.com/how-to-wash-driftwood/) | 7 homedit.com (https://www.homedit.com/hanging-pot-rack/) | 8 northteam.ca (https://northteam.ca/how-much-weight-can-drywall-hold-without-a-stud/) | 9 dgfloors.com (https://dgfloors.com/how-to-install-a-pot-rack/) | 10 doityourself.com (https://www.doityourself.com/stry/kitchen-pot-racks-mounted-or-hanging)