Fitting Driftwood Shelves To Uneven Walls
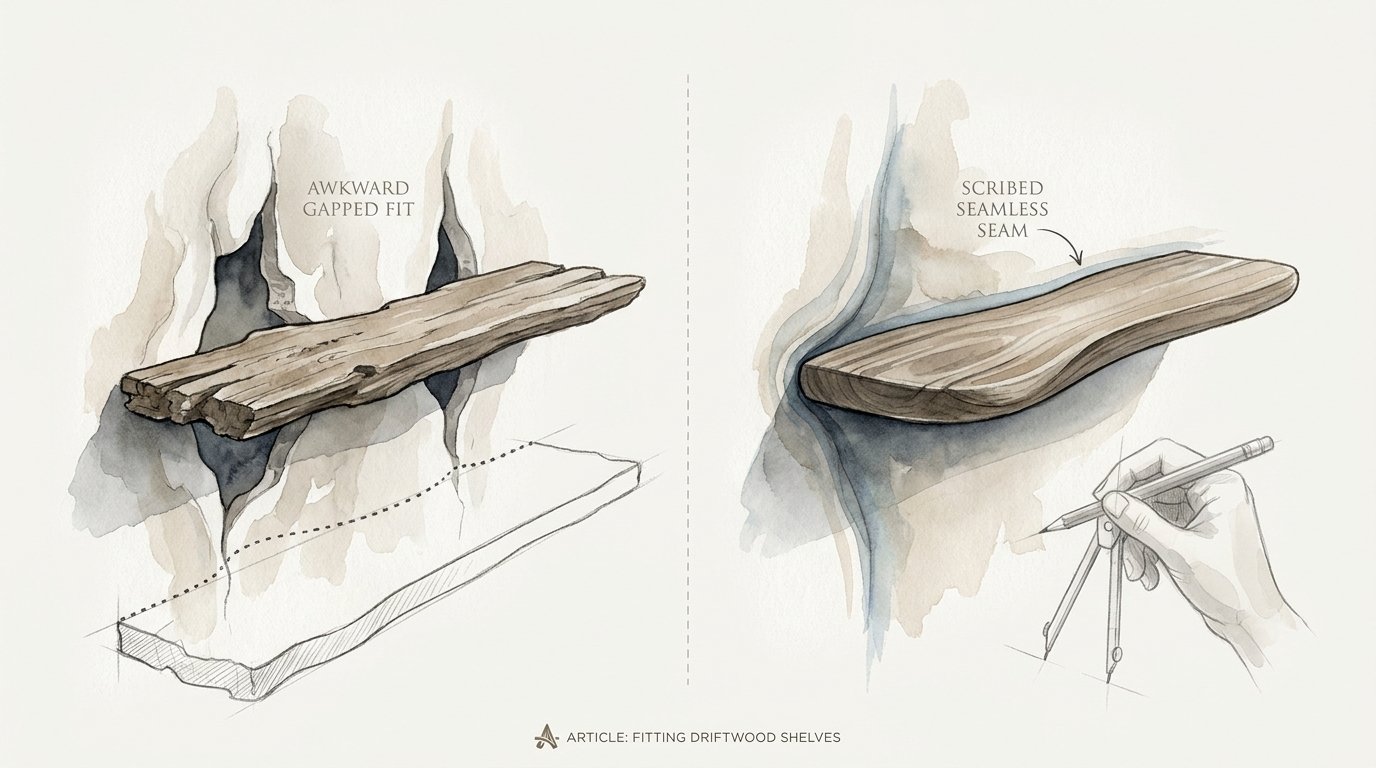
The difference between an amateur project and a professional installation is in the gaps. Walls are flat, but driftwood is wild. If you just screw it to the wall, you’ll end up with unsightly gaps that collect dust and look unfinished. Precision scribing allows you to transfer the wall’s profile onto the wood, creating a seamless fit that looks like an architectural feature rather than an afterthought.
[affiai]Modern construction often promises straight lines and 90-degree angles, but any seasoned builder knows the truth. Plaster bows, studs twist, and drywall settles into a series of valleys and peaks that no factory-edge board can match. When you bring a piece of driftwood—weathered by years of tides and sun—into this environment, the conflict between organic chaos and domestic geometry becomes apparent.
Mastering the art of the scribe is how you bridge these two worlds. It is a slow, deliberate process that requires a steady hand and a sharp eye. This guide will walk you through the techniques used by professional craftsmen and traditional pioneers alike to make unyielding timber look like it grew directly out of your living room wall.
Fitting Driftwood Shelves To Uneven Walls
Fitting a shelf to a wall that isn’t straight is the ultimate test of a woodworker’s patience. In the world of high-end carpentry, we call this “scribing.” It is the process of tracing the exact, irregular profile of a surface—be it stone, brick, or wavy plaster—onto a piece of wood so the two can meet with zero daylight between them.
For driftwood, the challenge is doubled. Unlike a standard kitchen cabinet or a length of baseboard, driftwood has no “true” edge. It is often twisted, knotted, and tapered. You aren’t just fitting a flat board to a crooked wall; you are marrying two different types of irregularity. This technique exists because a thick bead of caulk is a poor substitute for good joinery.
In real-world situations, you’ll encounter this most often in older homes or with feature walls made of natural materials like stacked stone. If you try to force a straight shelf against a stone fireplace, you’ll find gaps large enough to lose your car keys in. Scribing allows the shelf to “hug” the stone, wrapping around every protrusion and dipping into every recess. It creates the illusion that the shelf was part of the original structure.
Imagine the wall as a mountain range and your shelf as the valley floor. Without scribing, you are trying to push a straight ruler against the side of a cliff. With scribing, you are carving the valley floor to follow the base of the mountains perfectly. It is the hallmark of a “pioneer-grit” approach—valuing the time it takes to do a job right over the convenience of a quick, sloppy fix.
The Mechanics of the Scribe: Step-By-Step
Achieving a seamless fit requires a logical progression of steps. You cannot simply hold a pencil to the wood and hope for the best. Precision begins with your setup.
1. Preliminary Positioning
Secure your driftwood shelf in its intended location. Use a laser level or a long spirit level to ensure the top surface is perfectly horizontal. If the wall is severely bowed, the shelf will likely only touch the wall at one or two high points, leaving large gaps elsewhere. This is expected.
Use temporary supports or a second pair of hands to hold the shelf exactly where it will eventually live. If you are installing floating shelves with hidden brackets, you may need to mount the brackets first, then slide the shelf on just enough to hold it steady while you mark your lines.
2. Identifying the “Zero Point”
Look for the widest gap between the wall and the shelf. This measurement determines how much material you will need to remove from the back of the wood. For example, if the largest gap is 3/4 of an inch, your scribing tool must be set to exactly 3/4 of an inch.
Setting the tool to the widest gap ensures that once you cut to the line, the shelf will slide forward into the wall, closing all gaps simultaneously. If you set the tool to a measurement smaller than the widest gap, you won’t remove enough wood, and the shelf will still “bottom out” against the high spots of the wall.
3. Tracing the Contour
A standard compass is the traditional tool for this task. Place the metal point of the compass against the wall and the pencil lead against the top of the driftwood. Maintaining the compass at a perfectly 90-degree angle to the wall is critical. If you tilt the compass up or down as you move along the shelf, the distance between the point and the lead will change, resulting in an inaccurate line.
Slowly drag the compass along the entire length of the shelf. The metal point follows the undulations of the plaster or stone, while the pencil replicates those exact movements onto the wood. If you are working with very irregular stone, a “washer and pencil” trick can be faster. Place a large flat washer against the wall with a pencil held in the center hole. Roll the washer along the wall, and the pencil will trace the profile with surprising accuracy.
4. The Back-Bevel Cut
Once your line is marked, it’s time to remove the waste. Use a jigsaw with a scroll blade for tight curves. However, the secret to a perfect fit is the **back-bevel**. Instead of cutting straight through the thickness of the wood, tilt your saw blade at a 45-degree angle so that you are removing more material from the bottom (hidden) side of the shelf than the top (visible) edge.
This creates a “knife edge” on the top of the shelf. A thin edge is much easier to fine-tune with a sander than a full 2-inch thick face. It also ensures that only the very top, crisp line of the wood makes contact with the wall, allowing the shelf to seat more deeply and firmly against the surface.
Tools of the Trade
Modern technology has provided us with more options than the traditional compass, though the principles remain the same.
- Compass or Divider: The gold standard. Look for one with a locking nut so the gap doesn’t slip mid-trace.
- Linear Arc Scriber: A specialized woodworking tool that features an adjustable fence and a rolling guide. These are far more stable than a compass for long, straight runs.
- Contour Gauges: A series of sliding pins that you press against the wall to “capture” a shape. These are excellent for complex corners or around trim molding.
- Power Carving Discs: For thick driftwood slabs, a jigsaw might struggle. An angle grinder fitted with a wood-shaping disc (like those from Arbortech or Kutzall) allows you to “sculpt” the back of the shelf to match the wall.
- Barrel-Grip Jigsaw: Offers better control and a lower center of gravity than a top-handle saw, making it easier to follow intricate scribe lines.
Benefits of the Scribed Seamless Seam
Why bother with this level of detail? In a world of fast furniture and “good enough” DIY, taking the time to scribe offers several tangible advantages.
A professional finish is defined by the absence of visible filler. When a driftwood shelf fits the wall perfectly, it creates a high-end, custom-built look that instantly increases the value of the installation. It looks like the wood and the wall have been together since the beginning.
Maintenance is also a factor. Gaps between shelves and walls are magnets for dust, spiderwebs, and pet hair. Cleaning these narrow crevices is nearly impossible without a vacuum attachment. A scribed shelf eliminates these “dust traps,” keeping the home cleaner with less effort.
Structural integrity is the final benefit. A shelf that makes contact with the wall across its entire back edge is inherently more stable than one resting on two or three small points. It reduces the leverage on the mounting hardware and prevents the shelf from “rocking” or vibrating when items are placed on it.
Challenges and Common Mistakes
The most frequent error is failing to keep the scribing tool perpendicular to the wall. If you let the compass “drift” or lean as you move, the line you draw will be a distorted version of the actual wall. This leads to a shelf that still doesn’t fit after the cut. Constant awareness of your tool’s orientation is mandatory.
Another pitfall is trying to scribe a shelf that is already cut to its final length. Scribing usually moves the shelf “into” the wall by an inch or more. If you have already cut the shelf to fit between two cabinets or walls, the scribing process will make the shelf too short. Always start with a shelf that is slightly longer than you need.
Ignoring the “plumb” of the wall is a recipe for disaster. If the wall leans forward or backward, your scribe line must account for that angle. Using a spirit level to ensure the shelf is “level and plumb” before you ever pick up a pencil is the only way to ensure the final fit works.
Limitations: When Scribing Isn’t the Answer
While scribing is a powerful technique, it has its boundaries. If a wall is extremely irregular—such as a rough-cut fieldstone wall with 3-inch protrusions—scribing the wood may remove so much material that the shelf loses its structural strength. In these cases, it is often better to “let in” the wood by slightly chiseling the stone or using a hybrid approach with a small amount of dark, matching sealant.
Environmental factors also play a role. Wood is a living material that expands and contracts with changes in humidity. If you scribe a shelf with surgical precision in the middle of a dry winter, it may expand and put significant pressure on the drywall when the humid summer arrives. In regions with extreme seasonal swings, leaving a “paper-width” gap can prevent the wood from crushing the wall’s surface.
Extremely thin driftwood, such as pieces weathered down to a fragile 1/2-inch thickness, may not handle the back-beveling process well. The wood can become brittle and chip along the “knife edge.” For thin materials, a straight cut and a very careful sanding to the line is often safer than a steep bevel.
Advanced Considerations for Serious Practitioners
For those looking to take their craft to the next level, consider the “double-scribe” method. This involves making a rough scribe to get the wood within 1/8 of an inch of the wall, then performing a second, much finer scribe to achieve perfection. This is particularly useful on very long shelves where a small error at one end can compound over ten feet.
Mounting hardware also requires advanced planning. If you are using heavy-duty floating shelf brackets with 6-inch steel rods, remember that you cannot easily “tilt” the shelf onto the wall. You must be able to slide the shelf straight back. This means your scribe must be perfectly vertical. If the wall has a “belly” (a bow in the middle), you must relieve the wood in that specific area to allow the rods to seat fully.
Mortising the back of the shelf is another pro-tier move. Most high-quality floating brackets have a mounting plate that is about 1/4 of an inch thick. If you don’t route a recess (mortise) into the back of the driftwood to hide this plate, the shelf will never sit flush against the wall, regardless of how well you scribed the edge. Use a palm router to create a pocket for the plate, ensuring it is slightly deeper than the plate itself to allow for final adjustments.
Example Scenario: The Bowed Plaster Wall
Suppose you have a 4-foot piece of cedar driftwood that you want to mount in a 1920s bungalow. The wall has a noticeable “bulge” in the center where a stud has twisted over the decades.
First, you hold the cedar against the wall and level it. You find that the ends of the shelf are 1/2 inch away from the wall because the center bulge is pushing the board out. You set your compass to exactly 1/2 inch. Starting at one end, you drag the compass across the top face of the cedar.
Next, you use a jigsaw with a “down-cut” blade (to prevent splintering on the top surface) to cut the line at a 30-degree back-bevel. After the cut, you use a belt sander with 100-grit paper to smooth the line, taking care not to round over the crisp top edge.
Finally, you slide the shelf into place. The center bulge now nests into the hollow you carved, and the ends of the shelf sit tight against the plaster. Total time: 45 minutes. Total result: A shelf that looks like it was born in that room.
Final Thoughts
Mastering the scribe is less about the tools you own and more about the discipline you bring to the bench. It is an acknowledgment that the world is rarely straight, and that a craftsman’s job is to reconcile the perfection of a design with the reality of the site. Whether you are using a $500 linear scriber or a $2 washer, the goal is the same: a fit so tight that light cannot pass through.
This approach requires a shift in mindset. You must stop seeing “uneven” as a problem to be hidden and start seeing it as a template to be followed. Driftwood, with its natural curves and stories of the sea, deserves the respect of a proper installation.
Apply these techniques to your next project. Take the extra hour to back-bevel, to sand to the line, and to check your plumb. When you stand back and see that driftwood slab hugging the contours of your home without a single gap, you’ll understand why the pioneers spent so much time on their joinery. It is the grit that makes the beauty permanent.
Sources
1 youtube.com (https://www.youtube.com/watch?v=vgymSVys9Ow) | 2 familyhandyman.com (https://www.familyhandyman.com/project/how-to-scribe-for-a-perfect-fit/) | 3 oldworldtimber.com (https://www.oldworldtimber.com/a-comprehensive-guide-on-how-to-scribe-wood/) | 4 youtube.com (https://www.youtube.com/watch?v=9-cYp73ewEE) | 5 youtube.com (https://www.youtube.com/watch?v=btlysSKCpj4) | 6 wardrobedoorsdirect.co.uk (https://vertexaisearch.cloud.google.com/grounding-api-redirect/AUZIYQH4_4cPsky1K2olmPLFGCoQ3IcYxHkiCInJ_H-Khm1mssz8l5MVm_8cBaSPTkOIdLgUp5FZM5iyFoRt5jVLsAldhXlPSm0JguPV70SW47JgolpfPizm2_8rI5uUmeODbla8OZjTmDkDzyuDuzJc9Mv9eurpYgkKq49dl7aF9_DrGwpKzNnSeOqfyJjv3ZcMJURg) | 7 reddit.com (https://www.reddit.com/r/Carpentry/comments/x9erw0/best_toolsmethods_for_complex_scribes/) | 8 scribe-mate.com (https://www.scribe-mate.com/pages/best-scribing-tools-for-carpentry-and-joinery)