Free Driftwood Wine Rack Ideas
The ocean is currently washing up the high-end furniture you think you can’t afford. Retailers charge a premium for the ‘coastal aesthetic,’ but the ocean doesn’t have a middleman. While they’re selling hollow metal for the price of a mortgage payment, the beach is giving away solid, architectural timber for the cost of a morning walk. Your wine deserves a home with history.
[affiai]Working with driftwood isn’t just about saving a few dollars; it is about reclaiming a piece of the world that has been cured by salt and time. These pieces of timber have survived storms, sun-bleaching, and the crushing weight of the tides. When you bring them into your home, you aren’t just adding a shelf; you are installing a witness to the elements.
This guide will walk you through the grit and grace of transforming ocean-scoured wood into functional art. We will cover everything from the legalities of beachcombing to the chemistry of wood preservation, ensuring your collection sits on a foundation as solid as the coastline itself.
Free Driftwood Wine Rack Ideas
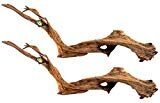
A driftwood wine rack is a marriage of natural sculpture and functional utility. Unlike factory-made units that rely on uniform lines and laminated surfaces, these racks celebrate the erratic, beautiful geometry of wood that has been shaped by the sea. They exist because the ocean is the ultimate woodworker, stripping away the soft sapwood to reveal the hard, resilient heartwood beneath.
In real-world interior design, these pieces serve as the “anchor” of a room. A massive, salt-crusted log mounted to a dining room wall can hold six bottles of Cabernet, turning a blank space into a conversation piece that smells faintly of the sea and aged oak. You might see a minimalist “peg” design where small branches are used as cradles, or a “monolith” style where a single heavy timber is bored with holes to hold bottle necks.
Visualize a piece of cedar that has spent a decade in the Pacific. It is silvery-grey, smooth to the touch, and possesses a shape no CNC machine could replicate. By adding simple wrought-iron hardware or hidden dowels, you transform that debris into a high-end storage solution. Whether it is a tabletop tripod or a floor-to-ceiling vertical display, the idea is to let the wood tell the story while the wine provides the reward.
The Anatomy of a Driftwood Project: How to Do It
Creating a wine rack from driftwood requires more patience than it does power tools. You are working with a material that is unpredictable. Some pieces are as hard as stone, while others are “punky” or soft in the center. The process moves from the shoreline to the workshop in several distinct phases.
Phase One: The Hunt and Selection
Not every piece of wood on the beach is a candidate for a wine rack. You want “sound” wood—material that doesn’t crumble when you press your thumbnail into it. Look for hardwoods like oak or maple, or resinous softwoods like cedar and cypress, as these resist rot more effectively. Avoid pieces that are still green or heavy with rot; the ocean should have already done the heavy lifting of stripping the bark and smoothing the edges.
Phase Two: Cleaning and Sanitizing
The ocean is beautiful, but it is also full of life—some of which you don’t want in your living room. Driftwood often harbors salt, sand, and microscopic organisms.
- The Initial Scrub: Use a stiff-bristled brush and fresh water to remove surface sand and loose debris. A pressure washer on a low setting can blast out grit from deep fissures.
- The Bleach Soak: Submerge the wood in a solution of one part bleach to ten parts water. Let it soak for 24 hours. This kills mold spores, bacteria, and any lingering insects.
- The Fresh Water Rinse: Rinse the wood thoroughly to remove the bleach residue. If the wood is small enough, boiling it for an hour is an even more effective way to sanitize and pull out deep-seated tannins.
Phase Three: Drying and Curing
This is where most beginners fail. You cannot work with wet driftwood. As wood dries, it shrinks and cracks. If you build your rack while the wood is damp, your joints will loosen, and your mounting hardware will fail. Let the wood air-dry in a shaded, well-ventilated area for at least two to four weeks. For smaller pieces, you can accelerate this in a low-heat oven (200°F) for several hours, provided you monitor it closely to prevent scorching.
Phase Four: Design and Construction
Once the wood is dry and stable, decide on your storage method.
- The Peg Method: Drill holes into the main timber and insert sturdy wooden dowels or copper pipes. The bottle rests on these two “arms.”
- The Bored Hole Method: Using a 3.25-inch Forstner bit, drill holes directly through a thick piece of wood. The bottle body or neck slides into the timber itself.
- The Floating Shelf: Secure a flat-faced piece of driftwood to the wall using heavy-duty anchors, creating a rustic ledge for bottles to stand on.
Benefits of Reclaimed Ocean Timber
Choosing driftwood over store-bought lumber offers more than just a “shabby chic” look; it provides structural and environmental advantages that modern materials can’t match.
Unmatched Durability
Driftwood that has survived years in the water is effectively “stress-tested.” The softest parts of the wood have already eroded, leaving behind a dense, weathered core. When properly dried and sealed, this wood is remarkably stable. It won’t warp like the cheap pine you find at a big-box hardware store because it has already experienced the worst conditions imaginable.
Sustainability and Low Carbon Footprint
Every piece of wood you pull from the beach is one less piece of virgin timber that needs to be harvested. You are participating in a closed-loop system of recycling. There are no factories, no industrial glues, and no international shipping involved in the “production” of your raw material.
Architectural Originality
No two pieces of driftwood are the same. When you build a wine rack from these materials, you are guaranteed a one-of-a-kind item. In a world of mass production, having an object that cannot be replicated adds a layer of soul to your home. It moves the needle from “furniture” to “sculpture.”
Challenges and Common Mistakes
Working with driftwood is not without its trials. If you treat it like standard lumber, you will run into trouble.
The “Salt Sweat” Phenomenon
Driftwood is impregnated with sea salt. If you don’t soak it in fresh water long enough, that salt will eventually “sweat” out of the wood when the humidity rises. This can ruin the finish, cause metal hardware to rust prematurely, and even damage the labels on your wine bottles. Always prioritize the fresh-water soak.
Structural Integrity Issues
Just because a log looks solid doesn’t mean it is. Some driftwood is “honeycombed” inside by shipworms or dry rot. Always test the weight-bearing points of your wood. If you are mounting a rack to a wall, ensure the wood where the screws enter is dense and “gritty” to the touch, not soft or fibrous.
Failure to Account for Weight Distribution
Wine is heavy. A standard 750ml bottle weighs about three pounds. A six-bottle rack is supporting nearly twenty pounds of dead weight. Beginners often underestimate the leverage a bottle exerts on a peg. If your dowels aren’t angled slightly upward (about 3 to 5 degrees), the bottles can vibrate out or sag over time.
Limitations and Environmental Constraints
While the beach is a “free” lumber yard, there are boundaries to what you can and should do.
Legal Restrictions
In many jurisdictions, it is illegal to remove driftwood from national parks, state beaches, or private property without a permit. Some areas protect driftwood because it provides critical habitat for shorebirds and prevents beach erosion. Always check local “beachcombing” laws. In places like Oregon, small-scale collection for personal use is usually fine, but using a chainsaw or a truck to haul away massive logs often requires a permit.
Environmental Hazards
Driftwood can sometimes be contaminated with more than just salt. In industrial coastal areas, wood can soak up oils, chemicals, or heavy metals. If the wood has a chemical smell or an oily sheen, leave it on the beach. You don’t want to bring industrial pollutants into your kitchen or wine cellar.
Scale and Complexity
Driftwood is rarely straight. This makes traditional joinery—like dovetails or mortise-and-tenon joints—extremely difficult. If you are looking for a rack with perfect 90-degree angles and modular expansion capabilities, driftwood might not be the right medium for you. It demands that you adapt your design to the wood, rather than forcing the wood to fit a blueprint.
Boutique Price vs. Shoreline Savings
The difference between buying a coastal-themed wine rack at a high-end retailer and making one yourself is staggering. Below is a breakdown of the typical investment required for both paths.
| Feature | Boutique Retailer | Shoreline DIY |
|---|---|---|
| Raw Material Cost | $150 – $500+ | $0 (Free on the beach) |
| Material Quality | Often faux-finished pine or resin | Solid, salt-cured hardwood |
| Customization | None (Standard sizes) | Infinite (Built for your space) |
| Time Investment | 15 minutes (Shipping) | 10 – 20 hours (Labor) |
| Aesthetic Value | Generic “Coastal” | Authentic “Nautical” |
Practical Tips and Best Practices
If you are ready to start your first project, keep these veteran tips in mind to ensure a professional result.
- Use Stainless Steel or Brass: Standard steel screws will react with any remaining salt in the wood and corrode. Use high-quality stainless steel or brass hardware to prevent “rust bleeding” into the grain.
- The “Balance Test”: Before drilling your final mounting holes, hold the wood against the wall and have someone place empty wine bottles on your planned peg locations. Driftwood is often heavy on one side; you need to find the natural center of gravity.
- Finishing with Oils: Avoid thick, shiny polyurethanes. They make driftwood look like plastic. Instead, use a “breathable” finish like Tung oil or Danish oil. This protects the wood while maintaining the tactile, matte texture that makes driftwood so appealing.
- Hidden Mounting: For a truly professional look, use “blind shelf supports.” These are long metal rods that go into the wall and into the back of the wood, making the wine rack appear to float without visible brackets.
Advanced Considerations for the Serious Practitioner
For those who have mastered the basic peg rack, there are ways to push the craft further. Scaling a driftwood project requires a deep understanding of wood tension and load-bearing physics.
Integrated Lighting
Consider routing a channel into the back of a large driftwood plank to install LED strip lighting. The light will “wash” over the wall behind the wood, highlighting the rugged edges of the timber and making the wine bottles glow from behind.
Compound Joinery
Serious practitioners often combine driftwood with other reclaimed materials. Integrating scrap rebar or industrial black pipe can create an “Industrial-Coastal” look. The trick is to ensure that the hard, cold metal doesn’t overpower the soft, organic lines of the wood. This requires precision drilling and often the use of epoxy resins to stabilize the points where metal meets wood.
Managing “Live Edges”
If your driftwood still has “punky” or soft outer layers that are aesthetically beautiful but structurally weak, you can use a stabilizing resin. By “painting” the soft areas with a thin, clear epoxy, you can lock the fibers in place, allowing you to keep the weathered look without the wood shedding dust or splinters into your wine.
Example Scenarios: From Beach to Bar
Let’s look at how two different pieces of wood require two different approaches.
Scenario A: The Tabletop Tripod
You find a root system from a cedar tree. It has three main “legs” that sit naturally on a flat surface.
1. Clean and dry the root thoroughly.
2. Instead of drilling through it, use thick leather cord to “cradle” three bottles between the root tendrils.
3. The result is a centerpiece that looks like a hand reaching out of the sand to hold your wine.
Scenario B: The Vertical Monolith
You find a six-foot-long, four-inch-thick plank of Douglas Fir. It is heavy and dead-straight on one side.
1. Use a 1.25-inch spade bit to drill holes at a downward 45-degree angle.
2. The holes should be just large enough for the neck of the wine bottle to slide in.
3. Mount this vertically to a wall stud. The bottles will hang horizontally, supported only by their necks. It is a striking, space-saving display for a modern kitchen.
Final Thoughts
The ocean is the world’s most patient craftsman. It takes a fallen tree and spends years stripping it down to its most essential, beautiful form. When you take that wood and turn it into a wine rack, you are honoring that process. You are taking something the world considered “refuse” and proving it has more value than anything found in a showroom.
Building a driftwood wine rack is a slow process. It demands that you scrub, soak, dry, and contemplate. But the result is a piece of furniture that feels alive. It carries the weight of the tides and the warmth of the sun into your home. It reminds you that the best things in life aren’t manufactured; they are found.
Start small. Find a single branch that speaks to you. Clean it, oil it, and let it hold a single bottle of your favorite vintage. Once you see the way the salt-cured grain catches the light, you’ll never look at a “boutique” furniture catalog the same way again. The shore is waiting, and the middleman is nowhere to be found.
Sources
1 parklanejewelry.com (https://www2.parklanejewelry.com/how-to-wash-driftwood/) | 2 beavercrafttools.com (https://beavercrafttools.com/blogs/wood-for-carving/driftwood-carving-a-completed-guide) | 3 youtube.com (https://www.youtube.com/watch?v=QiBDf4JN_XA) | 4 logfurnitureplace.com (https://logfurnitureplace.com/driftwood-wine-bottle-holders-ms01015.html) | 5 hawk-hill.com (https://www.hawk-hill.com/how-to-clean-driftwood/) | 6 dksstores.com (https://dksstores.com/blog-post67) | 7 homify.com.my (https://www.homify.com.my/diy/52765/preserve-driftwood-with-5-things-and-make-a-decorative-object-out-of-it) | 8 wineracksamerica.com (https://wineracksamerica.com/pages/how-to-make-custom-wood-wine-racks)