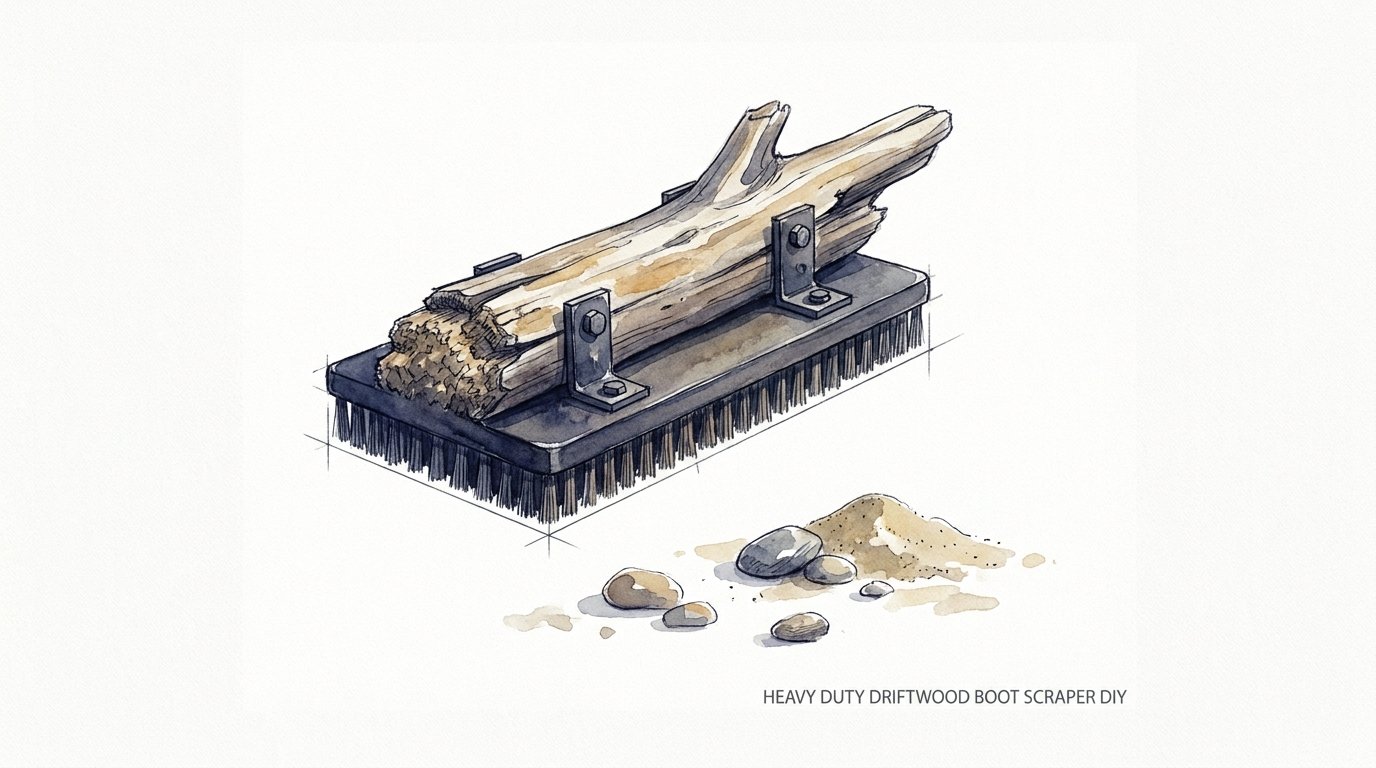
Heavy Duty Driftwood Boot Scraper Diy
Modern mats just hide the dirt; a driftwood scraper actually removes it before it ever crosses your threshold. Why do we buy plastic mats that crack in the sun and hold onto filth? The ocean has provided the perfect, heavy-duty chassis for a boot scraper that will outlast your house. This isn’t just about clean floors; it’s about making a statement at your door that the wild starts here.


Walking through the mud and muck is part of a life well-lived, but bringing that grit into your sanctuary is a mistake. Traditional solutions often involve thin coir mats that saturate in the rain or rubber trays that turn into miniature swamps. A heavy-duty driftwood boot scraper offers a different path. It utilizes the density of salt-cured timber and the raw efficiency of a metal edge to strip away the toughest debris.
Think of this project as a bridge between the untamed coast and your front porch. Driftwood has already survived the ultimate stress test—tumbling through tides and baking under a relentless sun. When you transform it into a functional tool, you are repurposing nature’s own reinforced structural material. This guide will show you how to build a scraper that stands as a silent sentry against the elements.
Every step in this process is designed for longevity. We aren’t looking for a decorative trinket that will splinter under a heavy work boot. We are building a tool with pioneer grit, meant to handle everything from thick clay to mountain snow. Let’s get to work on creating a piece of coastal rugged hardware that works as hard as you do.
Heavy Duty Driftwood Boot Scraper Diy
A heavy-duty driftwood boot scraper is a primitive yet highly effective device designed to clean footwear through mechanical friction. Unlike a standard mat, which relies on surface area to trap dust, a scraper uses a rigid edge—usually metal or stone—to pry mud out of deep tread patterns. The driftwood serves as the “chassis,” providing a heavy, stable base that won’t slide or tip when you apply downward force with your leg.
Historical versions of these tools, known as “decrottoirs” in 18th-century France, were essential for keeping excrement and street filth out of homes. While our streets are cleaner today, the principle remains the same for gardeners, hikers, and anyone living in a rural environment. The weight of the driftwood is its greatest asset. A piece of wood that has spent years at sea is often incredibly dense, often approaching the weight of stone once it is properly dried and seasoned.
In real-world terms, this DIY project replaces the flimsy alternatives found at big-box stores. Most commercial scrapers are made from thin-gauge steel that rusts through in two seasons or lightweight plastic that shifts underfoot. A driftwood scraper is anchored by its own mass. It creates a dedicated “transition zone” where the outdoors ends and the indoors begins, requiring no more maintenance than an occasional hosing down.
You will find these scrapers most at home on the porches of coastal cabins, farmstead mudrooms, or any entryway that sees high traffic from the great outdoors. They are particularly useful in climates with high rainfall, where mud is a constant companion. Because driftwood is naturally weathered, it develops a silver-grey patina that looks better with age, unlike painted metal that eventually flakes and fails.
How to Source and Prepare Your Driftwood
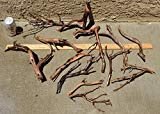
Finding the right piece of wood is the first and most critical step. Look for “Coastal Rugged” specimens—logs or thick branches that feel significantly heavier than they look. Avoid wood that is “punky” or soft to the touch, as this indicates internal rot that won’t hold a screw. Hardwoods like oak or cedar that have been washed to sea are ideal because they possess natural rot resistance that has been further enhanced by salt impregnation.
Cleaning the wood is a non-negotiable step to ensure the longevity of your scraper. Start by hosing the wood down with a high-pressure nozzle to remove sand, salt, and loose bark. If the wood came from a saltwater environment, it is wise to soak it in a tub of fresh water for 24 to 48 hours to leach out excess salt. This prevents the salt from corroding the metal blades you will eventually attach.
Kill off any hidden bacteria or pests by treating the wood with a mild bleach solution—roughly one cup of bleach to a gallon of water. Use a stiff brush to scrub the solution into every crevice, then rinse thoroughly. This step ensures that you aren’t bringing wood-boring insects onto your porch. Once cleaned, the driftwood must dry completely. Place it in a sunny spot with good airflow for at least 15 to 30 days. Patience here prevents the wood from cracking or warping after you’ve attached the scraper hardware.
Final preparation involves leveling the base. Driftwood is rarely flat, so you may need to use a saw or a large wood rasp to create a stable bottom surface. A scraper that wobbles is a safety hazard. Ensure the piece sits flush against the ground. If you want a more refined look, sand the top surface with 180-grit sandpaper to remove sharp splinters while maintaining the natural, weathered texture of the wood.
How to Build Your Boot Scraper Step-by-Step
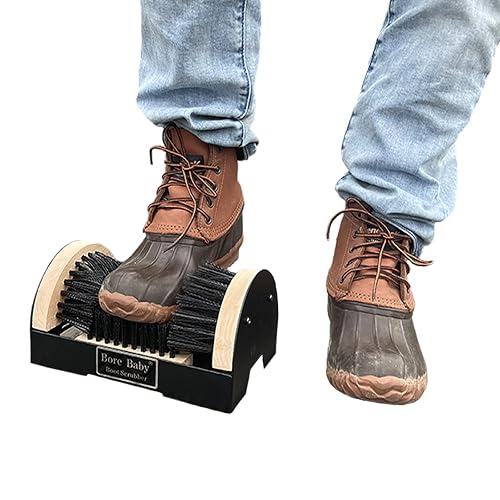
Once your wood is dry and level, you need to decide on your scraping mechanism. The most effective “heavy-duty” design uses a combination of a horizontal metal blade and flanking brushes. This allows you to scrape the sole of the boot on the metal and scrub the sides with the bristles simultaneously. Start by sourcing a piece of galvanized steel or a thick slate tile to act as the primary blade.
Create a channel for the blade by sawing two parallel lines into the top of the driftwood log. These lines should be about 2 to 3 inches deep and spaced just wide enough to accommodate your metal plate. Use a hammer and chisel to knock out the wood between the cuts. Test the fit of your blade; it should be snug. To secure it, apply a bead of exterior-grade construction adhesive or marine-grade epoxy into the channel before sliding the blade in.
Adding brushes increases the cleaning power significantly. Purchase two stiff-bristled scrub brushes with synthetic filaments, as these hold up better in wet conditions than natural fibers. Position them on either side of the metal blade. Drill pilot holes through the wooden backing of the brushes and into the driftwood base. Use 3-inch stainless steel screws to mount the brushes. Stainless steel is essential here to prevent “rust streaks” from staining your wood over time.
Consider adding a “balancing post” if your driftwood base is narrow. This is simply a sturdy branch or dowel mounted vertically that the user can hold onto while they scrape. Drill a large hole into the base, apply wood glue, and drive the post home. This simple addition transforms the scraper from a trip hazard into a professional-grade cleaning station that anyone can use safely.
Benefits of a Driftwood Scraper
Practical floor protection starts outside. By removing the bulk of mud and grit before it touches your entryway rug, you significantly extend the life of your indoor flooring. Grit acts like sandpaper on hardwood and tile; a driftwood scraper removes that abrasive material at the source. This leads to less vacuuming and a cleaner living environment with minimal effort.
Durability is the standout feature of this DIY approach. Driftwood that has been cured by the ocean is essentially pre-weathered. It has already undergone the contraction and expansion cycles that cause new pressure-treated lumber to crack. This makes it far more stable than the “industrial rubber” mats that often degrade and crumble after a single summer of UV exposure. A well-built driftwood scraper can easily last a decade or more with zero maintenance.
Aesthetics play a large role in the value of this project. Each piece of driftwood is unique, featuring knots, twists, and textures that no factory can replicate. It adds a touch of “pioneer grit” to your home’s exterior, signaling a respect for natural materials and functional design. It’s a conversation piece that serves a purpose, blending seamlessly into coastal or rustic landscaping where a black plastic mat would look out of place.
Cost-effectiveness is another major advantage. Most of the materials—the wood, the rocks for stabilization, and even the “scrap” metal—can be salvaged. Even if you buy high-end stainless steel screws and quality brushes, the total investment is usually lower than buying a premium cast-iron scraper from a boutique garden store. You are getting a custom, heavy-duty tool for the price of a few hardware store items.
Challenges and Common Mistakes
Choosing “punky” or rotting wood is the most frequent error. If you can push a screwdriver into the wood with your thumb, it is too far gone. This wood will not hold the screws for your brushes, and the metal blade will eventually wobble and tear out of the channel. Always test the density of your find before investing time in the cleaning and drying process.
Neglecting the drying phase often leads to project failure. If you mount metal hardware to wet wood, the wood will shrink as it dries, loosening the fasteners. Furthermore, trapping moisture under a metal blade or brush can encourage rot in the one place you can’t see. Ensure the timber is “bone dry” before you start drilling and gluing. This process cannot be rushed, especially in humid environments.
Using the wrong fasteners is a mistake that shows up within the first year. Zinc-plated screws will rust almost immediately when exposed to the moisture trapped in boot bristles. This leads to ugly orange stains on your driftwood and, eventually, structural failure of the scraper. Always spend the extra few dollars on 304 or 316-grade stainless steel screws to ensure your scraper remains as rugged as the coast it came from.
Ignoring the “wobble factor” can make the scraper dangerous to use. A boot scraper requires the user to balance on one leg while applying significant pressure with the other. If the driftwood base isn’t perfectly stable, it can flip or slide. Always ensure the bottom is flat or, better yet, anchor the scraper to your porch or a heavy stone slab. Safety must always come before the “natural” look of an unrefined log.
Limitations of the Driftwood Design
Weight can be a double-edged sword. While a heavy scraper is stable, it is also difficult to move for cleaning or repositioning. If you choose a massive log, you are essentially committing to its location. This makes it less ideal for people who like to frequently rearrange their outdoor spaces or for those with limited physical strength to handle heavy lifting during the construction phase.
Size constraints are another reality of working with found objects. You are limited by the shape of the driftwood you find. If you have a very large household or frequently host guests with oversized work boots, you might find that a single small log doesn’t provide enough surface area for efficient cleaning. Designing a “double” scraper or sourcing a very long, straight piece of timber requires more effort in the hunting phase.
Driftwood is not ideal for all types of footwear. The aggressive metal blade and stiff brushes are perfect for work boots, hiking shoes, and sneakers. However, they can easily ruin the delicate leather of dress shoes or the soft fabric of slippers. If your entryway sees a mix of rugged and refined footwear, you must warn users that this is a “heavy-duty” tool not meant for their Sunday best.
Environmental factors can still play a role in degradation over very long periods. While driftwood is resistant to rot, it is not immune. If the scraper sits in a permanent puddle or a completely shaded, damp corner, it will eventually succumb to fungus and decay. To mitigate this, the scraper should be placed in a well-drained area where it can dry out between rainstorms.
Coastal Rugged vs. Industrial Rubber
Comparing these two schools of thought reveals a trade-off between character and convenience. An industrial rubber scraper, often made from EPDM or recycled tires, is designed for pure utility. It is lightweight, uniform, and effectively “disposable.” It works well in high-volume commercial settings where aesthetics don’t matter and the mat will be replaced every year.
Coastal Rugged design, embodied by the driftwood scraper, prioritizes permanence and integration with the environment. It leverages the natural hardness of salt-seasoned timber to provide a more stable platform than rubber can offer. While a rubber mat might slide across a wet porch, a 40-pound driftwood log stays exactly where you put it. The table below highlights the measurable differences between these approaches.
| Feature | Coastal Rugged (Driftwood) | Industrial Rubber (EPDM) |
|---|---|---|
| Lifespan | 10+ Years (if maintained) | 2–3 Years |
| Weight/Stability | High (Heavy timber) | Low (Prone to sliding) |
| UV Resistance | Excellent (Naturally weathered) | Varies (Can crack over time) |
| Cost | Low (Salvaged materials) | Moderate (Retail price) |
| Aesthetic | Unique, Rustic | Uniform, Utilitarian |
Choosing the Coastal Rugged path requires more initial labor, but it yields a tool with far more soul. The industrial rubber option is a “set it and forget it” choice for those who don’t mind replacing their gear regularly. For the practitioner who values “pioneer grit” and equipment that tells a story, the driftwood scraper is the clear winner.
Practical Tips and Best Practices
Placement is the most important factor for success. Position the scraper exactly where a person naturally stops to open the door. If they have to go out of their way to use it, they won’t. If possible, place it under a slight overhang to protect it from the worst of the rain, but ensure it still gets enough sunlight to dry out periodically. This balance keeps the wood healthy and the metal from constant saturation.
Cleaning the scraper itself is often overlooked. Mud will eventually build up around the base and between the bristles. Once a month, use a stiff hand brush to knock away dried dirt and give the whole unit a quick spray with the hose. This prevents the scraper from becoming a source of dirt itself. If the brushes become clogged with hair or debris, use a small comb or an old fork to clear the bristles.
Check the fasteners annually. The constant pressure of scraping can eventually loosen even the best screws. A quick turn with a screwdriver once a year will keep the unit tight and safe. If you notice any “checking” or deep cracks in the wood, you can fill them with a bit of wood epoxy to prevent water from pooling inside and starting a pocket of rot.
Consider applying a “Spar Varnish” or marine-grade sealer if you live in an extremely wet climate. While the natural silver patina of driftwood is beautiful, a clear matte sealer will provide an extra layer of protection against the elements. This is especially helpful if your driftwood is a softer species that might be more prone to absorbing water. Ensure the wood is absolutely dry before applying any finish.
Advanced Considerations for Serious Practitioners
Adding a “Boot Jack” to the back of your scraper is a professional-level upgrade. A boot jack is a V-shaped notch that allows you to hook the heel of your boot and pull your foot out without using your hands. By integrating this into your driftwood base, you create a complete “entryway system.” This requires a bit more careful carving or a separate piece of wood securely bolted to the main log.
Dual-brush systems can be optimized by using brushes of different stiffness. You might mount a very coarse, wire-bristled brush on one side for removing heavy mud and a softer nylon brush on the other for a final “buffing” of the boot sides. This level of customization is something you will never find in a store-bought product and demonstrates a deep understanding of footwear maintenance.
Scaling the project for a mudroom involves mounting the driftwood to a larger, stationary platform. If you have a dedicated mudroom, you can bolt the driftwood scraper directly to the floor or a large heavy-duty tray. This ensures that the mud removed by the scraper is contained in a single, easy-to-clean area. For indoor use, ensure the wood has been “de-salted” even more thoroughly to prevent any damage to your interior air quality or nearby metal fixtures.
Weight distribution is key if you are using a lighter piece of driftwood. You can “ballast” the wood by drilling large holes into the bottom and filling them with lead weights or concrete. This allows you to use a piece of wood that has a beautiful shape but lacks the natural density needed for stability. It’s an advanced trick that keeps the aesthetic high while ensuring the tool remains functional under heavy loads.
Example Scenario: The Pacific Northwest Entryway
Imagine a cabin on the coast of Washington state. The soil is heavy clay, and it rains 200 days a year. A standard coir mat would be a sodden mess within a week. The owner finds a 3-foot length of salt-bleached cedar on the beach—thick as a man’s thigh and heavy as a stone. This becomes the foundation for their scraper.
They clean the cedar with a bleach-water mix and let it dry under the eaves for a month. Instead of a single blade, they use a piece of reclaimed 1/4-inch thick steel plate from a local shipyard. They chisel a deep groove and set the plate with marine epoxy. On the sides, they mount four heavy-duty scrub brushes, two per side, creating a “tunnel” that cleans the entire lower half of the boot in one pass.
The result is a 50-pound cleaning station that doesn’t budge even when used by a 250-pound logger in muddy caulk boots. Visitors recognize the “coastal rugged” look immediately; it fits the landscape and respects the local environment. More importantly, the cabin’s pine floors remain pristine despite the chaos of the environment outside. This is theory translated into a lifetime of practical application.
Final Thoughts
Modern mats just hide the dirt; a driftwood scraper actually removes it. By building your own heavy-duty boot scraper, you are reclaiming a piece of history and applying it to the modern world with pioneer grit. This project isn’t just about utility; it’s about a relationship with the materials that the earth and sea provide for free. It’s a way to keep your home clean while making a bold statement at your very first point of contact with the world.
Take the time to find the right piece of wood and don’t skip the preparation steps. The longevity of your scraper depends entirely on the quality of the “chassis” and the hardware you choose to mount. Once it is built, you will find that the ritual of scraping your boots becomes a satisfying end to every outdoor adventure. It is a moment of transition—shedding the weight of the trail before stepping back into the warmth of your home.
Experiment with different designs and don’t be afraid to customize the scraper to your specific needs. Whether you add a boot jack, multiple brush types, or a balancing post, the goal is to create something that works for you. This is a skill that deepens your understanding of functional woodworking and outdoor maintenance. Start your search on the shoreline today and build something that will stand the test of time.
Sources
1 amusingplanet.com (https://www.amusingplanet.com/2021/03/boot-scrapers.html) | 2 oldtownhome.com (https://www.oldtownhome.com/2013/9/25/These-Boot-Scrapers-Were-Made-for-Cleaning/) | 3 homify.com.my (https://www.homify.com.my/diy/52765/preserve-driftwood-with-5-things-and-make-a-decorative-object-out-of-it) | 4 tnnursery.net (https://tnnursery.net/blogs/garden-blog/driftwood-has-many-uses) | 5 gardenersworld.com (https://www.gardenersworld.com/how-to/diy/how-to-make-a-boot-scraper/) | 6 thisoldhouse.com (https://www.thisoldhouse.com/entryways-mudrooms/diy-boot-washing-station) | 7 youtube.com (https://www.youtube.com/watch?v=l_xTdiFAtFw) | 8 100things2do.ca (https://100things2do.ca/diy-boot-scraper/) | 9 ismattrading.com (https://ismattrading.com/2026/04/10/tested-industrial-rubber-products-what-lasted-longest/)