How To Arrange Driftwood Wall Art Professionally
Why do some driftwood collections look like a messy beach pile while others look like a $5,000 gallery centerpiece? Most people bring the beach home only to create a cluttered mess in the corner. The secret to professional coastal design isn’t the wood—it’s the geometry. Shifting from ‘storing’ to ‘sculpting’ turns raw debris into a structured masterpiece that defines the entire room’s energy.
[affiai]Professional designers treat natural elements with a pioneer-like grit and intentionality. They understand that a branch is not just a branch; it is a series of lines, shadows, and histories. This guide will walk you through the process of taking sun-bleached timber and elevating it to an architectural level. You will learn to see the difference between simple decoration and intentional installation.
Authentic coastal style demands more than just finding a piece of wood. It requires a deep respect for the material and a technical understanding of how to anchor that material into a modern living space. We will explore the mechanics of cleaning, the physics of mounting, and the psychology of arrangement.
How To Arrange Driftwood Wall Art Professionally
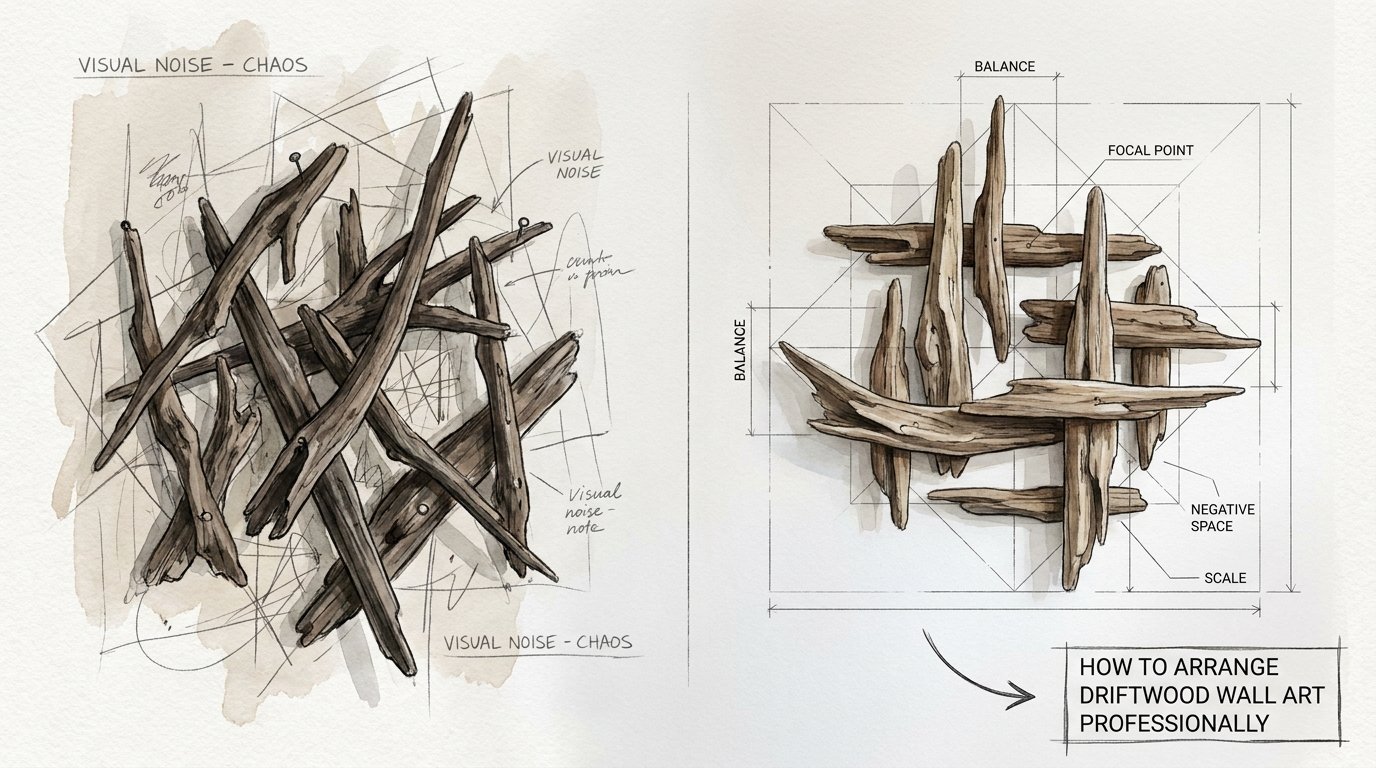
Arranging driftwood professionally means creating a sense of Architectural Harmony rather than contributing to Visual Noise. Visual noise occurs when a piece of decor feels disconnected from the room’s proportions, looking more like a random object than a part of the home’s structure. Professional arrangement focuses on “anchoring” the wood so it feels like it grew out of the wall itself.
Professional installations often follow the “Golden Ratio” or the “Rule of Thirds” to determine placement. Instead of centering a small piece on a large wall, a professional might offset it to create dynamic tension. The goal is to make the driftwood serve as a focal point that directs the eye toward other architectural features, such as a fireplace or a large window.
This process starts with the selection of the wood. A professional-grade piece usually has a “strong line”—a primary curve or straight edge that dictates the flow of the entire arrangement. You aren’t looking for a stick; you are looking for a skeleton. This skeletal structure provides the framework for the shadows that will eventually play across your wall.
Preparation: Taming the Tide-Washed Timber
Professional-looking art requires professional-level preparation. Raw driftwood straight from the shore often carries salt, sand, and unwanted biological guests. Neglecting the preparation phase leads to wood that eventually cracks, smells, or attracts pests.
The Deep Clean
Start by removing loose debris with a stiff-bristled brush or even an air compressor for deep crevices. For a thorough sanitization, submerge the wood in a solution of one part bleach to nine parts water for at least 24 hours. This ratio is strong enough to kill bacteria and insect eggs but gentle enough to preserve the wood’s integrity. If you prefer to keep the original wood tones, a shorter soak of 30 minutes in a 1:10 ratio is often sufficient.
Drying and Curing
Patience is the pioneer’s greatest tool. Wood must dry completely before it can be sealed or mounted. This process can take several days to a week depending on the thickness of the piece. Avoid using artificial heat sources like hair dryers, as rapid temperature changes can cause the wood to splinter or warp. A well-ventilated, shaded area is the best environment for natural drying.
Sealing the Surface
Raw wood absorbs moisture from the air, which can lead to mold in humid environments. Applying a clear wood sealant, beeswax, or tung oil protects the piece. For a matte, natural look, tung oil is a favorite among woodworkers because it penetrates deep into the fibers without leaving a glossy, “plastic” finish. Buffing the wood between coats creates a soft patina that looks like it has been weathered by decades of sun.
The Core Principles: Geometric Harmony vs. Visual Noise
Designers distinguish between these two concepts to ensure the art enhances the room rather than cluttering it. Visual noise is chaotic and distracting, while architectural harmony feels settled and intentional.
Identifying the Focal Point
Every professional installation has a clear focal point. You can find this by covering the piece with a cloth and then quickly removing it; the first spot your eye hits is your focal point. Professional arrangements ensure this point aligns with the viewer’s eye level or sits at a significant intersection of the room’s lines.
The Power of Directional Lines
Driftwood is a collection of lines. Horizontal lines suggest stability, repose, and tranquility—perfect for a bedroom or a reading nook. Vertical lines create energy and movement, making them ideal for entryways or living rooms with high ceilings. Curves and spirals suggest continuity and softness, breaking up the harsh angles of modern furniture.
Managing Negative Space
The space around the wood is just as important as the wood itself. Crowding a piece makes it look small and insignificant. A professional gives the wood “room to breathe,” ensuring there is enough blank wall space to allow the shadows of the wood to become part of the art.
Mounting Systems: The Hidden Architecture
The difference between a DIY project and a gallery piece often lies in the mounting hardware. You want the wood to appear as if it is floating or held by invisible hands.
Standard Hardware Options
- D-Hooks: These are reliable for medium-sized pieces and provide a sturdy anchor point when used with wall anchors.
- Monkey Hooks: These simple wire hooks can hold up to 50 lbs in drywall without a stud, making them excellent for lighter, sprawling branches.
- Eye Screws and Wire: This is a classic method for irregular shapes, allowing you to find a balance point by adjusting the wire length.
Heavy-Duty Solutions
For massive logs or “statement” stumps, you must find the wall studs. Using a French Cleat (or Z-clip) system provides the strongest support. One half of the cleat is screwed into the wood, and the other is screwed into the wall studs. This creates an interlocking joint that can hold hundreds of pounds while keeping the piece flush against the wall.
Styles and Templates: From Radial Starbursts to Linear Panels
You do not have to settle for a single branch. Professional designers often create “compositions” using multiple pieces of wood.
The Radial Starburst
Arrange smaller, similarly sized pieces in a circular pattern emanating from a central point. This creates a sunburst effect that works beautifully as a centerpiece over a bed. It mimics natural growth patterns and provides a high degree of symmetry, which is naturally pleasing to the human eye.
The Linear Grid
Mount several vertical or horizontal branches in a structured grid. This “panels” the wall, turning the organic wood into a modern architectural element. Using a level is critical here; the contrast between the perfectly straight grid and the irregular wood creates a sophisticated aesthetic.
The Floating Gallery
Instead of one large piece, use three to five smaller pieces arranged in a cluster. Keep the distance between the pieces consistent—usually 2 to 3 inches—to ensure the cluster reads as a single unit rather than a scattered collection.
Benefits of Professional Arrangement
Investing time in a professional arrangement offers more than just visual appeal. It changes the way a space functions and feels.
- Durability: Properly cleaned and mounted wood won’t sag, rot, or fall, ensuring the safety of everyone in the home.
- Biophilic Connection: Research shows that incorporating natural textures reduces stress and lowers heart rates. A professional layout maximizes these calming effects.
- Value: A well-executed driftwood installation can act as a permanent architectural feature, potentially increasing the character and perceived value of a property.
- Sustainability: Repurposing salvaged wood is one of the most eco-friendly ways to decorate, as it requires no new harvesting.
Common Pitfalls and How to Avoid Them
Even the most beautiful piece of wood can look “cheap” if the installation is rushed. Avoid these frequent errors to maintain a high-end look.
The “Messy Pile” Syndrome: This happens when too many small, unrelated pieces are grouped together without a clear unifying shape. Avoid this by choosing one “hero” piece and using others only to support its line.
Ignoring Gravity: Wood is heavy. Mounting a large piece into drywall without anchors will eventually lead to wall damage. Always weigh your piece and choose hardware rated for at least 25% more than that weight.
Poor Lighting: Driftwood is 50% wood and 50% shadow. If you place a piece in a flat-lit corner, it loses its depth. Use directional spotlights or “wall grazing” lights to emphasize the texture and cast dramatic shadows.
Limitations: When This Approach May Not Work
While driftwood is versatile, it isn’t always the right choice for every environment. Being aware of these constraints prevents future headaches.
Structural integrity is a primary concern. In homes with thin lath-and-plaster walls or weak drywall, heavy timber can be a liability. You must ensure your wall can handle the leverage of a protruding branch.
Environmental factors also play a role. In extremely humid bathrooms without proper ventilation, ???? sealed driftwood can eventually succumb to mold. Similarly, in very dry climates, old wood can become brittle and snap if handled frequently. If you live in an area with extreme fluctuations, consider “faux” driftwood or high-quality prints that capture the aesthetic without the structural risk.
Comparison: Natural Wood vs. Artistic Replicas
Sometimes the “real thing” isn’t the best fit for the situation. This table compares authentic driftwood with professional art prints or replicas.
| Feature | Natural Driftwood Sculpture | Professional Driftwood Prints |
|---|---|---|
| Authenticity | High; unique organic history. | Moderate; captures visual detail. |
| Maintenance | Requires cleaning and sealing. | Wipe with a cloth; no pests. |
| Installation | Complex; requires heavy hardware. | Simple; uses standard hooks. |
| Weight | Heavy (5–50+ lbs). | Light (1–5 lbs). |
| Durability | Susceptible to humidity/cracking. | UV-resistant and stable. |
Practical Tips for Lighting and Scale
Scale is the most common area where beginners fail. A piece of art should generally occupy 60% to 75% of the available wall space. If your driftwood is too small, it will look like a mistake.
To fix a scale issue, you can “extend” the art by painting a colored rectangle on the wall behind the wood. This creates a visual frame that makes the small piece feel larger and more intentional. Alternatively, you can flank a smaller piece of wood with two sconces to fill the horizontal space.
Lighting should always be asymmetrical. Placing a single light directly above the piece can flatten it. Instead, place a light to the upper left or right. This forces the shadows to fall into the nooks and crannies of the wood, revealing the “story” of its weathering.
Advanced Considerations for Large Installations
If you are planning a wall-sized installation, you need to think like an architect. Large-scale pieces often require a “sub-frame.” This is a hidden wooden lattice attached to the wall studs, to which the driftwood is then mounted. This allows for more creative placement since you aren’t limited to where the studs are located.
Consider the “Modular Approach” for massive walls. Instead of one 8-foot log, which is nearly impossible to ship or mount safely, use three 3-foot logs that “interlock” visually. By overlapping the ends slightly or following the same curve, you create the illusion of a single, massive piece of timber.
Think about the acoustic properties of the wood. Large, irregular surfaces act as natural diffusers, breaking up sound waves and reducing echo in large rooms. This makes driftwood not just a visual choice, but a functional one for open-concept homes with hardwood floors.
Example Scenario: The Living Room Transformation
Imagine a modern living room with a large, white wall above a grey sofa. The owner wants a coastal feel without the “kitsch” of plastic anchors and blue-striped pillows.
The designer selects a 5-foot piece of weathered cedar with a strong horizontal sweep. First, the wood is soaked in a bleach solution, dried for a week, and finished with two coats of matte beeswax. The designer then creates a cardboard template of the wood’s shape to test the placement on the wall.
Using a stud finder, the designer identifies two studs and installs a French cleat system. The wood is mounted so the “sweep” of the branch points toward the room’s large window, connecting the indoor art to the outdoor view. Finally, a small LED spotlight is placed on a nearby bookshelf, aimed at a 45-degree angle. The result is a sophisticated focal point that feels expensive, grounded, and timeless.
Final Thoughts
Arranging driftwood wall art is a craft that rewards those who respect the balance between nature’s chaos and man’s structure. Moving beyond the “messy pile” requires more than just a hammer and a nail; it requires a willingness to clean, preserve, and strategically place each piece.
The true beauty of this medium lies in its uniqueness. No two pieces of tide-washed wood are identical, meaning your installation will always be a one-of-a-kind statement. By focusing on geometry, light, and hidden architecture, you transform a piece of coastal debris into a professional-grade sculpture.
Experiment with different orientations and don’t be afraid to edit. Sometimes, removing a small branch from a larger piece is the key to finding its true focal point. As you develop your eye for architectural harmony, you will find that the ocean provides all the materials you need to turn a house into a sanctuary.
Sources
1 tailorwoodhaven.com (https://tailorwoodhaven.com/blogs/wood-wall-art/driftwood-wall-art-diy-ideas-to-transform-your-space) | 2 cleanthebeachbootcamp.com (https://cleanthebeachbootcamp.com/driftwood-art-ideas/) | 3 etwoodcrafts.com (https://etwoodcrafts.com/blogs/news/how-to-hang-heavy-wooden-art) | 4 wikihow.com (https://www.wikihow.com/Preserve-Driftwood) | 5 youtube.com (https://www.youtube.com/watch?v=SocvyByxfRc) | 6 specialeditionart.com (https://specialeditionart.com/blogs/theoracle/how-to-hang-driftwood-on-your-wall-a-comprehensive-guide) | 7 brissainteriores.com (https://brissainteriores.com/en/visual-noise/) | 8 northwestdriftwoodartists.org (https://www.northwestdriftwoodartists.org/lesson-center/about-the-art/inspiration-and-design/) | 9 rmcad.edu (https://www.rmcad.edu/blog/the-role-of-acoustics-in-interior-design-balancing-sound-and-style/) | 10 hackrea.net (https://www.hackrea.net/stories/driftwood-wall-art-ideas/) | 11 theroomsart.com (https://theroomsart.com/driftwood-wall-decor-guide/)