Mathematical Driftwood Garland Layout
Is your garland sagging because of the wood, or because you ignored the laws of gravity? Most DIYers just string sticks together and hope they hang straight. But the secret to that high-end boutique look is all in the physics. Learn how to calculate visual weight and use precision knotting to ensure your coastal masterpiece never sags or tilts.
[affiai]Creating a driftwood garland is an exercise in patience and a lesson in structural integrity. While the casual observer sees a charming collection of sea-worn timber, the craftsman sees a series of independent masses that must be tamed through a process of calibrated tension. If you simply drill holes and hope for the best, you are likely to end up with a tangled, uneven mess that looks more like debris than decor.
Coastal design relies on a sense of effortless balance, but that effortlessness is usually the result of rigorous preparation. You have to understand how density, length, and the center of gravity interact before you ever pick up a drill. This guide will walk you through the grit and the math required to build a piece that stands the test of time and the relentless pull of the earth.
True craftsmanship moves beyond guesswork spacing. It demands an understanding of how each individual piece of wood behaves when suspended. Whether you are building a five-foot mantel accent or a floor-to-ceiling vertical installation, the principles remain the same: respect the material, understand the physics, and never trust a knot you haven’t tested.
Mathematical Driftwood Garland Layout
The core of a professional-grade garland lies in the layout. This is where most people fail because they treat every piece of wood as if it were identical. In reality, driftwood is wildly irregular. One piece might be waterlogged and dense, while the next is a hollowed-out husk. Mathematical layout is the process of accounting for these variables to create a visually and physically balanced strand.
To begin a mathematical layout, you must first calculate your spacing interval. This isn’t just about the gaps between the wood; it is about the “Visual Mass Distribution.” The formula for basic spacing is the total length of your hanging area (L) minus the combined width of all your driftwood pieces (W), divided by the number of pieces plus one. This ensures that the negative space—the air between the sticks—is perfectly uniform across the entire run.
However, the math doesn’t stop at spacing. You must also account for the center of mass for each individual stick. For a symmetrical object, the center of mass is the geometric center. For an irregular piece of driftwood, you find the center of mass by suspending the piece from a temporary line and observing where it settles. The vertical line from the suspension point through the wood is where your drill hole should ideally be placed if you want the wood to hang level. This prevents the “see-saw” effect where one end of the stick constantly dips toward the floor.
In a professional setting, this method is used to ensure that large-scale installations do not put uneven stress on the mounting points. By calculating the total weight and the specific intervals of that weight, you can determine exactly what kind of anchors or hardware you need. It turns a “craft project” into an engineered feature for the home.
How to Calculate and Construct Your Garland
Constructing a garland with calibrated tension requires a systematic approach. You cannot rush the preparation phase if you want a result that looks deliberate rather than accidental. Follow these steps to ensure your construction is sound.
Step 1: Material Density Assessment
Different wood species have vastly different densities. Western Red Cedar, for instance, typically weighs about 23 pounds per cubic foot, while White Oak can reach up to 53 pounds per cubic foot. Before you begin, group your wood by species and weight. Mixing dense hardwoods with light softwoods without a plan will lead to a lopsided garland. Use a small kitchen scale to weigh each piece if you want to be truly precise. Your goal is to distribute the heavier pieces toward the center or ends depending on the “swag” or catenary curve you desire.
Step 2: Finding the Balance Point
Each piece of wood is an individual. To find where to drill, use the “Empirical Plumb Line” method. Loop a small string around the stick and move it until the stick hangs exactly the way you want it—usually horizontal. Mark this spot with a pencil. This is your fulcrum. Drilling exactly at this point ensures the stick stays level. If you prefer a more “wild” look, you can intentionally drill off-center, but you must balance that weight elsewhere on the line to prevent the whole garland from shifting.
Step 3: The Spacing Formula
Apply the spacing formula mentioned earlier: (Total Space – Total Wood Width) / (Number of Pieces + 1). For example, if you have a 60-inch mantel and 20 pieces of wood that are each 2 inches wide, your math would look like this: (60 – 40) / 21 = 0.95 inches of space between each piece. Round this to the nearest measurable fraction and stick to it. Consistency is what separates a boutique piece from a hobbyist’s first attempt.
Step 4: Drilling and Deburring
Use a drill bit that is only slightly larger than your twine. If the hole is too large, the wood will wiggle and slide. If it is too small, you will fray the rope as you thread it. Once the holes are drilled, use a small piece of sandpaper to smooth the edges of the holes. This prevents the wood from “sawing” through the twine over years of hanging. This is a step most people skip, but it is vital for the longevity of the piece.
Step 5: Knotting and Tensioning
Thread your twine through the wood and secure it with a knot that provides surface area. A simple overhand knot is often insufficient for heavy wood. Use a barrel knot or a double-overhand knot to create a “stopper” that won’t pull through the hole. As you add each piece, measure the distance from the previous knot to the current one. This is where calibrated tension comes into play—ensure each knot is cinched tight so the spacing does not drift over time.
Benefits of the Mathematical Approach
Choosing a calculated method over guesswork provides several measurable advantages. First and foremost is Structural Longevity. When weight is distributed evenly, the tension on the twine is uniform. This prevents specific sections of the rope from stretching faster than others, which is the primary cause of the “center sag” seen in many DIY garlands.
Aesthetics are also significantly improved. The human eye is incredibly good at spotting uneven gaps. By using a calculated interval, you create a sense of rhythm and pattern that is naturally pleasing to look at. It transforms the driftwood from a pile of beach waste into a sophisticated design element. This precision is particularly important for minimalists who want the wood to be the star of the show.
Finally, there is the benefit of Installation Reliability. If you know exactly how much your garland weighs because you did the math, you can choose the right wall hooks. You won’t be guessing if a command strip will hold or if you need a toggle bolt. This prevents damage to your walls and protects the garland from falling and breaking—something that often happens with top-heavy, poorly balanced designs.
Challenges and Common Mistakes
The most frequent error in driftwood construction is ignoring the Moisture Content of the wood. Driftwood found on the beach is often saturated with salt and water. As it dries in your home, it will lose weight and shrink slightly. If you build your garland with “wet” wood, the holes may expand or the twine may become loose as the wood fibers contract. Always allow your wood to cure in a dry, indoor environment for at least two weeks before drilling.
Another pitfall is using the wrong type of twine. While cotton bakers’ twine looks nice, it has a very low tensile strength and high elasticity. Over time, the weight of the wood will cause the cotton fibers to stretch, ruining your spacing. Jute is a better option, but it can be brittle. Hemp is often the professional’s choice because it has high tensile strength and is naturally resistant to mold and rot—essential for coastal environments with high humidity.
Knot slippage is the third major challenge. If your knots aren’t uniform or if you don’t use enough “tail” on the ends, the weight of the wood can cause the knots to tighten and shift. This changes your spacing. To avoid this, always pull your knots tight with pliers during construction and consider using a tiny dab of clear wood glue inside the knot if you are using a slippery synthetic rope like nylon.
Limitations of the Method
Mathematical precision has its limits, especially when dealing with the “catenary curve.” A catenary is the shape a rope takes when it hangs under its own weight. No matter how much you tighten the rope, there will always be a slight sag in the middle because of gravity. If you want a perfectly straight line, you cannot use a single rope; you would need a rigid internal structure like a wire or a rod.
Environmental factors also play a role. If you are hanging a driftwood garland outdoors or near an open window, wind becomes a factor. A garland that is perfectly balanced for a still room may become a chaotic pendulum in a breezy hallway. In these cases, the “Center of Gravity” calculation becomes even more critical to ensure the pieces don’t bang into each other and crack.
Finally, there is a limit to how long a single strand can be before the cumulative weight exceeds the tensile strength of the twine. A 3-ply jute twine might have a tensile strength of 80 pounds, but you should never load it to more than 25% of that capacity for a long-term installation. If your garland exceeds 20 pounds, you need to upgrade to a heavy-duty cord or incorporate multiple support points along the length of the run.
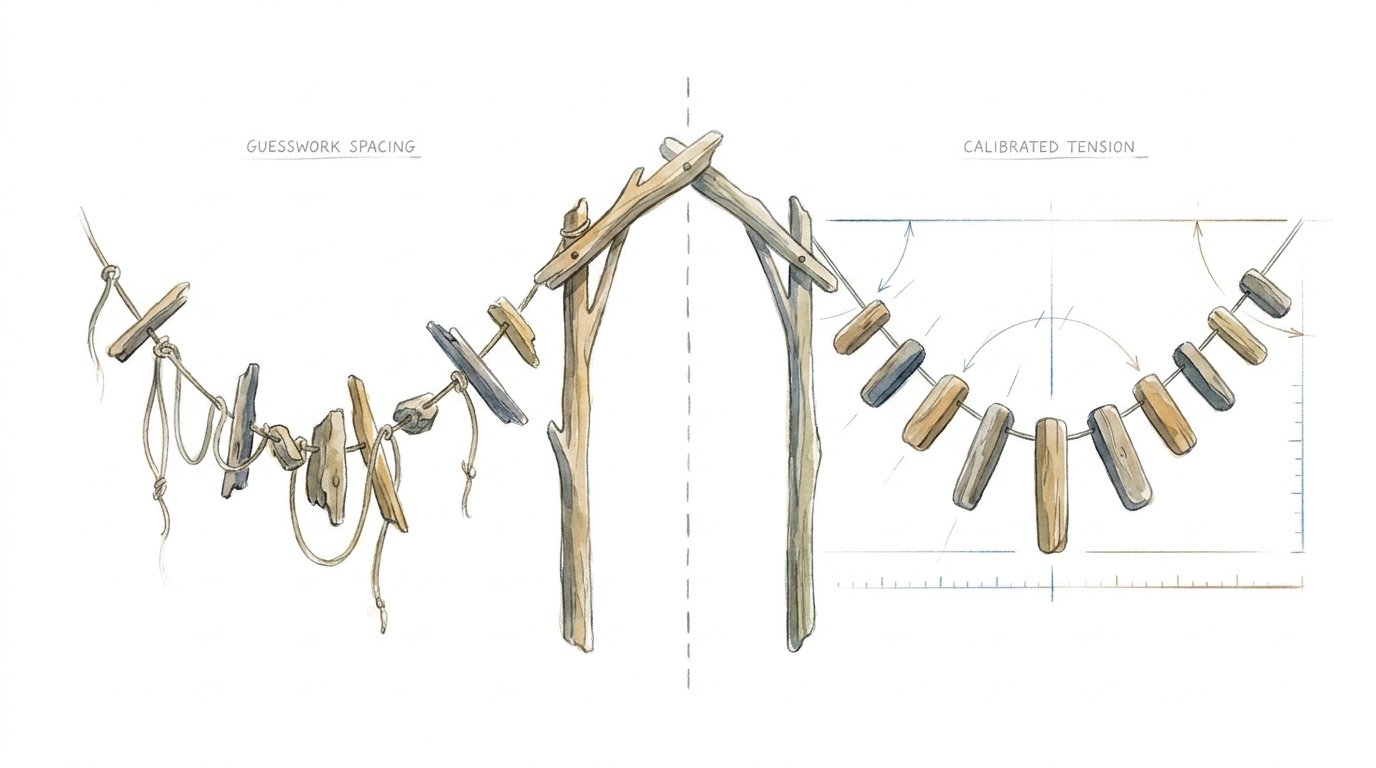
Comparison: Guesswork Spacing vs. Calibrated Tension
Understanding the difference between these two approaches is best done by looking at the measurable outcomes of the project. The following table highlights why taking the extra time for math pays off in the long run.
| Factor | Guesswork Spacing | Calibrated Tension |
|---|---|---|
| Visual Balance | Irregular; prone to “clumping” and empty gaps. | Uniform rhythm; follows professional design principles. |
| Structural Integrity | High risk of twine snapping at heavy points. | Load is distributed evenly across the entire cord. |
| Hanging Level | Wood pieces often tilt or hang vertically. | Each piece is drilled at its COG for a level look. |
| Durability | Sags within 3-6 months. | Maintains shape and spacing for years. |
| Required Skill | Low; beginner friendly. | Moderate; requires basic math and patience. |
Practical Tips for Success
Success with driftwood construction is often found in the small details. Here are a few “pioneer-grit” tips to help you get the best result:
- The Pull Test: Before you hang your garland, secure one end to a doorknob and pull firmly on the other. This “pre-stretches” the twine and sets the knots. It’s better for the garland to stretch now than after it’s on your wall.
- Drill Bit Sizing: Always test your drill bit on a scrap piece of wood first. Thread your twine through the hole. It should go through with a bit of resistance but without snagging.
- Weight Distribution: If you have a few exceptionally heavy pieces, place them at the very ends of the garland or exactly in the center. This helps maintain the symmetry of the hanging curve.
- Twine Choice: If your garland is going in a bathroom or kitchen, use hemp. It handles moisture far better than jute or cotton, which can develop a “musty” smell over time.
Advanced Considerations: Rotational Equilibrium
For those looking to take their craft to the next level, consider Rotational Equilibrium. This is the study of how forces cause objects to rotate. When you hang a piece of driftwood, you aren’t just dealing with it falling down (linear force); you are dealing with it spinning around the twine (torque).
If a stick is much heavier on one side than the other, it will try to rotate until the heavy side is at the bottom. To prevent this, you can use a “Double-Line” construction. Instead of one hole in the middle, you drill two holes—one on each side of the center. By running two parallel lines of twine, you lock the wood in place and prevent it from rotating. This is the technique used for high-end coastal wall hangings that need to remain perfectly static against a wall.
You can also experiment with “Tapered Spacing.” Instead of perfectly even gaps, you can mathematically increase the gap size as you move toward the center of the garland. This creates a “forced perspective” that can make a small room feel larger or a short mantel feel more expansive. It requires a bit more algebra, but the visual impact is significant.
Example Scenario: The 6-Foot Mantel Project
Let’s look at a real-world application. Suppose you want to create a garland for a 72-inch (6-foot) mantel. You have collected 30 pieces of weathered cedar. Each piece is roughly 1.5 inches wide. You want a 15% “swag” factor, meaning the garland won’t be pulled tight but will dip slightly.
First, calculate the actual length of the rope you need. For a 6-foot span with a 15% swag, you need 6 * 1.15 = 6.9 feet of garland (plus extra for the end drops). Total wood width is 30 pieces * 1.5 inches = 45 inches. The total rope length is roughly 83 inches. The “air” space is 83 – 45 = 38 inches. Divide 38 inches by 31 spaces, and you get 1.22 inches per gap.
By marking your rope at exactly 1.22-inch intervals and placing your knots there, you ensure that even when the garland swags, the wood stays perfectly distributed. If you had just guessed, you might have ended up with all the wood bunched in the middle dip, leaving the sides looking bare and the center looking overcrowded.
Final Thoughts
Building a driftwood garland is more than just a weekend craft; it is a way to bring the raw, untamed beauty of the coast into your home with the discipline of a master builder. By moving away from guesswork and embracing the physics of weight and tension, you create something that isn’t just a decoration, but a testament to your own grit and attention to detail.
The math might seem tedious at first, but the result is a piece that hangs with a level of professional polish that stores can’t replicate. It won’t sag, it won’t tilt, and it won’t fail when the seasons change. It is a sturdy, reliable piece of home decor that honors the material it’s made from.
Take your time, measure twice, and don’t be afraid to pull a few knots apart if they aren’t sitting right. The sea didn’t make that wood in a day, and you shouldn’t try to rush the process of turning it into art. Once you’ve mastered these principles, you can apply them to everything from hanging shelves to elaborate garden installations. The laws of gravity are constant—use them to your advantage.
Sources
1 youtube.com (https://www.youtube.com/watch?v=P7MjQrwAsBA) | 2 youtube.com (https://www.youtube.com/watch?v=dKnBqvPfHak) | 3 scribd.com (https://www.scribd.com/document/463017300/Centre-of-Gravity-Pnd) | 4 novausawood.com (https://www.novausawood.com/density-chart-all-species) | 5 scribd.com (https://www.scribd.com/document/689687631/Wood-Density) | 6 johncanningco.com (https://johncanningco.com/density-of-various-wood-species/) | 7 scienceworld.ca (https://www.scienceworld.ca/resource/finding-centre-gravity/)