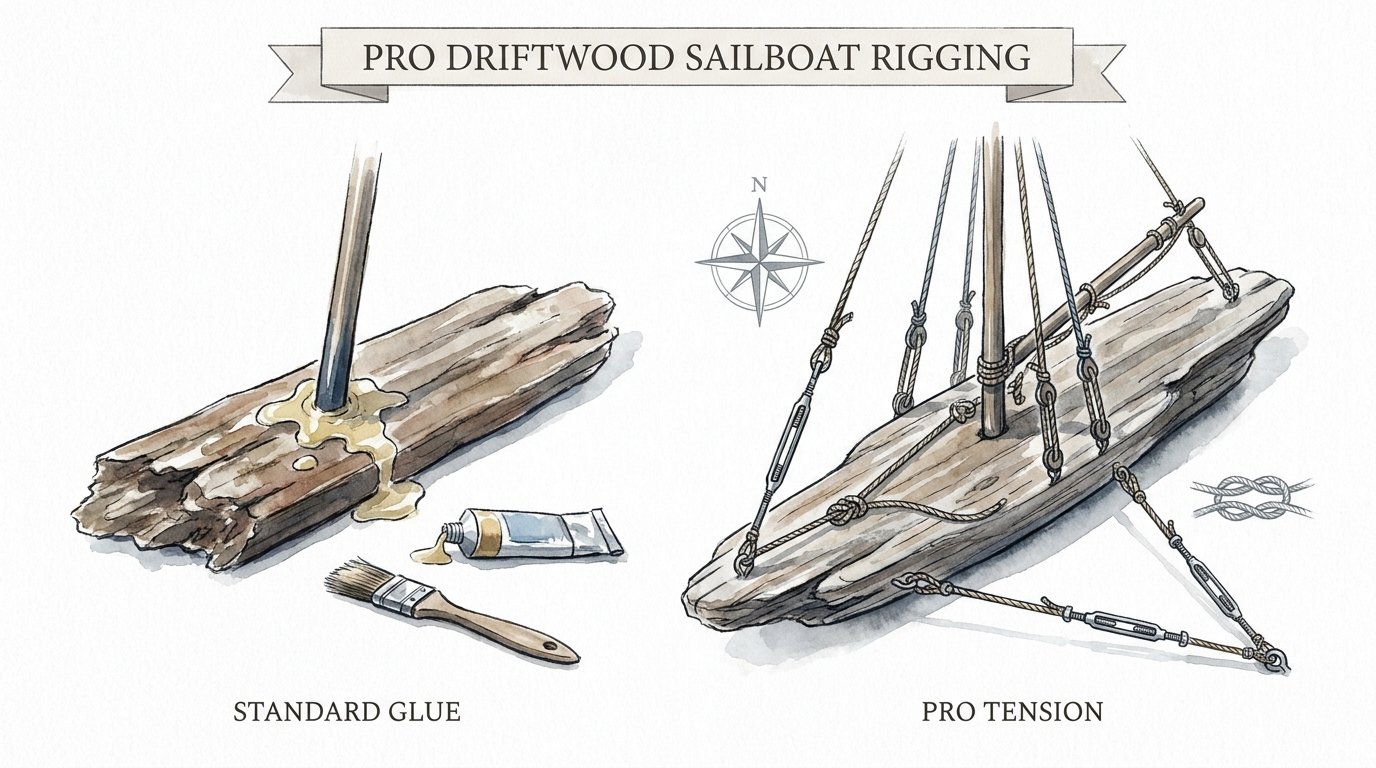
Pro Driftwood Sailboat Rigging
Does your decor look like a craft project, or does it look like it could actually handle a gale? Hot glue is the enemy of authentic coastal art. If you want your driftwood sailboat to command a room, you have to stop ‘sticking’ it together and start ‘rigging’ it like a real captain would.


True maritime art isn’t about how much glitter or blue paint you can slap on a piece of wood. It is about the structural honesty of the vessel. When you look at a professional-grade driftwood sailboat, you aren’t just looking at a pile of beach find; you are looking at a masterclass in tension, physics, and patience.
Pro Driftwood Sailboat Rigging is the difference between a dusty shelf-sitter and a museum-quality centerpiece. It moves beyond the simple “glued-stick-on-a-log” method and embraces the traditional principles of naval architecture. By using real cordage, functional knots, and proper tension, you create a piece that feels alive, as if it is simply waiting for a breeze to catch the canvas.
Pro Driftwood Sailboat Rigging
Pro Driftwood Sailboat Rigging is the application of traditional ship-rigging techniques—standing and running rigging—to the medium of found wood and weathered fabric. In the real world, rigging is the system of ropes, cables, and chains used to support a ship’s masts and control its sails. When applied to driftwood art, it transforms a static sculpture into a dynamic representation of maritime history.
At its core, this method relies on Pro Tension. This means the mast isn’t held up by a glob of adhesive; it is held upright by the balanced pull of shrouds and stays. This mimics the “skeleton” and “muscular system” of a real sailing vessel. The standing rigging acts as the bones, keeping the mast vertical, while the running rigging acts as the muscles, allowing the sails to be raised, lowered, and trimmed.
In real-world maritime environments, rigging is a matter of life and death. On a driftwood model, it is a matter of aesthetic integrity. Using these techniques gives the viewer a sense of scale and realism that hot glue simply cannot replicate. It creates a silhouette that looks purposeful and rugged, much like the pioneer-grit of the sailors who first mastered these lines.
The Foundation: Hull and Mast Selection
Before a single line is cast, you must have an honest hull. Look for driftwood that has been seasoned by the salt and sun. The wood should be dry, dense, and free of soft rot. Many artisans choose to “bake” their driftwood at 250 degrees for approximately two hours to ensure all moisture and hitchhiking pests are removed.
The mast should be a straight, sturdy piece of sun-bleached wood. Pro rigging requires the mast to be “stepped” into the hull. This involves measuring the diameter of your mast stick and drilling a hole into the hull that offers a tight, snug fit. A “tight fit” is essential for structural stability, as the rigging will later apply significant pressure to this point.
While some might use glue to secure the mast into the hole, the pro method relies on the mechanical fit. This allows the mast to stay upright through friction and the eventual downward pressure of the rigging itself. It is a more honest way to build, reflecting the traditional “mast step” found in full-scale wooden boats.
The Mechanics of Rigging: Standing vs. Running
To rig like a professional, you must understand the two primary categories of ship lines. This knowledge allows you to place every cord with purpose rather than just “decorating” the mast with string.
Standing Rigging
Standing rigging is the fixed part of the system. Its sole purpose is to support the mast and keep it from snapping or leaning under the weight of the sails. This includes:
- Shrouds: Lines that run from the masthead down to the sides of the hull. They prevent the mast from swaying left or right.
- Forestay: A line running from the mast to the bow (front) of the boat. It keeps the mast from falling backward.
- Backstay: A line running from the mast to the stern (rear). It keeps the mast from being pulled forward by the wind in the sails.
Running Rigging
Running rigging consists of the lines that move and control the sails. This is where the “art” of the rig comes into play.
- Halyards: The lines used to hoist the sails up the mast.
- Sheets: The lines that control the angle of the sails. When you “trim the sheets,” you are pulling the sail in or letting it out to catch the wind.
- Lifts: Lines used to support the weight of the booms or gaffs.
Materials of the Maritime Artisan
The choice of cordage can make or break the look of your vessel. Standard sewing thread is too thin and lacks the texture of real rope. Hot glue is far too thick and leaves unsightly “strings.” Instead, pros reach for materials that carry their own weight and history.
Waxed Linen or Hemp Cord: These are the gold standards. Waxed thread has the advantage of “grabbing” itself when you tie a knot, preventing the line from slipping under tension. Hemp provides that raw, organic texture that matches the ruggedness of driftwood.
Copper or Brass Wire: Instead of gluing lines directly to the wood, use small-gauge metal wire to create “eyebolts” or “cleats.” Bending a small piece of brass wire into a “U” shape and pressing it into the wood creates an authentic anchor point for your lines. You can also use tiny screw-eye hooks found in jewelry-making kits for a more refined look.
Canvas and Muslin: For sails, avoid synthetic fabrics. Choose a heavy muslin or a light canvas. To achieve a weathered, “hundred-years-at-sea” look, many artists soak their fabric in a strong solution of black tea or coffee. This imparts a warm, aged patina that complements the grey tones of driftwood.
The Essential Knots for Authenticity
A professional rig is only as good as the knots that hold it. If you use a simple “granny knot,” the tension will eventually cause it to slip, leaving your rigging saggy and unprofessional. Mastering a few key nautical knots is non-negotiable for the serious practitioner.
The Bowline: The King of Knots
The bowline is used to create a fixed loop at the end of a line. It is incredibly strong and, crucially, will not slip under load but remains easy to untie. It is perfect for attaching a halyard to the “head” of a sail.
The Clove Hitch
This is the standard knot for securing a line to a spar, such as the mast or the boom. It is quick to tie and provides a clean, professional finish. It is often used to secure the shrouds to the mast before they are led down to the hull.
The Figure-Eight Knot
Also known as a stopper knot, this prevents a line from slipping through an eyelet or a block. If your rigging passes through a hole in the wood, a figure-eight knot on the other side ensures it stays put.
The Cleat Hitch
If you have installed small brass “cleats” on your hull, the cleat hitch is the proper way to tie off your running rigging. It looks incredibly authentic and allows you to adjust the tension of the sails even after the build is finished.
The Weathering Process: Adding the Patina of Time
Fresh-cut fabric and clean cordage will ruin the illusion of a seafaring relic. Weathering is an essential step in Pro Driftwood Sailboat Rigging. It requires a balanced hand and a respect for natural decay.
After staining your sails with tea, consider using fine-grit sandpaper to fray the edges. Authentic sails endure immense friction; the edges should look slightly “worried.” Some artisans go as far as using a small amount of diluted grey paint to simulate salt-staining or “sun-bleaching” on the center of the sail panels.
For the wood itself, if it isn’t weathered enough, a wash of steel wool soaked in vinegar can create a chemical reaction that “greys” the wood instantly, mimicking years of salt-air exposure. This ensures the hull, mast, and sails all look like they belong to the same era.
Benefits of the Pro Tension Approach
Choosing the Pro Tension method over the Standard Glue approach offers several measurable advantages for the artist and the collector.
- Structural Integrity: A tensioned rig is surprisingly strong. Because the forces are balanced, the mast is less likely to lean or snap over time as the wood naturally shifts with humidity.
- Visual Depth: Real lines create shadows. When lines are spaced properly and held taut, they create a 3-D lattice that draws the eye in. Glued lines often look flat and messy.
- Tactile Quality: There is a weight and “snap” to a properly rigged boat. When you touch a line, it should feel firm, not flimsy. This gives the piece a sense of physical presence.
- Authenticity: For those who know a bit about sailing, a properly rigged model is a sign of respect for the craft. It stands up to scrutiny and tells a more compelling story of the sea.
Common Mistakes and How to Avoid Them
The most frequent error in driftwood sailboat building is The Glue Trap. Beginners often try to solve every structural problem with a hot glue gun. Not only does this look cheap, but hot glue also degrades over time, especially in sunlight. It turns yellow and brittle, eventually causing the sails to peel off.
Another common pitfall is Scaling Issues. Using rope that is too thick for the size of the hull makes the boat look like a toy. As a general rule, the higher you go up the mast, the thinner your lines should be. Use a slightly thicker cord for the main shrouds and a very fine thread for the lanyards and lashings.
Finally, avoid Static Rigging. A boat looks best when the sails appear to be catching a breeze. If your sails are pinned flat against the mast, the piece will look lifeless. Use thin copper wire hidden in the hem of the sail to “shape” it, giving it a gentle curve as if it were under pressure from the wind.
Limitations and Realistic Constraints
While Pro Driftwood Sailboat Rigging produces superior results, it is not without its challenges. This method is significantly more time-consuming than basic assembly. A single sloop can take ten to fifteen hours of meticulous knot-tying and tensioning.
Furthermore, driftwood is an unpredictable medium. Unlike kit-built models with pre-drilled holes, you are working with irregular shapes and varying wood densities. You may find that a certain piece of wood is too brittle to hold an eyebolt, requiring you to rethink your anchor points.
Environmental factors also play a role. Natural fibers like linen and hemp will expand and contract with changes in humidity. A rig that is perfectly tight in a dry workshop might go slack in a humid coastal home. This is why using “mechanical” tension—lines that can be adjusted or re-tightened—is a hallmark of the pro approach.
Comparison: Standard Glue vs. Pro Tension
To understand the value of this method, it helps to compare the two most common ways people build these pieces.
| Feature | Standard Glue Method | Pro Tension Method |
|---|---|---|
| Primary Fastener | Hot Glue / Super Glue | Mechanical Tension / Knots |
| Structural Support | Adhesive Bond | Balanced Counter-Tension |
| Visual Realism | Low (Crafty) | High (Museum Quality) |
| Longevity | Prone to peeling/yellowing | Decades of structural stability |
| Skill Level | Beginner | Advanced Beginner to Professional |
| Time Investment | 30 – 60 minutes | 10 – 20 hours |
Practical Tips for Immediate Application
If you are ready to start your first pro-rigged vessel, these best practices will save you hours of frustration and wasted material.
- Use a Pin Vise: Do not use a heavy power drill for the small hardware holes. A hand-operated pin vise gives you the control needed to drill into delicate driftwood without splitting it.
- Fray Check is Your Friend: After tying a knot, apply a tiny drop of “Fray Check” or diluted clear glue to the knot itself. This locks the fibers in place without creating a visible glob of glue.
- Work from the Inside Out: Always rig your central lines (halyards) before your outer support lines (shrouds). This prevents your hands from getting tangled in the outer rigging while you work on the details near the mast.
- Tension Gradually: Do not pull one line as tight as possible immediately. Tighten each stay a little bit at a time, moving around the boat to ensure the mast stays perfectly vertical throughout the process.
Advanced Considerations for the Serious Artisan
For those who want to push the boundaries of the craft, consider adding functional blocks and deadeyes. While you can buy these for model kits, making them out of small bits of darker wood or even hardened clay adds another layer of “collected” charm.
You might also experiment with Moving Booms. Instead of fixing the horizontal spars to the mast with glue, use a “parrel” (a ring of beads or cord) that allows the boom to pivot. This adds a level of realism that is rarely seen in driftwood art and allows you to “re-trim” the sails depending on how you want to display the piece.
Finally, think about the Base Mounting. A pro-rigged boat shouldn’t just sit on its hull. Consider mounting it on a piece of blackened steel or a contrasting piece of hardwood using hidden dowels. This elevates the work from a “beach find” to a formal sculpture.
Example Scenario: Building the ‘Gale-Ready’ Sloop
Imagine you have found a stunning 18-inch piece of grey driftwood hull and a long, tapered cedar branch for a mast. You start by baking the wood and drilling a 1/2-inch deep mast step.
Instead of gluing the sail to the mast, you create a “gaff rig.” You sew a bolt rope into the luff of your tea-stained canvas sail. You use a series of “marlin hitches” to lace the sail to the gaff (top spar) and the boom (bottom spar).
Next, you install four copper eyebolts into the hull. You run your shrouds from the masthead, through the eyebolts, and tie them off with a series of half-hitches. As you tighten the final backstay, you feel the mast become rock-solid. There is no glue, yet the structure feels like it could survive a trip across the harbor. This is the moment a craft project becomes art.
Final Thoughts
Pro Driftwood Sailboat Rigging is an exercise in structural honesty. It rejects the shortcuts of the modern craft aisle in favor of the timeless principles of the sea. By focusing on tension, authentic materials, and traditional knots, you create something that carries the weight of history and the spirit of the pioneer-grit that built the original vessels.
It is a slow process, one that requires steady hands and a patient mind. However, the result is a piece of art that commands respect. It doesn’t just look like a boat; it functions like one in miniature. Every line has a purpose, every knot has a name, and every sail tells a story of the wind it was built to catch.
Start with a single line. Learn the bowline until you can tie it with your eyes closed. Find a piece of wood that has a story to tell. By the time you tighten the last sheet on your first pro-rigged boat, you won’t just have a new piece of decor—you’ll have a deeper understanding of the ancient bond between wood, rope, and the sea.
Sources
1 fawcettboat.com (https://www.fawcettboat.com/blogs/articles/the-ultimate-guide-to-sailing-hardware-and-rigging) | 2 nauticed.org (https://sailing-blog.nauticed.org/rigging/) | 3 wordpress.com (https://woodandrope.wordpress.com/2012/05/20/driftwood-sailboat-tutorial-sail-away/) | 4 gcwmultimedia.com (https://www.gcwmultimedia.com/diy-driftwood-sailboat/) | 5 rachelteodoro.com (https://www.rachelteodoro.com/2010/05/driftwood-sailboat.html) | 6 youtube.com (https://www.youtube.com/watch?v=1fRAKC-CoEE) | 7 suburbanshipmodeler.com (https://suburbanshipmodeler.com/2017/06/23/rigging-begins/) | 8 glen-l.com (https://www.glen-l.com/rigging-small-sailboats-part-1/) | 9 sailingeurybia.com (https://sailingeurybia.com/diy-rerigging/) | 10 anydaycharter.com (https://anydaycharter.com/el/news/mastering-essential-sailing-knots-bowline-clove-hitch-and-figure-eight) | 11 boats.com (https://www.boats.com/how-to/8-marine-knots-every-boater-should-know/)