• Skip to main content
  • Skip to primary sidebar
  • Terms and Conditions
  • Privacy Policy
  • Contact

Driftwood 4 Us

Just About Driftwood

crafts

DIY Driftwood Xmas Tree

September 25, 2024 by admin

Have you ever thought about giving your holiday decor a unique, natural twist? If so, making a DIY Driftwood Xmas Tree might be the perfect project for you. This guide will walk you through the steps needed to create a stunning and eco-friendly piece that will become the centerpiece of your holiday celebrations.

What is a Driftwood Xmas Tree?

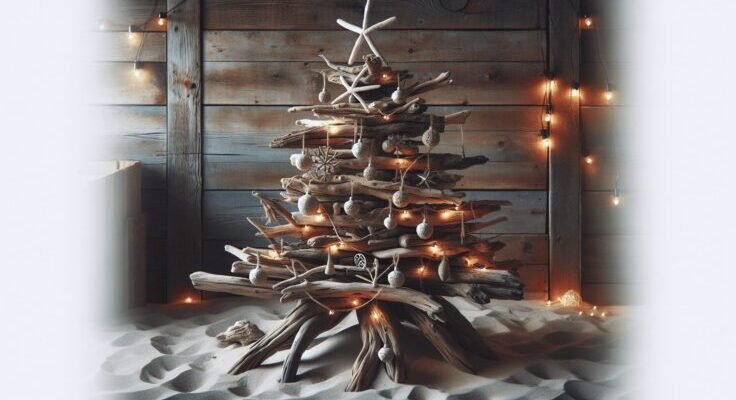
A Driftwood Xmas Tree is a creative and eco-friendly alternative to traditional Christmas trees. Instead of the usual green pine or fir, this tree is made from pieces of driftwood collected from beaches or rivers. It not only adds a rustic charm to your festivities but also gives you an opportunity to recycle and repurpose natural materials.

Why Choose a Driftwood Xmas Tree?

Eco-friendly

Using driftwood helps reduce your carbon footprint. Traditional Christmas trees often require lots of water and pesticides to grow, while artificial ones are made from plastic and other non-renewable resources. Driftwood trees make use of naturally fallen wood, reducing waste.

Unique and Customizable

Each piece of driftwood is unique, making your tree one-of-a-kind. You can customize the size, shape, and decorations to fit your aesthetic preferences and available space.

Cost-effective

Gathering driftwood is usually free, making this a budget-friendly project. The other materials needed are generally inexpensive and easy to find.

Materials You’ll Need

Here’s a table to simplify the list of materials you’ll need to gather for this project:

MaterialPurposeComments
DriftwoodMain structure of the treeGather varying lengths and widths
DrillTo make holes in the woodA variable-speed cordless drill works best
ScrewsTo secure the pieces togetherStainless steel is recommended
SandpaperTo smooth out rough edgesMedium to fine grit
SawTo cut the driftwood to desired sizesA hand saw or miter saw works well
String or WireTo tie and secure the branchesOptional, for extra support
BaseTo stabilize the treeYou can use a wooden block or a pottery base

DIY Driftwood Xmas Tree

Collecting Driftwood

Where to Look

Driftwood can often be found along beaches, riverbanks, or lakeshores. It’s best to look after a storm, as the water tends to wash up new pieces. Just make sure you check local regulations regarding the collection of natural materials, as some areas may have restrictions.

Choosing the Right Pieces

Select pieces that vary in length and diameter. Longer, thicker pieces will form the main trunk of your tree, while thinner, shorter pieces will make the branches. Look for wood that is dry and free of rot, bugs, or mold.

Preparing the Driftwood

Cleaning

Rinse the driftwood thoroughly with fresh water to remove any salt, sand, or dirt. If the pieces are particularly dirty, you can scrub them with a brush and a mild detergent. Let them dry completely before moving on to the next step.

Sanding

Use sandpaper to smooth out any rough edges or splinters. This will make the wood easier to handle and give your finished tree a more polished look.

Building the Base

The base is crucial for providing stability to your driftwood Christmas tree. You can use a wooden block, a pot filled with pebbles, or any other sturdy material that can hold the weight of the tree.

Assembling the Base

  1. Drill a Hole in the Base: Use a drill to make a hole in the center of your base. The diameter should be slightly larger than the width of your thickest driftwood piece.
  2. Insert the Tree Trunk: Fit the thickest piece of driftwood into the hole. Secure it with screws from the bottom of the base for added stability.

DIY Driftwood Xmas Tree

Creating the Tree Structure

Arranging the Branches

  1. Sort the Driftwood: Lay out your pieces of driftwood from longest to shortest.
  2. Mark the Trunk: Starting from the bottom of the trunk, mark where each branch will be placed. The distances can be evenly spaced or varied for a more natural appearance.

Drilling and Securing

  1. Drill Holes: Drill holes through the trunk where you marked earlier.
  2. Insert the Branches: Fit each branch piece through the drilled holes, securing them with screws or string as needed.

Additional Support

If some branches feel loose, you can tie them to the trunk with thin wire or strong string to ensure they stay in place.

Decorating Your Driftwood Xmas Tree

Natural Decorations

You can keep the natural, rustic look by adding simple decorations like pinecones, dried oranges, or homemade ornaments. String lights also add a cozy, festive glow to your tree.

Traditional Ornaments

If you prefer a more traditional look, you can use typical Christmas decorations like baubles, tinsel, and ribbons. Just make sure they’re not too heavy, as driftwood branches may not support a lot of weight.

Custom Touches

This is your tree, so feel free to get creative! Paint the driftwood in festive colors, add glitter, or hang small personal items that have sentimental value.

Benefits of a Driftwood Xmas Tree

Unique Aesthetic

Driftwood Xmas Trees offer a unique aesthetic that stands apart from the traditional green, piney trees. The natural shapes and textures of the driftwood pieces add a coastal, rustic charm to your holiday decor.

Sustainability

By repurposing natural materials, you’re making an eco-friendly choice that reduces waste. This is especially significant during a season that often generates a lot of waste with disposable wrapping papers, packaging, and non-recyclable Christmas trees.

Easy Maintenance

Driftwood trees are far easier to maintain than their pine or fir counterparts. You won’t have to worry about watering the tree, sweeping up falling needles, or dealing with sap.

Storage and Reusability

Once the holiday season is over, you can easily disassemble your driftwood Xmas tree and store it for next year. This makes it a durable and reusable decoration.

Common Mistakes and How to Avoid Them

Mistake: Using Wet Driftwood

Solution: Always ensure that the driftwood is completely dry before you begin the project. Wet wood can rot or warp over time, compromising the stability of your tree.

Mistake: Overloading the Tree with Decorations

Solution: Keep the decorations to a minimum or use lightweight items. Driftwood branches can only support so much weight before they start to droop or break.

Mistake: Inadequate Base Support

Solution: Make sure your base is heavy and sturdy enough to support the whole structure. If needed, add extra weights or use a wider base for additional stability.

Troubleshooting

Leaning Tree

If your tree starts to lean, check the base and trunk for stability. You may need to add more weight to the base or use longer screws to secure the trunk better.

Loose Branches

If any branches feel loose or wobbly, you can wrap a bit of wire around the junction where the branch meets the trunk for additional support.

Unstable Base

If the base doesn’t seem heavy or broad enough, consider bracing it with additional materials or using a larger, heavier base.

Tips for Success

Planning Your Design

Take some time to sketch out your design or arrange the driftwood pieces loosely on the floor before you start drilling. This will give you an idea of how your completed tree will look and make it easier to spot any potential issues.

Safety First

Always wear protective gear like gloves and safety glasses when using power tools. Driftwood can have sharp edges and using a drill or saw improperly can lead to injuries.

Involving the Family

This DIY project can be a fun activity for the whole family. Kids can help collect driftwood, sand the pieces, and even assist with some of the safer decorating tasks.

.## Additional Ideas for Themed Driftwood Xmas Trees

Beach-Themed Tree

Use seashells, starfish, and nautical-themed ornaments to create a beach-inspired Christmas tree. This can be a wonderful way to remember fun summer vacations or simply to create a warm, coastal vibe.

Woodland Tree

If you’re a nature lover, consider decorating your driftwood tree with elements found in the forest. Pinecones, moss, small animal figurines, and wooden ornaments can bring a touch of the great outdoors into your home.

Minimalist Tree

For those who prefer simplicity, a minimalist driftwood Christmas tree can be a beautiful and elegant option. Use white lights and a few simple, monochromatic decorations to keep the focus on the natural beauty of the driftwood.

Resources and Tutorials

Online Tutorials

There are numerous video tutorials available online that can provide visual guidance and additional tips. Websites like YouTube and Pinterest are excellent places to start.

Driftwood Crafting Communities

Join online forums or social media groups dedicated to driftwood crafts. These communities are great for sharing ideas, troubleshooting issues, and finding inspiration.

Books and Magazines

Look for crafting books and magazines that focus on DIY projects and natural decor. These can offer detailed instructions, beautiful images, and expert tips to help you perfect your driftwood Xmas tree.

Conclusion

The DIY Driftwood Xmas Tree is more than just a holiday decoration; it’s a statement of sustainability and creativity. By choosing to create this unique tree, you’re not only adding a beautiful and personalized element to your holiday decor but also making an environmentally responsible choice. Whether you go for a rustic, natural look or jazz it up with elaborate ornaments, your driftwood Xmas tree is sure to be a hit with family and friends.

So, gather your materials, roll up those sleeves, and start creating a festive masterpiece you’ll be proud to display year after year.

Filed Under: Driftwood Ideas Tagged With: christmas tree, crafts, Driftwood, Handmade, Holiday decor

Driftwood Wind Chime Diy

September 22, 2024 by admin

Have you ever found yourself walking along the beach, collecting beautiful pieces of driftwood, and wondering what creative project might be worthy of their natural beauty? Driftwood has a rustic, weathered charm that’s perfect for various DIY projects. One particularly enchanting project you can try is crafting your own driftwood wind chime. Not only is this a great way to bring a piece of the beach back to your home, but the gentle sounds created by a wind chime can add a tranquil atmosphere to your outdoor space.

Driftwood Wind Chime Diy

Why Create a Driftwood Wind Chime?

Driftwood wind chimes bring a serene and natural element to any outdoor or indoor space. The soft clinking of wood against wood or metal can be incredibly soothing. Plus, making one yourself is a fun and rewarding project. Whether you’re looking to add a personal touch to your garden, create a unique indoor decoration, or give a handmade gift, this DIY project is a great choice. It allows you to unleash your creativity while utilizing found materials from nature.

Gathering Your Materials

Before you start crafting, you’ll need to gather all the necessary materials. Here’s a list of what you’ll need:

MaterialDescription
DriftwoodCollect pieces of various shapes and sizes from the beach or a local nature area.
DrillA hand drill or power drill with small drill bits for making holes in the driftwood.
Fishing Line or TwineStrong and transparent fishing line or twine to hang the pieces together.
Metal or Glass BeadsOptional, for added decorative elements and sound variety.
Metal Chimes or BellsOptional, for different sounds in your wind chime.
ScissorsFor cutting the fishing line or twine.
SandpaperTo smooth rough edges on the driftwood pieces (if necessary).
Hooks or Hanging HardwareFor attaching the wind chime to a porch, tree, or other structure.

Selecting Your Driftwood

The driftwood is the star of your wind chime, so take your time choosing pieces that vary in size and shape. Driftwood that’s at least 12 inches in length is ideal for the top piece. For the chimes, select smaller pieces around 4 to 6 inches long.

Additional Decor

Metal or glass beads can add a splash of color and an extra musical element to your wind chime. Similarly, small bells or metal chimes can be strung in to offer a pleasant contrast to the soft wooden sounds of the driftwood.

Preparing Your Driftwood

Once you’ve gathered all your materials, the next step is preparing your driftwood.

Cleaning the Driftwood

Begin by thoroughly cleaning the driftwood pieces. Soak them in a mix of water and a bit of bleach to eliminate any insects or salt that might still be attached. Rinse them off well and let them dry completely.

Sanding

If your driftwood has any sharp edges or rough areas, use sandpaper to smooth these out. This ensures that the wind chime will be safe to handle and gives a slightly polished look to the wood.

Drilling Holes

Carefully drill small holes in each piece of driftwood. For the top piece, drill multiple holes where you plan to attach the smaller pieces. For the smaller pieces, drill one hole at the top. Use a small bit to avoid splitting the wood.

Assembling the Wind Chime

Now comes the fun part – putting it all together!

Stringing the Pieces

  1. Measure Your Fishing Line or Twine: Cut lengths of fishing line or twine to your desired length. Remember to account for tying knots.

  2. Attach the Driftwood: Start by threading a piece of line through a hole in the top piece of driftwood and tying a firm knot to keep it in place. Do this for all the holes along the top piece.

  3. Add Smaller Pieces: Begin attaching the smaller driftwood pieces to the lengths of line hanging from your top piece. You can add beads or bells between pieces for additional decoration and sound. Tie a knot underneath each piece of driftwood to keep it secured.

  4. Final Adjustments: Once all pieces are attached, hold up your wind chime and check the balance. Adjust the length of the strings and positioning of the pieces if necessary to ensure even spacing and level hanging.

Driftwood Wind Chime Diy

Finishing Touches

Setting Up the Hanging Hardware

To hang your wind chime, you’ll need to attach a hook or other hanging hardware to the top piece of driftwood.

  1. Finding the Right Spot: Ensure your chosen location has enough space for the wind chime to move freely without hitting nearby objects.

  2. Attaching the Hook: Screw a small hook into the center of the top driftwood piece, or use strong glue to attach your chosen hanging hardware securely.

Testing

Before you consider your wind chime complete, give it a trial run by hanging it in its intended spot. Listen to the sounds it makes and observe how it moves. Make any further adjustments to string lengths or positions as necessary.

Benefits of Making a Driftwood Wind Chime

Creating your own driftwood wind chime is more than just a creative craft; it provides several personal and environmental benefits.

Personal Enrichment

Engaging in a hands-on project like this can be incredibly fulfilling. It’s a perfect way to spend a few hours away from screens and technology. Plus, the sense of accomplishment you’ll feel each time you hear the chime ringing in the wind is invaluable.

Environmentally Friendly

This DIY project makes excellent use of naturally sourced and recyclable materials. By gathering driftwood and other natural elements, you’re repurposing materials that may otherwise go unused.

Economic Savings

Creating your own wind chime saves money compared to purchasing one from a store. Plus, it allows you to craft something totally unique and tailored to your aesthetic preferences.

Tips for an Exceptional Driftwood Wind Chime

For a wind chime that truly stands out, consider these additional tips:

Experiment with Different Materials

Don’t limit yourself to just driftwood and beads. Consider incorporating:

  • Colored sea glass
  • Shells
  • Metal pieces
  • Reclaimed wood or metal objects

Seasonal Variations

Build wind chimes that reflect different seasons or holidays. For instance:

  • Use red and green beads for a Christmas-themed wind chime.
  • Incorporate pastel colors for an Easter-themed piece.
  • Use autumn leaves and earthy tones for a fall variation.

Gift Ideas

A handmade driftwood wind chime makes a heartfelt gift. Customize it to fit the recipient’s style:

  • Use their favorite colors.
  • Incorporate initials or meaningful symbols.
  • Create themes that match their personal interests or home decor.

Troubleshooting Common Problems

Even the best DIY crafts can run into a few snags. Here are some common issues and how to resolve them.

Pieces Not Hanging Straight

If pieces of driftwood aren’t hanging evenly, double-check your knots. Ensure they are tight and positioned correctly. Additionally, verify that the holes are drilled straight and centered.

Imbalanced Wind Chime

An imbalanced wind chime can affect both the look and sound. Ensure that the string lengths are correct and evenly spaced out. Adjust the weights by adding or removing beads, or repositioning the driftwood pieces.

Lack of Sound

If your wind chime isn’t producing the desired sound, you may need to change the positioning or the materials. Ensure the pieces are close enough to touch when the wind blows. Experiment with adding metal or glass components for a more resonant sound.

Conclusion

Crafting a driftwood wind chime is a wonderful way to connect with nature, spend some quality creative time, and produce a beautiful, personalized item for your home or garden. Not only does it offer a soothing visual and auditory experience, but it also gives a sense of pride and accomplishment each time you hear it singing in the breeze. Whether you’re gifting it or enjoying it yourself, a driftwood wind chime is an exquisite reminder of the sea and the beauty of nature.

Filed Under: Driftwood Ideas Tagged With: crafts, DIY, Driftwood, home decor, Wind Chime

Driftwood Stain

September 4, 2024 by admin

Have you ever wondered about the charm and allure of driftwood stain? This unique finish is known for its weathered, rustic appearance that can transform ordinary wood into something truly special. A driftwood stain imparts a timeless, natural look that suits a variety of styles, whether it’s coastal, farmhouse, or even industrial.

What is Driftwood Stain?

Driftwood stain is a type of wood finish designed to mimic the look of naturally weathered wood found along the shoreline. The finish gives the wood a grayish tone, often with hints of blue or brown, to emulate the effects of sun, salt, and water exposure. This stain is a popular choice for those looking to add a touch of nature’s rustic beauty to their furnishings, decor, or woodworking projects.

Why Choose Driftwood Stain?

There are many reasons why you might opt for a driftwood finish. Here are just a few:

  • Aesthetic Appeal: Driftwood stain brings a natural, rustic charm to furniture and home decor, making it a popular choice for various interior styles.
  • Versatility: It complements a range of design themes, whether you’re going for a coastal look, a modern farmhouse vibe, or an industrial aesthetic.
  • Conceal Imperfections: The distressed look can also help to conceal scratches and other imperfections, making it ideal for pieces that see a lot of use.

Materials Needed for Applying Driftwood Stain

To achieve the perfect driftwood finish, you’ll need a few basic items:

MaterialsPurpose
SandpaperTo prep the surface by smoothing rough areas and opening wood grain.
Driftwood stainThe key ingredient for achieving the driftwood look.
Paintbrush or ragFor applying the stain evenly across the wood surface.
SealerTo protect the finished piece and ensure durability.
Drop clothTo keep your work space clean.

Driftwood Stain

Steps to Apply Driftwood Stain

Preparation

  1. Choose the Right Wood: Softwoods like pine or cedar often yield the best results with driftwood stain. However, hardwoods can be used but may require more prep work.
  2. Sand the Wood: Begin by sanding the wood surface to remove any previous finishes and to smooth out any rough patches. Use coarse sandpaper (around 100 grit) to start, then move to a finer grit (220) for a smooth finish.

Applying the Stain

  1. Choose Your Staining Method: Decide whether you will use a brush or a rag to apply the stain. Brushes provide more control for even application, while rags can offer a softer, more diffused finish.
  2. Apply the Stain: Start by applying a thin coat of driftwood stain. Work in small sections, applying the stain along the grain of the wood. If using a brush, ensure even coverage by working out any visible streaks.
  3. Wipe Excess Stain: After a few minutes, use a clean rag to wipe away any excess stain. This step helps to highlight the natural wood grain and ensures an even look.

Finishing Touches

  1. Allow to Dry: Let the stain dry completely, typically 24 hours, before proceeding to the next step.
  2. Apply a Sealer: Once dry, apply a clear sealer to protect the wood and enhance the look of the finished piece. This could be a polyurethane, wax, or oil finish, depending on your preference for gloss and durability.

Tips for a Better Driftwood Finish

Experiment with Layers

Achieving the perfect driftwood look sometimes requires layering different shades. You can start with a lighter base and add layers of darker stains to create depth. Don’t be afraid to mix and match to get the exact hue you desire.

Test First

Always practice on a scrap piece of wood before committing to your final piece. This will give you a sense of how the stain behaves and what the final color will look like.

Consider Multi-Color Staining

Using more than one color can provide a richer, more varied appearance. For instance, you might combine a lighter driftwood base with darker accent stains to give a more dramatic, aged look.

Driftwood Stain

Photo Realistic Images for Pinterest

Creating the perfect, photo-realistic images to share on Pinterest can showcase the beauty and versatility of driftwood stain. To achieve the best results:

Quality Setup

  1. Lighting: Natural light is your best friend. Place your piece near a window or take it outside to capture it in daylight.
  2. Backdrop: Use a simple, neutral backdrop to keep the focus on the piece. White or light gray works well.

Photo Composition

  1. Angles: Shoot from multiple angles to highlight the details of the wood grain and the overall effect of the stain.
  2. Close-ups: Include close-up shots that showcase the texture and intricate details of the finish.

Image Requirements

Make sure your images are 1000×1500 pixels. This size is perfect for Pinterest and will help ensure your images look great on the platform.

Frequently Asked Questions About Driftwood Stain

Can I Make My Own Driftwood Stain?

Yes, you can create your own driftwood stain by mixing various stains and paints. A popular method involves using a combination of gray and brown stains. Some DIY enthusiasts even use a diluted mix of vinegar and steel wool to achieve a naturally aged look.

Is Driftwood Stain Safe for Outdoor Use?

While driftwood stain can be used on outdoor furniture, it is essential to apply a protective sealer to withstand the elements. Look for a sealer designed for outdoor use to ensure longevity.

How Do I Maintain a Driftwood-Stained Piece?

Maintenance is fairly simple. Regularly dust and clean the piece with a damp cloth. Avoid harsh chemicals, as they can damage the finish. Re-seal the piece periodically to maintain its protective layer, especially for items exposed to heavy use or outdoor conditions.

Creative Uses for Driftwood Stain

Furniture

One of the most common uses for driftwood stain is on furniture. Whether it’s a coffee table, dining set, or bookshelf, this finish can add character and a rustic touch to any room.

Home Decor

Driftwood stain works wonderfully on smaller decor items like picture frames, mirror frames, and signs. It can give these items a hand-crafted, timeless look.

Accent Walls

Consider using driftwood stain on a wood-paneled accent wall. This can create a stunning focal point in living rooms, bedrooms, or even bathrooms.

DIY Projects

If you love DIY projects, driftwood stain is a fantastic way to elevate your creations. Think about coat racks, shelving units, or even headboards. The possibilities are limitless!

Conclusion

Driftwood stain is a versatile and beautiful finish that adds a unique rustic charm to any wood surface. Whether you’re restoring an old piece of furniture or starting a new DIY project, this stain can help you achieve a timeless, weathered look. By following the steps outlined above, you can apply driftwood stain with confidence, creating stunning results you’ll be proud to show off. Plus, your photo-realistic images on Pinterest will showcase your handiwork, inspiring others to embrace the driftwood trend.

So, are you ready to bring the beauty of the shore into your home with driftwood stain? Grab your materials and get started on your next wood finishing project. The possibilities are as endless as your creativity!

Filed Under: Driftwood Ideas Tagged With: crafts, Driftwood, home decor, staining, Woodworking

Driftwood Signs

September 4, 2024 by admin

Have you ever considered adding a charming rustic touch to your home, garden, or business with driftwood signs? Driftwood signs are a beautiful way to showcase your creativity while incorporating the natural beauty of weathered wood. They evoke feelings of tranquility and a connection to nature, making them a popular choice for decorating spaces both indoors and outdoors.

What is Driftwood?

Driftwood refers to wood that has been washed onto shore by the action of winds, tides, or waves. It often has a smooth, weather-beaten surface after being subjected to the elements of nature for a long period, giving it a unique and organic appearance. Driftwood can come from a variety of sources, including trees, branches, or even remnants of wooden boats.

Types of Driftwood

Driftwood can vary widely in its characteristics based on its source and the environmental conditions it has endured. Below are different types of driftwood you may encounter:

TypeCharacteristics
HardwoodDense, strong, and often darker in color
SoftwoodLighter in weight, color, and less dense
Lake DriftwoodUsually softer due to prolonged water exposure
Ocean DriftwoodOften polished and smooth due to tidal action

Why Choose Driftwood Signs?

Driftwood signs add a unique, rustic charm that can’t be replicated by synthetic or new wood materials. Their weathered appearance adds character to any space, and each piece of driftwood is unique, ensuring that no two signs are the same. They also offer an eco-friendly option for decor, as they utilize reclaimed materials that have been naturally processed by the environment.

Benefits of Driftwood Signs

BenefitDescription
Eco-FriendlyUses reclaimed natural materials, reducing waste
Unique DesignEach piece of driftwood has its own unique shape, texture, and color
VersatileSuitable for various environments, from coastal homes to urban gardens
DurableNaturally resistant to the elements, making it ideal for both indoor and outdoor use

Driftwood Signs

How to Create Driftwood Signs

Creating your own driftwood sign can be a rewarding project that allows you to personalize your decor in a meaningful way. Whether you’re looking to add a welcome sign to your front door or a motivational quote to your living room, the possibilities are endless.

Materials You’ll Need

To get started, gather the following materials:

  • Pieces of driftwood
  • Sandpaper
  • Paint (acrylic or outdoor paint)
  • Brushes
  • Stencils (optional)
  • Sealer (optional, for outdoor use)
  • Hanging accessories (hooks, twine, etc.)

Step-by-Step Guide

  1. Select Your Driftwood: Choose pieces of driftwood that fit the size and shape you need for your sign. Ensure the wood is dry and free from any marine debris.

  2. Prepare the Wood: Clean the driftwood by brushing off any loose particles. Lightly sand the surface to remove splinters and create a smooth area for painting.

  3. Design Your Sign: Plan what you want your sign to say. You can use stencils for precision or freehand your design if you prefer a more rustic look.

  4. Paint Your Sign: Use acrylic or outdoor paint to apply your design. Multiple coats may be needed for bright colors.

  5. Seal Your Sign: If your driftwood sign will be placed outdoors, apply a wood sealer to protect it from the elements.

  6. Attach Hanging Accessories: Depending on where you’ll display your sign, attach hooks, twine, or other hanging accessories.

Creating Pinterest-Ready Images of Driftwood Signs

Sharing your driftwood sign creation on Pinterest can inspire others and showcase your work. Here’s how you can generate photo-realistic images for Pinterest:

Photography Tips

  1. Lighting: Use natural light wherever possible to highlight the texture and color of the driftwood.
  2. Background: Choose a rustic or neutral background that complements the style of your sign.
  3. Composition: Focus on the angles that best showcase your artwork. Close-up shots can highlight details, while wider shots can show context.

Image Editing Tools

Use tools like Adobe Photoshop, Canva, or other photo editing software to enhance your images. You can adjust lighting, contrast, and add text overlays to make your images Pinterest-worthy.

Optimal Image Size

Pinterest images should ideally be vertical, with a recommended size of 1000×1500 pixels. This ensures your images fit well within the Pinterest feed, making them more likely to be pinned and shared by others.

Driftwood Signs

Popular Uses for Driftwood Signs

Driftwood signs are incredibly versatile and can be tailored to suit many different environments and purposes. Here are a few popular uses:

Home Decor

Driftwood signs can add a natural, rustic element to your home decor. Use them to display family names, inspirational quotes, or welcome messages. They work well in living rooms, entryways, and even bathrooms.

Garden Decor

Enhance your garden with driftwood signs that label different plants, welcome guests, or add whimsical touches to your outdoor space. They blend seamlessly with nature and add an organic feel to your garden.

Business Signage

For businesses, driftwood signs can set you apart with their unique, handcrafted appearance. Use them for shop names, directional signs, or menu boards in cafés and restaurants, especially those with a coastal or rustic theme.

Wedding Decor

Driftwood signs are a popular choice for wedding decor, adding a touch of romance and natural beauty. They can be used to direct guests, mark seating arrangements, or display the couple’s names and wedding date.

Preserving and Maintaining Driftwood Signs

To ensure your driftwood sign retains its beauty over time, follow these maintenance tips:

Indoor Use

For indoor signs, the primary concern is dust and dirt. Regularly wipe your sign with a dry cloth. Avoid using water or cleaning solutions which could damage the paint or wood.

Outdoor Use

Outdoor signs will face more harsh conditions. Apply a wood sealer annually to protect against moisture and UV rays. If your sign is exposed to extreme weather, consider placing it in a more sheltered area.

Where to Find Driftwood

If you’re not near a beach or lake, you can still find driftwood from various sources:

Local Sources

  • Beaches and Lakeshores: Collect driftwood that has naturally washed ashore.
  • Forest Trails: Look for fallen branches and pieces of wood that have naturally weathered.

Online Sources

If you can’t gather driftwood locally, many online retailers sell driftwood pieces. Ensure you choose reputable sources that responsibly harvest driftwood.

Trends in Driftwood Decor

Driftwood has become a popular material not just for signs, but for a variety of decor items. Here are some trending uses of driftwood in home decor:

Shelving

Driftwood shelves add a rustic touch to any room, providing both functionality and aesthetic appeal.

Furniture

Driftwood is used to craft unique furniture pieces like coffee tables, benches, and headboards.

Art

Driftwood can be used to create stunning wall art, sculptures, and other decorative items that make a statement.

Inspiring Ideas for Driftwood Signs

If you’re searching for ideas to get started on your driftwood sign project, consider these inspirations:

Welcome Signs

Create a warm and inviting welcome sign for your home or garden using driftwood’s natural charm.

Inspirational Quotes

Paint meaningful quotes or phrases that uplift and inspire.

Custom Names

Personalize your spaces with driftwood signs featuring your family name or the names of loved ones.

Directional Signs

Use driftwood to craft rustic directional signs for events, gardens, or large properties.

Conclusion

Crafting driftwood signs is a fulfilling way to add a touch of nature and personality to your spaces. Whether you’re a seasoned crafter or a beginner, the materials are accessible, the process is straightforward, and the results are uniquely beautiful. So, gather your tools and some driftwood, and let your creativity flow!

Thank you for reading about driftwood signs. I hope you feel inspired to create your own, whether to beautify your home, garden, or even as gifts for friends and family. Your space will soon have a distinctive and charming new addition that brings the tranquility and beauty of nature right to your doorstep.

Filed Under: Driftwood Ideas Tagged With: crafts, DIY, Driftwood, Rustic Decor, Signs

Gnomes On Driftwood

September 3, 2024 by admin

Have you ever wondered where the magical world of gnomes intersects with nature’s artistry of driftwood? These unique and enchanting creations capture the imagination, blending folklore with natural beauty in a way that brings warmth and whimsy to any space. Whether you are a seasoned collector or a curious newcomer, “Gnomes On Driftwood” promises to offer you a delightful journey into this charming niche.

What Are Gnomes on Driftwood?

Gnomes on driftwood are essentially delightful little gnome figurines that are either carved from or set on pieces of naturally sculpted driftwood. This unique art form combines the whimsy and magic of gnomes with the organic beauty of driftwood, resulting in a fusion that’s both aesthetically pleasing and heartwarming.

The Origin of Gnome Folklore

Gnomes have a long history in European folklore, typically depicted as small, stout creatures that live underground. They are often associated with the protection of nature and hidden treasures. Their mysterious and magical qualities make them endearing characters that captivate the imagination.

The Beauty of Driftwood

Driftwood is wood that has been washed onto shore by the elements, often over many years. Each piece has its own unique texture and shape carved out by water, wind, and sand. This makes every gnome on driftwood a one-of-a-kind piece of art.

Why Combine Gnomes and Driftwood?

Creating gnomes on driftwood merges two wonderful worlds: the fantasy of gnomes and the raw beauty of nature. This combination offers both aesthetic appeal and emotional connection, bringing a touch of magic to everyday life.

Emotional Connection

When you combine whimsical gnomes with naturally sculpted driftwood, you create art that resonates on an emotional level. The natural patterns and textures of driftwood combined with the charming figures of gnomes offer a comforting, almost nostalgic feeling.

Aesthetic Appeal

There is a simple beauty in merging natural elements with folklore-inspired art. The driftwood provides an organic base that complements the gnome figurines, making them perfect for both outdoor gardens and indoor decor.

How to Make Your Own Gnomes on Driftwood

Creating your own gnome on driftwood can be both a rewarding and enjoyable project. Here are some simple steps to get you started.

Materials You Will Need

ItemPurpose
DriftwoodBase for your gnome
Gnome FigurinesCan be store-bought or handmade
Glue GunTo securely attach the gnome to the driftwood
PaintOptional, for adding personal touches
SealantTo protect the driftwood and gnome from elements

Step-by-Step Instructions

  1. Select Your Driftwood: Choose a piece of driftwood that speaks to you. Its natural shape should be something that can accommodate a small gnome.
  2. Prepare the Driftwood: Clean the driftwood and let it dry out completely. If needed, sand down any rough edges.
  3. Choose or Create Your Gnome: You can either purchase a small gnome figurine or create one using materials like clay or wood.
  4. Attach the Gnome: Using a glue gun, carefully attach your gnome to the piece of driftwood. Ensure it is securely fastened.
  5. Add Personal Touches (Optional): You can paint the gnome or the driftwood to add more character.
  6. Seal Your Creation: Apply a sealant to protect your gnome on driftwood from the elements.

Gnomes On Driftwood

Where to Display Gnomes on Driftwood

Once you have your gnomes on driftwood, the next step is finding the perfect spot to display them. Here are some ideas to get your creative juices flowing.

Indoor Spaces

These charming pieces of art can bring personality to various indoor settings. Consider placing them on bookshelves, mantels, or even as part of your desk decor. They can also be a talking point in living rooms or dining areas.

Outdoor Spaces

Gnomes on driftwood make great additions to gardens, patios, or porches. Their natural and whimsical appearance can add a magical touch to your outdoor spaces. Just make sure they are protected from extreme weather conditions.

Buying Gnomes on Driftwood

If creating your own gnomes on driftwood isn’t your thing, there are plenty of places where you can purchase them. Various artisans specialize in this niche, offering a range of designs and sizes.

Online Marketplaces

Platforms like Etsy and eBay have numerous listings for gnomes on driftwood. These are often handcrafted items, so each piece is unique.

Local Craft Fairs

Craft fairs are excellent places to find local artisans who create gnome on driftwood pieces. You’ll not only find unique items but also support local artists.

Taking Care of Your Gnomes on Driftwood

Once you have your gnomes on driftwood, proper care will ensure they last a long time. Here are some tips to keep them in pristine condition.

Cleaning

Avoid using harsh chemicals. A gentle wipe with a damp cloth should suffice.

Protection

If you’re displaying them outdoors, consider bringing them in during extreme weather conditions to prolong their life.

Gnomes On Driftwood

Benefits of Gnomes on Driftwood

By now, you might be curious about the benefits of owning these charming artworks. Let’s delve into why they’re worth your consideration.

Aesthetics

Gnomes on driftwood are visually pleasing. Their unique and whimsical appearance can add character to any space, whether indoors or outdoors.

Emotional Well-being

There’s something inherently comforting about these pieces. They remind us of simpler times and fuel our imagination, which can actually have a calming effect.

Eco-Friendly Art

Using driftwood for crafts is a form of recycling, contributing to a more sustainable environment. You’re not only getting a unique piece of art but also helping the planet.

Gnomes in Various Cultures

Gnomes are not just a Western phenomenon. Many cultures around the world have their own versions of these mythical creatures.

European Gnomes

In Europe, gnomes are often seen as guardians of the earth, living underground and protecting buried treasures.

Asian Mythical Creatures

Though not called gnomes, similar small mythical beings exist in various Asian cultures. For example, in Japan, the Zashiki-warashi are believed to be childlike spirits that protect homes.

Native American Folklore

Some Native American tribes have legends about small, mystical creatures that can control nature and offer protection to humans.

Popular Themes and Variations

Gnomes on driftwood come in various themes and styles. Here’s a list of popular types that you might find intriguing:

Seasonal Themes

Some artisans create gnomes on driftwood tailored to different seasons. For example, summer gnomes might come with sunflower decorations, while winter gnomes might feature snowflakes.

Holiday Themed Gnomes

Holiday versions are also a big hit. Halloween gnomes on driftwood could be dressed as witches, while Christmas gnomes might come in Santa hats.

Themed Collections

Some artists create themed collections, such as “beach gnomes” or “forest gnomes,” incorporating elements that relate to these environments. This can make for a cohesive and charming collection.

Customizing Your Gnomes on Driftwood

Customization is one of the joys of owning gnomes on driftwood. Here’s how you can personalize your pieces to make them truly unique.

Painting

Consider painting your gnome and driftwood base. Whether it’s adding a splash of color to the gnome’s hat or painting a scene on the driftwood, this can make your piece stand out.

Adding Accessories

Small accessories like miniature tools, tiny flowers, or even faux jewels can add a special touch to your gnomes on driftwood.

Engraving

If you’re handy with tools, you could engrave names, dates, or even short messages onto the driftwood, making the piece even more unique.

The Role of Gnomes in Modern Pop Culture

Gnomes have found their way into modern pop culture, influencing art, literature, and even movies. Their enduring charm ensures they remain relevant through the years.

In Literature

Books like “Gnomes” by Wil Huygen and Rien Poortvliet provide an in-depth look into gnome lore, captivating readers with their detailed illustrations and storytelling.

In Movies and TV Shows

Movies like “Gnomeo & Juliet” and various other animations have brought gnomes into the limelight, making them popular among people of all ages.

In Garden Décor

Garden gnomes have been a popular choice for outdoor decoration for years, and gnomes on driftwood are a sophisticated extension of this trend.

Frequently Asked Questions (FAQs)

What Size Should Driftwood Pieces Be?

The size of the driftwood you choose depends on where you plan to display your gnome. Small pieces are great for indoor settings, while larger pieces can make a statement in outdoor spaces.

Is It Safe to Collect Driftwood?

Collecting driftwood is generally safe, but always make sure to follow local guidelines, as some places have restrictions on gathering natural materials from public lands.

Can I Use Any Type of Gnome?

You can use any type of gnome, but ensure it’s made of durable material suitable for either indoor or outdoor display, depending on your needs.

How Do I Seal My Driftwood and Gnome?

A water-based polyurethane sealant works well for both driftwood and gnome figurines. It’s advisable to apply multiple thin layers rather than one thick layer.

Where Can I Find Driftwood?

You can find driftwood at beaches, lakeside shores, riverbanks, or purchase them from craft stores or specialty online shops.

Conclusion

Gnomes on driftwood present a charming blend of folklore and nature’s artistry, making them an enchanting addition to any setting. Whether you choose to create your own or purchase one, these unique pieces are sure to bring a smile to your face and warmth to your heart. By merging the whimsical world of gnomes with the natural beauty of driftwood, you are not only acquiring a piece of art but also a little slice of magic that can transform any space. So why not add a touch of enchantment to your home with a gnome on driftwood today?

Filed Under: Driftwood Ideas Tagged With: Art, crafts, DIY, Driftwood, Gnomes, Handmade

Driftwood Resin

September 1, 2024 by admin

Have you ever found yourself mesmerized by the beauty of driftwood washed ashore, bleached by the sun and polished by the sands of time? Imagine combining this natural allure with the translucent marvel of epoxy resin to create breathtaking art pieces. This captivating fusion is known as “driftwood resin.”

Driftwood Resin

What is Driftwood Resin?

Driftwood resin is a creative technique where the organic texture and unusual shapes of driftwood are combined with epoxy resin to make stunning art pieces, furniture, or decor items. You might think of it as a marriage between nature and art, merging rustic elements with modern materials to craft something unique and beautiful.

Why Choose Driftwood Resin?

The charm of driftwood resin lies in its versatility and uniqueness. Each piece of driftwood comes with its distinct shape, size, and texture, resulting in one-of-a-kind creations. Here are a few reasons why you might want to consider driftwood resin for your next project:

  1. Aesthetic Appeal: Driftwood adds a touch of natural beauty, while the resin brings in a sleek, contemporary look.
  2. Durability: Epoxy resin is a robust material that helps preserve the delicate structures of driftwood.
  3. Customization: You can experiment with colors, shapes, and inclusions to create a piece that suits your taste perfectly.

Materials Required for Driftwood Resin Projects

Before you start your driftwood resin adventure, it’s essential to gather all the necessary materials. Here’s a handy table to help you identify and organize what you’ll need:

MaterialsDescription
DriftwoodNaturally sourced wood pieces, cleaned and dried
Epoxy ResinA two-part resin consisting of resin and hardener
Measuring CupsFor accurately measuring resin and hardener
Mixing SticksFor combining resin and hardener thoroughly
Silicone MoldTo shape the resin into your desired form
SandpaperFor smoothing edges and surfaces
Safety GearGloves, protective eyewear, and masks to ensure safe handling
Heat Gun or TorchTo remove bubbles from the resin
Pigments or InksFor coloring the resin (optional)
Additional InclusionsItems like shells, stones, or metal shavings (optional)

Selecting the Right Driftwood

Choosing the right piece of driftwood is crucial for your project. The wood should be free of rot and thoroughly dried. You can find driftwood on beaches, riversides, or lakeshores. If you’re sourcing wood from the wild, make sure to clean it well to get rid of salt, debris, and other residues.

Preparing Driftwood for Resin

Proper preparation of driftwood is vital to ensure a smooth and successful resin application. Follow these steps for the best results:

Cleaning

Start by cleaning the driftwood. Remove any dirt, sand, or organic material using a stiff brush and water. For a thorough clean, you can soak the driftwood in a mixture of water and bleach (about 1:10 ratio) for 24 hours. This will kill any remaining microorganisms and brighten the wood. Rinse it well and let it dry completely.

Drying

Drying the driftwood is a crucial step. Wet wood can cause the resin to cure improperly, leading to cloudy or brittle results. Air dry the wood in a well-ventilated space for several days or use a kiln or oven at a low temperature to speed up the process.

Sanding

Once the driftwood is dry, sand it to smoothen any rough edges and enhance the texture. Use varying grits of sandpaper to achieve a perfect finish. Sand until the wood feels smooth to the touch.

Working with Epoxy Resin

Epoxy resin is what brings the magic to your driftwood creations. Though it may seem intimidating at first, working with resin can be quite enjoyable and rewarding.

Mixing Resin and Hardener

When working with epoxy resin, following the correct mixing ratio is imperative. Usually, the ratio is 1:1 or 2:1 resin to hardener, but always refer to the product instructions. Use measuring cups to ensure accurate proportions. Combine the two parts in a clean, dust-free container and mix thoroughly for at least 3 minutes, scraping the sides and bottom regularly.

Removing Bubbles

Bubbles can be a common issue when working with resin. To minimize them, mix the resin slowly and gently. After pouring the resin, use a heat gun or torch to remove any bubbles that rise to the surface. Move the heat source in a sweeping motion over the resin surface to pop the bubbles without holding it in one spot for too long, which can burn the resin.

Coloring the Resin

If you want to infuse color into your resin, you can use pigments, inks, or powders. Start with a small amount and gradually add more until you achieve the desired shade. Mixing different colors can also create stunning effects.

Driftwood Resin

Creating Driftwood Resin Art

Now comes the fun part—bringing your driftwood resin project to life! Whether you’re making a simple decor piece or an elaborate artwork, follow these guidelines for a successful crafting experience.

Setting Up the Mold

Choose a silicone mold that fits the size and shape of your driftwood. Alternatively, you can create a custom mold using silicone rubber. Ensure the mold is clean and free of dust and debris. Position the driftwood inside the mold, propping it up if needed to achieve the desired look.

Pouring the Resin

Pour the mixed resin slowly into the mold, covering the driftwood and filling any gaps. This gradual pour helps reduce the formation of air pockets. If you have any inclusions like shells or stones, add them now. Use a stick to position and adjust them as needed.

Curing Time

Epoxy resin takes time to cure. This can range from 24 to 72 hours, depending on the resin brand and environmental conditions. Keep the mold in a level, dust-free environment during this period. Cover the mold to protect it from dust and debris.

Demolding and Finishing

After the resin has fully cured, carefully remove the piece from the mold. Trim any excess resin using a sharp utility knife. Sand the edges and surfaces with fine-grit sandpaper to smoothen them. If needed, you can apply a final coat of resin or a polish to enhance the shine.

Common Issues and Troubleshooting

Even with careful planning, you might encounter a few challenges when working with driftwood resin. Here’s how to tackle some common problems:

Cloudy Resin

Cloudy resin usually results from improper mixing or moisture contamination. Ensure your driftwood is completely dry and measure and mix your resin accurately. Using a dehumidifier in your workspace can also help.

Uneven Surface

An uneven surface can occur if the resin settles or cures unevenly. Make sure your mold is placed on a level surface and check it periodically during the curing process. Sand down any uneven areas and apply a thin coat of resin to correct the issue if necessary.

Sticky Resin

Sticky or tacky resin is usually a result of incorrect mixing or curing conditions. Verify that you have used the correct resin-to-hardener ratio and allowed sufficient curing time. If areas remain sticky, you might need to mix and reapply a new layer of resin.

Tips and Tricks for Success

Here are some handy tips to enhance your driftwood resin projects and avoid common pitfalls:

  1. Practice on Small Projects: Start with small pieces to get comfortable with the materials and techniques before tackling larger projects.
  2. Keep it Clean: Ensure your workspace is clean and free from dust. Cover your work with a box or plastic container during curing to protect it.
  3. Consistency Matters: Always measure your resin and hardener accurately and mix them thoroughly to ensure proper curing.
  4. Experiment with Inclusions: Don’t be afraid to incorporate other elements like flowers, stones, or metallic flakes to add an extra dimension to your work.
  5. Safety First: Always work in a well-ventilated area and wear safety gear like gloves, glasses, and a mask to protect yourself from fumes and skin contact.

Applications of Driftwood Resin Art

Driftwood resin can be used to create a variety of items that are both functional and decorative. Here are some popular applications:

Furniture

Combining driftwood and resin can produce stunning furniture pieces like tables, shelves, or benches. The natural forms of driftwood serve as a base, with resin used to create a smooth, durable surface.

Home Decor

Driftwood resin art pieces make beautiful additions to home decor. Imagine a resin-encased driftwood centerpiece, candle holders, or picture frames gracing your living room or hallway.

Jewelry

Small pieces of driftwood encased in resin can be transformed into unique jewelry items like pendants, earrings, or bracelets. These pieces make for perfect handmade gifts.

Wall Art

Large slabs of resin-embedded driftwood can be mounted on walls to create one-of-a-kind artwork. Experiment with colors, inclusion, and arrangements to offer a captivating visual display.

Driftwood Resin Projects Step-By-Step Guide

To give you a more practical understanding, let’s walkthrough a simple driftwood resin project—a driftwood resin coaster. This straightforward project will help you get the hang of the basics.

Materials Needed

  • Small pieces of dried driftwood
  • Epoxy resin kit
  • Silicone coaster mold
  • Measuring cups
  • Mixing sticks
  • Sandpaper
  • Heat gun
  • Protective gear (gloves, mask, goggles)
  • Color pigments (optional)
  • Small inclusions (optional)

Step 1: Prepare the Driftwood

Clean and dry the small pieces of driftwood. Sand any rough edges until they are smooth.

Step 2: Set Up the Mold

Place the driftwood pieces in the silicone coaster mold. Arrange them in a visually pleasing pattern.

Step 3: Mix the Resin

Measure out the resin and hardener according to the manufacturer’s instructions. Mix them thoroughly using a mixing stick, ensuring you scrape the sides and bottom of the container.

Step 4: Add Color (Optional)

If you want colored resin, add a few drops of pigment or ink and mix until you achieve the desired color.

Step 5: Pour the Resin

Pour the mixed resin slowly into the mold, filling it just enough to cover the driftwood. Use the heat gun to remove any bubbles that appear on the surface.

Step 6: Curing

Allow the resin to cure according to the instructions, typically 24-72 hours. Keep the mold in a dust-free environment.

Step 7: Demolding and Finishing

Once the resin is fully cured, carefully remove the coaster from the mold. Sand any rough edges and apply a polish if desired. Your driftwood resin coaster is ready to use!

Conclusion

Driftwood resin is a captivating blend of nature and modernity, offering endless possibilities for creative expression. Whether you’re making small decorative items or large furniture pieces, the allure of driftwood combined with the sleek finish of resin is sure to capture anyone’s attention.

Your journey with driftwood resin starts with understanding the materials, preparing them correctly, and following processes meticulously. With practice and creativity, you can transform ordinary pieces of driftwood into extraordinary works of art. So, gather your materials, set up your workspace, and let your imagination run wild with driftwood resin. Happy crafting!

Filed Under: Driftwood Ideas Tagged With: crafts, DIY, Driftwood, home decor, resin art

Driftwood Picture Frame

August 27, 2024 by admin

Have you ever gazed upon a picture frame and wondered how you could infuse a touch of nature into its design? Crafting your own driftwood picture frame is an exciting and rewarding project that lets you bring the beauty of the coast into your home. Whether you’re framing a family photo, a cherished piece of artwork, or a scenic shot from a memorable vacation, a driftwood picture frame is the perfect way to add a captivating, rustic charm to your decor.

Driftwood Picture Frame

What is a Driftwood Picture Frame?

A driftwood picture frame is a picture frame that incorporates pieces of driftwood into its design. Driftwood, as the name suggests, consists of wood that has been washed ashore by the waves. Over time, the wood is smoothed and weathered by the elements, giving it a unique, rustic appearance. This makes driftwood an excellent material for a variety of DIY projects, including picture frames.

Benefits of Using Driftwood

Driftwood comes with several appealing attributes:

  • Natural Aesthetic: Its weathered, rustic look brings a piece of nature indoors.
  • Sustainability: Utilizing driftwood is eco-friendly as it repurposes natural materials.
  • Unique Design: Every piece of driftwood is unique, ensuring that no two frames are exactly alike.

Materials You Will Need

Before you get started, it’s crucial to gather all the necessary materials. This will make the process smoother and more enjoyable.

List of Required Materials

MaterialDescription
Driftwood piecesVarious sizes and shapes, washed and dried
Picture frameBasic frame to use as a base
Hot glue gun & glue sticksFor attaching driftwood pieces to the frame
SandpaperTo smooth any rough edges on the driftwood
SawTo trim driftwood pieces to fit the frame
Sealer or varnishTo protect and finish the driftwood
Protective glovesTo protect your hands while working with wood and glue
Craft knife or utility knifeFor finer adjustments and trimming

Optional Materials

MaterialDescription
PaintFor adding a touch of color to your driftwood
Rope or twineFor additional decorative elements
Small nautical decorShells, starfish, or anchors for added embellishments

Step-by-Step Guide to Creating a Driftwood Picture Frame

Creating a driftwood picture frame involves several steps, but don’t worry! We will break it down into simple, manageable parts.

Step 1: Choosing the Driftwood

The first step is selecting the driftwood you’ll use. Look for pieces that are weathered but still sturdy. The goal is to find a variety of shapes and sizes to create an interesting and eye-catching design. Driftwood can sometimes be found along the shoreline, but if you don’t live near a beach, many craft stores and online retailers sell driftwood for crafting purposes.

Step 2: Preparing the Driftwood

Once you’ve collected the driftwood, you need to prepare it:

  • Wash and Dry: Thoroughly wash the driftwood pieces to remove any dirt, salt, or sand. Allow them to dry completely.
  • Sand: Use sandpaper to smooth out any rough edges or splinters. You want the driftwood to be pleasant to touch and handle.
  • Trim: If necessary, use a saw to trim the pieces to the desired length. Ensure that you have a good mix of sizes to create a balanced look.

Step 3: Preparing the Frame

Select a basic picture frame as your base. This can be an old frame you already own or an inexpensive one purchased specifically for this project. The frame should be sturdy enough to support the added weight of the driftwood.

Step 4: Arranging the Driftwood

Before you start gluing, lay out your driftwood pieces on the frame to decide on the arrangement. Play around with different configurations until you’re satisfied with the design. This step is crucial for achieving a balanced and aesthetically pleasing result.

Step 5: Gluing the Driftwood

Now that you have your layout planned:

  1. Heat the Glue Gun: Allow the glue gun to heat up completely.
  2. Start Gluing: Begin attaching the driftwood pieces to the frame. Apply a generous amount of glue to the back of each piece, then press it firmly onto the frame.
  3. Work in Sections: Work in small sections to ensure that the glue doesn’t cool and harden before you attach the driftwood.
  4. Hold Until Set: Hold each piece in place for a few seconds to ensure a strong bond.

Step 6: Adding Finishing Touches

Once all the driftwood pieces are attached and the glue has dried, you may want to:

  • Seal the Wood: Apply a sealer or varnish to protect the driftwood and give it a finished look. Make sure to choose a product that preserves the rustic appearance.
  • Decorate: Add any additional decorative elements, such as rope, twine, or nautical decor. These can be attached using the hot glue gun as well.

Step 7: Inserting the Picture

Finally, insert your chosen picture into the frame. Make sure it is well-secured and that any clasps or tabs are firmly in place.

Tips and Tricks

Creating a driftwood picture frame can be a straightforward process, but these tips can help make it easier and more enjoyable.

Choosing the Right Driftwood

TipExplanation
Variety is KeySelect pieces of various shapes and sizes for an interesting arrangement
Check for Soft SpotsAvoid pieces that feel soft or brittle as they may not hold up over time
Consider TextureLook for pieces with interesting textures or patterns for added visual interest

Gluing Techniques

TipExplanation
Test the GlueTest your glue on a small area first to ensure it adheres well
Work QuicklyHot glue sets quickly, so work with small sections at a time
Reinforce if NeededFor larger pieces, consider reinforcing with small nails or screws

Enhancing Durability

TipExplanation
Seal ProperlyApply sealer or varnish to protect the wood from moisture and wear
Use Sturdy FrameEnsure your base frame is strong enough to support the added weight
Secure Hanging MethodMake sure the hanging mechanism is robust to handle the combined weight of the frame and driftwood

Driftwood Picture Frame

Alternative Designs

If you want to put a unique spin on your driftwood picture frame, consider some of these alternative designs.

Rustic Chic

Paint portions of the driftwood in soft, pastel colors for a shabby chic look. This can add a vintage feel while retaining the natural element.

Minimalistic

Use fewer, larger pieces of driftwood to create a more modern and minimalist design. This can make a bold statement without overwhelming the picture inside.

Multi-Texture

Combine driftwood with other natural materials like stones or shells. This adds different textures and can make your frame even more distinctive.

Enhanced Nautical Theme

Add elements such as small, decorative anchors, ropes, or seashells to enhance the nautical theme further. These can be glued onto the frame in the same manner as the driftwood.

Inspiration and Uses

A driftwood picture frame isn’t just a craft project; it’s a piece of art that can:

  • Frame Memories: Showcase your cherished memories in a frame that’s as unique as the moments they capture.
  • Gift Idea: Make a beautiful, handcrafted gift for friends and family.
  • Home Decor: Add a rustic, coastal touch to your interior decor.
  • Themed Events: Use for weddings, beach-themed parties, or special events to tie in with the theme.

Maintenance and Care

Keeping your driftwood picture frame in pristine condition involves a few simple steps.

Cleaning

Dust the frame regularly with a soft cloth to keep it clean. If it becomes particularly dirty, a slightly damp cloth can be used to wipe it down.

Handling with Care

Be gentle when handling the frame to prevent any pieces from breaking or coming loose. Always hold it by the frame rather than by the driftwood pieces.

Avoiding Moisture

Avoid placing the frame in areas with high humidity or direct sunlight, as this can cause the wood to warp or the glue to weaken over time.

Conclusion

Creating a driftwood picture frame is a fantastic way to bring a touch of nature into your home while showcasing your creativity. With its natural beauty and rustic charm, a driftwood frame can turn any picture into a stunning work of art. By following these steps and tips, you can craft a frame that is uniquely yours, reflecting both your personal style and the timeless beauty of the coast. So, get your materials ready and start crafting a masterpiece that you’ll be proud to display!

Filed Under: Driftwood Ideas Tagged With: crafts, DIY Project, Driftwood, home decor, Picture Frame

Driftwood Painting

August 26, 2024 by admin

Have you ever walked along the beach, admiring the driftwood scattered along the shore, and wondered what you could create from such naturally beautiful pieces? Driftwood painting is a delightful and unique way to turn nature’s debris into stunning art. This guide will walk you through everything you need to know to start your driftwood painting journey, from finding the perfect piece of wood to the finishing touches that will make your artwork shine.

What is Driftwood Painting?

Driftwood painting is the art of transforming weathered wood washed ashore into visual masterpieces. The combination of natural textures and your creative flair can result in astonishing artwork that draws on the beauty and ruggedness of the seaside. This art form encapsulates a fusion of natural beauty and human creativity.

The Appeal of Driftwood

Driftwood carries a unique charm due to its journey through water and its exposure to the elements. Each piece has its own story, reflected in its shapes, textures, and worn surfaces. The artistic potential is vast, and each piece of driftwood offers a blank canvas for your creativity.

Why Choose Driftwood Painting?

Driftwood painting is not just about creating art; it’s about the process of transformation and the enjoyment of seeing something beautiful arise from what was once considered waste. It’s an eco-friendly way of creating art that resonates with the natural world and offers a sense of peace and accomplishment.

Gathering Your Materials

Before you begin painting, you need to gather your materials. Here’s what you will need for a basic driftwood painting project:

MaterialPurpose
DriftwoodThe canvas for your artwork
SandpaperSmoothing the wood surface
Acrylic PaintAdding color and design to your driftwood
Paint BrushesVarious sizes for different details
Sealing VarnishProtecting your painted driftwood
PaletteMixing and holding your paint
Water and ClothCleaning brushes and wiping off excess paint
Sketch PencilsOutlining your design before painting
Protective GearEnsuring safety during sanding and painting

Finding the Right Driftwood

The most critical part of your preparation is finding the right piece of driftwood. Aim for pieces that are naturally worn, free of excessive rot, and of a size manageable for your project. Beaches, riverbanks, and lakesides are terrific places to find driftwood.

Driftwood Painting

Preparing Your Driftwood

Preparation is key to ensuring your driftwood is ready for painting. This involves cleaning, drying, and sanding the wood.

Cleaning the Driftwood

First, you should clean your driftwood to remove any sand, dirt, or salt. Soak the driftwood in a mixture of water and a mild detergent for a couple of hours. You can use a soft brush to scrub off any remaining debris. After cleaning, rinse the driftwood thoroughly with clean water.

Drying the Driftwood

Drying your driftwood is equally important. Allow the driftwood to air dry completely, which can take a few days to a couple of weeks depending on the humidity and the size of the wood. Place it in a well-ventilated, dry area during this period.

Sanding the Driftwood

Once dry, sand the driftwood to smooth out any rough spots and prepare the surface for painting. Use a fine-grit sandpaper and be gentle to maintain the character of the wood. Wipe the driftwood with a damp cloth to remove any dust after sanding.

Creating Your Design

Now that your driftwood is prepped, it’s time to plan your design. Think about the natural shapes and contours of the wood and how they can inspire your artwork.

Sketching Your Design

Use a light pencil to sketch your design onto the driftwood. Whether you are painting a landscape, abstract shapes, or intricate patterns, having a rough outline will help guide your painting process.

Choosing Your Color Palette

Selecting the right colors is crucial. Consider the natural tones of the driftwood and choose colors that will complement or contrast effectively. Acrylic paints are commonly used for driftwood painting as they adhere well to wood and are available in a variety of vibrant colors.

Driftwood Painting

Painting Your Driftwood

With your design sketched out and your colors selected, you can start painting your driftwood.

Base Coats and Backgrounds

Begin with base coats and backgrounds. Paint larger areas and allow them to dry before adding more detailed work. This stage sets the foundation for the subsequent layers of paint and helps cover the natural color of the driftwood if needed.

Adding Details

Once the base layers are dry, start adding details. Use smaller brushes for intricate patterns and details. Take your time with this step to ensure that your design is meticulously applied.

Layering Techniques

Layering is essential for creating depth and dimension in your painting. Allow each layer of paint to dry before adding another to prevent colors from blending unintentionally. Experiment with different techniques such as dry brushing and glazing to add texture and interest.

Sealing and Finishing Touches

After completing your painting, the final step is to seal and protect your artwork.

Sealing Your Artwork

Sealing your painted driftwood is crucial for durability, especially if it will be displayed outdoors. Apply a clear sealing varnish or polyurethane finish to protect the paint. These products come in matte, satin, and glossy finishes, so choose one that suits your desired look.

Attaching Hardware

If you plan to hang your driftwood painting, attach appropriate hardware to the back. Screws or D-rings work well for larger pieces, while smaller driftwood can be fitted with picture hangers or wire.

Final Inspection

Before declaring your work complete, inspect it for any touch-ups that may be needed. Check for any missed spots or areas that might need an extra coat of sealer.

Displaying Your Driftwood Art

Where you display your driftwood painting can enhance its beauty even more. Consider various locations and methods to show off your artwork.

Indoor Display

Indoor displays allow you to control the environment around your artwork. Hang your piece in a well-lit area to make the colors pop. Mantels, walls, and shelves provide excellent display options.

Outdoor Display

If you prefer to display your driftwood outside, ensure it is in a sheltered area to minimize exposure to harsh weather. The sealant will protect it, but additional care, such as periodic re-sealing, may extend its longevity.

Combining Pieces

Consider creating a series of driftwood paintings that can be displayed together. This can create a cohesive and dramatic visual impact.

Tips and Tricks for Driftwood Painting

Here are some valuable tips and tricks to help you on your driftwood painting journey:

Experiment with Techniques

Don’t be afraid to try new painting techniques. Experimenting can lead to the discovery of unique styles and effects that might work perfectly for your driftwood.

Incorporate Natural Features

Use the natural features of the driftwood in your design. The grain, knots, and texture can all contribute to the final appearance of your artwork.

Practice Patience

Patience is vital in driftwood painting. Allowing your layers to dry fully and spending extra time on details can make a significant difference in the final product.

Keep Learning

Stay curious and keep learning. There are always new styles, techniques, and ideas to explore. Joining an art group or following online tutorials can provide fresh inspiration.

Challenges You May Encounter

Every artistic endeavor has its challenges. Here are some common issues you might face and how to tackle them:

Uneven Surfaces

Driftwood often has uneven surfaces that can make painting challenging. Use fine brushes to navigate these areas or incorporate them into your design.

Paint Adherence

Sometimes paint may not adhere well to driftwood. Ensuring proper cleaning and sanding will help, but you can also use a primer to improve adhesion.

Weathering and Fade

If exposed to the elements, your driftwood painting may weather and fade over time. Regular maintenance and re-sealing can mitigate this issue.

Conclusion

Driftwood painting is a rewarding and eco-friendly art form that allows you to connect with nature while expressing your creativity. From gathering materials to finishing touches, each step in the process offers an opportunity to learn and grow as an artist. Embrace the journey and enjoy the beautiful transformations that driftwood painting can bring to your artistic repertoire.

Filed Under: Driftwood Ideas Tagged With: crafts, DIY, Driftwood, home decor, Nature Art, Painting

Driftwood Ornaments Diy

August 22, 2024 by admin

Have you ever strolled along the beach and stumbled upon pieces of driftwood, marveling at their unique shapes and worn textures? Turning these treasures into beautiful decorations isn’t just a creative endeavor; it’s an enjoyable way to bring the serenity of the sea into your home. Let’s embark on a journey to craft distinctive and charming driftwood ornaments.

Why Choose Driftwood for Your Crafts?

Choosing driftwood for your DIY projects is not only a way to recycle natural materials but also brings the tranquility and aesthetics of the ocean indoors. Each piece of driftwood has a unique pattern and history, giving your crafts a personalized touch.

Environmental Benefits

Using driftwood is an eco-friendly choice, as it repurposes natural materials that have been washed ashore. By collecting driftwood, you’re aiding in the cleanup of beaches and reducing waste.

Aesthetic Charm

Driftwood’s weathered look adds rustic charm to any décor. Its natural variations in color and texture can perfectly complement coastal, farmhouse, or shabby chic interior designs.

Collecting Driftwood

Collecting your driftwood is the first step of this enjoyable process. But there’s more to gathering these treasures than merely picking up sticks from the beach.

Where to Find Driftwood

Beaches, riverbanks, lakesides, and creek beds are excellent places to find driftwood. Early morning or after a storm often brings new pieces ashore.

Legal and Ethical Considerations

Before you start gathering driftwood, check local regulations. In some places, removing driftwood is prohibited to protect the ecosystem. Always make sure you are not disturbing wildlife or fragile environments.

The Ideal Pieces

Look for pieces that are smooth and free of too much decay. The wood should be dry and not crumbly, ensuring it’s sturdy enough for crafting purposes.

Driftwood Ornaments Diy

Preparing Driftwood for Crafting

Before turning your driftwood into ornaments, it needs to be properly cleaned and treated.

Cleaning Your Driftwood

  1. Rinse Thoroughly: Wash the pieces with fresh water to remove sand, dirt, and salt.
  2. Scrub with a Brush: Use a stiff brush to get rid of any algae or barnacles.
  3. Soak in a Bleach Solution: Submerge the wood in a solution of 1 part bleach to 10 parts water for 24 hours to kill any remaining bacteria and remove odors.

Drying the Driftwood

After cleaning, let the driftwood dry thoroughly. This can take several days or even weeks, depending on the size of the pieces and your local climate. Ensure it’s fully dry to prevent mold or decay later on.

Basic Tools and Materials

Now that your driftwood is ready, let’s gather the essential tools and materials you’ll need for crafting.

Tool/MaterialPurpose
DriftwoodMain material for your ornaments
Hot Glue GunFor securing pieces together
Small SawCutting driftwood to desired sizes
SandpaperSmoothing rough edges
Paints and BrushesAdding color and details
Twine or WireFor hanging ornaments
Small DrillMaking holes for hanging
Varnish or SealantProtecting and finishing the wood

Driftwood Ornaments Diy

Simple Driftwood Ornament Ideas

Now, let’s explore a few charming and simple DIY projects to get you started with driftwood ornaments.

Driftwood Hanging Stars

  1. Materials Needed:

    • Five pieces of driftwood (similar length)
    • Hot glue gun
    • Twine or wire
    • Small drill (optional)
  2. Instructions:

    • Arrange the driftwood pieces into a star shape, overlapping them at the ends.
    • Secure the joints with a hot glue gun.
    • Drill a small hole at the top for hanging or wrap twine around the top point to create a loop.

Driftwood Christmas Trees

  1. Materials Needed:

    • Several pieces of varying lengths
    • Hot glue gun
    • Small wooden dowel or branch for the trunk
    • Twine or wire
  2. Instructions:

    • Arrange the pieces into a tree shape, with the longest at the bottom and the shortest at the top.
    • Glue each piece to the dowel or branch trunk.
    • Attach a loop of twine at the top for hanging.

Driftwood Mobiles

  1. Materials Needed:

    • Multiple pieces of driftwood
    • Twine or fishing line
    • Hot glue gun
  2. Instructions:

    • Drill small holes in one end of each piece of driftwood.
    • Thread twine or fishing line through the holes.
    • Tie the pieces to a horizontal driftwood piece, spacing them as desired.
    • Ensure the lengths vary for an attractive mobile design.

Advanced Driftwood Ornaments

Once you’re comfortable with basic projects, you might want to try more intricate designs.

Driftwood Mirror Frame

  1. Materials Needed:

    • Small mirror
    • Several identical pieces of driftwood
    • Hot glue gun
  2. Instructions:

    • Arrange driftwood pieces around the mirror to form a frame.
    • Secure each piece with a hot glue gun.
    • Consider adding a backing for extra stability.

Driftwood Candle Holders

  1. Materials Needed:

    • Thick pieces of driftwood
    • Tea light candles
    • Small drill or chisel
  2. Instructions:

    • Measure the diameter of the tea light candles.
    • Drill or chisel out holes in the driftwood to fit the candles.
    • Smooth the edges with sandpaper if necessary.

Driftwood Wall Art

  1. Materials Needed:

    • Multiple driftwood pieces
    • Canvas or wooden backing
    • Hot glue gun
  2. Instructions:

    • Arrange the driftwood pieces in a pattern or abstract shape.
    • Glue them onto the canvas or wooden backing.
    • Experiment with geometric designs or recreate scenes.

Customizing Your Driftwood Ornaments

To make your ornaments uniquely yours, consider adding personal touches. Let’s discuss some customization techniques.

Painting and Decorating

  1. Acrylic Paints: Add patterns, designs, or color blocks to make your ornaments stand out.
  2. Decoupage: Use mod podge to adhere decorative paper or fabric to the driftwood.
  3. Beadwork: Incorporate beads or small adornments using twine or wire.

Personal Messages

Engrave or paint your favorite quotes, names, or special dates onto the driftwood to add a sentimental touch.

Maintenance and Preservation

It’s essential to maintain your driftwood ornaments to ensure they last for years.

Sealing

Apply a varnish or sealant to protect the wood from moisture and damage. This can be especially important if the ornaments are displayed outdoors.

Cleaning

Regularly dust your ornaments and wipe them with a damp cloth when necessary. Avoid using harsh chemicals, as they can damage the wood.

Inspiration and Ideas

Sometimes, a bit of inspiration can spark your creativity. Here are some ideas to consider.

Seasonal Ornaments

  • Autumn: Incorporate dried leaves, pine cones, and other seasonal elements.
  • Winter: Add faux snow, glitter, or small Christmas decorations.
  • Spring: Use pastel paints and embellishments like flowers or butterflies.

Thematic Ornaments

  • Nautical: Add seashells, anchors, and other marine-themed items.
  • Rustic: Use neutral tones and natural fibers such as jute or burlap.
  • Modern: Incorporate metallic paints or geometric shapes for a contemporary look.

Sharing and Gifting Driftwood Ornaments

Your handmade driftwood ornaments make fantastic gifts and can also be shared in various ways.

Gifting

Wrap your ornaments in rustic paper or burlap for a beautiful, eco-friendly presentation. Personalized messages or tags can make the gift even more special.

Selling

If you’re particularly proud of your creations, consider selling them online or at local craft fairs. Handmade items are always in demand, especially those with a unique, natural aesthetic.

Troubleshooting and Tips

Even the most experienced crafters encounter challenges. Here are some common issues and how to solve them.

Uneven Pieces

If your driftwood pieces are uneven, use a small saw to trim them. Sandpaper can smooth rough edges and make pieces more uniform.

Glue Not Holding

Ensure the surfaces are clean and dry before gluing. Sometimes, using a stronger adhesive like epoxy can help for more durable bonds.

Pieces Not Aligning

Lay out your design before gluing to see how the pieces fit together. You can also use clamps to hold pieces in place while the glue dries.

Conclusion

Creating driftwood ornaments is a fulfilling and relaxing way to bring a piece of the beach into your home. Each project is a unique masterpiece, reflecting the natural beauty and tranquility of the sea. From simple stars to intricate wall art, the possibilities are endless. Grab your tools, collect some driftwood, and let your creativity flow.

Filed Under: Driftwood Ideas Tagged With: crafts, DIY, Handmade, home decor, Ornaments

Driftwood Ornaments

August 22, 2024 by admin

Have you ever found yourself walking along the beach and marveling at the beautiful pieces of driftwood washed ashore? These natural treasures, smoothed by the ocean, carry a sense of timeless beauty and mystique. Creating driftwood ornaments is not only a wonderful way to repurpose these pieces but also an opportunity to add a bit of coastal charm to your living space. Let’s embark on a journey to transform simple driftwood into stunning decor items that will captivate anyone who sees them.

Driftwood Ornaments

What is Driftwood?

Driftwood refers to the pieces of wood that have been washed ashore by the action of tides, waves, or winds. These wooden fragments can come from various sources, be it broken tree branches, roots, or entire tree trunks. Over time, the constant abrasion from sand and water smooths the wood, giving it a weathered and rustic appearance. This natural process makes each piece of driftwood unique, boasting different textures, shapes, and hues.

Where to Find Driftwood

Driftwood can be commonly found along coastlines, riverbanks, and lakeshores. Beaches are particularly abundant with these woody gems, especially after storms or high tides. While collecting driftwood, it’s essential to be mindful of local regulations, as some areas may have restrictions to protect natural habitats. Always ensure you gather responsibly to preserve the environment.

The Appeal of Driftwood

The allure of driftwood lies in its organic, weathered look, which brings a touch of nature and a story of its journey to your home. Its versatility allows for a wide range of crafting possibilities, from small ornaments to larger pieces of furniture. Driftwood can complement various decor styles, including coastal, rustic, and even modern settings, making it a popular choice for creative projects.

Materials Needed for Driftwood Ornaments

To begin your adventure in creating driftwood ornaments, you’ll need a few basic materials and tools. These essentials make the crafting process smooth and enjoyable, allowing you to focus on your creativity.

Material/ToolPurpose
Driftwood PiecesPrimary material for ornament creation
SandpaperSmoothing rough edges and surfaces
Glue (wood glue/E-6000)Strong adhesive for attaching pieces
Drill and Drill BitsCreating holes for hanging or joining pieces
Twine or Fishing LineFor hanging ornaments
Wood Sealer (optional)Preserving the wood, adding shine
Assorted Beads, ShellsDecorative elements for embellishment
Paints and Brushes (optional)Adding color or designs to your pieces

Preparing Driftwood

Before you start crafting, it’s important to prepare your driftwood properly. Begin by cleaning the wood to remove any debris, algae, or salt. You can soak the pieces in a mixture of water and bleach (ratio of 9:1) for 24 hours, then rinse thoroughly and let them dry completely. Sanding the driftwood is the next step; this will help you achieve a smooth surface and eliminate any rough edges.

Crafting Driftwood Ornaments

Now that your materials are ready, let’s dive into a few delightful driftwood ornament projects. These crafts are simple and suitable for all skill levels, making them a great way to spend a creative afternoon.

Driftwood Christmas Tree

A driftwood Christmas tree is a charming and rustic addition to your holiday decor. It’s easy to make and can be customized to your liking.

  1. Materials Needed:

    • Several pieces of driftwood (varying lengths)
    • Wood glue
    • Small wooden base or a sturdy piece of driftwood as a base
    • Drill and drill bits
    • Twine or fishing line
  2. Steps:

    1. Start by selecting a piece of driftwood that will serve as the trunk.
    2. Arrange smaller pieces horizontally on both sides of the trunk, forming a triangular tree shape.
    3. Drill small holes where the branches (horizontal driftwood) will be attached to the trunk and glue them into place.
    4. Attach your tree to the base using strong glue or screws for stability.
    5. Add twine or fishing line at the top to hang if desired.

Driftwood Garland

A driftwood garland is a versatile and stylish decor item that you can hang on your mantle, window, or wall.

  1. Materials Needed:

    • Multiple small pieces of driftwood
    • Twine or durable string
    • Drill and drill bits
  2. Steps:

    1. Drill small holes in each piece of driftwood.
    2. Thread the twine through the holes, spacing the driftwood pieces evenly apart.
    3. Continue until you have achieved your desired length.
    4. Tie knots on either end of the garland to secure the pieces in place.

Driftwood Mobile

A driftwood mobile is perfect for adding a whimsical touch to any room. It’s especially lovely when hung near a window where it can catch the breeze.

  1. Materials Needed:

    • Long, slender pieces of driftwood
    • Twine or fishing line
    • Glue (wood glue or E-6000)
    • Decorative elements like beads, shells
  2. Steps:

    1. Arrange your driftwood pieces in a balanced manner, considering the overall design.
    2. Attach twine or fishing line to each piece.
    3. Consider adding decorative elements like beads or shells to the lines.
    4. Connect all lines to a central piece of driftwood, ensuring it hangs evenly.
    5. Hang your mobile from the ceiling or a hook.

Advanced Driftwood Crafts

Once you feel comfortable with basic driftwood ornaments, you might want to explore more complex projects. These advanced crafts require a bit more skill but yield beautiful results that are sure to impress.

Driftwood Mirror Frame

Creating a driftwood frame for a mirror adds a coastal or rustic touch to your home. It’s a gorgeous way to bring natural elements into your interior design.

  1. Materials Needed:

    • Driftwood pieces
    • Mirror
    • Wood glue or strong adhesive like E-6000
    • Hacksaw (optional for cutting driftwood to size)
  2. Steps:

    1. Choose a variety of driftwood pieces that complement each other in terms of size and shape.
    2. Lay out your mirror on a flat surface.
    3. Arrange the driftwood pieces around the mirror to form a frame. You may need to cut some pieces to fit perfectly.
    4. Once satisfied with the layout, glue the driftwood pieces to the mirror’s edges.
    5. Let the glue dry completely before hanging your new mirror.

Driftwood Lamp

A driftwood lamp is not just functional but also an artistic statement piece in any room.

  1. Materials Needed:

    • Large, sturdy piece of driftwood
    • Lamp kit (available at craft or hardware stores)
    • Drill and drill bits
    • Lampshade
    • Glue or screws (for additional stability)
  2. Steps:

    1. Select a solid piece of driftwood to serve as the base of the lamp.
    2. Follow the instructions on the lamp kit to attach the electrical components to the driftwood. This may involve drilling a hole to run the wire through.
    3. Secure the lampshade holder and screw in a light bulb.
    4. Plug in your lamp to ensure it works properly.
    5. Add any finishing touches, like additional driftwood pieces or decorative elements.

Driftwood Wall Art

An eye-catching piece of driftwood wall art can serve as a focal point in any room.

  1. Materials Needed:

    • Multiple pieces of driftwood
    • Canvas or wooden backing
    • Wood glue or strong adhesive
    • Paint (optional)
  2. Steps:

    1. Choose a canvas or wooden backing for your wall art.
    2. Arrange your driftwood pieces in a visually pleasing design. This could be abstract or a specific shape, like a heart or tree.
    3. Glue the driftwood pieces to the backing, pressing firmly to ensure they adhere properly.
    4. Allow the glue to dry thoroughly.
    5. Consider adding paint or other decorative elements to enhance your artwork.

Driftwood Ornaments

Tips for Working with Driftwood

Crafting with driftwood is a rewarding experience, but it can come with its own set of challenges. Here are a few tips to help you as you work with this unique material.

Safety First

Always prioritize safety when working with tools like drills and saws. Wear safety goggles and gloves to protect your eyes and hands. If you use any sort of adhesive, ensure you are in a well-ventilated area to avoid inhaling fumes.

Choosing Quality Driftwood

When selecting driftwood, look for pieces that are sturdy and free of rot. Soft or decaying wood can be challenging to work with and may not hold together well.

Preserving Driftwood

To ensure your driftwood projects last, you might want to seal the wood. This can prevent further deterioration and add a nice finish. Clear polyurethane or wood sealers work well for this purpose.

Experiment with Designs

Don’t be afraid to experiment with different arrangements and designs. Driftwood is incredibly versatile, and there are endless possibilities for creativity. Whether you’re making a small ornament or a large art piece, let your imagination guide you.

Driftwood Ornament Ideas

If you’re looking for more inspiration, consider these additional driftwood ornament ideas that can add charm to your home:

Driftwood Jewelry Holder

Create an elegant holder for your necklaces and earrings using a piece of driftwood. Drill small holes or attach hooks to the wood to hang your jewelry.

Driftwood Coasters

Slice a thicker piece of driftwood into neat rounds to make rustic coasters. Sand the edges to make them smooth, and consider sealing them to protect the wood.

Driftwood Picture Frame

A driftwood picture frame can be a wonderful way to display your favorite photos. Use small pieces of driftwood to decorate a plain picture frame, adhering them with glue.

Driftwood Candle Holder

Driftwood can make a beautiful base for candles. Secure small candles onto a piece of driftwood, ensuring they are stable and won’t tip over.

Driftwood Key Holder

Attach small hooks to a piece of driftwood and mount it near your door. This makes for a practical and charming place to hang your keys.

Driftwood Dreamcatcher

Incorporate driftwood into a dreamcatcher design for a unique twist. Use the driftwood as the base, attaching feathers, beads, and other materials to create a beautiful and symbolic piece of art.

Enhancing Your Driftwood Ornaments

To make your driftwood ornaments even more special, consider adding personal touches. Here are some ideas to enhance your creations:

Adding Color

While the natural look of driftwood is beautiful, adding a splash of color can create a striking contrast. Use acrylic paints to add designs or patterns to your driftwood pieces. You can paint them entirely or add subtle details.

Incorporating Textiles

Combine driftwood with textiles like fabric, rope, or yarn for added texture and interest. Wrapping sections of the wood with these materials can introduce a new dimension to your ornaments.

Using Natural Elements

Enhance the organic feel of your driftwood ornaments by incorporating other natural elements such as seashells, stones, or dried flowers. These additions can complement the driftwood and create a cohesive, nature-inspired look.

Benefits of Crafting with Driftwood

Engaging in driftwood crafts offers several benefits beyond just creating beautiful ornaments. Here’s why you might want to consider taking up this hobby:

Eco-Friendly

Using driftwood for crafting is a sustainable way to repurpose natural materials that have washed up on shore. By giving these pieces of wood a new life, you are contributing to reducing waste and taking advantage of what nature provides.

Therapeutic

Crafting can be highly therapeutic, offering a chance to unwind and focus on a creative task. Working with your hands and creating something beautiful can provide a sense of accomplishment and relaxation.

Personalization

Crafting with driftwood allows you to create unique, personalized items for your home or gifts for loved ones. Each piece you make is one of a kind, reflecting your personal style and creativity.

Community Engagement

Sharing your passion for driftwood crafts can lead to community engagement. Join local craft groups, participate in beach clean-up events, or even start a small business selling your creations at markets and craft fairs.

Conclusion

Driftwood ornaments offer a beautiful way to bring a piece of nature into your home. From simple projects like garlands and mobiles to more advanced crafts like lamps and mirror frames, the possibilities are endless. Each piece of driftwood tells a story, and through your creativity, you can give it a new life and purpose.

Remember to gather your materials responsibly, prioritize safety, and have fun experimenting with different designs and techniques. Whether you’re a seasoned crafter or a beginner, working with driftwood will surely bring joy and a sense of connection to the natural world. Happy crafting!

Filed Under: Driftwood Ideas Tagged With: Coastal Decor, crafts, DIY, Driftwood, Ornaments

  • « Previous Page
  • Page 1
  • …
  • Page 3
  • Page 4
  • Page 5
  • Page 6
  • Page 7
  • …
  • Page 10
  • Next Page »

Primary Sidebar

Driftwood4us.com, is a participant in the Amazon Services LLC Associates Program, an affiliate advertising program designed to provide a means for sites to earn advertising fees by advertising and linking to amazon.com.