Ancient Nautical Decor Rigging Techniques
Modern glue fails in the humidity, but the knots of our ancestors only get tighter with age. We’ve forgotten how to build for the long haul. Modern ‘crafts’ rely on chemicals and heat that eventually go brittle. The old ways—the ways of the sea—relied on tension, friction, and the natural movement of the wood. A sailboat rigged with ancestral knowledge doesn’t just look better; it lives better. It’s time to stop gluing and start lashing.


You are likely here because you can sense the difference between a mass-produced piece of furniture held together by hidden staples and a structure that wears its strength on the outside. There is a grit and a grace to traditional rigging that modern manufacturing cannot replicate. When you learn to lash a joint or secure a shelf with nothing but rope and gravity, you aren’t just making decor; you are continuing a lineage of engineering that crossed oceans long before the first factory ever belched smoke.
This guide will walk you through the transition from consumer to craftsman. We will explore the specific techniques used by mariners for centuries and show you how to apply them to your home projects. Whether you are building a hanging bookshelf, a rugged room divider, or simply framing a mirror, these ancestral methods will ensure your work survives the shifting tides of time and trend.
Ancient Nautical Decor Rigging Techniques
Traditional rigging is the art of using cordage to stabilize, support, and move structural elements. In the world of sailing, rigging was divided into two categories: standing rigging, which held the masts in place, and running rigging, which allowed for the adjustment of sails. In the context of nautical decor, we borrow heavily from standing rigging—specifically the techniques of lashing and seizing.
Ancient nautical decor rigging techniques are founded on the principle that mechanical advantage and friction are superior to rigid fasteners. In a ship’s rigging, every joint had to be able to flex without snapping. If a mast were bolted rigidly to a hull, the first heavy gale would shatter the wood. By using rope lashings, sailors created joints that could “breathe” under stress.
In your home, these techniques provide a visual and structural honesty. A lashed joint shows exactly how the load is being carried. It uses natural materials like hemp, manila, and sisal, which offer a tactile warmth that plastic and steel lack. Today, these methods are used to create everything from “floating” furniture to architectural details that evoke the rugged beauty of the Age of Sail.
How the Lash Works: The Three Pillars of Traditional Rigging
Understanding how to lash requires you to master two fundamental movements: the wrap and the frap. Every effective nautical lashing is a combination of these two actions. Wrapping brings the two pieces of wood together, while frapping—winding the rope between the wood pieces and over the wraps—cinches the entire joint to an incredible degree of tension.
There are three primary lashings you should master for most decor projects:
The Square Lashing
This is the workhorse of traditional rigging. You use the square lashing whenever you need to join two spars at a right angle (90 degrees). It is the ideal choice for building shelving units or securing the cross-beams of a bed frame.
To perform a square lashing, start with a clove hitch on the vertical support. Wrap the rope around both the vertical and horizontal pieces in a consistent pattern (usually three or four full turns). Once the wraps are complete, perform three “frapping” turns between the logs. These fraps pull the wraps inward, creating the legendary “ancestral” tightness that glue can never achieve.
The Diagonal Lashing
If your spars cross at an angle other than 90 degrees, or if the wood pieces have a natural tendency to spring apart, the diagonal lashing is your solution. This technique starts with a timber hitch pulled tight around both pieces where they cross.
Unlike the square lashing, which follows the “over-under” pattern of the cross, the diagonal lashing wraps directly across the “X” formed by the timbers. It is particularly useful for cross-bracing on the back of large shelving units or for creating decorative trellises.
The Shear Lashing
Use the shear lashing when you want to join two parallel poles or create an A-frame structure. This was the method used to create “sheer legs”—primitive cranes used to lift heavy masts into place.
In a shear lashing, you wrap the rope around two parallel poles roughly eight to ten times. You then frap between the poles. When you spread the legs of the poles apart, the lashing tightens even further. This is a brilliant technique for making tripod-style floor lamps or support legs for a nautical-themed desk.
Benefits of Tension Over Adhesion
Choosing ancestral lashing over factory assembly isn’t just an aesthetic choice; it’s a functional one. Modern adhesives are often the weakest link in a build. They are prone to failure in high-humidity environments where the wood expands and the glue does not, leading to cracks and structural failure.
The practical benefits of using traditional rigging techniques include:
- Durability: Natural fibers like manila and hemp are incredibly resilient. When properly maintained with oil or tar, a lashed joint can last for decades, even in coastal air.
- Reversibility: Unlike glue or screws, which damage the wood permanently, a lashing can be undone, adjusted, and retied. This allows you to tighten the structure as the wood seasons and shrinks over time.
- Structural Give: A lashed joint distributes stress across the surface area of the rope rather than concentrating it on a single screw point. This prevents the wood from splitting under heavy loads.
- Authentic Aesthetics: There is a depth of character in a hand-tied knot. It speaks of effort and skill, turning a simple utility item into a piece of functional art.
Challenges and Common Mistakes
The most frequent error for beginners is failing to account for “slack.” Rope has a natural elasticity, and if you do not apply significant tension during the wrapping phase, the entire structure will feel “racked” or wobbly once you stand it up.
Another common mistake is choosing the wrong material. Many modern “nautical” ropes found in big-box stores are actually synthetic blends or low-quality sisal that is too brittle for tight knotting. If the rope feels “slippery,” it is likely a plastic-based imitation. These will not hold a frap; the friction required to maintain the tension simply isn’t there.
Finally, do not underestimate the importance of the starting and ending knots. If your clove hitch is sloppy, the entire lashing will eventually unravel. You must maintain tension on the “standing” part of the rope throughout the entire process. If you let go of the line mid-wrap, you lose the mechanical advantage you’ve worked to build.
Limitations: When the Lash is Not Ideal
While we advocate for the “old ways,” a serious practitioner understands that every tool has its limits. Natural fiber rope is an organic material. If you use untreated hemp in a bathroom or an outdoor area without proper ventilation, it will eventually rot.
Furthermore, lashings are not well-suited for joints that require a “flush” or perfectly flat surface. Because the rope sits on top of the wood, you must design your decor around the bulk of the knots. If you are building a minimalist, mid-century modern coffee table, a bulky square lashing will look out of place and function poorly.
Lastly, there is a weight limit to consider. While a 1-inch manila rope can hold thousands of pounds, the stability of a lashed joint depends on the friction between the wood and the rope. Extremely heavy loads on very smooth, finished wood may cause the lashing to slide unless you “notch” the wood—a technique where you carve a shallow channel for the rope to sit in.
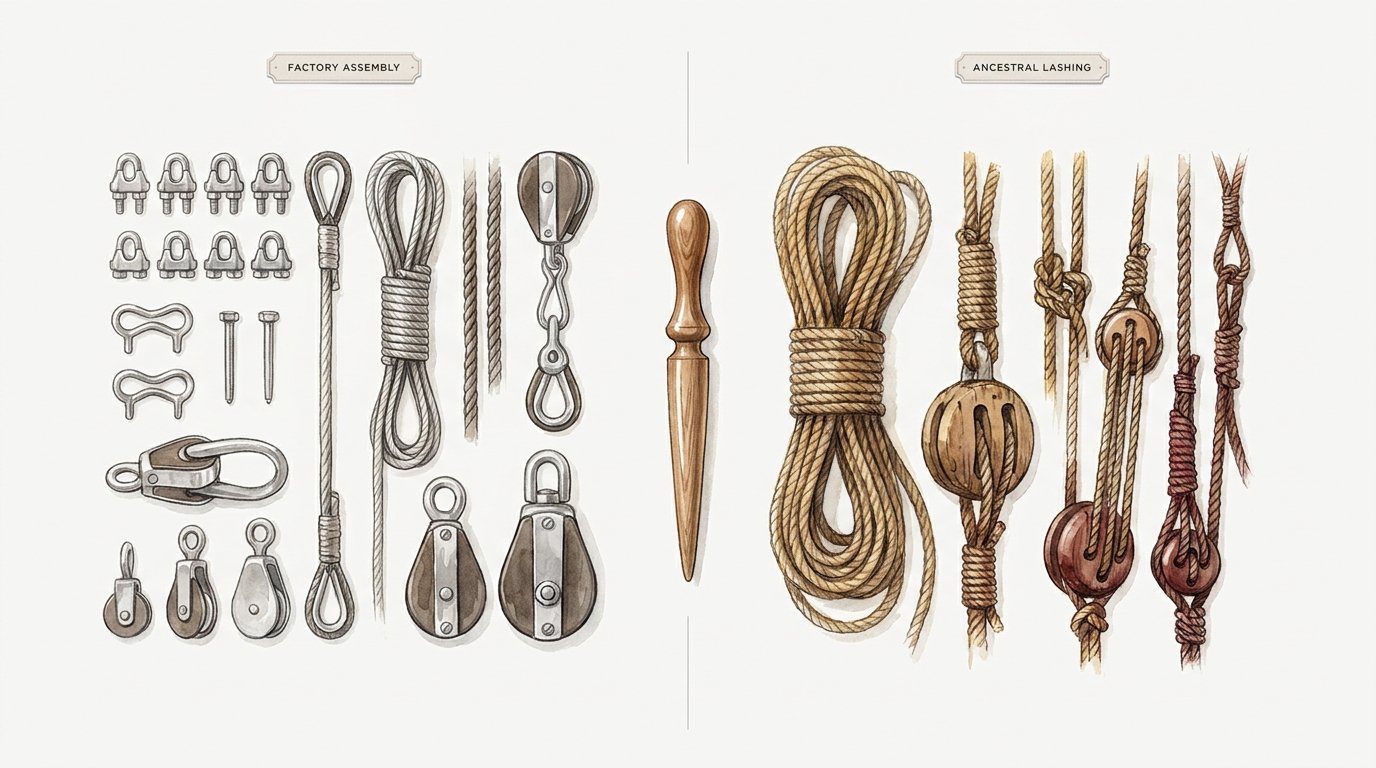
Ancestral Lashing vs. Factory Assembly
To truly appreciate the difference, it helps to compare the two philosophies of construction. Factory assembly focuses on speed and invisibility, while ancestral lashing focuses on permanence and visibility.
| Feature | Factory Assembly (Glue/Screws) | Ancestral Lashing (Rope/Tension) |
|---|---|---|
| Joinery Logic | Rigid adhesion/Point stress | Friction/Distributed tension |
| Humidity Response | Glue becomes brittle and cracks | Natural fibers expand/contract with wood |
| Maintenance | Difficult; usually requires total rebuild | Simple; retighten or replace cordage |
| Skill Level | Low (Machine-driven) | Medium to High (Hand-crafted) |
Practical Tips for the Home Workshop
When you begin your first rigging project, keep these best practices in mind. They are the difference between a project that looks “crafty” and one that looks “nautical.”
- Whip Your Ends: Never leave the ends of your rope raw or taped with plastic. Use a “common whipping”—a small twine wrap—to secure the ends of your rope. It prevents fraying and shows that you understand the details of the trade.
- Hydrate Your Rope: If you are working with manila, some riggers find that slightly dampening the rope before tying allows it to shrink and tighten as it dries, creating a permanent, rock-solid bond.
- Use a Marlinespike: A marlinespike is a tapered metal tool used to separate rope strands or to pry a knot tight. You can use it to get that extra half-inch of tension during your frapping turns.
- Tar and Oil: For a true maritime look and smell, use “Pine Tar” or a “Stockholm Tar” solution on your hemp rope. It preserves the fiber and gives the rope a dark, rich patina that screams of high-seas adventure.
Advanced Considerations: Seizing and Splicing
Once you have mastered the basic lashings, the serious practitioner should look into seizing and splicing. These techniques take you beyond just “tying things together” and into the realm of true rigging.
Seizing is the process of binding two ropes together side-by-side. This is essential if you are creating a rope railing and want to join the main line to a support post. A “Round Seizing” is the most common and involves a series of very tight, small-diameter wraps finished with a hidden knot.
Splicing is the process of weaving the strands of a rope back into itself. For nautical decor, the “Eye Splice” is the most valuable. Instead of tying a loop at the end of a rope (which weakens it), you weave the strands back into the standing part. This creates a permanent loop that is actually stronger than the rope itself. Use this for the top of hanging shelves or for securing a mirror to the wall.
Example Scenario: The Lashed Hanging Shelf
Let’s look at how these principles come together in a practical project. Imagine you want to build a three-tier hanging bookshelf for a study.
Instead of drilling holes in the wood and tying simple knots underneath, you will use a series of Round Lashings. You begin with two thick vertical ropes (3/4-inch manila). At the height of each shelf, you will lash a small wooden “cleat” to the rope. The shelf then rests on these cleats.
This method allows you to adjust the height of the shelves easily. Because you are using a round lashing around the main rope and the cleat, the weight of the books actually increases the friction on the joint, making it more secure the more you load it. It is a perfect demonstration of the “tension and friction” principle. No screws, no glue—just the physics of the sea.
Final Thoughts
Embracing ancient nautical rigging techniques is a rebellion against the “disposable” culture of modern furniture. It is an acknowledgment that our ancestors figured out the most efficient ways to move and support weight using only what the earth provided. When you lash a joint or splice an eye, you are engaging with a functional history that spans millennia.
Start small. Practice your square lashings on a couple of scrap pieces of 2×4. Feel the way the frapping turns suddenly turn a loose pile of wood into a rigid structure. Once you feel that “click” of tension, you will never want to go back to the hot glue gun again.
As you build, remember that the knots are not just decoration. They are the skeleton of the piece. Treat the rope with respect, maintain its tension, and your work will stand as a testament to the “pioneer grit” that built the world before the age of chemicals. Happy rigging.
Sources
1 heritagecrafts.org.uk (https://heritagecrafts.org.uk/craft/rigging/) | 2 squarespace.com (https://static1.squarespace.com/static/63d5940a650cf126eb968c19/t/695d4f6464aeee13fbbbab5e/1767722852381/Freda+rig+history+and+materials-sm.pdf) | 3 maritime.org (https://maritime.org/doc/steel/part6.php) | 4 scoutpioneering.com (https://scoutpioneering.com/wp-content/uploads/2013/02/lashing-information.pdf) | 5 westshorecert.net (http://www.westshorecert.net/Lashings.pdf) | 6 artofmanliness.com (https://www.artofmanliness.com/skills/manly-know-how/how-to-tie-lashings/) | 7 youtube.com (https://www.youtube.com/watch?v=-CgmOEIV-CY) | 8 girlscoutsccc.org (https://www.girlscoutsccc.org/content/dam/girlscoutsccc-redesign/documents/pageForms/K2017LashingManual20160926.pdf) | 9 photolens.co.uk (https://9thhuddersfieldscouts.photolens.co.uk/Scouting/Scoutcraft/Ropework/Lashings.pdf) | 10 battlbox.com (https://www.battlbox.com/blogs/outdoors/mastering-shear-lashing-a-comprehensive-guide-to-tying-and-techniques) | 11 lapware.org (http://www.lapware.org/files/pdf/rope-1.pdf) | 12 maritimesa.org (https://maritimesa.org/nautical-science-grade-10/2020/12/14/types-of-rope-natural-ropes/) | 13 iropes.com (https://www.iropes.com/blog/insights-4/ultimate-guide-to-natural-fiber-rope-types-and-uses-720) | 14 rightrope.com (https://rightrope.com/blog/rope-for-home-decor-innovative-uses-for-rope-in-home-decor/) | 15 wikipedia.org (https://en.wikipedia.org/wiki/Rigging)