Diy Multi-use Driftwood Garden Furniture
Is your garden furniture taking up space or giving back to the earth? Why settle for a chair that just sits there? We’re turning storm-tossed timber into a seating area, a vertical garden, and a wildlife sanctuary all in one. In a world of plastic single-use junk, be a multi-dimensional builder.
[affiai]There is a quiet dignity in the silver-gray bones of a tree that has survived the ocean. When you find a piece of driftwood, you aren’t just looking at debris; you are looking at a survivor of current and tide. This timber has been salt-cured, sun-bleached, and tumbled into shapes that no sawmill could ever replicate.
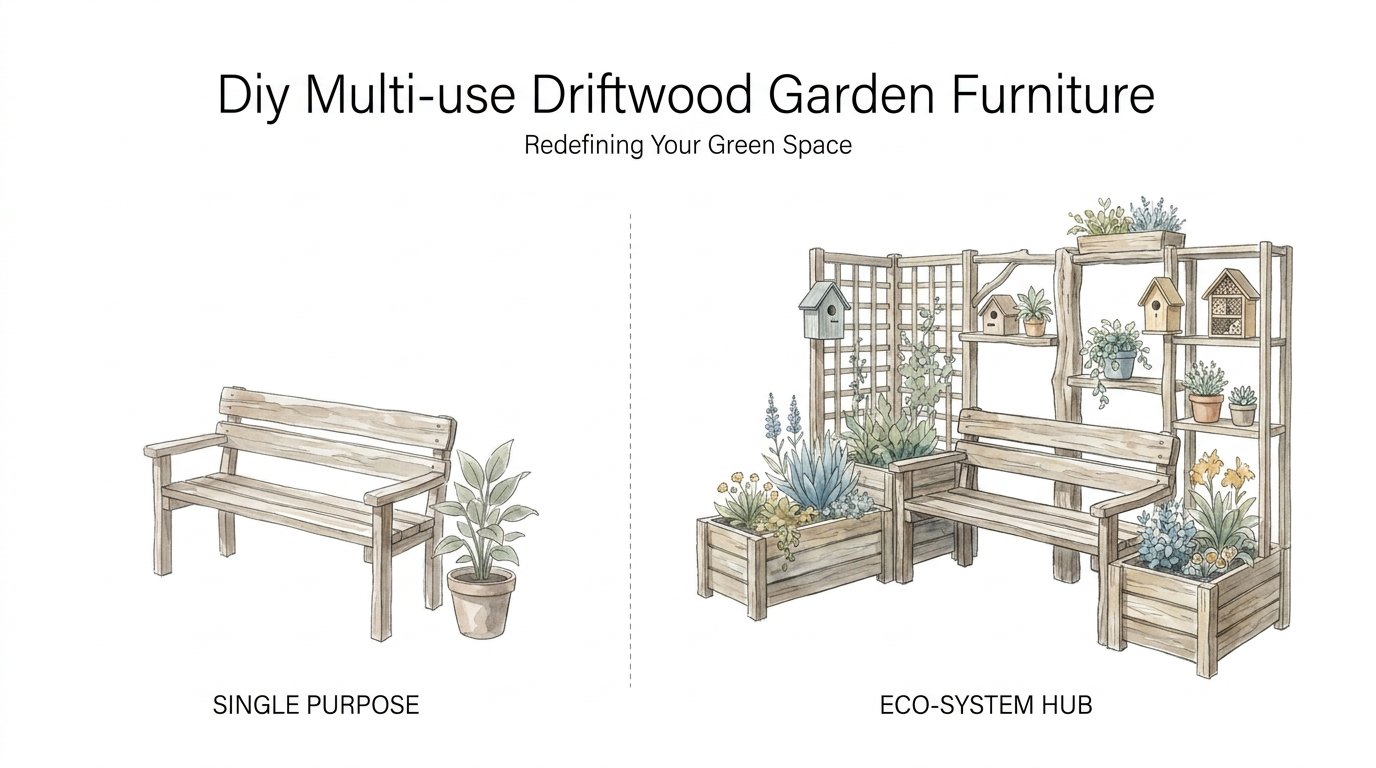
Traditional garden furniture serves one purpose: it holds a human. But a multi-use hub does more. It acts as a bridge between the cultivated garden and the wild edges of our environment. We are building structures that provide a place for us to rest, a home for rare solitary bees to nest, and a foothold for resilient plants to thrive.
Every piece of wood pulled from the shoreline has a story. Our job is to give it a second act. Whether you are building a simple bench with an integrated planter or a complex vertical garden wall, the principles remain the same. We prioritize structural grit, ecological utility, and a deep respect for the material.
Diy Multi-use Driftwood Garden Furniture
Diy Multi-use Driftwood Garden Furniture is the practice of scavenging naturally weathered timber to create functional outdoor installations that serve multiple ecological and human roles. Unlike store-bought cedar or pressure-treated pine, driftwood has already been tested by the harshest elements on earth. This makes it an ideal candidate for long-term outdoor use, provided you understand how to work with its irregular geometry.
At its core, this concept moves away from the “single-purpose” mindset. We aren’t just making a chair; we are creating an ECO-SYSTEM HUB. This might look like a bench where the backrest is a series of drilled nesting holes for mason bees, or a leg that doubles as a hollowed-out pocket for hardy succulents. It exists where functionality meets conservation.
In the real world, these pieces are used to anchor “rewilding” zones in suburban backyards. They provide “stepping stones” for pollinators in urban corridors and offer a rustic, nostalgic aesthetic that mimics the pioneer spirit of resourcefulness. You don’t need a massive workshop to do this; you need a sharp eye and the willingness to let the wood dictate the design.
Visualization is key here. Think of a massive, salt-cured log acting as the base of a garden bench. Instead of a flat, boring seat, the top is a thick plank of salvaged timber. On one end, the log extends upward, its natural crevices filled with moss and ferns. On the other, the wood is solid and drilled with various diameters to house the next generation of pollinators.
How It Works: Sourcing and Preparing Your Timber
Sourcing is the first hurdle of the pioneer builder. You cannot simply walk onto any beach and start loading a truck. Legalities vary wildly across the globe. In the United Kingdom, collecting driftwood is often restricted to protect against coastal erosion. Australian law can impose significant fines—up to $8,500—for removing natural materials from protected beaches. Always check with local authorities or land managers before you start your scavenge.
Once you have secured your timber legally, the preparation phase begins. Driftwood is often saturated with salt and may house unwanted guests. Active infestations are usually marked by white, powdery “frass” (insect debris), while older, non-active sites show yellow, clumpy dust. If the wood is solid and free of active borers, it is ready for cleaning.
A deep soak is the most effective way to stabilize the wood. Create a solution of 1 part bleach to 9 parts water. Submerge the timber completely for at least 24 to 72 hours. This kills bacteria, leaches out excess salt that could harm plants, and neutralizes hidden larvae. If you prefer a more natural approach, a mixture of white vinegar and essential oils like peppermint or eucalyptus can act as a deterrent for pests, though it may not be as thorough as a bleach soak.
Drying is a test of patience. Never build with wet driftwood. As the water leaves the fibers, the wood will shrink and possibly crack. Leave your timber in a shaded, well-ventilated area for several weeks. A moisture meter is a helpful tool here; aim for a moisture content below 15% before you introduce joinery or finishes.
Designing for Multi-Use Functionality
Building an integrated system requires thinking in layers. We look at the driftwood and ask: where can a human sit? Where can a plant grow? Where can an insect hide? This tripartite design philosophy ensures your furniture is never just “junk in the yard.”
The Seating Layer
Seating requires stability and comfort. Because driftwood is rarely flat, you may need to use a drawknife or a hand plane to level the surface where the “seat” meets the “support.” When joining irregular logs, traditional 90-degree measurements often fail. We use “scribing” techniques—tracing the profile of one log onto another—to ensure a tight, load-bearing fit.
The Vertical Garden Layer
Driftwood often features natural hollows created by rot or erosion. These are perfect natural planters. Line these pockets with a scrap of weed barrier or landscape fabric to prevent soil from washing out. Use a potting mix that mimics coastal or rocky conditions: high in perlite or coir for drainage, as sitting water will rot your furniture from the inside out.
The Wildlife Sanctuary Layer
This is where the structure becomes a living hub. Solitary bees, such as mason and leafcutter bees, do not live in hives. They look for existing tunnels in dead wood. Use a drill to create “bee hotels” in the non-structural parts of your furniture. Use bits ranging from 2mm to 10mm in diameter, and drill at least 12cm to 15cm deep. Ensure the holes are smooth—bees will avoid splintered tunnels that could damage their wings.
Benefits of Multi-Use Driftwood Furniture
Choosing this approach offers measurable advantages over standard garden decor. First and foremost is the longevity of material. Driftwood has already spent years, perhaps decades, exposed to salt and sun. The softest tissues have been stripped away, leaving behind the densest, most durable fibers. When properly treated, this wood can outlast modern pressure-treated timber.
The ecological impact is the second major benefit. By providing nesting sites and planting pockets, you are creating a “vertical corridor” for wildlife. A single driftwood bench can support a colony of pollinators that service every flower in a 200-foot radius. It turns your seating area into a productive member of the local ecosystem.
Financial savings are also significant. While high-end teak furniture costs thousands, the raw material for driftwood projects is often free for those willing to do the legwork. You are trading your time and grit for a bespoke, heirloom-quality piece that cannot be found in any catalog.
Finally, there is the psychological benefit of the “pioneer-grit” aesthetic. These pieces serve as a daily reminder of resilience. They connect the homeowner to the natural rhythms of the sea and the forest, providing a sense of place that plastic furniture simply cannot emulate.
Challenges and Common Mistakes
The most frequent error is ignoring the salt content. Salt is hygroscopic, meaning it pulls moisture from the air. If you don’t leach the salt out, your wood will constantly feel damp and will eventually kill any sensitive plants like ferns or mosses that you try to grow in it. Always prioritize the 9:1 bleach or vinegar soak.
Structural failure is another common pitfall. Many beginners rely solely on wood glue. However, wood glue requires flat, clean surfaces to bond effectively. On irregular driftwood, glue should only be a secondary reinforcement. Always use mechanical fasteners—lag bolts, timber screws, or deep-set dowels—to ensure the piece can handle the weight of a human.
Mistaking “rustic” for “rotting” is a dangerous game. Just because a log looks cool doesn’t mean it is structurally sound. Use the “awl test.” Take a sharp metal point and press it firmly into the wood. If it sinks in easily, the heartwood is compromised by rot and should only be used for decorative purposes, not as a load-bearing leg or seat support.
Limitations: When Driftwood Is Not Ideal
Driftwood structures are heavy. Once you combine large logs with soil and moisture, these pieces become semi-permanent. If you live in a rental property or plan to move soon, building a large-scale driftwood installation may not be practical. These are “legacy” pieces intended to settle into the landscape.
Environmental constraints also play a role. In extremely arid climates, driftwood can become brittle and silver-gray very quickly, losing its structural flexibility. Conversely, in ultra-humid rainforest environments, even salt-cured wood will eventually succumb to fungal decay without aggressive maintenance. Understand your local micro-climate before committing to a massive build.
Finally, there is the limitation of tools. While a basic bench can be made with a hand saw and a drill, complex multi-use hubs often require specialized equipment. To join curved logs effectively, you may need a chainsaw mill, a drawknife, and long-reach drill bits. If you are a complete novice, start small with a wall-mounted planter before attempting a full-sized seating hub.
Comparison: Driftwood vs. Standard Materials
How does a driftwood build stack up against the common alternatives found in a home improvement store? We look at cost, environmental footprint, and maintenance requirements.
| Feature | Driftwood Multi-Use Hub | Pressure-Treated Pine | Composite (Plastic) |
|---|---|---|---|
| Material Cost | Free / Scavenged | Moderate | High |
| Eco-Value | High (Wildlife support) | Low (Chemical leach) | Negative (Microplastics) |
| Joinery Skill | Advanced / Intuitive | Beginner / Standard | Moderate |
| Lifespan | 15–30+ Years | 10–15 Years | 25+ Years |
| Maintenance | Natural Oils / Cleaning | Stain / Sealer | Low / Cleaning |
Practical Tips and Best Practices
When you are ready to assemble your multi-use furniture, follow these “pioneer-grit” rules to ensure the structure lasts for the next generation. These techniques focus on working *with* the wood’s nature rather than fighting it.
- Use “Vector Clamping”: When gluing irregular shapes, standard clamps will slip. Create “cauls”—small scrap wood blocks with one flat side and one side that matches the curve of your driftwood. Clamp onto these cauls to apply even pressure to the joint.
- Pre-drill Everything: Driftwood is prone to splitting because it is often very dry. Never drive a screw or bolt without a pilot hole that is slightly smaller than the fastener’s diameter.
- The 2-to-10 Rule: For your bee hotel sections, drill a variety of hole sizes. 2mm to 4mm attracts smaller wasps and flies, while 6mm to 10mm is preferred by the harder-working mason bees.
- Elevate the Base: Never let your driftwood sit directly on the soil. Use “sacrificial” stones or heavy gravel as a footer. This prevents “wicking,” where the wood sucks up moisture from the ground, leading to base-rot.
Advanced Considerations for Serious Builders
For those looking to push the boundaries of DIY Multi-use Driftwood Garden Furniture, consider the chemistry of your finishes. While many people love the raw, sun-bleached look, the wood will eventually degrade. Natural oils like Linseed or Tung oil are excellent “pioneer” choices. They penetrate deep into the fibers and harden, creating a water-resistant barrier without the plastic-like look of polyurethane.
Another advanced technique is Shou Sugi Ban, or Japanese wood charring. Briefly burning the surface of the driftwood with a torch creates a layer of carbonized wood that is naturally resistant to fire, rot, and insects. It also creates a stunning, blackened aesthetic that contrasts beautifully with the green of your vertical garden plants.
If you are building a larger structure, such as a driftwood arbor or a “throne-style” seat, you must consider the center of gravity. Irregular logs have “ghost weight”—bulk that isn’t where you expect it to be. Use a plumb bob to ensure your vertical supports are truly carrying the load down to the footers, rather than leaning on your joinery.
Example Scenario: The “Pollinator Bench”
Let’s look at a practical application of these principles. A builder in the Pacific Northwest collects three large cedar drift-logs and a thick, water-worn plank. Following the legal guidelines, they transport the wood home and perform a 48-hour bleach soak to kill any salt-loving bacteria.
The builder uses the two smaller logs as vertical “legs” and the largest log as a backrest. The backrest log is naturally hollow at one end. The builder fills this hollow with a mix of coir, compost, and native Sedum. Because Sedum is drought-tolerant, it thrives in the well-draining driftwood environment.
On the solid side of the backrest, the builder drills fifty holes of varying diameters. By the following spring, these holes are occupied by Orchard Mason Bees. The seat itself is secured with recessed lag bolts, hidden by driftwood plugs. The result is a 300-pound furniture piece that provides a place for the gardener to rest, a food source for insects (via the Sedum flowers), and a safe nursery for pollinators.
Final Thoughts
Building with driftwood is an exercise in listening. The wood tells you where it wants to be joined and where it wants to be left alone. By creating multi-use garden furniture, you are doing more than just decorating a yard; you are acting as a steward of the materials that nature has provided.
These structures represent a shift back to a more sustainable, self-reliant way of living. They require more effort than clicking “Add to Cart,” but the reward is a garden that feels alive, integrated, and deeply personal. Your furniture becomes part of the history of your land, aging alongside your trees and providing for the creatures that call your garden home.
We encourage you to head to the shoreline, find that one piece of wood that speaks to you, and start building. Don’t worry about perfection; nature isn’t perfect, and that is exactly why it is beautiful. Start with a single planter, master the joinery, and eventually, you will have a garden filled with functional art that gives back to the earth.
Sources
1 growitbuildit.com (https://growitbuildit.com/how-to-build-a-bee-hotel-guide-with-pictures-from-log/) | 2 davidpublisher.com (https://davidpublisher.com/Public/uploads/Contribute/64be1440d55dc.pdf) | 3 youtube.com (https://www.youtube.com/watch?v=TXdGI1PS5EU) | 4 instructables.com (https://www.instructables.com/Diy-Log-Bench/) | 5 usda.gov (https://www.fs.usda.gov/wildflowers/pollinators/pollinator-of-the-month/carpenter_bees.shtml) | 6 borderfreebees.com (https://borderfreebees.com/wp-content/uploads/2019/04/Bee-Hotel-Specs-final.pdf) | 7 youtube.com (https://www.youtube.com/watch?v=48WuBS7LwOQ) | 8 reddit.com (https://www.reddit.com/r/woodworking/comments/1hwwelx/where_can_a_landlocked_individual_aquire_large/) | 9 youtube.com (https://www.youtube.com/watch?v=bB2FRD6jLhY) | 10 youtube.com (https://www.youtube.com/watch?v=izMaQp5myf8)