Driftwood Shelf Joinery Techniques
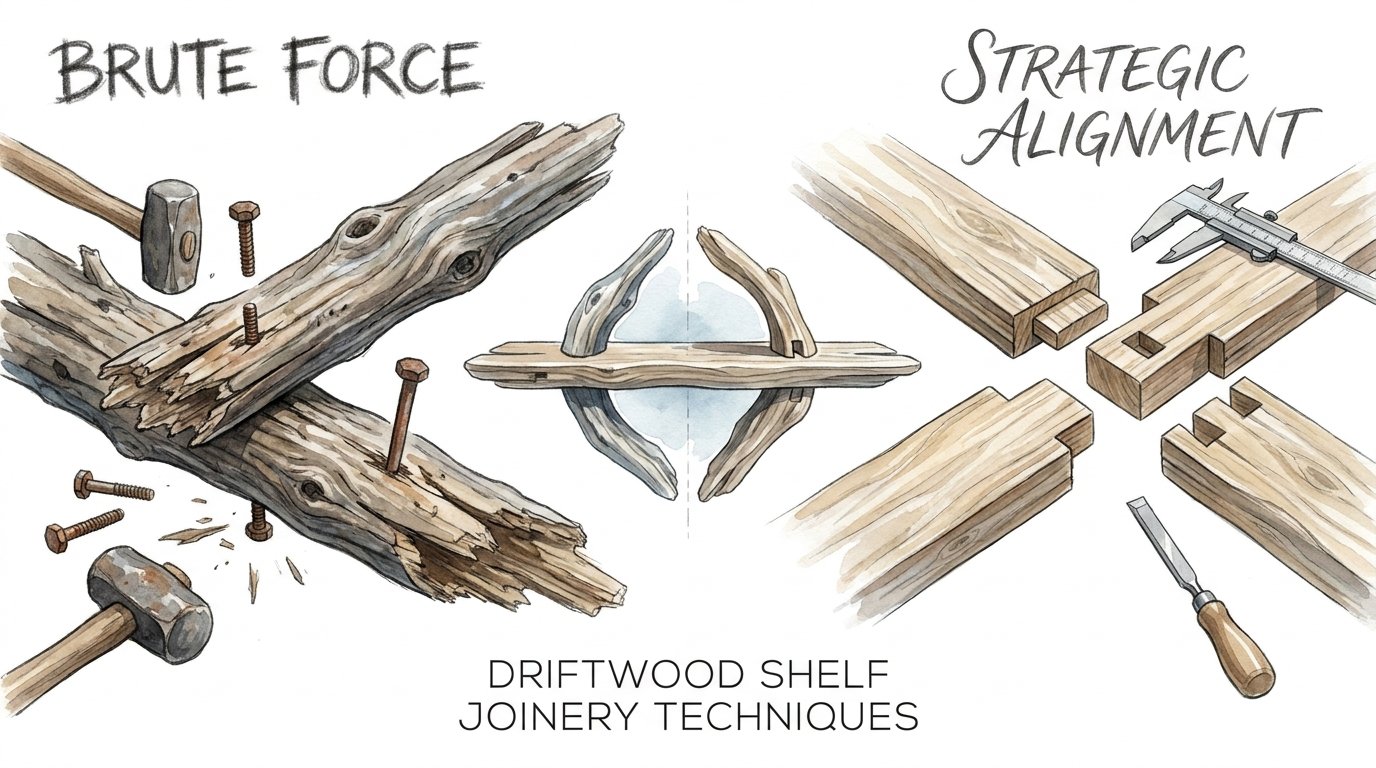
Why are you fighting the wood’s grain when the ocean has already carved the perfect joint for you? Most DIYers treat driftwood like store-bought 2x4s, forcing screws into fragile fibers and wondering why their shelves split. The master doesn’t reach for the drill first; they reach for the right angle.
[affiai]By using the natural crooks and notches carved by years of tides, you can build a shelf that holds more weight with zero hardware. It’s not about working harder; it’s about letting the ocean’s architecture do the heavy lifting. This approach shifts the focus from brute force to strategic alignment, allowing the wood’s existing geometry to provide the structural integrity.
Building with found wood requires a different mindset than standard carpentry. You aren’t imposing your will on a blank slate; you are responding to a story the water has already written. Understanding these natural forms allows you to create furniture that feels like it grew directly out of your wall.
Driftwood Shelf Joinery Techniques
Driftwood shelf joinery is the art of connecting weathered timber using the wood’s own shape and traditional mechanical interlocking instead of metal fasteners. It exists because saltwater and time change the cellular structure of wood, often making it too brittle for modern screws but perfect for friction-based joints. You find this practice everywhere from coastal artist colonies to rugged mountain cabins where “found” material is the primary resource.
In real-world situations, this technique is used to create floating shelves, heavy mantels, and decorative ledges that appear to defy gravity. Think of a natural “V” in a branch acting as a built-in bracket or a deep tide-carved groove serving as a housing for a flat plank. These aren’t just aesthetic choices; they are functional adaptations to the unique properties of scavenged timber.
Working with driftwood means dealing with wood that has been “cured” by the elements. The sun has bleached out the lignins and the water has washed away the sap, leaving behind a skeletal structure. When you use traditional joinery on these pieces, you are honoring the wood’s survival, creating a connection that moves naturally with changes in humidity.
How to Master the Natural Joinery Process
The first step in driftwood joinery is selection and preparation. You cannot simply pull a piece from the sand and start cutting. Saltwater-soaked wood requires desalination to prevent it from “sweating” salt and ruining your wall or finish. Submerge your find in a fresh-water tank for 7 to 14 days, changing the water every 48 hours until it remains clear.
Once the wood is desalinated and dried to a stable moisture content, you must identify the “keys” of the piece. Look for natural crooks, which are points where a branch met a trunk. These areas have dense, interlocked grain that can support significant weight without splitting. These crooks often serve as the vertical supports that will hold your horizontal shelf plank.
To create a no-hardware joint, you will likely use a modified lap joint or a mortise and tenon. Use a sharp chisel to clean out existing natural notches rather than cutting new ones whenever possible. If you must cut, follow the existing flow of the grain to ensure the joint remains strong. A tight friction fit, sometimes secured with a hand-carved wooden peg, is often all that is needed to lock the pieces together.
Benefits of Hardware-Free Construction
One of the primary advantages of this method is the elimination of stress points. Metal screws create a rigid point in a material that wants to move, which often leads to the wood cracking over time. Natural joinery distributes weight across a larger surface area, utilizing the wood’s inherent compressive strength.
Traditional joints actually tend to tighten as the years go by. As the wood experiences seasonal expansion and contraction, the interlocking fibers press against each other, making the shelf more stable rather than looser. This is why centuries-old timber frames still stand while screwed-together decks often wobbly after a decade.
There is also a profound aesthetic benefit. A shelf held together by its own geometry has a “clean” look that metal brackets cannot replicate. It maintains the illusion of a single, continuous piece of nature brought indoors. This creates a focal point that feels both ancient and sophisticated.
Challenges and Common Mistakes
The most frequent error is ignoring the “punky” or soft spots in weathered wood. Driftwood often has a hard exterior shell but a decayed core where moisture sat the longest. If you attempt to seat a joint in soft wood, the shelf will eventually sag or fail entirely. Always test the density with an awl before deciding where to place your joints.
Pests and mold are another silent challenge. Insects like to hide in the deep crevices of beach-found timber. Failing to sanitize the wood in a 1:10 bleach-to-water solution can introduce wood-boring beetles into your home. This soak should last about 15 to 20 minutes followed by a thorough rinse and a long drying period in a shaded, ventilated area.
Beginners often try to force a “perfect” 90-degree angle where the wood doesn’t want one. If you fight the natural curve of a branch, you weaken the fibers. It is better to have a slightly angled shelf that is structurally sound than a perfectly level one that relies on a compromised joint.
Limitations of Driftwood Joinery
You must accept that driftwood has lower structural ratings than kiln-dried construction lumber. The weathering process often introduces micro-cracks that reduce the wood’s bending strength. Consequently, these shelves are better suited for displaying books, plants, or art rather than serving as heavy-duty kitchen storage for cast iron pans.
Environmental constraints also play a role. If you live in an area with extreme humidity swings, a purely friction-fit joint may loosen during the dry season. While traditional joinery is designed to move, the irregular shapes of driftwood make these movements harder to predict than in square-milled oak or maple.
Weight distribution is the final boundary. Because you are using the wood’s natural architecture, you are limited by the size and shape of the pieces you find. You cannot easily “scale up” a design if the right crook doesn’t exist in nature. This makes every project a unique, one-off build that cannot be mass-produced.
Comparison: Natural Joinery vs. Mechanical Fasteners
| Feature | Natural Joinery (No Hardware) | Mechanical Fasteners (Screws/L-Brackets) |
|---|---|---|
| Durability | High; joints tighten over time. | Medium; screws can pull out or rust. |
| Aesthetics | Organic, seamless, “artisan” look. | Visible metal, often looks “DIY.” |
| Wood Movement | Accommodates seasonal shifts. | Resists movement, causing splits. |
| Skill Level | Intermediate to Advanced. | Beginner. |
Practical Tips and Best Practices
Always use sharp hand tools. Dull chisels will crush the delicate, weathered fibers of driftwood rather than slicing through them. When you are working with wood that has been softened by the sea, a surgical edge is the only way to get a clean, tight-fitting joint.
If you encounter a particularly beautiful piece of wood that has a soft “punky” spot where a joint needs to be, consider a wood hardener. Some practitioners use specialized resins to reinforce the internal structure of the wood. This allows the joint to remain hardware-free while providing the density needed to hold a load.
Finish your work with natural oils like linseed or tung oil. These oils penetrate the fibers and provide a water-resistant barrier without creating a thick, plastic-like film. This preserves the tactile, matte quality of the driftwood that made you pick it up on the beach in the first place. Avoid heavy varnishes that can yellow and peel in the sun.
Advanced Considerations for Serious Builders
Serious practitioners look at the “shear moment” of the wood. This is the point where the weight of the shelf tries to slide the horizontal plank past the vertical support. By carving a slight “seat” or housing into the vertical branch, you transform that sliding force into a downward compressive force, which wood handles much better.
Tensioning is another advanced technique. You can use a slight “drawbore” method where you drill a hole through the joint but offset the holes in the two pieces by a fraction of an inch. When you drive a wooden peg through, it pulls the joint together with incredible force. This creates a permanent, rock-solid connection that requires no glue.
Scaling your designs requires an understanding of different species. Not all driftwood is equal. Hardwoods like oak or maple that have washed into the sea will remain much stronger than softwoods like poplar or pine. Identifying the genus of your found wood will help you determine how thin you can safely cut your joints.
Example Scenario: The Kitchen Ledge
Imagine you have found a heavy, salt-bleached cedar log and a flat, grey-washed plank. To build a kitchen spice rack, you select two “V” shaped branch sections from the log to act as your supports. You carefully carve a flat notch into the top of each “V,” matching the thickness of your plank exactly.
Instead of screwing the plank onto the supports, you carve a small groove on the underside of the plank that “locks” onto the branch supports. When the shelf is mounted to the wall—perhaps using a hidden French cleat made of the same wood—the weight of the spice jars actually pushes the plank deeper into the notches.
The result is a shelf that becomes more stable as you add more items to it. There is no wobbling, no visible screws, and no risk of the metal rusting in a humid kitchen environment. The joinery is entirely self-supporting, relying on the “pioneer-grit” logic of wood-on-wood contact.
Final Thoughts
Mastering driftwood shelf joinery is about more than just building a place to put your keys. It is a return to a style of craftsmanship that respects the material’s history and inherent strengths. By stepping away from the hardware aisle and looking toward the natural architecture of the wood, you create pieces that are truly timeless.
This approach requires patience and a keen eye for detail. You must learn to listen to the wood, identifying where it is strong and where it needs support. The reward for this effort is a piece of furniture that carries the spirit of the ocean into your living space.
Start small with a single-plank display shelf and experiment with how different notches hold weight. As you gain confidence, you will find that the possibilities are as vast as the coastline itself. Let the tides be your architect and your hands be the tools that bring that vision to life.
Sources
1 wrighttimberframe.com (https://wrighttimberframe.com/traditional-timber-frame-joinery/) | 2 bayandbent.com (https://www.bayandbent.com/wood-joinery) | 3 mymumthedreamer.com (https://mymumthedreamer.com/how-to-clean-driftwood-for-crafting/) | 4 fawnallen.co.uk (https://www.fawnallen.co.uk/blogs/journal/traditional-woodworking-joints-a-complete-guide-to-screwless-joinery) | 5 realcraft.com (https://realcraft.com/blogs/articles/when-ancient-meets-modern-your-guide-to-wood-joints) | 6 stackexchange.com (https://woodworking.stackexchange.com/questions/2654/techniques-for-working-with-driftwood) | 7 dksstores.com (https://dksstores.com/blog-post6) | 8 microaquaticshop.com.au (https://microaquaticshop.com.au/blogs/bonsai-driftwood/27-best-driftwoods-for-aquarium-types) | 9 marcusfishtanks.com (https://marcusfishtanks.com/blogs/news/caring-for-different-types-of-driftwood-tips-and-techniques) | 10 hawk-hill.com (https://www.hawk-hill.com/how-to-clean-driftwood/) | 11 tennesseewholesalenursery.com (https://tennesseewholesalenursery.com/blogs/tennessee-wholesale-nursery-blog/driftwood-can-take-many-shapes-forms-and-sizes) | 12 vermonttimberworks.com (https://www.vermonttimberworks.com/blog/timber-frame-traditional-joinery/)