How To Select Professional Grade Driftwood
The difference between a shelf that sags and a shelf that lasts a century is the five seconds you spend picking it up. Most DIYers make the ‘Standard’ mistake of grabbing the first pretty branch they see. But ‘Pro’ selection is about structural geometry. I look for ‘Keystone’ pieces—wood that has already grown its own 90-degree support brackets. When you find the right geometry on the beach, you don’t need to buy hardware at the store.
[affiai]If you have ever stood on a shoreline and felt the pull of a silver-gray log, you know the allure of driftwood. It carries the weight of the tide and the grit of the salt. However, bringing that piece into your home requires more than just an eye for beauty; it requires an understanding of the pioneer’s approach to materials. You aren’t just looking for a decoration; you are looking for a structural partner.
A driftwood shelf is a marriage of nature’s randomness and human utility. To make it work, you have to look past the surface texture and see the hidden skeleton within the wood. This guide will show you how to identify professional-grade materials, prepare them for a lifetime of service, and avoid the pitfalls that turn a weekend project into a heap of sawdust and regret.
How To Select Professional Grade Driftwood
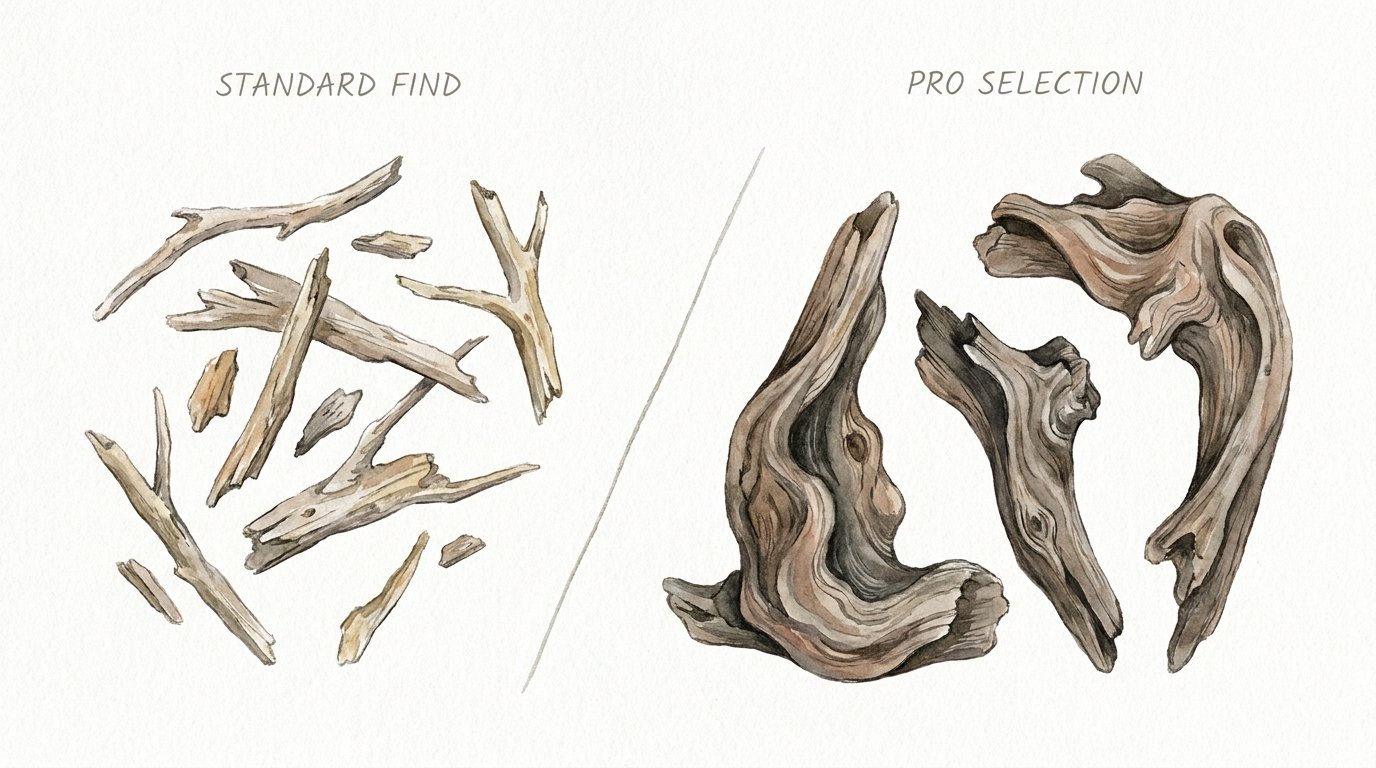
Professional grade driftwood is defined by its density, its history of exposure, and most importantly, its structural geometry. Unlike the “standard finds” that most hobbyists pick up—which are often light, punky, and prone to crumbling—pro-grade pieces have been seasoned by years of saltwater immersion and sun-bleaching. This process leaches out the soft sugars and leaves behind a hardened, mineralized fiber that rivals kiln-dried lumber in stability.
In the real world, these pieces are used for heavy-load shelving, fireplace mantels, and even architectural supports. Think of the difference between a sponge and a stone. A professional piece should feel surprisingly heavy for its size. This weight indicates that the heartwood is still intact and the cellular structure hasn’t been hollowed out by rot or marine borers.
Visualizing professional grade wood starts with looking at the “crotches” or junctions where branches meet the trunk. In the woodworking world, these are often discarded, but for a driftwood shelf, they are the keystone. These areas possess a compressed grain that is naturally reinforced, providing a 90-degree angle that can serve as its own bracket. When you find a piece where the tree has already done the engineering, you’ve found gold.
The Anatomy of Structural Geometry: How to Do It
Selecting the right piece isn’t just about walking the beach; it’s about a systematic evaluation of the wood’s potential. You are looking for a piece that can support weight without bending under its own mass. Follow these steps to ensure your selection is up to the task.
The first step is the **Fingernail Test**. Press your thumbnail into the wood. If it leaves a deep indentation or the wood feels “spongy,” it has already begun to succumb to soft rot or fungal decay. Professional grade wood should be hard enough to resist a thumbnail, signaling that the lignin—the “glue” that holds wood fibers together—is still strong.
Next, perform the **Tap Test**. Strike the wood with a hard object, like a small stone or a hammer. A solid, structural piece will produce a sharp “thwack” or even a slight ringing sound. A piece that is hollowed out by rot or insects will produce a dull, muffled thud. This simple acoustic test can tell you more about the internal health of the log than an hour of visual inspection.
Finally, look for **Keystone Geometry**. This is the art of finding a piece with a natural 90-degree bend. Look for where a root met a trunk or a heavy branch emerged from a lead. These bends are structurally superior to any joint you could glue or screw together because the wood fibers run continuously through the corner. This “grown-in” bracket is what allows you to mount a shelf that looks like it is growing out of the wall while holding thirty pounds of books.
Benefits of Professional Grade Selection
Choosing high-quality, structurally sound driftwood offers advantages that go far beyond aesthetics. When you prioritize structural geometry, you are investing in the longevity of the piece and the safety of your home.
One of the most measurable benefits is **hardware reduction**. Standard driftwood shelves often require bulky, ugly steel brackets to stay level because the wood itself is too weak to be bored into or cantilevered. A pro-grade piece with a natural 90-degree “keystone” can be mounted directly to wall studs using hidden long-shank lag bolts. The wood acts as its own support system, creating a “floating” effect that is both clean and incredibly strong.
Another advantage is **long-term stability**. Driftwood that has been properly selected and seasoned will not warp, twist, or check as much as fresh lumber. Because it has already spent years in the harshest environment on earth, it has reached an “equilibrium moisture content” that makes it remarkably predictable once it is moved indoors. You won’t have to worry about your shelf pulling away from the wall or cracking down the middle six months after you hang it.
Challenges and Common Mistakes
The most frequent error is falling for the **”Pretty but Punky” Trap**. A piece of wood can look stunning with its silver patina and gnarled texture, but if it is internally decayed, it is useless for shelving. DIYers often bring these pieces home, only to find that screws won’t hold in the soft wood, or worse, the shelf snaps under the weight of a single vase.
Another common pitfall is **ignoring the legalities**. It is easy to assume that because the wood is “drift,” it is free for the taking. However, in many regions, driftwood plays a vital role in coastal ecosystems, preventing erosion and providing habitat. In the UK, the Coastal Protection Act 1949 regulates what can be removed from shorelines. In the US and Canada, National Parks and Wildlife Refuges strictly prohibit the removal of any natural material. Always check local regulations to ensure your “pro selection” doesn’t result in a professional-grade fine.
Lastly, many beginners fail to **account for saltwater residue**. Salt is hygroscopic, meaning it pulls moisture out of the air. If you don’t properly leach the salt out of your driftwood, your shelf will “sweat” during humid months, which can lead to mold growth on the wall behind it or damage to the items sitting on the shelf.
Limitations of Driftwood Shelving
While driftwood is a powerhouse of character, it does have realistic constraints. One of the primary limitations is **weight-to-span ratio**. Because driftwood is rarely perfectly straight or of a uniform thickness, calculating its load-bearing capacity is more of an art than a science. Unlike a 2×10 from the lumber yard, you cannot simply look up a span table for a gnarled piece of cedar root.
Environmental trade-offs are also a factor. Driftwood is essentially “recycled” nature, which is excellent for sustainability. However, the cleaning process required to make it safe for indoor use—soaking, bleaching, and long-term drying—can be resource-intensive and time-consuming. If you need a shelf by tomorrow afternoon, driftwood is not your material.
Practical boundaries also exist regarding **mounting surfaces**. A heavy driftwood shelf requires solid anchoring. If your walls are made of lath and plaster or thin drywall with wide stud spacing, you may be limited in the size of the piece you can safely install. The “lever effect” of a deep, heavy shelf can easily pull a fastener right out of a weak wall.
Comparison: Pro Selection vs. Standard Find
To better understand why the “Pro” approach matters, consider how a structural piece compares to a decorative one across key metrics.
| Feature | Standard Find (Decorative) | Pro Selection (Keystone) |
|---|---|---|
| Internal Density | Low (Punky/Spongy) | High (Hardwood/Mineralized) |
| Mounting Method | External Brackets Required | Internal Lag Bolts/Floating |
| Load Capacity | 5-10 lbs (Light Decor) | 30-60+ lbs (Books/Heavy Items) |
| Longevity | Prone to Cracking/Boring Insects | Stable for Decades |
| Prep Time | Minimal (Dry and Brush) | Extensive (Leach, Sanitize, Cure) |
Practical Tips for Preparation
Once you have secured a piece with the right structural geometry, the real work begins. You cannot simply pull a log off the beach and screw it to your wall. It needs to be sanitized and stabilized.
Start by **leaching the salt**. Submerge your driftwood in a large tub of fresh water for at least 48 to 72 hours. Change the water daily. This process draws out the salt that would otherwise attract moisture and ruin your wall finish. For an added layer of safety, many pros use a 1:10 solution of bleach and water during the final soak to kill any remaining bacteria, fungi, or hitchhiking insects like termites or carpenter ants.
Next is the **drying phase**. This is where most people fail. Professional woodworkers will tell you that wood needs to dry “slow and steady.” If you put a wet log next to a heater, it will crack and split. Instead, place it in a well-ventilated, shaded area—like a garage or a covered porch—for several weeks. If you are in a hurry, a DIY “kiln” can be made using a cardboard box and a dehumidifier, but even then, patience is your best tool.
Finally, handle the **surface prep**. Use a wire brush to remove loose bark and “soft” outer layers until you reach the hard, structural core. Sand only the parts that will be touched or used to hold items; leaving the natural “weathered” face intact preserves the story of the wood. For a finish, avoid thick varnishes that make the wood look like plastic. A simple coat of boiled linseed oil or a matte polyurethane will protect the fiber while letting the natural silver-gray tones shine through.
Advanced Considerations for Serious Practitioners
For those looking to take their driftwood work to the next level, consider the **”Hybrid Support” system**. This involves using the natural geometry of the wood in tandem with modern engineering. For example, if you have a stunning but slightly thin piece, you can router a channel into the back of it to hide a steel flat-bar reinforcement. This allows the wood to retain its “wild” look while gaining the structural rigidity of metal.
Another advanced technique is **balancing the center of gravity**. When mounting an irregular piece, you must find the “pivot point” where the weight is distributed evenly across your mounting bolts. A serious practitioner will often mock up the shelf using a cardboard template first. This allows you to visualize exactly where the internal lag bolts need to enter the wood to ensure it sits perfectly level and doesn’t rotate under a load.
Lastly, consider the **species of the find**. While all driftwood looks similar after years in the water, their base characteristics remain. Drift-oak (hardwood) will be incredibly heavy and difficult to drill, but it will hold a thread better than almost anything else. Drift-cedar (softwood) is naturally rot-resistant and smells incredible, but it is much softer and requires larger diameter fasteners to prevent “thread-stripping” inside the wood.
Example Scenario: The Kitchen “Keystone” Shelf
Let’s look at a practical application. Imagine you find a 4-foot section of a fallen maple tree that has washed up. It has a thick “crotch” where a major branch once lived, creating a natural 90-degree angle.
You bring it home, leach the salt for three days, and let it air-dry for a month. After cleaning it with a wire brush, you find the “level line” along the flat top of the branch. You drill two 1/2-inch holes through the back of the “crotch” section, spaced exactly 16 inches apart to match your wall studs.
By using 8-inch lag bolts that go 3 inches into the studs and 5 inches into the dense maple, you create a shelf that can hold twenty pounds of cast-iron pans. The natural 90-degree bend of the wood acts as a built-in corbel, transferring the weight of the pans directly into the wall. No hardware is visible, and the shelf looks like a permanent part of the home’s architecture.
Final Thoughts
Building with driftwood is a lesson in patience and observation. It forces you to stop looking for what is convenient and start looking for what is right. The difference between a shelf that sags and one that stands for a century isn’t in the tools you use, but in the five seconds you spend evaluating the wood’s geometry before you ever leave the beach.
By focusing on “Keystone” pieces and respecting the structural integrity of the wood, you move beyond simple DIY crafting and into the realm of functional art. You aren’t just making a place to put your keys; you are bringing a piece of the earth’s history into your living space, prepared with the grit and foresight of a true pioneer.
Take your time. Listen to the wood. When you find that perfect 90-degree bracket grown by nature, you’ll realize that the best hardware isn’t something you buy—it’s something you discover. Experiment with different species, refine your cleaning process, and soon, you’ll be seeing structural geometry everywhere the tide comes in.
Sources
1 oceanhomemag.com (https://www.oceanhomemag.com/home-design/driftwood-decor/) | 2 legacyhandcraft.com (https://legacyhandcraft.com/resources/best-wood-for-floating-shelves/) | 3 parklanejewelry.com (https://www2.parklanejewelry.com/how-to-wash-driftwood/) | 4 discovertheoutdoors.co.uk (https://discovertheoutdoors.co.uk/beachcombing-uk-law/) | 5 dksstores.com (https://dksstores.com/blog-post49) | 6 durhambuilding.com (https://blog.durhambuilding.com/best-wood-types-for-shelving/) | 7 youtube.com (https://www.youtube.com/watch?v=Pkznsw5bV8Q)