Backlit Driftwood Wall Art Techniques
Is your wall art just taking up space, or is it actually sculpting the light in your room? Most people just nail a stick to the wall and wonder why it looks like a DIY project gone wrong. The pros don’t just hang wood; they manipulate shadows. See how hidden lighting transforms a beach find into a $2,000 gallery piece.


Backlit Driftwood Wall Art Techniques
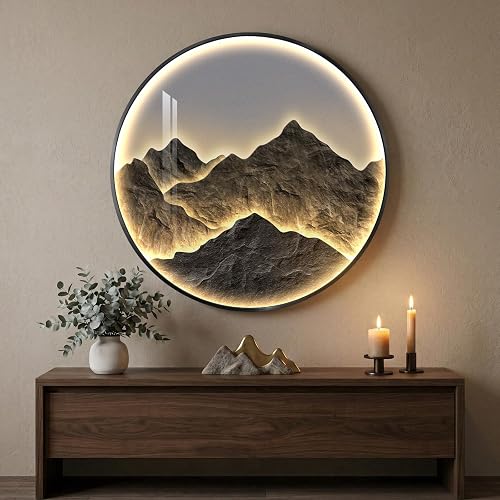
Backlit driftwood wall art is the intentional marriage of raw, weathered timber and modern illumination. It is a design technique that uses a light source hidden behind a piece of reclaimed wood to cast a soft, diffused glow onto the wall surface. This glow, often referred to as a “halo effect,” creates a high-contrast silhouette that emphasizes the wood’s organic twists, grains, and hollows.
In the real world, this technique is used to create focal points in coastal homes, mountain cabins, and modern minimalist apartments. It acts as both a source of ambient lighting and a three-dimensional sculpture. Unlike a standard lamp, the wood itself becomes the lampshade, dictating where the light can and cannot go. This creates a “sculptural shadow” that changes depending on the viewer’s position in the room.
The core of this practice is about highlighting the “history” of the wood. Driftwood has been beaten by waves, bleached by the sun, and scoured by sand. When you place a light behind it, you aren’t just lighting a piece of wood; you are highlighting every battle scar it earned in the ocean. It’s the difference between looking at a map and actually walking the terrain.
How to Prepare and Light Your Driftwood Masterpiece
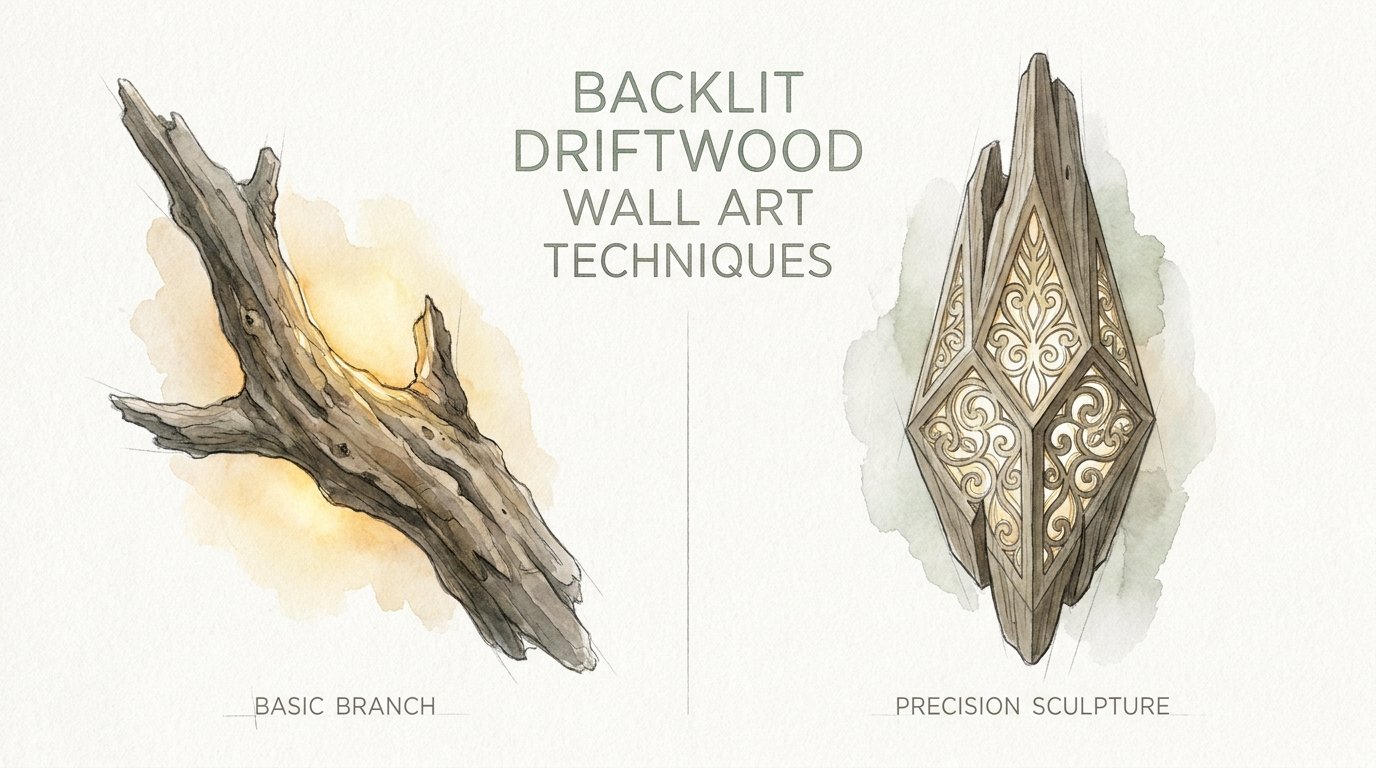
Creating a gallery-quality piece starts long before you plug in a single LED. You have to treat the wood with the respect its age deserves. This process involves a transition from a “basic branch” found on a shoreline to a “precision sculpture” ready for a luxury interior.
First, you must sanitize the wood. Nature isn’t always clean, and beach-found timber often harbors salt, microscopic organisms, or even small insects. Soak your driftwood in a solution of one part bleach to ten parts water for at least 24 hours. This kills any remaining “critters” and helps lighten the wood to that classic silver-grey patina.
Once soaked, the wood needs to dry completely. This can take anywhere from a few days in the hot sun to a week in a climate-controlled workshop. Moisture is the enemy of electronics; never mount LEDs to damp wood. After drying, use a stiff brush or a rotary tool to remove loose bark and soft, pulpy rot. You want to reach the “hard heart” of the branch.
For the lighting itself, most professionals use flexible LED strips. These are superior to old-fashioned “fairy lights” because they provide a continuous line of light rather than hot spots. Measure the back of your driftwood and identify the “spine”—the flattest part of the wood that will face the wall. Using a wood adhesive or the strip’s own backing, adhere the LEDs along this spine.
To hide the light source entirely, you may need to carve a shallow channel into the back of the wood using a router or a chisel. This ensures the LED strip is recessed. When the piece is mounted, the observer sees the glow reflecting off the wall, but never the individual light beads themselves. This “hidden-source” technique is what separates amateur crafts from professional art.
The Measurable Benefits of Backlit Natural Art
The most immediate benefit of backlit driftwood is the introduction of biophilic design into a living space. Biophilic design is the practice of connecting people with nature through building and decor. Research shows that looking at natural textures and organic shapes can lower heart rates and reduce stress.
Beyond the psychological impact, there are practical advantages to this art form.
- Multi-functional Lighting: It provides a soft, non-glare ambient light that is perfect for hallways, bedrooms, or media rooms where overhead lighting is too harsh.
- Visual Depth: By pulling the wood away from the wall with spacers (usually 1 to 2 inches), you create a 3D effect that makes a room feel larger and more layered.
- Eco-Friendly Luxury: You are repurposing a discarded natural material. With high-end driftwood pieces selling for thousands of dollars, this is one of the few DIY projects with a massive “sweat equity” return.
- Customization: Unlike store-bought lamps, every piece of driftwood is unique. You are guaranteed a one-of-a-kind light fixture that cannot be replicated.
Because LEDs use very little power and generate almost no heat, they are safe to keep on for extended periods. This makes backlit art an excellent choice for a nightlight or a “mood setter” that runs in the background of your daily life.
Challenges and Common Pitfalls to Avoid
Many beginners rush the process and end up with a piece that looks “busy” or cheap. The most common mistake is over-lighting. If the LEDs are too bright, they wash out the texture of the wood and create a blinding glare. You want a glow, not a searchlight. Using a dimmer switch is almost mandatory for achieving the right atmosphere.
Another frequent error is poor wire management. Nothing ruins the illusion of a floating piece of natural art like a thick black power cord dangling down the wall. Pros solve this by either installing a recessed outlet behind the art or using a battery pack hidden in a hollowed-out section of the branch. If you must use a cord, paint it the exact color of your wall to help it disappear.
Shadow “hot spots” are another technical challenge. If the LED strip is too close to the wall, you will see individual dots of light. This is called “pixelation.” To fix this, ensure the wood is mounted at least 1.5 inches away from the wall. This distance allows the light to spread out and blend together before it hits the surface, creating a smooth, professional halo.
Finally, ignore the structure at your peril. Large pieces of driftwood can be surprisingly heavy and awkward. Using a single nail is a recipe for disaster. Heavy-duty D-rings or French cleats are necessary to keep the piece stable. If the wood wobbles, the shadows will flicker, and the “gallery feel” will vanish instantly.
Limitations and Environmental Constraints
While beautiful, backlit driftwood isn’t the right choice for every environment. High-humidity areas like bathrooms or outdoor patios can cause the wood to expand and contract. This movement can eventually pop the LED strips off their adhesive backing or cause the wood to warp away from its mounting brackets. If you plan to use driftwood in a damp area, it must be sealed with multiple coats of marine-grade spar urethane.
The size of the room also matters. In a very small, cramped space, a large piece of driftwood with an intense backlight can feel overwhelming. It eats up “visual volume.” Conversely, a tiny twig on a massive white wall will look lost and insignificant. Scale is critical.
Maintenance is another factor often overlooked. Driftwood is porous and has a lot of nooks and crannies that collect dust. When you add a light source behind it, every dust bunny and cobweb is illuminated and magnified. Owners must be willing to use canned air or a soft brush to clean the piece regularly. If you want “set it and forget it” decor, this might not be the project for you.
Precision Sculpture vs. Basic Branch
When planning your project, it helps to know which path you are taking. Are you looking for a rustic, “beach house” vibe, or a polished, “metropolitan gallery” look?
| Factor | Basic Branch Approach | Precision Sculpture Approach |
|---|---|---|
| Wood Selection | Raw, unprocessed, largely as-found. | Highly selected for grain, curves, and density. |
| Finish | Natural or light sanding. | Polished, oiled, or stained to highlight grain. |
| Lighting | Visible fairy lights or simple strips. | Recessed LEDs with diffusers and dimmers. |
| Mounting | Simple hooks or wire. | Hidden French cleats or standoff spacers. |
| Ideal For | Casual cabins, DIY enthusiasts. | Modern luxury homes, professional offices. |
The “Basic Branch” is great for a weekend project, but the “Precision Sculpture” requires a higher level of tool proficiency and a deeper understanding of how light interacts with different wood species.
Practical Tips for Perfect Shadow Play
To get the most out of your backlit art, you need to think like a cinematographer. The color temperature of your LEDs changes everything. Warm white (2700K to 3000K) complements the natural browns and tans of the wood, creating a cozy, campfire-like feel. Cool white (5000K+) can make the wood look sterile and blue, which rarely works unless you are aiming for a very specific “glacier” aesthetic.
Angle the LEDs inward slightly toward the center of the wood. This forces the light to wrap around the edges, making the silhouette appear sharper. If the lights point straight back at the wall, the effect is flat. If they point outward, the light spills too far and loses its shape.
Consider the wall texture. A smooth, matte-painted wall is the perfect canvas. If the wall is high-gloss, you will see a reflection of the LED strip itself, which looks messy. If the wall is heavily textured (like brick or stone), the backlighting will highlight every bump and crater in the wall. This can be a beautiful “double-texture” effect, but it requires even more precise light placement to avoid looking cluttered.
Advanced Considerations for Serious Practitioners
For those looking to take their craft to the next level, integration with smart home systems is the gold standard. Connecting your driftwood art to a system like Philips Hue or a Lutron dimmer allows you to program the lighting to change throughout the day. Imagine the “halo” slowly brightening as the sun sets, or shifting to a deep amber in the late evening.
Advanced makers also experiment with “layered lighting.” Instead of one strip on the back, they might place smaller LEDs inside natural hollows or cracks in the wood. This makes the wood appear as if it is glowing from within, like a piece of cooling lava. This requires significant drill work and careful wire routing through the heart of the branch.
Material choice can also be expanded. While “driftwood” usually refers to ocean-found timber, “ghost wood” or sandblasted grapevines offer similar aesthetic qualities with different structural densities. Combining these woods with resin-filled “river” sections can create a mixed-media piece that glows through the translucent resin while backlighting the solid wood.
Example Scenario: The Modern Entryway
Imagine a 5-foot long piece of weathered Cedar driftwood mounted horizontally in a minimalist entryway. The wall is a dark charcoal grey. The artist has used a “Precision Sculpture” approach, sanding the face of the wood to a 400-grit finish and applying a clear matte wax.
Behind the wood, a high-density LED strip is set into a 1/2-inch deep routed channel. The piece is held 2 inches off the wall by three hidden steel standoffs. When the owner arrives home, a motion sensor triggers the light. The charcoal wall is suddenly flooded with a warm, 2700K glow.
The light catches the silver edges of the Cedar and casts a long, spindly shadow toward the ceiling that looks like the skeleton of an ancient tree. This isn’t just a light fixture; it’s a dramatic entrance that tells a story of the Pacific Northwest before a single word is spoken.
Final Thoughts
Backlit driftwood wall art is more than just a hobby; it is a way to bring the rugged, unyielding beauty of the wilderness into the refined spaces of our homes. It bridges the gap between the chaotic power of the ocean and the controlled comfort of modern architecture.
By following these techniques, you move past the “basic branch” and into the realm of professional artistry. Success lies in the preparation of the wood, the subtlety of the light, and the patience to let the natural shadows do the heavy lifting.
Whether you are a weekend DIYer or a serious practitioner, the goal remains the same: stop hanging wood on your walls and start sculpting the atmosphere of your home. Experiment with different shapes, play with light temperatures, and don’t be afraid to let the wood dictate the final design. The ocean spent decades shaping that piece; the least you can do is give it the spotlight it deserves.
Sources
1 youtube.com (https://www.youtube.com/watch?v=_kzd_OhjyDI) | 2 lakewedoweelife.com (https://www.lakewedoweelife.com/lake-life/driftwood-art-and-treasures-by-tammy-lovvorn) | 3 coco-papaya.com (https://www.coco-papaya.com/en/blog/ethnic-decoration-handicrafts-from-around-the-world/driftwood-decoration-a-unique-and-natural-choice-to-beautify-your-interior) | 4 homify.com.my (https://www.homify.com.my/diy/52765/preserve-driftwood-with-5-things-and-make-a-decorative-object-out-of-it) | 5 hawk-hill.com (https://www.hawk-hill.com/how-to-clean-driftwood/) | 6 theroomsart.com (https://theroomsart.com/driftwood-wall-decor-guide/) | 7 bayislandmuseum.com (https://www.bayislandmuseum.com/blog/the-art-of-driftwood-sculpture/) | 8 diydriftwood.com (https://diydriftwood.com/make-driftwood-pendant-light/) | 9 stylecurator.com.au (https://stylecurator.com.au/diy-driftwood-wall-art/) | 10 hometalk.com (https://www.hometalk.com/diy/upcycle/q-how-to-preserve-large-driftwood-piece-44401954) | 11 diydriftwood.com (https://diydriftwood.com/make-a-driftwood-wall-sculpture/) | 12 youtube.com (https://www.youtube.com/watch?v=WHovJVofQlk) | 13 youtube.com (https://www.youtube.com/watch?v=pEJRG61peu0)