How To Drill Straight Holes In Curved Driftwood
Don’t gamble with your wall studs; one crooked hole can turn a masterpiece into a disaster. Drilling into a round, irregular piece of wood is a nightmare for even seasoned woodworkers. If you’re off by even a fraction of a degree, your shelf will sag. Stop eyeballing it! This 5-minute scrap-wood jig ensures every hole you drill is laser-straight, making your heavy driftwood shelf as stable as a skyscraper.
[affiai]Working with driftwood isn’t like working with dimensional lumber from the big-box store. Nature doesn’t deal in 90-degree angles or flat reference planes. When you pick up a piece of timber that has been tumbled by the tide and bleached by the sun, you are holding a sculpture, not a board. Trying to mount that sculpture to a flat wall requires a bridge between the organic and the geometric.
The stakes are high. A floating shelf relies entirely on the internal alignment of the mounting rods. If your holes are even two degrees off, the rods will bind, the shelf won’t sit flush against the drywall, and your hard-won treasure will look like a DIY disaster. This guide strips away the guesswork and replaces it with the kind of grit-and-logic precision that keeps structures standing for decades.
How To Drill Straight Holes In Curved Driftwood
Drilling a straight hole into a curved surface is a fundamental challenge because drill bits are designed to follow the path of least resistance. On a flat board, the bit’s tip bites into the fibers and stays put. On a rounded log or a piece of weather-beaten driftwood, the bit wants to “walk” or skate along the curve. This happens because the cutting edges of the bit do not engage the wood simultaneously; one side hits the slope first, pushing the bit off-center.
In the real world, this is the same problem encountered when drilling into metal pipes or cylindrical furniture legs. For a driftwood shelf, the problem is compounded by the wood’s internal structure. Driftwood often has varying densities due to salt saturation, localized rot, or “pith” (the soft center of a branch). Without a physical guide to force the bit into a 90-degree path, the drill will naturally follow the softer grain, resulting in a hole that exits the wood exactly where you don’t want it to.
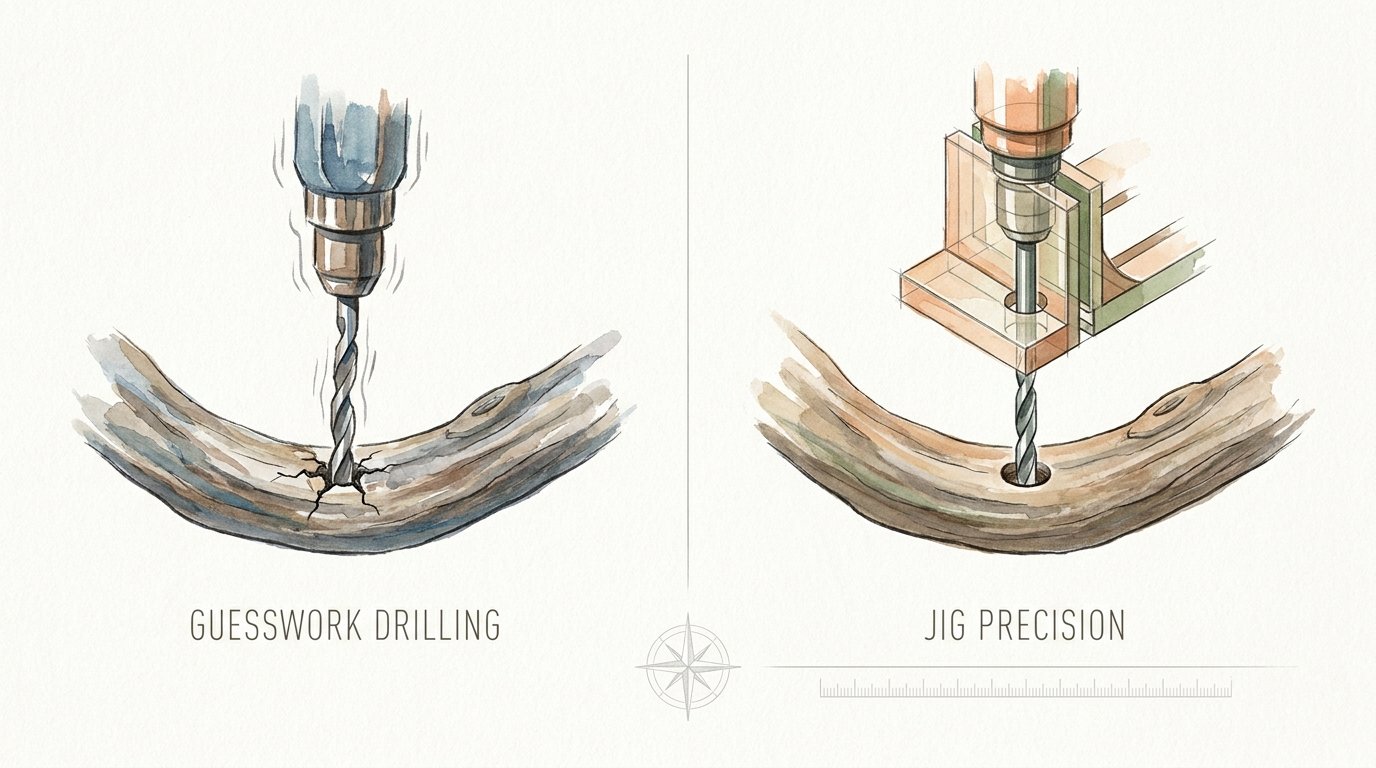
To solve this, we use a reference guide—a drill jig. A jig acts as an external skeleton for your drill bit. It provides a flat, square surface that the drill’s chuck can reference, ensuring that regardless of how “wobbly” the driftwood looks, the path of the hole remains true to the vertical and horizontal axes required for your mounting hardware.
Building the 5-Minute Scrap-Wood Jig
You do not need a fancy machine shop to achieve precision. A reliable jig can be fashioned from a few pieces of 2×4 scrap and a steady hand. The goal is to create a guide block that is deep enough to keep the bit from tilting as it enters the wood.
Start with a block of hardwood—oak or maple is better than pine because the hole won’t enlarge as quickly with repeated use. This block should be at least 3 inches thick. If you don’t have a 3-inch thick block, screw two 2×4 scraps together. Using a drill press (or a very careful hand on a workbench), drill a hole through the center of this block that matches the diameter of your shelf-mounting rods—typically 1/2 inch or 3/4 inch.
Next, attach a “fence” to the bottom of this block. This is simply a thinner piece of wood that hangs off the edge, allowing you to hook the jig over the back edge of your driftwood. Because driftwood is irregular, you may need to shim this fence or use a V-notch if the wood is particularly round. The fence ensures that the hole is centered on the thickness of the wood every single time.
Once the jig is built, clamp it firmly to the driftwood. In woodworking, “firm” means the wood and the jig become one single unit. If the jig moves even a millimeter during the process, the hole is compromised. Use heavy-duty F-style clamps or C-clamps to lock the jig onto the most stable part of the driftwood’s curve.
Advantages of the Guided Drilling Approach
The primary benefit of using a jig over freehand drilling is the mechanical consistency it provides. When you are drilling a hole 6 to 9 inches deep for a heavy-duty floating bracket, a 1-degree error at the entrance becomes a 1/4-inch error at the end of the hole. A jig eliminates this cumulative error by “trapping” the bit’s shank and preventing it from wandering.
Furthermore, this method protects the aesthetic of the wood. Driftwood is often brittle or “furry” on the surface. A wandering bit can mar the face of the shelf or cause “blowout” where the wood fibers splinter. By using a jig, you ensure the bit enters exactly where intended, preserving the natural beauty of the piece. Other advantages include:
- Repeatability: You can drill multiple holes that are perfectly parallel to each other, which is essential for multi-rod brackets.
- Safety: A jig prevents the drill from “binding and kicking,” a common occurrence when a bit hits a hard knot in a curved piece of wood.
- Depth Control: It is easier to set a depth stop (using a piece of tape on the bit) when you have a flat jig surface to measure from.
Common Mistakes and Pitfalls
The most frequent error is failing to clear the chips. Deep holes in driftwood are notorious for clogging. If the flutes of your drill bit become packed with wood shavings, the friction generates immense heat. This heat can char the wood, making it brittle, or even worse, it can cause the drill bit to expand and seize inside the hole. Always pull the bit out every inch or so to clear the debris.
Another pitfall is using the wrong bit. Many beginners reach for a spade bit (or “paddle bit”) because they are inexpensive. Spade bits are disastrous for deep holes in curved wood; they have no “centering” ability once they are an inch deep and will almost certainly wander. A long auger bit or a high-quality brad-point bit is required. Auger bits are specifically designed with a screw-tip that pulls the bit into the wood and large flutes that eject chips efficiently.
Finally, don’t ignore the wood’s moisture content. Driftwood found on a beach may feel dry on the surface but can be “soggy” in the core. Drilling into wet wood is like drilling into clay; the bit will gum up, and as the wood dries later, the holes may shrink or warp, making it impossible to fit the mounting hardware. Ensure your wood has a moisture content below 12% before you begin the final drilling.
Limitations of the Scrap-Wood Jig
While a scrap-wood jig is a powerhouse for most projects, it has its boundaries. If the driftwood is extremely twisted—think of a piece that looks like a corkscrew—a standard flat-fence jig may not have enough surface area to “bite” onto. In these cases, the jig might need to be custom-shaped to the wood’s profile using a rasp or a drawknife.
Environmental factors also play a role. Driftwood often contains trapped sand, salt, and even small pebbles. These “inclusions” act like sandpaper on your tools. Even a hardened steel auger bit will dull quickly when it hits a pocket of Atlantic sand. If you are working with a particularly “dirty” piece of wood, your jig may provide the right angle, but your bit may simply give up halfway through. In these scenarios, you must be prepared to stop and sharpen your bit mid-project.
Comparison: Guesswork vs. Jig Precision
| Factor | GUESSWORK DRILLING | JIG PRECISION |
|---|---|---|
| Setup Time | Instant (Start immediately) | 5–10 Minutes |
| Accuracy | Low (High cumulative error) | Excellent (Within 0.5 degrees) |
| Difficulty | High (Requires steady hand) | Low (Jig does the work) |
| Risk of Ruining Wood | Significant | Minimal |
| Hardware Fit | Loose or Binding | Perfect, Flush Alignment |
Practical Tips and Best Practices
When you’re ready to make the cut, remember that preparation is the better part of valor. Use a center punch or a sharp awl to create a small indentation where the center of your hole should be. This gives the drill bit a “nest” to sit in, preventing that initial skate that can throw off the whole alignment. If you’re working with very hard driftwood, like weathered juniper or oak, you might even consider a small pilot hole with a 1/8-inch bit first.
Maintain your tools with a pioneer’s respect. A dull bit is a dangerous bit. It requires more pressure, which increases the likelihood of the jig slipping or the drill kicking back. If you notice the drill is smoking or if the chips coming out look like dust rather than curls, stop. Sharpen the bit or swap it out. A sharp bit should pull itself into the wood with minimal downward force.
- Use a Speed Square: Even with a jig, hold a speed square next to your drill as you start. This provides a secondary visual check to ensure you aren’t leaning into the drill.
- Wax the Bit: For deep holes in dense wood, rub a bit of beeswax or paste wax on the flutes of the bit. This reduces friction and helps the chips slide out more easily.
- Mark Your Depth: Wrap a piece of bright blue painter’s tape around your bit at the required depth. Stop the moment the tape brushes the top of your jig.
Advanced Considerations for Heavy Shelves
For shelves intended to hold significant weight—such as a collection of heavy books or kitchen cast iron—the internal structure of the driftwood becomes a critical failure point. If the wood is “punky” (soft or slightly decayed), the holes you drill won’t have the structural integrity to hold a mounting rod. In these cases, professional woodworkers often use epoxy reinforcement.
After drilling your hole with the jig, you can pour a thin, penetrating epoxy into the hole. Let it soak into the surrounding wood fibers and cure. Then, re-drill the hole. This creates a hard, plastic-reinforced “sleeve” inside the driftwood that can handle the leverage of a heavy shelf. This technique turns a piece of decorative wood into a functional structural element.
Additionally, consider the hardware. For irregular driftwood, adjustable floating shelf brackets are your best friend. These brackets allow you to tilt the mounting rods slightly after they are attached to the wall. This “fine-tuning” can compensate for a piece of wood that isn’t perfectly flat on the back, ensuring the top surface of your shelf remains level even if the wood itself is wild and untamed.
Example Scenario: The 4-Foot Cedar Driftwood Log
Imagine you’ve found a 4-foot long cedar log on the coast. It’s 6 inches thick, beautifully silvered, and weighs about 40 pounds. You want to mount it in your living room as a mantelpiece. To support this weight, you need three 3/4-inch diameter rods, each extending 6 inches into the wood.
Without a jig, you would attempt to hold the log steady while leaning over it with a heavy drill. The log’s natural taper means your drill bit would likely enter at an angle, and by the time you reached the 6-inch mark, the bit might be dangerously close to the front face of the log. If the three holes aren’t perfectly parallel, the log will never slide onto the three wall rods simultaneously.
By using the 5-minute scrap-wood jig, you clamp the guide block to each of the three marked locations. The jig provides a 3-inch long “tunnel” for your 3/4-inch auger bit. As you drill, the jig forces the bit to stay perpendicular to the back face of the cedar. You clear the chips every two inches. The result? Three holes that are perfectly aligned. You slide the log onto the wall brackets, and it clicks into place with a satisfying “thud,” flush against the wall and level to the eye.
Final Thoughts
Craftsmanship is not about having the most expensive tools; it is about having the most reliable systems. Working with driftwood is an exercise in patience and respect for the natural world. By taking the five minutes required to build a simple drilling jig, you are honoring the wood and ensuring that your project stands the test of time. A crooked hole is a permanent mistake, but a well-executed jig is a guarantee of success.
Whether you are a hobbyist making a single shelf or a pro building a custom furniture line, the principles of guided drilling remain the same. Precision is the foundation of strength. Stop fighting the curves of the wood and start using them to your advantage. Once you master the jig, no piece of timber—no matter how weathered or warped—will be off-limits for your next project.
Apply these techniques today. Build your jig, sharpen your bits, and turn that piece of beach-found treasure into a rock-solid feature of your home. The satisfaction of a shelf that doesn’t sag is worth every minute of preparation.
Sources
1 youtube.com (https://www.youtube.com/watch?v=c5SvkAeYNhA) | 2 desunia.com (https://www.desunia.com/knowledge-base/cabinet-making/how-to-make-a-shelf-hole-jig-that-will-last/) | 3 rightonbracket.com (https://rightonbracket.com/blogs/blog/tips-for-drilling-holes-when-installing-floating-shelves) | 4 youtube.com (https://www.youtube.com/watch?v=Gd8XWWaLVW8) | 5 shelfology.com (https://shelfology.com/collections/floating-shelf-brackets) | 6 drillbitwarehouse.com (https://www.drillbitwarehouse.com/helpful-tips-for-drilling-straight-holes-in-curved-surfaces/) | 7 reddit.com (https://www.reddit.com/r/woodworking/comments/chhane/help_having_trouble_drilling_1_inch_hole_into/) | 8 youtube.com (https://www.youtube.com/watch?v=ggDsw1nQDQ8) | 9 sawdustgirl.com (https://sawdustgirl.com/diy-shelf-pin-drill-jig/) | 10 woodworkersinstitute.com (https://woodworkersinstitute.com/10-tips-for-drilling-better-holes-part-one/) | 11 hawk-hill.com (https://www.hawk-hill.com/diy-floating-driftwood-shelf/)