• Skip to main content
  • Skip to primary sidebar
  • Terms and Conditions
  • Privacy Policy
  • Contact

Driftwood 4 Us

Just About Driftwood

DIY

Driftwood Seashell Wall Art Ideas

June 22, 2024 by admin

In “Driftwood Seashell Wall Art Ideas,” you’ll discover how to transform your living space with creative and eco-friendly decor. By combining the rustic beauty of driftwood with the delicate charm of seashells, you can create stunning wall art that adds a coastal vibe to your home. This guide will inspire you with various project ideas, from simple designs for beginners to more intricate pieces for seasoned crafters. Whether you’re looking to bring a touch of the beach into your living room or create a unique piece for your gallery wall, these ideas will help you craft something truly special. Have you ever thought about bringing the serene beauty of the beach into your home? If you love the ocean, driftwood and seashells are two fantastic elements that can help you capture that coastal vibe. Today, we’ll dive into some amazing driftwood seashell wall art ideas that are not only beautiful but also easy to create. Whether you’re a seasoned crafter or just dipping your toes into DIY projects, there’s something here for everyone.

Why Choose Driftwood and Seashells?

Combining driftwood and seashells in wall art brings the tranquility and beauty of the seaside right into your living space. These natural materials are not only environmentally friendly but also versatile and budget-friendly. Plus, they can be found on most beach outings, making them readily accessible for your DIY projects.

Benefits of Using Driftwood and Seashells

Let’s break down some compelling benefits of choosing driftwood and seashells for your wall art:

BenefitExplanation
Eco-FriendlyMade from natural materials often found washed up on beaches, reducing waste and recycling nature.
Budget-FriendlyLow-cost to free materials, depending on where you gather them.
VersatileUseful for a variety of projects from simple to complex, fitting various home décor styles.
UniqueEach piece of driftwood and shell is unique, making your art one of a kind.
Easy to Work WithGreat for beginners and experts alike, easy to shape, glue, and paint.

Getting Started: Gathering Your Materials

Before we jump into specific project ideas, let’s talk about what you’ll need to get started. Having the right materials on hand will make your crafting experience more enjoyable and efficient.

Basic Materials

Here’s a list of the basic materials you’ll need for most driftwood and seashell wall art projects:

  • Driftwood pieces (various sizes)
  • Seashells (collected or purchased)
  • Hot glue gun and glue sticks
  • Strong craft adhesive
  • Picture hanging hooks
  • Twine or fishing line (for hanging pieces)
  • Scissors
  • Sandpaper
  • Craft paints and brushes (optional)

Finding Driftwood and Seashells

Collecting your materials can be half the fun! Head to your nearest beach or lakeshore to gather driftwood and seashells. Always keep an eye out for interesting shapes and sizes. Make sure to clean your finds thoroughly before using them in your projects. You can do this by soaking them in a mixture of water and a small amount of bleach to remove any dirt and bacteria.

Driftwood Seashell Wall Art Ideas

Easy Driftwood Seashell Wall Art Projects

Ready to start crafting? Let’s discuss some easy projects that will get you started on your driftwood and seashell wall art journey.

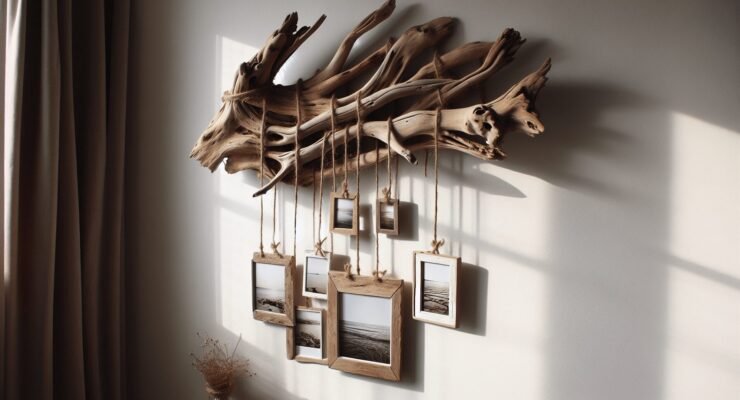
Driftwood and Seashell Mobile

A driftwood and seashell mobile is a simple yet beautiful piece that adds a touch of whimsy to any room. Here’s how to make one:

  1. Gather Your Driftwood: Find a long piece of driftwood to serve as the top of your mobile.
  2. Prepare Seashells: Use a small drill bit to make holes in your seashells.
  3. Assemble Mobile: Cut lengths of twine or fishing line, thread them through the holes in your seashells, and tie them off.
  4. Attach to Driftwood: Secure the seashell strings to the driftwood by tying or gluing them into place.
  5. Add Hanging Hook: Attach a piece of twine to each end of the driftwood to hang your mobile.

Driftwood Seashell Frame

A driftwood seashell frame is perfect for showcasing photos or artwork. Here’s how to craft one:

  1. Choose Frame Base: Start with a basic wooden picture frame.
  2. Attach Driftwood: Arrange the driftwood pieces around the frame’s edges and secure them with hot glue or strong craft adhesive.
  3. Add Seashells: Glue seashells sporadically over the driftwood, filling in gaps and adding visual interest.
  4. Decorate and Finish: Optionally paint the driftwood or shells to match your décor before hanging your frame.

Intermediate Driftwood Seashell Wall Art Projects

Feeling confident? Let’s move on to some intermediate projects that require a bit more time and technique but yield stunning results.

Driftwood Seashell Mirror

Transform a plain mirror into a seaside masterpiece.

  1. Choose Your Mirror: Select a mirror with a flat frame or one with a wide border.
  2. Prepare Your Layout: Lay out your driftwood and seashells around the border to visualize your design.
  3. Adhere Drfitwood: Start by gluing down your larger pieces of driftwood first, ensuring they form a cohesive border.
  4. Fill Gaps with Seashells: Use smaller seashells to fill in the spaces between driftwood pieces.
  5. Let Dry and Hang: Allow the adhesive to dry completely before hanging your new mirror.

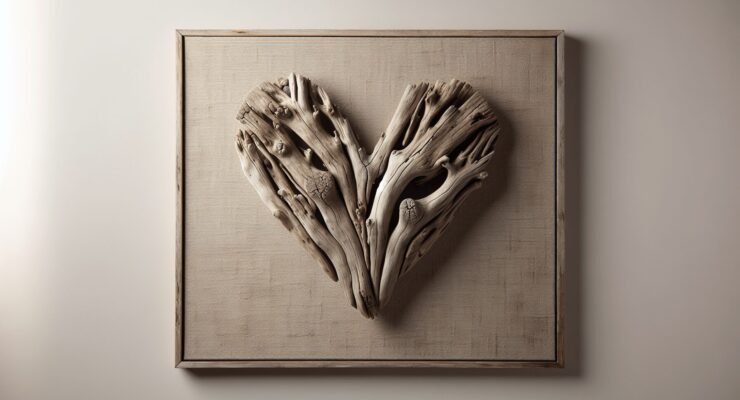
Driftwood Seashell Anchor

Create a nautical-themed anchor wall art piece.

  1. Draw Anchor Template: Use a pencil to draw an anchor shape on a piece of cardboard or heavy-duty paper.
  2. Cut and Transfer: Cut out the shape and use it as a template to trace onto a wooden board.
  3. Arrange Driftwood: Break or cut your driftwood pieces to fit the anchor shape, arranging them inside the traced outline.
  4. Attach Driftwood and Seashells: Glue each piece of driftwood in place. Once the anchor shape is filled, add seashells as decorative accents.

Driftwood Seashell Wall Art Ideas

Advanced Driftwood Seashell Wall Art Projects

For the ambitious crafters, these advanced projects will be sure to impress and become focal points in your home.

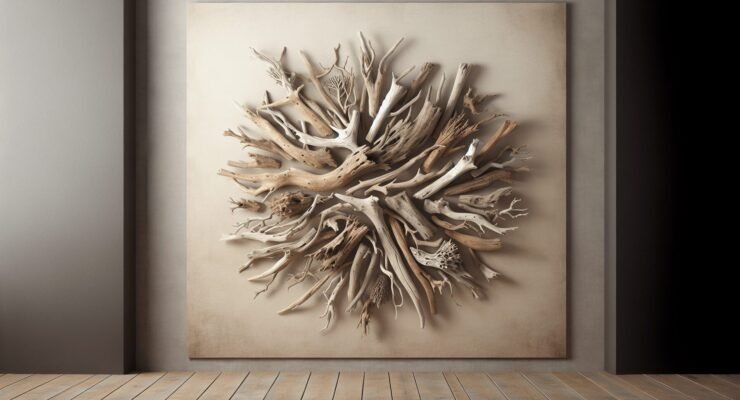
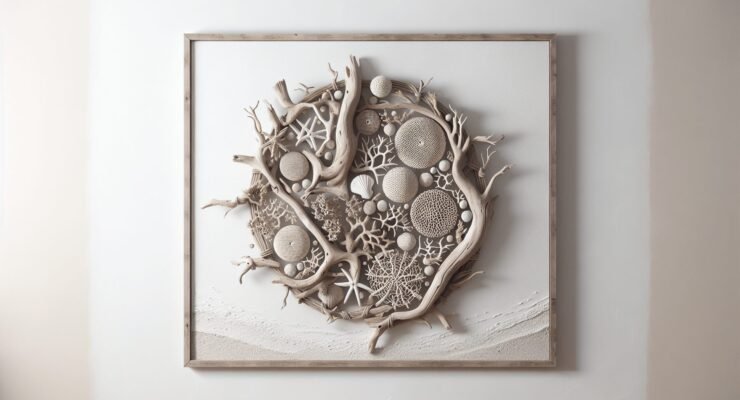
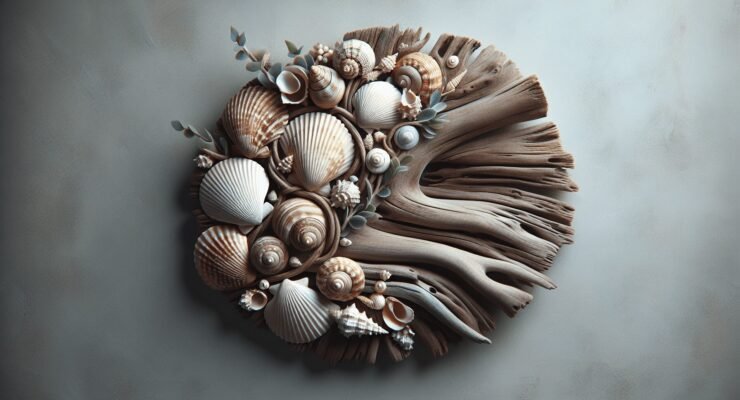
Driftwood Seashell Mosaic

Create an intricate mosaic that tells a story or captures a scene.

  1. Choose a Base: Select a sturdy piece of plywood or canvas as your base.
  2. Plan Your Design: Sketch your design lightly in pencil, planning out where each piece will go.
  3. Cut and Arrange Driftwood: Carefully cut driftwood pieces to fit your design, placing them on the base without gluing initially.
  4. Incorporate Seashells: Strategically place seashells within your design, considering color and texture contrast.
  5. Glue Pieces: Begin gluing each piece in place starting from the outside and working your way in.
  6. Let Dry and Frame: Allow ample time for drying before displaying your mosaic art.

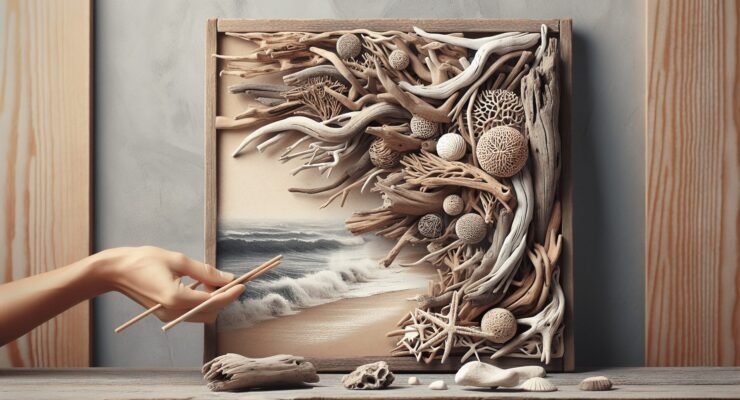
Driftwood Seashell Wall Panel

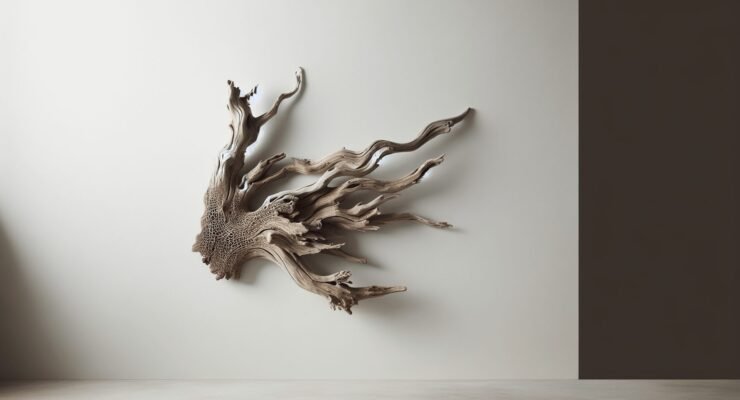
Construct a large wall panel with a cascading design that can serve as a focal point in any room.

  1. Choose Your Panel Base: Select a large wooden or metal panel.
  2. Plan Your Layout: Like with the mosaic, sketching your design beforehand can be helpful.
  3. Prepare Driftwood and Shells: Sand driftwood pieces if needed and clean shells.
  4. Create Cascading Effect: Start at the top of the panel and layer driftwood and seashells to create a cascading effect, giving the impression of waves flowing down the panel.
  5. Finish with a Sealant: To ensure durability, finish your piece with a clear sealant.

Tips and Tricks for Perfect Driftwood Seashell Art

Creating driftwood seashell art can be a rewarding experience. Here are a few tips to make the process smoother and the final product even more stunning:

Clean Your Materials

Always clean your driftwood and seashells thoroughly to prevent dirt, bacteria, and salt from damaging your art over time.

Use Strong Adhesive

A strong, clear-drying adhesive will ensure that your driftwood and seashells remain securely attached to your art base.

Balance is Key

When arranging your materials, pay attention to balance and symmetry, ensuring that your design feels cohesive and well-planned.

Play with Colors and Textures

Don’t be afraid to incorporate different colors and textures in your projects. Painted seashells or bleached driftwood can add unique elements to your design.

Show Off Your Driftwood Seashell Wall Art

Once your artwork is complete, it’s time to display it! Here are some ideas for showcasing your new creations:

Living Room

Create a focal point by placing your driftwood seashell art above the sofa or fireplace.

Bathroom

Add a touch of the seaside by hanging your artwork in the bathroom, complementing existing coastal décor.

Bedroom

Incorporate pieces into your bedroom décor, creating a serene and calming atmosphere.

Gallery Wall

Mix your driftwood seashell art with other artworks to create an eclectic and personal gallery wall.

Final Thoughts

Creating driftwood seashell wall art is a delightful way to bring the beauty of the beach into your home. Whether you’re new to crafting or a seasoned DIY aficionado, there’s a project here for you. From simple mobiles and frames to elaborate mosaics and wall panels, the possibilities are vast and exciting.

So grab your driftwood, gather your seashells, and let your creativity flow. Your home will thank you for the infusion of natural, coastal charm. Happy crafting!

Filed Under: Driftwood Ideas Tagged With: Coastal Decor, DIY, Driftwood, Seashells, Wall Art

Driftwood Picture Hanger Wall Art

June 22, 2024 by admin

Imagine your living space transformed with a charming and rustic touch that tells a story of nature’s beauty. The Driftwood Picture Hanger Wall Art brings the enchanting essence of the coast right into your home. With its unique and organic design, this piece beautifully displays your cherished memories while adding a cozy, seaside vibe to any room. It’s not just a décor item; it’s a blend of nature and artistry that captivates the heart and warms the soul. Enjoy the simple elegance of driftwood and create a wall that speaks volumes about your style and love for the ocean. Have you ever wondered how you can bring a touch of nature and creativity into your home décor? Imagine combining the rustic charm of driftwood with your favorite photos or art pieces to create a unique and captivating wall display. If this idea excites you, then you’re in for a treat. In this friendly guide, we’ll delve into everything you need to know about creating your own Driftwood Picture Hanger Wall Art. Ready to get started? Let’s dive in!

Driftwood Picture Hanger Wall Art

What is Driftwood Picture Hanger Wall Art?

Driftwood Picture Hanger Wall Art combines the natural beauty of driftwood with your cherished memories or artworks. This creative project not only brings a piece of nature indoors but also adds a personal touch to your space. By hanging pictures or art from driftwood, you create an eye-catching display that tells a story and adds character to any room.

Why Choose Driftwood for Wall Art?

Driftwood is naturally beautiful and has unique textures and shapes that are difficult to replicate with manufactured materials. It often carries a weathered appearance, which can add a rustic, beachy, or organic touch to your décor. Moreover, using driftwood can be a sustainable and eco-friendly option if you source it responsibly.

Materials Needed for Your Driftwood Picture Hanger Wall Art

To get started on your own driftwood picture hanger wall art, you’ll need a few key materials. Most of these are easy to find and may even be items you already have at home.

Here’s a handy table to organize what you’ll need:

MaterialsDescription
DriftwoodChoose a piece sturdy enough to hold pictures.
Twine or StringUse this for hanging the pictures.
Hooks or Eye ScrewsSecure these into the driftwood for hanging.
Hanging ClipsUse these to attach pictures or art to the twine.
Photos or Art PiecesChoose items you want to display.
ToolsDrill, pliers, scissors, measuring tape.

Selecting Your Driftwood

Selecting the right piece of driftwood is vital. You want something sturdy enough to hold the weight of your photos or art, but not so heavy that it becomes a burden to hang on the wall. Look for driftwood that has interesting shapes or textures, as these features will add character to your wall art. You can often find driftwood at beaches, lakes, or even craft stores.

Preparing Your Driftwood

Once you’ve selected your driftwood, it’s essential to prepare it for your project. This ensures it’s clean, safe, and ready to be a part of your wall art.

Cleaning the Driftwood

Driftwood can often be covered in dirt, sand, or even bits of algae. Here’s how to clean it:

  1. Rinse: Use water to rinse off any obvious debris.
  2. Soak: Soak the driftwood in a mixture of water and mild bleach (1 part bleach to 9 parts water) for 24 hours to kill any bacteria or pests.
  3. Scrub: Gently scrub the driftwood with a brush to remove any remaining dirt.
  4. Dry: Allow the driftwood to dry completely, which could take a few days.

Sealing the Driftwood (Optional)

While not always necessary, sealing your driftwood can provide extra protection and durability. Use a clear wood sealer or varnish to coat the driftwood, making sure to follow the manufacturer’s instructions. Once sealed, allow the driftwood to dry thoroughly.

Assembling Your Driftwood Picture Hanger Wall Art

Now comes the fun part – putting everything together! Follow these steps to assemble your driftwood picture hanger wall art.

Attaching Hooks or Eye Screws

  1. Measure and Mark: Decide where you want to place the hooks or eye screws on your driftwood. It’s usually best to have them spaced evenly.
  2. Drill Holes: Drill small pilot holes where you’ve marked the spots.
  3. Insert Hooks/Eye Screws: Screw in the hooks or eye screws until they are secure.

Adding Twine or String

  1. Cut the Twine: Cut pieces of twine to the desired length, taking into account that they’ll need to hang and hold the weight of your pictures.
  2. Thread the Twine: Thread the twine through the hooks or eye screws, tying secure knots to ensure they don’t come loose.
  3. Arrange the Twine: Let the twine hang freely from the driftwood. You can have one piece of twine for each picture or arrange them in a cascading style.

Attaching the Hanging Clips

  1. Position the Clips: Attach hanging clips to the twine where you want the pictures to be displayed.
  2. Secure the Clips: Ensure the clips are tightly fastened so they can hold the pictures securely.
  3. Adjust as Needed: You might need to adjust the length of the twine and the position of the clips to get everything looking just right.

Hanging the Pictures or Art Pieces

Finally, it’s time to add your photos or art pieces. Simply clip them onto the hanging clips and adjust as necessary to achieve the desired arrangement. Make sure everything is secure and evenly spaced.

Driftwood Picture Hanger Wall Art

Tips for Personalizing Your Driftwood Picture Hanger Wall Art

One of the best things about this project is how customizable it is. Here are some tips to help you make your driftwood picture hanger wall art truly unique.

Incorporate Natural Elements

Beyond driftwood, consider adding other natural elements such as shells, feathers, or small stones. These can be attached to the twine or driftwood itself to enhance the organic feel of your wall art.

Use Different Twine Types

Experiment with different types of twine or string, such as jute, hemp, or colored yarn. Each material adds a different texture and look to your piece.

Mix and Match Frames

If you’re not using clips, you can also incorporate small frames to hang from the driftwood. Mix and match different frame styles and colors for an eclectic look.

Vary Picture Sizes

Using a variety of picture sizes can create a more dynamic visual impact. Combine larger photos with smaller ones to create depth and interest.

Add Lighting

Incorporate small fairy lights or LED strips to highlight your wall art, making it a stunning focal point even in low light.

Maintenance and Longevity

Taking care of your driftwood picture hanger wall art ensures it remains a beautiful part of your home for years to come.

Regular Dusting

Gently dust the driftwood and photos with a soft cloth or duster regularly to keep everything looking clean.

Securing Loose Parts

Over time, the twine or clips might become loose. Check periodically and re-tighten any knots or screws as needed.

Avoid Direct Sunlight

Prolonged exposure to direct sunlight can fade your photos and potentially damage the driftwood. Try to hang your art in a spot that gets indirect light or use UV-protective coatings on the photos.

Creative Inspirations and Ideas

If you’re looking for some additional inspiration, consider these creative ideas for your driftwood picture hanger wall art.

Themed Displays

Create themed displays for different seasons, holidays, or family events. Swap out photos and decorative elements to keep the wall art fresh and relevant.

Storytelling Through Pictures

Arrange your photos or art pieces to tell a story. This could be the progression of your family over the years, a memorable vacation, or a personal journey you want to share.

Interactive Elements

Add interactive elements such as small chalkboards or mini bulletin boards where you can write messages or pin notes.

Conclusion

Driftwood picture hanger wall art is a fantastic way to combine natural beauty with personal memories or artistic expressions. By following this guide, you can create a unique and customizable wall display that adds warmth and personality to your space. Whether you’re an experienced crafter or a DIY newbie, this project is accessible, enjoyable, and immensely rewarding.

So, gather your materials, unleash your creativity, and start crafting your driftwood picture hanger wall art. Your walls will thank you, and you’ll have a beautiful, conversation-starting piece that showcases your style and ingenuity. Happy crafting!

Filed Under: Driftwood Ideas Tagged With: DIY, Driftwood, Picture Hanger, Rustic Decor, Wall Art

Driftwood Hanger Wall Art

June 21, 2024 by admin

Imagine transforming your living space with a touch of natural elegance—Driftwood Hanger Wall Art brings just that. This unique piece combines the rustic charm of driftwood with functional artistry to create a compelling focal point for any room. You’ll appreciate how the organic textures and shapes of the driftwood seamlessly blend with various decor styles, making it a versatile addition to your home. Whether you’re hanging it in your entryway, living room, or bedroom, this wall art effortlessly adds a warm, coastal vibe that invites nature indoors. Have you ever wondered how you could bring the serenity and beauty of the beach into your home? Driftwood hanger wall art is a timeless and charming way to achieve just that. It’s an inventive and sustainable form of decoration that adds a unique, rustic touch to any room. Not only is driftwood beautiful to look at, but using it in art projects can also be a peaceful and rewarding experience.

Driftwood Hanger Wall Art

What is Driftwood Hanger Wall Art?

Driftwood hanger wall art involves creating decorative pieces using driftwood and various other materials. These pieces typically hang on the wall, adding texture and natural beauty to your space. It’s an art form that can be as simple or complex as you like, making it accessible for beginners and intriguing for seasoned DIYers.

The Beauty of Driftwood

Driftwood, the natural wood washed ashore by water bodies like rivers, lakes, or oceans, has a distinctive charm. Its weathered appearance, unique shapes, and textured surfaces tell the story of its journey through water and time. Each piece of driftwood is different, making every artwork made from it unique.

Why Choose Driftwood Hanger Wall Art?

There are so many reasons to love driftwood hanger wall art. Here are a few:

  • Eco-Friendly: Reusing driftwood reduces waste and promotes sustainability.
  • Versatile: It complements various decor styles, from rustic to coastal.
  • Creative: There’s no right or wrong way to create this art, making it a liberating and enjoyable process.

Essential Materials and Tools

Before starting your driftwood hanger wall art project, you’ll need to gather some essential materials and tools. Here’s a basic list to get you started:

MaterialPurpose
DriftwoodThe main feature of your artwork
Hooks/NailsFor hanging pieces of driftwood
Twine/stringTo connect pieces or hang the artwork
Beads/CrystalsOptional embellishments
Paints/VarnishTo protect or color the driftwood
SandpaperFor smoothing rough edges
DrillFor making holes in the driftwood

Finding Driftwood

One of the most enjoyable parts of this project is gathering your driftwood. This can be a fun day out, whether you’re walking along the beach, riverbank, or lakeside. Look for pieces that have interesting shapes, textures, and sizes. It’s essential to ensure that the driftwood is dry and free from pests.

Preparation

Once you’ve collected your driftwood, it’s time to prepare it:

  1. Clean the driftwood: Rinse it with fresh water to remove any salt, sand, or dirt.
  2. Dry thoroughly: Allow the driftwood to dry completely to prevent mold or rot.
  3. Sand the edges: Use sandpaper to smooth out any rough edges that might be hazardous.

Designing Your Driftwood Hanger Wall Art

Let your imagination run wild with the design of your driftwood hanger wall art. Here are some steps to help you organize your project:

Conceptualize Your Design

Start with a rough sketch of your idea. Decide if you want your driftwood to form a particular shape or pattern. Think about the colors and additional elements you’d like to include, such as beads, shells, or small mirrors.

Arrangement

Lay out your pieces of driftwood and arrange them in various ways until you find a composition you like. This is your chance to play around with shapes and sizes.

Connecting the Pieces

Depending on your design, you might need to connect the pieces of driftwood. You can do this using twine, string, or even wire. Drill small holes into the driftwood to thread your connecting material through, tying knots to secure it.

Adding Embellishments

Adding extra elements like beads, crystals, or paint can enhance the visual appeal of your art. Be mindful not to overdo it; sometimes, simplicity is the key to elegance.

Step-by-Step Guide to a Classic Driftwood Hanger

Creating a classic piece of driftwood hanger wall art can be a great starting point. Here’s a step-by-step guide to help you:

Step 1: Gather Materials

Collect all your materials and tools. Make sure everything is clean and dry.

Step 2: Plan Your Design

Sketch out a simple design on paper. For example, you might want to create a horizontal hanger with multiple pieces of wood hanging vertically.

Step 3: Prepare Your Driftwood

Clean, dry, and sand your driftwood pieces.

Step 4: Drill Holes

Drill small holes into the top and bottom of each piece of driftwood where you plan to string them together. Ensure the holes are evenly spaced.

Step 5: Connect the Driftwood

Thread twine or string through the holes and tie knots to secure each piece. Ensure the connections are firm but allow the driftwood to dangle.

Step 6: Add Embellishments

If you want, add beads or small shells between the pieces of driftwood for extra charm.

Step 7: Hang Your Artwork

Install hooks or nails on the wall where you wish to hang your artwork. Securely attach your driftwood piece, ensuring it’s balanced.

Driftwood Hanger Wall Art

Various Styles of Driftwood Hanger Wall Art

Driftwood hanger wall art can be adapted to suit various styles and preferences. Here are a few ideas:

Coastal Chic

Enhance the natural beauty of driftwood by embracing a coastal theme. Use light colors, shells, and nautical elements to complement your artwork.

Rustic Farmhouse

Pair driftwood with metal hooks or rustic hardware to create a farmhouse-inspired look. Sand certain parts of the driftwood more heavily to reveal lighter wood beneath, adding a distressed touch.

Bohemian Vibes

Combine driftwood with macrame, colorful beads, and feathers for a boho-chic piece of art. This style allows for a plethora of textures and colors.

Minimalist Elegance

Keep it simple by using just a few carefully chosen pieces of driftwood. Avoid additional embellishments and let the natural beauty of the wood speak for itself.

Tips for Success

Creating driftwood hanger wall art is relatively straightforward, but here are some tips to ensure your project goes smoothly:

Choose Quality Driftwood

Not all driftwood is created equal. Look for pieces that are sturdy and well-weathered, as these will be the most beautiful and durable.

Take Your Time

Allow yourself plenty of time to experiment with different designs and arrangements. This will ensure that you’re happy with the final result.

Use Quality Tools

Having the right tools on hand, like a good drill and sandpaper, can make the process much more manageable and fun.

Safety First

Always wear protective gear, such as gloves and goggles when handling tools. Ensure your workspace is well-ventilated.

Maintaining Your Driftwood Art

To ensure your driftwood wall art remains beautiful for years, a little maintenance may be required. Here are some tips:

Dust Regularly

Dust your artwork lightly with a soft cloth or feather duster to keep it clean.

Avoid Direct Sunlight

Although driftwood is naturally sun-weathered, prolonged exposure to direct sunlight can cause additional fading and wear.

Re-seal if Necessary

If you’ve used a varnish or sealant on your driftwood, you might need to reapply it occasionally to maintain protection.

Conclusion

Driftwood hanger wall art is an excellent way to bring a piece of the outdoors into your home. Whether you’re a seasoned DIY enthusiast or a beginner looking to try something new, the versatility and beauty of driftwood make it an ideal material. Remember to enjoy the process, experiment with different designs, and let your creativity flow. Whether you aim for a coastal chic, rustic farmhouse, bohemian, or minimalist style, your final piece will undoubtedly add charm and personality to any space. Happy crafting!

Filed Under: Driftwood Ideas Tagged With: craft, DIY, Driftwood, Home Design, Wall Art

Driftwood Heart Wall Art

June 21, 2024 by admin

Driftwood Heart Wall Art” is a delightful and inspiring guide to creating a beautiful piece of home decor using nature’s materials. In this heartwarming article, you’ll discover how to transform simple pieces of driftwood into a stunning heart-shaped wall art that adds a touch of rustic charm to any room. You’ll be walked through the entire process, from gathering the perfect driftwood pieces to assembling and finishing your unique creation. Embrace your creativity and bring the outdoors into your home with this lovely, handcrafted decoration that truly comes from the heart. Have you ever stumbled upon a beautiful piece of driftwood at the beach and wondered how you could incorporate it into your home décor? Driftwood Heart Wall Art might just be the perfect way to bring a touch of nature and a sense of personalized charm into your living space. Let’s explore how you can create and display this unique art that combines the raw beauty of nature with the warmth of a heartfelt gesture.

Driftwood Heart Wall Art

What is Driftwood Heart Wall Art?

Driftwood Heart Wall Art is exactly what it sounds like—an art piece created using driftwood shaped into a heart. This type of wall art can be a meaningful addition to your home, bringing a bit of the natural world indoors while also serving as a focal point in your décor. The rustic and whimsical nature of driftwood makes it an ideal material for creating a heart-shaped piece that can symbolize love, connection, and the uniqueness of nature.

Why Choose Driftwood for Art?

Driftwood is nature’s own masterpiece. Each piece is unique, shaped by the elements and tumbled smooth by the sea. Here are a few reasons why driftwood makes an excellent material for art:

  • Eco-friendly: Using driftwood is a way of recycling natural resources.
  • Unique: No two pieces of driftwood are the same, ensuring that your art piece will be one-of-a-kind.
  • Aesthetic Appeal: Driftwood has a natural, rustic look that adds charm and warmth to any space.

Materials Needed for Driftwood Heart Wall Art

Creating your own Driftwood Heart Wall Art can be a fun and rewarding DIY project. Here’s a list of materials you’ll need to get started:

MaterialDescription
DriftwoodCollected pieces of varying lengths and shapes.
Backing BoardA sturdy piece of wood or canvas to attach the driftwood to.
Strong AdhesiveIndustrial glue or a hot glue gun to secure the driftwood pieces.
Picture HangersTo mount the art on the wall.
SandpaperOptional, for smoothing rough edges on the driftwood.
Pencil & RulerFor marking the outline of the heart on the backing board.
Optional: Paint or VarnishIf you want to add a layer of color or protection to your project.

Collecting Driftwood

The first step in your project is to gather driftwood. This can be a fun adventure on its own! Head to your nearest beach, lake, or riverbank and start collecting. Look for pieces that are interestingly shaped and smooth. Aim for a variety of lengths to give your heart a more textured and layered look.

Step-by-Step Guide to Making Driftwood Heart Wall Art

Here’s a detailed guide on how to create your own Driftwood Heart Wall Art from scratch.

Step 1: Prepare Your Backing Board

Before you start attaching driftwood, you’ll need a backing for your heart. This can be a simple piece of wood or canvas.

  1. Choose your backing board: Select something sturdy enough to hold the weight of your driftwood.
  2. Outline the heart shape: Use a pencil to lightly sketch a heart shape on your backing board. You can use a ruler to ensure symmetry if you desire.

Step 2: Arrange the Driftwood Pieces

This is where your creativity shines. Lay out your driftwood pieces within the heart outline to ensure they fit well together.

  1. Dry fit the pieces: Without using glue, arrange the driftwood inside the heart outline. This is your chance to play around with different placements.
  2. Layering: Consider layering smaller pieces over larger ones for a 3D effect.

Step 3: Attach the Driftwood

Once you’re happy with the arrangement, it’s time to start attaching the pieces.

  1. Glue the driftwood: Begin gluing each piece to the backing board, starting from the bottom and working your way up. Use a strong adhesive to ensure that the pieces stay securely in place.
  2. Hold until set: Some adhesives may require you to hold the pieces in place for a few seconds until they set.

Step 4: Add Finishing Touches

After all the pieces are glued, you might want to add a few finishing touches to make your art piece stand out.

  1. Sand rough edges: Use sandpaper to smooth any rough or splintered edges if necessary.
  2. Option to paint or varnish: If you desire, add a layer of paint or varnish to protect the wood and give it a polished look.

Step 5: Hang Your Art

Now that your Driftwood Heart Wall Art is complete, it’s time to display it!

  1. Attach picture hangers: Secure picture hangers to the back of the board.
  2. Find the perfect spot: Choose a prominent place in your home to hang your new artwork.

Decorating with Driftwood Heart Wall Art

Once you’ve created your piece, you’ll want to find the perfect place to display it. Here are some ideas on how to incorporate Driftwood Heart Wall Art into your décor.

In the Living Room

Hang your Driftwood Heart Wall Art above the mantle or a prominent wall to make it a focal point of the room. Pair it with other natural elements like plants, stones, or seashells to create a cohesive look.

In the Bedroom

Bring a sense of calm and nature into your bedroom by hanging the heart art above your bed. It can serve as a symbolic gesture of love and connection, perfect for a personal space.

In the Entryway

Greet your guests with a touch of rustic charm by placing your art in the entryway. It’s a great way to set the tone for the rest of your home’s décor and adds a personal touch right from the start.

Driftwood Heart Wall Art

Caring for Your Driftwood Art

Once your Driftwood Heart Wall Art is in place, you’ll want to keep it looking its best. Here are some tips on caring for your art piece:

Dusting

Dust your driftwood heart regularly. Use a soft cloth or a feather duster to gently remove any dust build-up.

Avoiding Moisture

While driftwood comes from the water, it’s best to keep your finished art piece dry to prevent mold or decay. Avoid placing it in areas with high humidity.

Handling with Care

Driftwood can be fragile. Handle your art piece with care, especially when moving or cleaning it.

The Symbolism of Driftwood Heart Wall Art

Beyond its aesthetic appeal, Driftwood Heart Wall Art holds deeper meaning and symbolism.

Love and Connection

Creating a heart shape symbolizes love and connection, making this art piece a sentimental addition to your home.

Nature and Sustainability

Using driftwood highlights a commitment to sustainability and an appreciation for the natural world. Each piece of wood tells a story of its journey and transformation.

Personal Touch

Because you create it yourself, Driftwood Heart Wall Art embodies your personal touch and creativity. It’s a reflection of your taste, style, and the effort you put into making something special.

Customizing Your Driftwood Heart Wall Art

Every piece of Driftwood Heart Wall Art can be as unique as the person who makes it. Here are some ideas for personalizing your creation.

Adding Color

While the natural look of driftwood is beautiful, adding a splash of color can make your art piece stand out. Consider painting a few driftwood pieces in pastel hues or metallics for a modern twist.

Incorporating Other Materials

Mix in other natural elements like sea glass, shells, or stones to add texture and variety. These additional materials can enhance the coastal feel of your wall art.

Personalized Messages

Incorporate small plaques or tags with personalized messages, names, or dates, making your driftwood heart a meaningful keepsake or a unique gift.

Conclusion

Driftwood Heart Wall Art is more than just a decorative piece; it’s a testament to creativity, sustainability, and the beauty of nature. By following these steps, you can create a unique and heartfelt art piece that speaks to your personal style and adds charm to any room. So, gather your materials and let your creativity flow—your stunning driftwood heart is just a few steps away from adorning your walls with love and natural beauty.

Filed Under: Driftwood Ideas Tagged With: craft, DIY, Driftwood, Heart Art, Wall Decor

Driftwood Crafts Wall Art

June 19, 2024 by admin

Imagine transforming your home with the rustic charm of ocean-tossed treasures. In “Driftwood Crafts Wall Art,” you’ll explore creative ways to turn pieces of driftwood into beautiful and unique wall art. This guide not only provides step-by-step instructions but also inspires you with a variety of designs that showcase the natural beauty of each driftwood piece. Get ready to bring the essence of the seaside into your living space, one artistic project at a time. Have you ever considered transforming your living space with a touch of nature? Driftwood crafts wall art can add a rustic yet sophisticated flair to any room. Let’s dive into the world of driftwood and discover how you can create stunning pieces that bring the beach right into your home.

What Is Driftwood?

Driftwood is wood that has been washed onto the shore by the action of tides, waves, or winds. Its weathered, worn appearance makes it an ideal material for crafting beautiful, natural art pieces.

The Appeal of Driftwood

There’s something magical about driftwood. Its naturally sculpted forms bring a piece of nature indoors. No two pieces of driftwood are alike, ensuring that any creation you make is entirely unique.

Sourcing Driftwood

Finding driftwood can be an adventure all on its own. Beachcombing for these treasures allows you to explore nature while collecting materials for your next project. If you live near a coastline, you’re in luck. Otherwise, you can purchase driftwood online or from craft stores.

The Basics of Driftwood Crafts

Before you start creating driftwood wall art, you’ll need to grasp some fundamental techniques and tools. This will ensure your art pieces are not only beautiful but also durable.

Essential Tools and Materials

To get started with driftwood crafts, you’ll need a few basic tools and supplies:

Tool/MaterialPurpose
Driftwood piecesMain material for crafting
SandpaperSmoothing rough edges
Wood glueBonding pieces together
Nails and screwsSecuring larger structures
SawCutting driftwood to size
HammerDriving nails into driftwood
Paint and paintbrushesAdding color or designs
Hooks or framesMounting your art to the wall

Preparing Your Driftwood

Before you start crafting, it’s essential to prepare your driftwood:

  1. Cleaning: First, rinse off any sand or debris. You can soak the driftwood in a bleach solution (one-part bleach to nine parts water) for an hour to remove bacteria and parasites.
  2. Drying: Let the wood dry thoroughly. This could take several days, depending on the thickness of your pieces.
  3. Sanding: Use sandpaper to smooth out any rough spots.

Driftwood Crafts Wall Art

Creating Driftwood Wall Art

Now that you’ve got your materials ready, it’s time to create some stunning wall art. Here are a few ideas to get you started:

Driftwood Sculptures

Driftwood sculptures are an excellent way to bring a piece of nature into your home. You can combine various pieces of driftwood to form abstract shapes or recognizable objects.

  1. Design: Sketch your design on paper first. Decide on the overall shape and layout.
  2. Assembly: Use wood glue and nails to securely attach the driftwood pieces together.
  3. Finishing Touches: Sand any rough edges and paint if desired. Attach a hook or frame to the back for wall mounting.

Driftwood Mirrors

Adding a driftwood frame around a mirror can instantly enhance its appeal. Follow these steps:

  1. Mirror Selection: Choose a mirror with a simple frame or no frame at all.
  2. Layout: Arrange your driftwood pieces around the mirror to form a frame. Play with the arrangement until you’re satisfied.
  3. Attachment: Use strong glue or small nails to attach the driftwood to the mirror’s frame.

Driftwood Picture Frames

Picture frames made of driftwood add a rustic touch to your favorite photos.

  1. Measure and Cut: Measure the dimensions of your picture and cut the driftwood to size.
  2. Assembly: Use wood glue and small nails to connect the driftwood pieces into a frame shape.
  3. Decoration: Add any additional decorations, like shells or small pieces of coral.

Customizing Your Driftwood Art

Personalizing your driftwood art ensures it complements your home’s decor. Here are a few customization ideas:

Painting and Staining

Adding color or a finish to your driftwood can dramatically change its appearance.

  • Painting: Use acrylic paint to add color. You can opt for solid colors, ombre effects, or intricate designs.
  • Staining: Wood stains can enhance the natural grain of the driftwood. Choose a light stain for a subtle look or a dark stain for a more dramatic effect.

Adding Embellishments

Enhance your driftwood art with these embellishments:

  • Shells: Glue small seashells onto your driftwood for a beach-themed look.
  • Rope: Wrap rope around sections of the driftwood to add texture.
  • Beads and Charms: Thread beads or charms onto nails or hooks attached to the driftwood.

Driftwood Crafts Wall Art

Displaying Your Driftwood Wall Art

Once your driftwood art is complete, you’ll want to display it in a way that best highlights its beauty.

Hanging Techniques

Choose the right hanging method to ensure your art is secure and well-presented:

  • Hooks and Screws: Attach heavy-duty hooks or screws to the back of your driftwood piece for hanging.
  • Wire: If your art is lightweight, a wire stretched across the back can be a simple hanging solution.
  • Adhesive Strips: For smaller, lighter pieces, adhesive strips can be an easy and damage-free way to hang your art.

Placement Tips

Consider these tips when deciding where to display your driftwood art:

  • Focal Point: Place your art where it will naturally draw attention, such as above a fireplace or on an accent wall.
  • Grouping: Grouping smaller pieces together can create a striking visual impact.
  • Lighting: Ensure your driftwood art is well-lit, whether through natural light or strategically placed lamps.

Caring for Your Driftwood Art

To keep your driftwood wall art looking its best, a little maintenance is required.

Dusting

Regularly dust your driftwood art to prevent dirt buildup. A soft, dry cloth or a feather duster works best.

Protecting from Moisture

Since driftwood has been exposed to water, it’s essential to keep it dry indoors. Avoid placing your art in damp areas like bathrooms or basements.

Repairing Damage

Over time, your driftwood art may show signs of wear. Keep wood glue and small nails handy for minor repairs.

Inspiring Driftwood Art Projects

Need more inspiration? Here are a few driftwood wall art ideas to spark your creativity:

Driftwood Tree Art

Create a tree design on your wall using different lengths of driftwood. Use smaller pieces for branches and larger ones for the trunk.

Driftwood Wall Hangings

Combine driftwood pieces with other natural elements, like feathers and beads, to create a bohemian wall hanging.

Driftwood Shelving

Transform sturdy pieces of driftwood into rustic shelves. Attach brackets to the wood and mount them on your wall.

Final Thoughts

Driftwood crafts wall art is not only a fantastic way to bring a touch of nature into your home, but it’s also a creative and fulfilling hobby. With a bit of planning and some basic tools, you can transform simple pieces of driftwood into stunning art that reflects your personal style. So the next time you find yourself on a beach, keep an eye out for those unique pieces of driftwood – your next masterpiece might just be waiting to be discovered.

Happy crafting!

Filed Under: Driftwood Ideas Tagged With: DIY, Driftwood, Handmade, home decor, Wall Art

Coastal Driftwood Wall Art Ideas

June 19, 2024 by admin

If you’re looking to bring a touch of the seaside into your home, “Coastal Driftwood Wall Art Ideas” is your go-to guide. Imagine the unique charm of driftwood adding a relaxed, beachy vibe to your living space. This article will inspire you with creative ways to incorporate this natural treasure into stunning wall art, whether it’s elegant arrangements or rustic displays. Dive in and let your walls tell a story of coastal beauty and craftsmanship. Have you ever strolled along the beach, picking up a piece of driftwood and wondering how you could transform it into a stunning piece of art for your home? Coastal driftwood wall art can bring the tranquil beauty of the ocean right into your living room. Whether you’re decorating a beach house or just want to evoke the coastal vibes in your urban apartment, driftwood can be a versatile and charming element in your decor.

What is Driftwood?

Driftwood is basically wood that’s been washed ashore by the action of waves, tides, or wind. The wood might come from trees, branches, or even man-made objects. Over time, the water and elements smooth out its rough edges, creating unique shapes and textures. This natural weathering process makes each piece of driftwood distinctive, adding to its beauty and appeal.

Benefits of Using Driftwood in Your Home

Eco-Friendly

By using driftwood in your decor, you’re giving new life to a piece of wood that has already been discarded by nature. It’s a sustainable way to add beauty to your home without contributing to deforestation.

Unique

No two pieces of driftwood are exactly alike. Each has its own character, which makes your wall art truly one-of-a-kind.

Versatile

Driftwood can be used in various ways—from serving as a simple frame to being the centerpiece of an elaborate wall display. The possibilities are only limited by your imagination.

Coastal Driftwood Wall Art Ideas

Finding and Preparing Driftwood

Before you can create your wall art, you’ll need to gather and prepare your driftwood. Here are some tips to help you get started.

Where to Find Driftwood

  • Beaches and Lakeshores: These are the most common places to find driftwood.
  • Rivers and Streams: Sometimes driftwood washes up along rivers and streams, especially after a significant rainfall.
  • Online Stores: If you don’t live near a body of water, you can always purchase driftwood online.

Cleaning Driftwood

  1. Rinse Thoroughly: Use freshwater to rinse off any sand, salt, or debris.
  2. Scrub: A brush can help you remove any stubborn dirt or grime.
  3. Soak: Soak the driftwood in a mixture of water and bleach (ratio 9:1) for 24 hours to kill any bacteria or insects.
  4. Dry: Let the driftwood air dry for several days to ensure it’s completely dry before you start your project.

Driftwood Wall Art Ideas

Let’s dive into some creative ways you can use driftwood to create stunning wall art.

Driftwood Wall Sculptures

Create an abstract or representative sculpture using various pieces of driftwood. Arrange them in a pattern or design that appeals to you. Use hot glue or nails to secure the pieces together, and then mount your sculpture on the wall.

Driftwood Frames

Use long, straight pieces of driftwood to frame a mirror or picture. The natural, rustic look of the driftwood will add a coastal charm to any framed piece.

Driftwood Hangers

Create a functional and stylish wall piece by attaching hooks or pegs to a flat piece of driftwood. Use it to hang keys, jewelry, or even lightweight coats.

Driftwood Shelves

If you have larger and sturdier pieces, you can turn them into floating shelves. Secure the driftwood to the wall with brackets and use the shelves to display small plants, books, or other decorative items.

Driftwood Signage

Use smaller pieces of driftwood to create a sign. Arrange the pieces to spell out a word or phrase and attach them to a backing board. This can be a fun and personalized addition to your home.

Driftwood Mobiles

Create a mobile by drilling small holes in pieces of driftwood and threading them onto strings. Hang the mobile from the ceiling or a wall mount to add a dynamic element to your room.

Coastal Driftwood Wall Art Ideas

Specific Projects and How to Do Them

Coastal Driftwood Mirror Frame

Materials Needed:

  • Driftwood pieces
  • Mirror
  • Glue gun and glue sticks
  • Backing board
  • Hanging hardware

Steps:

  1. Arrange the driftwood pieces around the mirror, ensuring they cover the edges completely.
  2. Use the glue gun to secure the driftwood to the mirror.
  3. Attach the mirror to the backing board for extra stability.
  4. Add hanging hardware to the back of the board.
  5. Hang your stunning new mirror on the wall.

Driftwood Fish Sculpture

Materials Needed:

  • Long driftwood pieces for the body
  • Smaller pieces for the fins, tail, and head
  • Glue gun and glue sticks
  • Saw (if cutting is necessary)
  • Paint (optional)

Steps:

  1. Lay out the driftwood pieces to form the body of the fish.
  2. Attach smaller pieces to create the fins, tail, and head.
  3. Use the glue gun to secure all pieces together.
  4. Paint your sculpture if desired.
  5. Mount it on the wall using hanging hardware.

Driftwood Initials or Name Sign

Materials Needed:

  • Several small driftwood pieces
  • Backing board
  • Glue gun and glue sticks
  • Paint (optional)

Steps:

  1. Arrange the driftwood pieces to form the letters of your initials or name on the backing board.
  2. Use the glue gun to secure the driftwood pieces to the board.
  3. Paint the letters if desired.
  4. Attach hanging hardware to the back of the board.
  5. Hang your personalized sign on the wall.

Tips and Tricks for Working with Driftwood

Handling and Safety

  • Always wear gloves when handling driftwood to protect your hands from splinters.
  • Use a mask when sanding or cutting driftwood to avoid inhaling dust particles.

Tools

  • A hot glue gun is excellent for lightweight projects.
  • For more substantial pieces, consider using screws and brackets.
  • A small saw can help trim pieces to fit your design.

Design Considerations

  • Take your time arranging the pieces before committing with glue or screws.
  • Mix and match different textures and shapes for a more dynamic look.
  • Don’t be afraid to incorporate other materials like shells, stones, and sea glass for added coastal flair.

Where to Display Your Driftwood Art

Living Room

Display your driftwood art above the fireplace or on a feature wall to make it a focal point in your living room.

Bedroom

Hang a driftwood mobile above the bed or place framed driftwood art on your nightstand for a serene, beachy vibe.

Bathroom

Bathrooms are an excellent place to incorporate coastal decor. Use driftwood shelves to hold toiletries or hang a driftwood sign on the door.

Entryway

Greet guests with a welcoming driftwood sign in your entryway or use a driftwood hanger to hold keys and accessories.

Maintaining Your Driftwood Art

Dusting

Regularly dust your driftwood art to keep it looking fresh. Use a soft brush or cloth to avoid damaging the wood.

Avoid Moisture

Although driftwood originates from a watery environment, it’s best to keep your art dry to prevent mold and mildew.

Repairing

If any pieces come loose, use a hot glue gun to reattach them. For more substantial repairs, screws and brackets may be necessary.

Conclusion

Coastal driftwood wall art is a versatile, eco-friendly, and unique way to bring the beauty of the ocean into your home. Whether you opt for a simple driftwood frame or an elaborate wall sculpture, these ideas will help you create stunning art that resonates with the tranquil aura of the coast. So, the next time you find yourself at the beach or near a body of water, collect a few pieces of driftwood and let your creativity flow. Happy crafting!

Filed Under: Driftwood Ideas Tagged With: Coastal, DIY, Driftwood, Interior Design, Wall Art

Driftwood Christmas Tree Wall Art

June 19, 2024 by admin

In the charming realm of DIY holiday decorations, “Driftwood Christmas Tree Wall Art” offers you a delightful and eco-friendly way to celebrate the season. Picture yourself strolling along a picturesque beach, collecting unique driftwood pieces to craft a stunning and rustic Christmas tree for your wall. This project not only adds a touch of coastal charm to your home but also allows you to flex your creative muscles. With a little bit of imagination and some basic supplies, you’ll soon have a one-of-a-kind piece that radiates warmth and festive cheer throughout your space. Have you ever wondered how to bring a touch of the beach to your Christmas décor? Driftwood Christmas Tree Wall Art is a wonderful way to merge coastal charm with the festive spirit of the holiday season. Whether you live by the ocean or simply wish to capture its essence, creating a driftwood Christmas tree can be a fun and gratifying DIY project. This article will walk you through everything you need to know about crafting this unique piece of art, from gathering materials to displaying your creation.

What is Driftwood Christmas Tree Wall Art?

Driftwood Christmas Tree Wall Art is a form of wall décor made from pieces of driftwood assembled in the shape of a Christmas tree. This artistic decoration combines the rustic, natural look of driftwood with the traditional holiday symbol of the Christmas tree. It brings a unique and eco-friendly flair to your holiday decor.

Why Choose Driftwood?

Driftwood is not only beautiful but also sustainable. By recycling this natural material, you contribute to saving the environment. Plus, each piece of driftwood is unique, adding a one-of-a-kind touch to your creation.

Perfect for Any Space

This type of wall art can fit into various decor styles, from coastal and nautical themes to rustic and even modern aesthetics. It’s perfect for those who want a holiday decoration that stands out from the usual glitter and tinsel.

Materials You Will Need

Before diving into the creation process, you’ll need to gather some essential materials. Here’s a list of what you’ll need to get started:

MaterialDescription
Driftwood PiecesVarious lengths and thicknesses, cleaned and dried
Hot Glue Gun and Glue SticksTo adhere the driftwood pieces together
Backing Board or CardboardA sturdy base for mounting the driftwood tree
Saw or Pruning ShearsFor cutting driftwood to desired lengths
SandpaperTo smooth out rough edges
Paint (optional)For adding color or designs to your driftwood
Twine or StringTo create a hanger for your wall art
Decorations (Shells, Starfish, etc.)For added embellishment

Optional Extras

While the basic materials will help you create a simple and beautiful tree, you might also want to consider some optional extras like fairy lights, small ornaments, or festive ribbons to add more holiday cheer.

Driftwood Christmas Tree Wall Art

Step-by-Step Guide to Creating Your Driftwood Christmas Tree Wall Art

Step 1: Gather Driftwood

The first step in your project is to gather driftwood. This can be a fun activity in itself. Go for a walk along the beach and collect pieces of driftwood in various shapes and sizes. Look for pieces that are relatively straight and of different lengths, as you’ll use these to form the branches of your tree.

Step 2: Clean and Prepare the Driftwood

Once you’ve collected your driftwood, it’s essential to clean it thoroughly. Wash the pieces in soapy water to remove any salt, sand, or algae. Rinse well and let them dry completely. After drying, use sandpaper to smooth out any rough edges or surfaces.

Step 3: Plan Your Design

Next, lay out your driftwood pieces on a flat surface and start arranging them in a tree shape. Begin with the longest piece at the bottom, gradually using shorter pieces as you work your way up to the top. This will create the typical triangular tree shape.

Step 4: Cut and Assemble

Using a saw or pruning shears, cut the driftwood pieces to your desired lengths. Once cut, start gluing the pieces onto your backing board or cardboard. Begin with the bottom piece and work your way up. Use a hot glue gun to ensure a secure hold. Make sure each piece is aligned properly before the glue sets.

Step 5: Add Decorations

If you want to add a bit more creativity, consider decorating your tree. You can use small shells, starfish, tiny ornaments, or even paint to add festive touches. Glue your chosen decorations onto the driftwood pieces.

Step 6: Create a Hanger

To hang your driftwood tree, you’ll need to attach a string or twine. Simply glue or staple the string to the back of your backing board. Make sure it’s secure enough to hold the weight of your art.

Step 7: Display Your Art

Find the perfect spot in your home to display your new piece of wall art. Whether it’s above the mantel, in the hallway, or as part of a larger gallery wall, your driftwood Christmas tree is sure to bring holiday cheer.

Tips for a Successful Project

Creating Driftwood Christmas Tree Wall Art is relatively simple and straightforward, but a few handy tips can help you ensure success:

Choose the Right Driftwood

Opt for pieces that are not too brittle or decayed. You want sturdy pieces that will last through the holiday season and beyond.

Safety First

When using tools like saws and pruning shears, always prioritize safety. Wear gloves and safety goggles if necessary.

Experiment with Different Shapes

Don’t feel restricted to a traditional tree shape. Experiment with different designs and let your creativity flow.

Keep It Eco-Friendly

Avoid using non-biodegradable materials as much as possible. Stick to natural decorations and sustainable practices.

Involve the Family

If you’re looking for a fun holiday activity, involve your family in the project. Kids can help gather driftwood and assist with simpler assembly tasks.

Driftwood Christmas Tree Wall Art

Benefits of Driftwood Christmas Tree Wall Art

Eco-Friendly

One of the best things about using driftwood is that it’s a recycled material. By repurposing driftwood, you’re contributing to waste reduction and helping to keep beaches clean.

Unique and Personalized

Every piece of driftwood is unique, making your tree one-of-a-kind. You can customize it further with personal decorations or messages.

Cost-Effective

Most of the materials needed for this project can be sourced for free or at a low cost. Driftwood itself is free if you live near a beach.

Therapeutic

Crafting can be a therapeutic activity. It allows you to disconnect from technology and spend some quality time with nature and your creativity.

Frequently Asked Questions (FAQs)

Can I Use Other Types of Wood?

Yes, while driftwood is preferred for its unique appearance and sustainability, you can use other types of reclaimed wood.

How Do I Ensure My Driftwood Is Clean?

Soak the driftwood in a mixture of bleach and water for about 24 hours, then rinse thoroughly and let it dry completely. This will kill any bacteria or pests.

Can I Make This Project Without a Backing Board?

While a backing board provides stability, you can also create a freestanding driftwood tree by gluing the pieces directly to one another, though this method may be a bit more challenging.

What If I Don’t Live Near a Beach?

If you don’t have access to beach driftwood, you can purchase it online or use other forms of reclaimed wood.

Can I Use Paint?

Absolutely, painting your driftwood can add a different flair to your wall art. Just make sure to use non-toxic paint if you want to keep the eco-friendly nature of your project.

Conclusion

Creating Driftwood Christmas Tree Wall Art is a delightful way to combine the rustic charm of driftwood with the festive spirit of Christmas. Whether you’re a seasoned DIY enthusiast or a beginner, this project offers a fun, eco-friendly, and personalized way to decorate your space for the holidays. So gather those driftwood pieces, fire up the hot glue gun, and let your creativity bring a touch of coastal whimsy to your Christmas celebrations. Happy crafting!

Filed Under: Driftwood Ideas Tagged With: christmas, DIY, Driftwood, tree, Wall Art

Coastal Driftwood Wall Art

June 18, 2024 by admin

Imagine transforming your living space with a touch of seaside magic. Coastal Driftwood Wall Art embodies the serene beauty of the shore, bringing the natural charm of driftwood into your home. You’ll explore how artists gather these unique pieces of wood, weathered by the ocean waves, and craft them into stunning wall decor. From minimalist designs to intricate arrangements, this article will guide you through the various styles and ideas for incorporating this unique art form into your décor, evoking memories of the beach and a sense of coastal tranquility. Have you ever found yourself collecting driftwood along the shoreline during a relaxing coastal walk? Turning these treasures into beautiful, personalized pieces of wall art can be both fulfilling and delightful. Let’s dive into the world of coastal driftwood wall art and discover how you can create your own masterpiece.

Coastal Driftwood Wall Art

What is Coastal Driftwood Wall Art?

Coastal driftwood wall art is a form of artwork made from pieces of driftwood found along shorelines. This natural wood, reshaped and smoothed by water and weather, carries a unique aesthetic that embodies the beauty and tranquility of coastal living. Incorporating driftwood in your home decor can bring a touch of nature and a hint of seaside serenity to your space.

The Allure of Driftwood

Driftwood is not just ordinary wood. It is naturally sculpted by water currents, waves, and weather conditions. Each piece tells a story and carries with it the spirit of the sea. Its varied shapes, textures, and colors add an organic and rustic charm to your artwork.

Why Create Driftwood Wall Art?

Creating driftwood wall art is more than just a crafting project; it’s a way to connect with nature, express creativity, and bring the serene beauty of the coast into your home. Additionally, working with driftwood is a sustainable practice, as it utilizes natural and reclaimed materials.

Tools and Materials You’ll Need

Before you start crafting, gather the necessary tools and materials. Here’s a handy table to help you get organized:

ItemPurpose
DriftwoodMain material for the artwork
SandpaperSmoothing rough edges
Saw (if needed)Cutting larger pieces down to size
Wood Glue / NailsAssembling the artwork
BackboardBase to mount your driftwood art
Hanging HardwareSecuring the finished piece to the wall
Paint/Stain (optional)Adding color or finish to the driftwood
Brushes (optional)Applying paint or stain

Finding the Perfect Driftwood

The best driftwood can be found along the coastlines, especially after high tides or storms. Look for pieces that are smooth, free from cracks or rot, and have interesting shapes. The key is to collect a variety of sizes and shapes to give you more creative flexibility when designing your art piece.

Preparing the Driftwood

Once you’ve gathered your driftwood, it’s essential to clean and prepare it before starting your project. Use sandpaper to smooth any rough edges, and if necessary, wash the pieces with mild soap and water to remove any dirt or debris. Allow the driftwood to dry completely before using it in your artwork.

Designing Your Driftwood Wall Art

The design phase is where your creativity truly shines. Take some time to envision how you want your final piece to look, considering aspects such as size, shape, and complexity.

Choosing a Theme or Concept

Themes can help you create a cohesive and visually pleasing piece of art. Here are a few ideas to inspire you:

  • Natural and Minimalist: Emphasize the raw beauty of driftwood by arranging pieces in a simple yet striking composition.
  • Marine Life: Incorporate shapes and motifs inspired by sea creatures, such as fish, shells, or starfish.
  • Abstract: Play with different shapes and arrangements to create an abstract art piece.
  • Geometric Patterns: Formulate geometric patterns for a modern twist on coastal decor.

Sketching Your Design

Creating a rough sketch of your design can help guide you during the assembly process. It doesn’t have to be perfect; just a simple layout to visualize how the pieces will fit together.

Assembling Your Driftwood Wall Art

Now that you have your design in mind and your materials ready, it’s time to start assembling your artwork.

Arranging Your Driftwood

Start by laying out your pieces on a flat surface according to your design sketch. Play around with the arrangement until you’re satisfied with the composition. Don’t be afraid to make adjustments as you go.

Securing the Pieces

Depending on your design, you can use wood glue or nails to secure the driftwood pieces together. If using wood glue, apply it to the edges of the driftwood and press them together firmly. Clamp the pieces in place until the glue dries completely. For added stability, especially for larger pieces, nails can be used in conjunction with glue.

Mounting on a Backboard

Once your driftwood design is assembled, mount it on a backboard for added support. Choose a backboard that complements your driftwood in terms of size and color. Secure the driftwood to the backboard using wood glue, nails, or screws.

Adding Hanging Hardware

The final step in the assembly process is to attach hanging hardware to the backboard. Use sturdy screws and picture wire to ensure your art is securely mounted on the wall. Make sure to place the hanging hardware evenly so that the artwork hangs straight.

Coastal Driftwood Wall Art

Finishing Touches

While your driftwood wall art might already look fantastic as it is, there are a few optional finishing touches that can enhance its appearance.

Painting or Staining

If you prefer a specific color theme or finish, you can paint or stain your driftwood. Choose a paint or stain that complements your overall home decor. Use a brush to apply the paint or stain evenly, and allow it to dry completely before mounting.

Adding Decorative Elements

Enhance your driftwood wall art by incorporating additional decorative elements, such as seashells, beads, or small marine-themed trinkets. Use hot glue to attach these elements securely to your driftwood.

Displaying Your Driftwood Wall Art

Once your artwork is complete, it’s time to display it proudly. Choose a location where it can be the focal point of the room and where its beauty can be appreciated.

Ideal Places for Display

Here are some ideal spaces to showcase your coastal driftwood wall art:

  • Living Room: Above the sofa or fireplace mantel.
  • Bedroom: Above the bed or on a feature wall.
  • Bathroom: Adding a coastal theme to your bathroom decor.
  • Entryway: Creating a welcoming vibe in your hallway or entrance.

Lighting Considerations

Proper lighting can enhance the natural beauty of your driftwood wall art. Use ambient lighting or dedicated spotlights to highlight the textures and shapes of the driftwood. Avoid placing your art in direct sunlight, as prolonged exposure can cause the wood to fade over time.

Caring for Your Driftwood Wall Art

To ensure your driftwood wall art remains beautiful for years to come, regular maintenance and care are essential.

Protection from Moisture

Although driftwood has been naturally weathered, it’s still crucial to protect it from excessive moisture. Avoid placing your artwork in damp or humid areas, and consider applying a clear protective sealant if you anticipate exposure to moisture.

Dusting and Cleaning

Dust your driftwood wall art regularly using a soft cloth or a feather duster. For deeper cleaning, use a slightly damp cloth to gently wipe away any dirt or grime. Avoid using harsh chemicals or abrasive cleaners, as they can damage the wood.

Customizing Your Driftwood Wall Art

One of the greatest joys of creating driftwood wall art is the ability to personalize it to suit your taste and style. Here are a few ways to customize your artwork:

Incorporating Personal Elements

Add personal touches to your driftwood art by incorporating objects that hold sentimental value, such as small keepsakes, family photos, or mementos from beach vacations.

Experimenting with Mixed Media

Combine driftwood with other materials like metal, glass, or fabric to create a mixed media piece. This approach can add depth and interest to your artwork.

Seasonal and Theme Variations

Customize your driftwood wall art to reflect different seasons or themes. For example, you can add festive decorations for the holidays, or create a coastal-themed piece with summery accents.

Inspiration and Ideas

If you’re looking for inspiration, here are some creative ideas to spark your imagination:

  • Driftwood Wreath: Arrange smaller pieces of driftwood into a circular wreath shape and add shells and other coastal elements.
  • Driftwood Mirror Frame: Use driftwood to frame a mirror, creating a stunning coastal statement piece.
  • Driftwood Sculptures: Create three-dimensional sculptures from driftwood, such as abstract forms or representations of sea creatures.
  • Driftwood Collage: Combine driftwood with other natural materials like sea glass, shells, and pebbles to create a textured collage.

Showcasing Artists

If you’re interested in seeing how other artists use driftwood in their work, consider researching well-known driftwood artists. Follow their social media profiles or visit their websites for inspiration and tips.

Frequently Asked Questions (FAQs)

To help you navigate the world of coastal driftwood wall art, here are answers to some common questions:

Can I Use Any Type of Driftwood?

While most driftwood is suitable for crafting, it’s best to choose pieces that are solid, free of rot or damage, and have been thoroughly cleaned and dried.

How Do I Remove Bacteria and Pests from Driftwood?

Soak your driftwood in a mixture of water and bleach (1:10 ratio) for several hours. Rinse thoroughly and let it dry completely before using it in your artwork.

What If My Driftwood Art Becomes Damaged?

Repair minor damages by gluing broken pieces back together with wood glue. For significant damage, you might need to replace the affected piece of driftwood.

Do I Need Any Special Skills to Create Driftwood Art?

No special skills are required, just creativity and patience. Follow the steps outlined in this guide, and don’t be afraid to experiment and have fun.

Conclusion

Coastal driftwood wall art is a wonderful way to bring the natural beauty of the beach into your home. By understanding the basics, planning your design, and assembling your artwork with care, you can create a stunning piece that reflects your personal style and love for the coast. So, the next time you find yourself on a sandy shore, gather some driftwood and let your creativity flow. Happy crafting!

Filed Under: Driftwood Ideas Tagged With: Coastal, DIY, Driftwood, Handmade, Wall Art

Driftwood Wall Art Christmas

June 18, 2024 by admin

As the holiday season approaches, you find yourself yearning for unique and charming decorations that reflect your love for nature and handcrafted art. In “Driftwood Wall Art Christmas,” you’ll discover how to create stunning and festive decorations using simple pieces of driftwood. Imagine transforming salvaged wood into beautiful, rustic wall art that captures the spirit of Christmas while adding a touch of coastal elegance to your home. This article will guide you through easy-to-follow steps and inspire you with creative ideas to make your holiday décor truly unforgettable. Have you ever wondered how you can bring a unique and natural touch to your Christmas decorations this year? If so, you might want to consider creating driftwood wall art for Christmas. This charming and eco-friendly decor adds rustic elegance to your home and can be a fun and rewarding DIY project.

Driftwood Wall Art Christmas

What is Driftwood Wall Art?

Driftwood wall art is artwork created from pieces of wood that have been naturally weathered and washed ashore by bodies of water like oceans, lakes, or rivers. The wood’s natural aging process gives it a unique texture and color, making each piece of driftwood art distinct. Considering this uniqueness, driftwood offers a perfect canvas for your Christmas wall art.

Benefits of Driftwood Wall Art

There are numerous benefits to choosing driftwood wall art for your Christmas decorations:

  • Eco-friendly: Driftwood wall art utilizes natural materials, reducing waste and carbon footprint.
  • Unique: No two pieces of driftwood are identical, making each piece of art one of a kind.
  • Versatile: Driftwood can complement various decorating styles, from rustic to modern.
  • Cost-effective: Driftwood can often be collected from local beaches, lakes, or rivers at no cost.

Gathering Your Driftwood

Before you start your driftwood wall art project, you need to gather your materials. Here are some tips for finding and selecting high-quality driftwood pieces.

Where to Find Driftwood

Driftwood can often be found along beaches, riverbanks, and lakeshores. Take a leisurely walk along these areas and look for pieces that catch your eye. Collect a variety of shapes and sizes to give yourself more options when creating your art.

Selecting the Right Pieces

When selecting driftwood for your Christmas wall art, consider these factors:

  • Size and Shape: Choose pieces that fit the scale of your intended artwork.
  • Texture: Look for interesting textures that add depth to your creation.
  • Strength: Select solid pieces that will hold up well without crumbling or breaking.

Cleaning Your Driftwood

Once you’ve gathered your driftwood, it’s crucial to clean it properly:

  1. Rinse with fresh water to remove sand, dirt, and salt.
  2. Soak in a solution of water and bleach (1:9 ratio) for 24 hours to disinfect and kill any organisms.
  3. Rinse again with fresh water and let it dry completely, preferably in the sun.

Tools and Materials You’ll Need

Before diving into the creative process, it’s essential to have the right tools and materials on hand. Here’s a handy table to help you organize what you’ll need:

ToolsMaterials
Hot glue gun and glueDriftwood pieces
Small saw or handsawNails/screws
SandpaperString or twine
Drill and drill bitsAcrylic paint and brushes
Wire cuttersRibbon and ornaments
Ruler and measuring tapeTransparent wood finish/sealant

Creating Driftwood Wall Art

Now comes the fun part: creating your driftwood wall art Christmas decorations! Here’s a step-by-step guide to get you started.

Step 1: Plan Your Design

Before starting to assemble your driftwood, sketch out your design. This will help you visualize the final piece and organize your materials. Consider these ideas for your Christmas driftwood art:

  • Christmas Trees: Arrange smaller pieces of driftwood in the shape of a Christmas tree.
  • Stars: Form a star using longer, slender driftwood pieces.
  • Reindeer: Use a combination of driftwood shapes to create a rustic reindeer.

Step 2: Lay Out Your Pieces

Arrange your driftwood pieces on a flat surface according to your sketch. Play around with the arrangement until you’re satisfied with the layout. This step allows you to see how the pieces fit together and make any necessary adjustments.

Step 3: Assembly

Use a hot glue gun to attach smaller pieces of driftwood together. For larger pieces, nails or screws may be required for added stability. Here are some tips for effective assembly:

  • Hot Glue Gun: Ideal for smaller, lighter pieces of driftwood. Hold the pieces together until the glue sets.
  • Nails/Screws: Use a drill to make pilot holes before attaching with nails or screws to prevent the wood from splitting.

Step 4: Adding Decorative Elements

To give your driftwood art a festive touch, consider incorporating some of the following Christmas-themed decorations:

  • Paint: Use acrylic paints to add color. Consider painting driftwood pieces red, green, or gold.
  • Ornaments: Attach small Christmas ornaments using strong adhesives or wire.
  • Ribbon: Add ribbons or bows for a cheerful look.
  • Lights: String LED fairy lights for a magical touch.

Step 5: Finishing Touches

Once your driftwood art is assembled and decorated, apply a layer of transparent wood finish or sealant. This step helps protect your creation and enhances the natural beauty of the wood.

Driftwood Wall Art Christmas

Displaying Your Driftwood Wall Art

Now that you’ve crafted your driftwood wall art, it’s time to display it proudly. Here are some tips for showcasing your creations in your home.

Hanging Your Artwork

Use sturdy picture hangers, nails, or screws to secure your driftwood art to the wall. Ensure it is level and well-supported.

Arrangements and Locations

Consider displaying your driftwood wall art in various locations:

  • Living Room: Above the fireplace or sofa.
  • Entryway: Welcome guests with a festive driftwood display.
  • Dining Room: Create a conversation piece near your dining table.

Driftwood Wall Art Gift Ideas

Driftwood wall art makes for a thoughtful and unique Christmas gift. Here are some ideas for personalized driftwood gifts:

  • Monogrammed Initials: Create a piece of driftwood art with the recipient’s initials.
  • Family Names or Phrases: Spell out meaningful words or family names using driftwood.
  • Seasonal Themes: Design seasonal-specific art that can be enjoyed year-round.

Caring for Your Driftwood Wall Art

Proper care helps ensure the longevity of your driftwood wall art. Here are some maintenance tips:

  • Avoid Direct Sunlight: Prolonged exposure to sunlight can fade the wood and decorations.
  • Dust Regularly: Use a soft cloth or duster to keep your art clean.
  • Inspect Periodically: Check for loose decorations or pieces and fix them promptly.

Incorporating Driftwood into Other Christmas Decorations

Driftwood isn’t just for wall art; it can be incorporated into various Christmas decorations for a cohesive, rustic theme. Here are some additional ideas:

Driftwood Christmas Tree

Create a small, tabletop Christmas tree using various sizes of driftwood branches, stacking them to form a conical shape. Decorate with small ornaments, lights, and ribbon.

Driftwood Garland

Craft a rustic garland by stringing together small pieces of driftwood with twine or string. Drape the garland over your mantel, banister, or around door frames for a cozy, natural look.

Driftwood Centerpieces

Use driftwood as the base for a Christmas centerpiece. Combine with candles, greenery, and ornaments for a stunning table decoration.

FAQs (Frequently Asked Questions)

Is Driftwood Safe to Use Indoors?

Yes, driftwood is safe to use indoors if it has been properly cleaned and treated. Follow the cleaning and disinfecting steps mentioned earlier to ensure it’s free from harmful organisms.

Can I Paint Driftwood?

Absolutely! Painting driftwood can add a vibrant touch to your wall art. Use acrylic paints, as they adhere well to wood surfaces and offer a range of colors.

Where Can I Buy Driftwood if I Can’t Collect It Myself?

If you can’t collect driftwood yourself, consider purchasing it from local craft stores, online retailers, or specialty shops that sell natural decor materials.

Conclusion

Creating driftwood wall art for Christmas is a wonderful way to bring a touch of nature and creativity into your holiday decor. Not only does it serve as a beautiful and unique decoration, but it also promotes eco-friendliness and sustainability. With these tips and ideas, you’re well on your way to crafting stunning driftwood creations that will celebrate the season in style.

So, what are you waiting for? Grab your driftwood, gather your materials, and let your imagination run wild as you create beautiful driftwood wall art for Christmas. Whether for yourself or as thoughtful gifts for loved ones, these rustic and elegant decorations are sure to bring a warm and festive spirit to any home. Happy crafting!

Filed Under: Driftwood Ideas Tagged With: Christmas Decor, DIY, driftwood art, Holiday Crafts, Wall Art

Driftwood Branch Wall Art

June 17, 2024 by admin

Imagine transforming a plain wall into a captivating natural masterpiece with driftwood branch wall art. In the article, “Driftwood Branch Wall Art,” you’ll discover the enchanting beauty and rustic charm that driftwood brings to your living spaces. You’ll learn how each uniquely weathered piece tells a story of its journey through water and time, making your decor as unique as your personal style. Get ready to dive into the world of driftwood and find inspiration for creating one-of-a-kind art that will make your home feel cozy, serene, and naturally beautiful. Have you ever wandered along a beach, picked up a piece of driftwood, and wondered what you could create with it? Driftwood branch wall art might be just the DIY project you need to bring a touch of nature into your home décor. This rustic yet elegant art form transforms simple weathered wood into stunning pieces of wall art. Whether you’re an avid DIY enthusiast or just looking for a new creative outlet, driftwood branch wall art offers endless possibilities to express your artistic flair.

What is Driftwood Branch Wall Art?

Driftwood branch wall art is an art form that uses driftwood, often found along beaches or riverbanks, to create decorative wall pieces. The natural, weathered look of driftwood gives each piece a unique character that can’t be replicated by machine-made products. Driftwood’s soft, worn texture often carries a sense of history and mystery, evoking the journey it took to get to you.

Driftwood branch wall art can range from simple, minimalist designs to complex, intricate patterns. Whether you hang a single, beautifully weathered branch on your wall or create an elaborate driftwood sculpture, each piece has its own story and distinct charm.

Why Driftwood?

Connection to Nature

Creating driftwood branch wall art allows you to bring a touch of nature into your home. Driftwood is not only beautiful but also sustainable, as using it for art repurposes a material that would otherwise be considered waste.

Unique Aesthetic

No two pieces of driftwood are alike. The variations in color, texture, and shape make each piece of driftwood branch wall art a one-of-a-kind creation. This uniqueness adds a personal touch to your home décor that mass-produced items simply can’t provide.

Therapeutic and Fun

Working with driftwood can be a relaxing and meditative process. The act of collecting driftwood can be an enjoyable outdoor activity that connects you with nature, while the crafting process allows you to express your creativity.

Driftwood Branch Wall Art

Where to Find Driftwood

Local Beaches and Riverbanks

One of the most common places to find driftwood is along beaches and riverbanks. Driftwood is often washed ashore by tides and currents, collecting in nooks and crannies along the waterfront. Walking along these areas can yield a variety of shapes and sizes perfect for your art projects.

Online Marketplaces

If you’re not near a natural source of driftwood, you can find it on online marketplaces like Etsy, eBay, or specialized websites that sell driftwood for crafts. These pieces are often cleaned and ready to use, which can save you some preparation time.

Craft Stores

Some craft stores carry driftwood in their natural décor section. While these pieces might be more uniform in shape and size, they can still serve as excellent materials for your wall art.

Preparing Driftwood for Art

Once you’ve collected your driftwood, it’s essential to prepare it before turning it into a piece of art.

Cleaning the Driftwood

The driftwood might have dirt, algae, or other marine life attached to it. Cleaning is an essential step to ensure your art piece is hygienic and long-lasting.

  1. Rinse the Driftwood: Use freshwater to rinse off any dirt or debris.
  2. Soak in Bleach Solution: Soak the driftwood in a solution of nine parts water to one part bleach for 24 hours to kill any remaining bacteria or organisms.
  3. Rinse Again: Rinse thoroughly to remove any bleach.
  4. Dry: Allow the driftwood to dry completely, preferably in the sun, to ensure it’s ready for crafting.

Inspecting for Stability

Before starting your project, check each piece of driftwood for stability. Make sure there are no weak sections or cracks that could break during the crafting process. Stable pieces will ensure the longevity and integrity of your finished wall art.

Final Sanding

A light sanding can help to smooth out any rough or sharp edges. Use fine-grit sandpaper to preserve the natural texture while making the wood safer to handle.

Driftwood Branch Wall Art

Design Ideas for Driftwood Branch Wall Art

Minimalist Designs

If you prefer a simple yet elegant approach, consider creating minimalist designs. A single piece of driftwood, carefully chosen for its unique shape, can make a striking statement when mounted against a plain wall.

Driftwood Collage

For a more intricate piece, gather several branches and arrange them in a collage. You can place them horizontally, vertically, or in a more random, natural pattern. This type of wall art can serve as an eye-catching centerpiece in any room.

Combined with Other Natural Elements

Driftwood pairs beautifully with other natural elements like shells, stones, or feathers. Creating a mixed-media piece can add depth and complexity to your art.

Themed Designs

Consider creating themed designs based on your interests or décor style. For instance, you could craft a nautical-themed piece with driftwood, rope, and seashells, or a forest-inspired design with pieces that resemble branches and leaves.

Functional Art

Driftwood is not only for decoration. You can create functional pieces like coat racks, key holders, or shelving using driftwood branches. These items combine utility with rustic beauty, adding both style and functionality to your home.

Step-by-Step Guide to Creating Driftwood Branch Wall Art

Materials Needed

MaterialDescription
DriftwoodCollected or purchased, clean and dry
SandpaperFine-grit for smoothing rough edges
SawIf you need to trim the driftwood to fit your design
Screws/NailsFor mounting pieces together
WireFor hanging the finished piece
DrillFor making holes if necessary
GlueStrong adhesive for securing smaller pieces
VarnishOptional, to finish and seal the wood
Protective GearGloves, eye protection, mask (for sanding)

Planning Your Design

  1. Visualize the Layout: Before you start attaching pieces together, lay out your driftwood on the floor or a large table to visualize the final design.
  2. Sketch It Out: Draw a rough sketch of your intended design to guide you through the construction process. This helps in determining which pieces fit best and where.

Constructing the Art

  1. Attach Base Pieces: If your design has a base, start by attaching the largest or main driftwood pieces. Use screws or nails for secure attachment.
  2. Add Smaller Pieces: Gradually add smaller pieces according to your design, attaching them securely with glue or screws.
  3. Allow Time for Drying: If using glue, ensure each piece is fully dry before moving on to prevent shifting or misalignment.

Finishing Touches

  1. Sand Rough Edges: After constructing the piece, sand any remaining rough edges to ensure a smooth finish.
  2. Apply Varnish: If you prefer a polished look, apply a coat of varnish to seal and protect the wood. This can also enhance the wood’s natural grain and color.
  3. Attach Hanging Hardware: Securely attach wire or other hanging hardware to the back of the piece, ensuring it can support the weight of your art.

Tips for Displaying Driftwood Branch Wall Art

Choosing the Right Wall

Select a wall that complements the natural aesthetic of driftwood. Neutral colors often work best, allowing the wood’s unique features to stand out. A well-lit area will highlight the textures and nuances of your art.

Height and Placement

Consider the height at which you hang your art. Eye level is typically the most effective for large pieces, while smaller pieces can be grouped together in a gallery-style arrangement. Ensure the placement allows for easy viewing and appreciation.

Lighting Effects

Proper lighting can enhance the beauty of your driftwood branch wall art. Use soft, diffused lighting to cast gentle shadows and highlight the textures. Avoid harsh direct light that can create glare and reduce the natural appeal.

Caring for Your Driftwood Art

Regular Dusting

Dust your driftwood art regularly using a soft cloth or brush. This prevents buildup that can dull the wood’s natural beauty.

Avoid Humidity

Excessive humidity can affect the wood’s stability. Ensure your driftwood art is displayed in a well-ventilated area to maintain its condition over time.

Occasional Inspection

Periodically inspect your art for any signs of wear or damage. Tighten screws or reapply glue if necessary to keep your piece in good shape.

Selling Your Driftwood Art

If you find yourself creating multiple pieces of driftwood branch wall art, you might consider selling them. Here are some tips to get started:

Online Platforms

Platforms like Etsy, eBay, and Amazon Handmade are great places to sell your driftwood art. These websites have a large audience of customers looking for unique, handcrafted items.

Art and Craft Fairs

Local art and craft fairs can be excellent venues to showcase your work. These events allow you to interact directly with customers and receive feedback on your art.

Social Media

Social media platforms like Instagram and Pinterest are perfect for visual art. Regularly post high-quality photos of your driftwood art to attract followers and potential buyers.

Pricing Your Art

When pricing your driftwood art, consider the cost of materials, time spent, and the uniqueness of each piece. Research similar items to ensure your pricing is competitive yet fair.

Conclusion

Driftwood branch wall art is a unique and versatile way to bring a piece of nature into your home. Each piece of driftwood carries its own story and history, adding a touch of rustic charm and elegance to your décor. Whether you create minimalist designs or intricate collages, driftwood offers endless possibilities for creative expression. Not only is this art form visually stunning, but it also provides a therapeutic and sustainable outlet for your creativity.

So next time you find yourself by the water, take a closer look at the driftwood lying at your feet. With a bit of imagination and effort, you could transform that simple piece of wood into a beautiful work of wall art, turning the forgotten into the unforgettable. Happy crafting!

Filed Under: Driftwood Ideas Tagged With: crafting, DIY, Driftwood, Rustic Decor, Wall Art

  • « Previous Page
  • Page 1
  • …
  • Page 31
  • Page 32
  • Page 33
  • Page 34
  • Page 35
  • …
  • Page 41
  • Next Page »

Primary Sidebar

Driftwood4us.com, is a participant in the Amazon Services LLC Associates Program, an affiliate advertising program designed to provide a means for sites to earn advertising fees by advertising and linking to amazon.com.